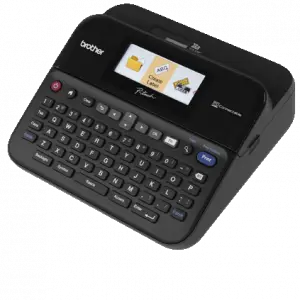

brother P-touch Electronic Labeling System User Guide

brother P-touch Electronic Labeling System User Guide
Read this User’s Guide before you start using your P-touch.
Keep this User’s Guide in a handy place for future reference.
Please visit us at http://support.brother.com/ where you can get product support and answers to frequently asked questions (FAQs).
INTRODUCTION
Thank you for purchasing the P-touch labeler PT-D600.
Your new P-touch labeler is an easy to operate, feature packed labeling system that makes creating professional, high quality labels a breeze.
This manual contains various precautions and basic procedures for using this labeler. Read this manual carefully before using and keep in a handy place for future reference.
Federal Communications Commission (FCC) Declaration of Conformity
(For USA Only)
Responsible Party : Brother International Corporation
200 Crossing Boulevard
Bridgewater, NJ 08807-0911, U.S.A.
TEL : (908) 704-1700
Declares, that the products
Product Name : Brother P-touch Electronic Labeling System
Model Number : PT-D600
comply with Part 15 of the FCC Rules. Operation is subject to the following two conditions: (1) this device may not cause harmful interference, and (2) this device must accept any interference received, including interference that may cause undesired operation.
This equipment has been tested and found to comply with the limits for a Class B digital device, pursuant to Part 15 of the FCC Rules. These limits are designed to provide reasonable protection against harmful interference in a residential installation. This equipment generates, uses, and can radiate radio frequency energy and, if not installed and used in accordance with the instructions, may cause harmful interference to radio communications. However, there is no guarantee that interference will not occur in a particular installation. If this equipment does cause harmful interference to radio or television reception, which can be determined by turning the equipment off and on, the user is encouraged to try to correct the interference by one or more of the following measures:
- Reorient or relocate the receiving antenna.
- Increase the separation between the equipment and receiver.
- Connect the equipment into an outlet on a circuit different from that to which the receiver is connected.
- Consult the dealer or an experienced radio/TV technician for help.
Important
- The enclosed interface cable should be used in order to ensure compliance with the limits for a Class B digital device.
- Changes or modifications not expressly approved by Brother Industries, Ltd. could void the user’s authority to operate the equipment.
International ENERGY STAR® Compliance Statement
The purpose of the International ENERGY STAR® Program is to promote the development and popularization of energy-efficient office equipment. As an ENERGY STAR® Partner, Brother Industries, Ltd. has determined that this product meets the ENERGY STAR® guidelines for energy efficiency.
![]()
Compilation and Publication Notice
Under the supervision of Brother Industries, Ltd., this manual has been compiled and published, covering the latest product’s descriptions and specifications. The contents of this manual and the specifications of this product are subject to change without notice.
If new versions of the PT-D600 software become available, this manual may not reflect the updated features. Therefore, you may find that the software and the contents in this manual are different.
Any trade names and product names of companies appearing on Brother products, related documents and any other materials are all trademarks or registered trademarks of those respective companies. BROTHER is either a trademark or a registered trademark of Brother Industries, Ltd.
General Description

Safety Precautions
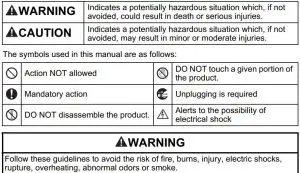
To prevent injury and damage, important notes are explained using various symbols. The symbols and their meanings are as follows:


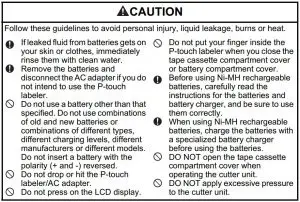
General Precautions
- Depending on the location, material, and environmental conditions, the label may unpeel or become irremovable, the color of the label may change or be transferred to other objects. Before applying the label, check the environmental conditions and the material.
- Do not use the P-touch labeler in any way or for any purpose not described in this guide. Doing so may result in accidents or damage the P-touch labeler.
- Use only Brother TZe tapes with the P-touch labeler. Do not use tapes that do not have the
 mark.
mark. - Only use a soft, dry cloth to clean the labeler; never use alcohol or other organic solvents.
- Use a soft wipe to clean the print head; never touch the print head.
- Do not put any foreign objects into the tape exit slot, AC adapter connector or USB port, etc.
- Do not place the P-touch labeler/batteries/AC adapter in direct sunlight or rain, near heaters or other hot appliances, in any location exposed to extremely high or low temperatures (e.g., on the dashboard or in the back of your car) or high humidity, or in dusty locations.
- Do not try to print if the cassette is empty; it will damage the print head.
- Do not pull the tape while printing or feeding; it will damage the tape and the P-touch labeler.
- It is recommended that you use the USB cable supplied with the P-touch labeler. Should another USB cable need to be used, ensure it is of high quality construction.
- Any data saved in memory will be lost due to failure or repair of the P-touchlabeler, or if the battery expires.
- The P-touch labeler is not equipped with a charging feature for rechargeable batteries.
- The printed text may differ from the text that appears in the LCD.
- The length of the printed label may differ from the displayed label length.
- When power is disconnected for two minutes, all text, format settings and any text files saved in the memory will be cleared.
- You can also use Heat Shrink Tube in this model. Check the Brother website (http://www.brother.com/) for further information. You cannot print frames, pre-set P-touch templates, or use certain font settings when using Heat Shrink Tube. Printed characters may also be smaller than when using TZe tape.
- Be sure to read the instructions provided with Fabric Iron-On Tapes, Extra Strength Adhesive Tapes or other special tapes and observe all precautions noted in the instructions.
- A protective clear plastic sticker is placed over the display during manufacturing and shipping. This sticker should be removed prior to use.
GETTING STARTED
Unpacking Your P-touch labeler
Carton Contents
- P-touch labeler
- Starter Tape Cassette
- AC adapter
- USB Cable
- User’s Guide
LCD Display and Keyboard
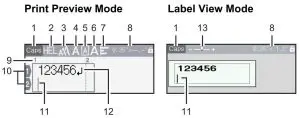
1. Caps mode
2-7. Style guidance
8. Tape width x Label length
9. Block number
10. Line number
11. Cursor
12. Return mark
13. Zoom
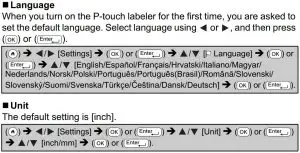
The default language is [English].
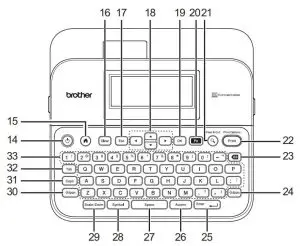
14. Power
15. Home
16. Clear
17. Escape
18. Cursor
19. OK
20. Function
21. Preview
22. Print
23. Backspace
24. Shift
25. Enter
26. Accent
27. Space
28. Symbol
29. Scale/Zoom
30. Shift
31. Caps
32. Tab
33. Letter
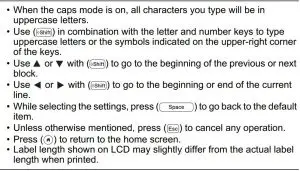
NOTE
Power Supply and Tape cassette
When using AC adapter (AD-E001)
Insert the plug on the adapter cord into the AC adapter jack on the side of the machine. Insert the plug into the nearest standard electrical outlet.

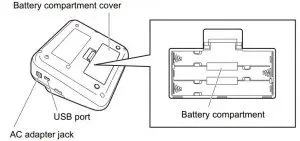
When using six new AA alkaline batteries (LR6) or fully charged Ni-MH batteries (HR6)
Make sure that their poles point in the correct directions. To remove the batteries, reverse the installation procedure.

NOTE
- For memory back up, we recommend using AA alkaline batteries (LR6) or Ni-MH batteries (HR6) together when using the AC adapter.
- To safeguard and backup the P-touch labeler’s memory, when the AC adapter is unplugged it is recommended to have AA alkaline batteries (LR6) or Ni-MH batteries (HR6) installed in the P-touch labeler.
- When power is disconnected for more than two minutes, all text and format settings will be cleared. Any text files saved in the memory will also be cleared.
- Remove the batteries if you do not intend to use the P-touch labeler for an extended period of time.
- Dispose of the battery at an appropriate collection point, not in the general waste stream. In addition, be sure to observe all applicable federal, state, and local regulations.
- When storing or discarding the battery, wrap it (for example with cellophane tape), to prevent it from short-circuiting.
(Battery insulation example)

- Cellophane tape
- Alkaline or Ni-MH battery
 CAUTION
USING A COMBINATION OF DIFFERENT BATTERIES (SUCH AS Ni-MH AND ALKALINE), MAY RESULT IN AN EXPLOSION. DISPOSE OF USED BATTERIES ACCORDING TO THE INSTRUCTIONS.
Insert a Tape Cassette

NOTE
- When inserting the tape cassette, make sure that the tape and ink ribbon do not catch on the print head.
- If you cannot close the tape cassette compartment cover, check to ensure the release lever is in the up position. If not, lift the lever, and then close the cover.
Turning Power On/Off
Press ( ) to turn the P-touch labeler on.
Press ( ) again to turn the P-touch labeler off.
NOTE
Your P-touch labeler has a power saving function that automatically turns itself off if no key is pressed within a certain time under certain operating conditions. Refer to “Specifications” on page 53.
Setting Language and Unit
Turning Tape Color Detection On/Off
When using the label view mode, if tape color detection is set to [On], the P-touch labeler detects the color of the tape cassette and displays the label image on the LCD screen according to the color of the tape cassette. This enables you to display a more accurate preview of the label that you are creating. The default setting is [On].

NOTE
Depending on the tape cassette you are using, the P-touch cannot detect the color of the tape cassette. In this case, the label image on the LCD screen is displayed as black text on a white background.
Feeding Tape
Feed & Cut
To feed and cut the tape, press the following keys:

Feed only
To feed the tape, press the following keys:

NOTE
Feed Only function is recommended when using Fabric Iron-On Tapes, which should be cut using scissors.
How to use the P-touch labeler
Create a label with the P-touch labeler
 NOTE
NOTE
In addition to entering text, the P-touch labeler has a large range of formatting options.
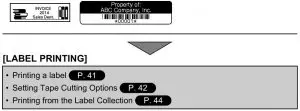
Examples of labels you can create using the P-touch labeler:
NOTE
Before printing, you can check the layout of your label using the preview function.
Refer to “Previewing Labels” on page 41.
Example of the preview screen: 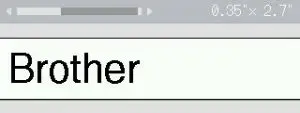
Create a label by connecting your labeler to a PC
[GETTING STARTED]
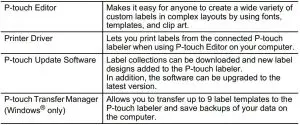
This labeler can be connected to a PC/Mac and used with the P-touch Editor software to create more elaborate labels. To use your labeler connected to a computer, attach your labeler to a computer via the included USB cable and install the P-touch Editor software and drivers.
Features
Installer download website
- A CD-ROM is not included with this product.
- To download and install printer drivers and software such as the P-touch Editor
5.1 on your computer, visit our installer download website (www.brother.com/inst/).
Printer drivers and software are also available to download individually from the list of available printer drivers and software on our support website below:


Setting Input Mode
The default setting is [Label View].
Label View Mode
The character attributes and frames, etc. that you set are reflected on the LCD screen while creating a label. This enables you to easily check what the label will look like.
Example: 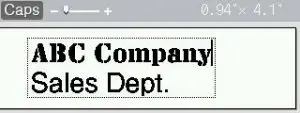

Print Preview Mode
The character attributes and frames, etc. that you set are not reflected on the LCD screen while creating a label. You can check what the label will look like using the preview function. Refer to “Previewing Labels”.
Example: 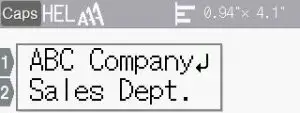

EDITING A LABEL
Entering and Editing Text
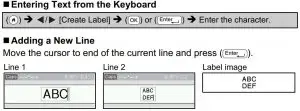
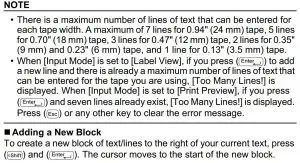


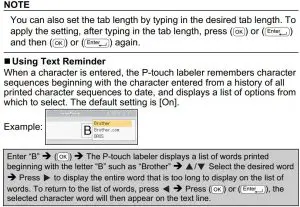

Entering Accented Characters


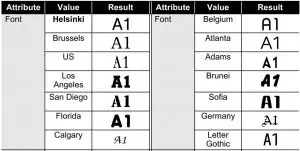
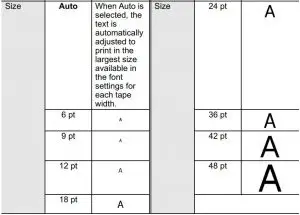
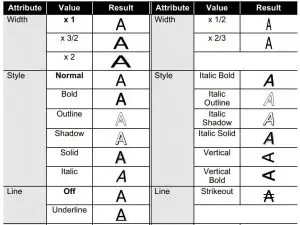
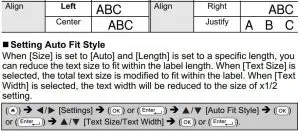
Setting Character Attributes ([Font]/[Size]/[Width]/ [Style]/[Line]/[Align])
You can set character attributes by label or by each line both before and after entering text.

NOTE
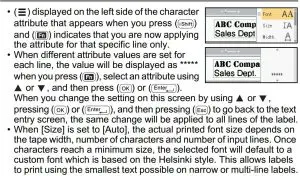
- The 6 point font only prints in Helsinki, no other font type.
- When [Size] is set to [Auto] and all the text is entered in uppercase, the text is automatically adjusted to print in the largest font size possible for each tape width. This font size is larger than the largest font size available in the font settings for each tape width.
Setting Options
Setting Frames
 NOTE
NOTE
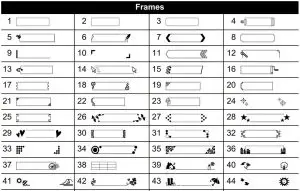
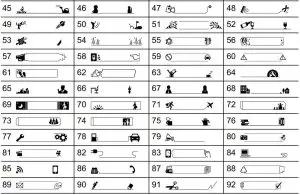
You can also select a frame by typing in the frame number.
Frames

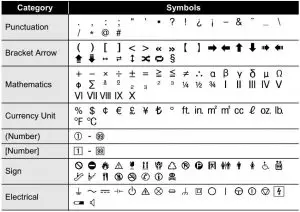
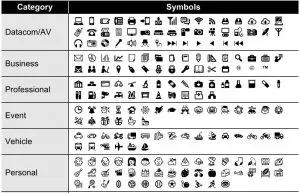
Entering Symbols
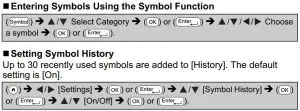
Symbol List

Setting Label Attributes ([Length]/[Cut Option]/ [Tab Length])
- Length : [Length] can be set within the range 1.2″ (30 mm) – 12.0″ (300 mm). When [Auto] is selected, the length of the label is automatically adjusted based on the amount of text entered.
- Cut Option : Refer to “Setting Tape Cutting Options” on page 42.
- Tab Length: Refer to “To change tab length:” on page 17.

NOTE

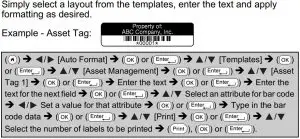
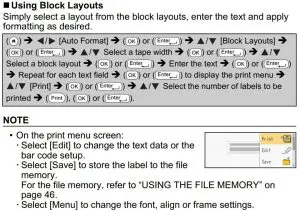
Using Auto-Format Layouts
NOTE
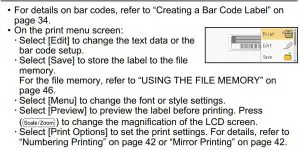
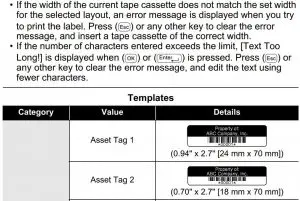

Templates
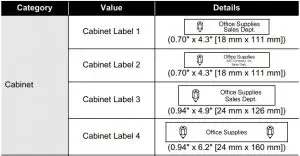
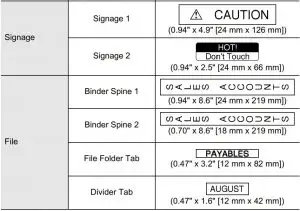
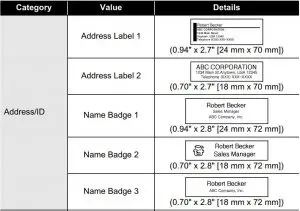
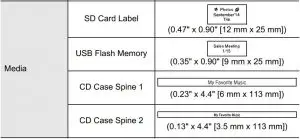
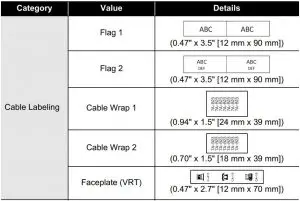
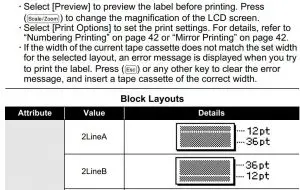
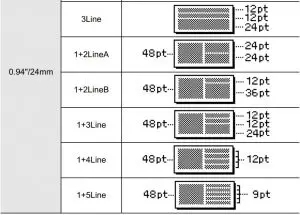
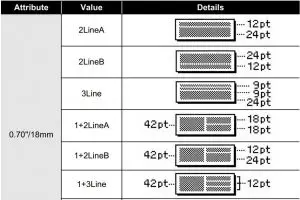

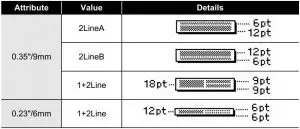


NOTE
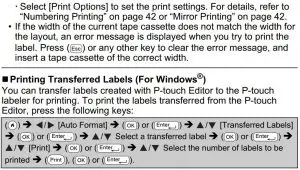
[Transferred Labels] can be selected when a label created with the P-touch Editor has been transferred to the P-touch labeler. For details on the Transfer Manager, visit our website at
http://support.brother.com.
Creating a Bar Code Label
NOTE
- The P-touch labeler is not designed exclusively for creating bar code labels. Always check that bar code labels can be read by the bar code reader.
- For best results, print bar code labels in black ink on white tape. Some bar code readers may not be able to read bar code labels created using colored tape or ink.
- Use the [Large] setting for [Width] whenever possible. Some bar code readers may not be able to read bar code labels created using the [Small] setting.
- Continuously printing a large number of labels with bar codes can overheat the print head, which may affect printing quality.
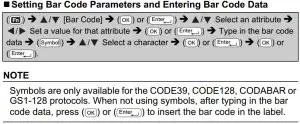
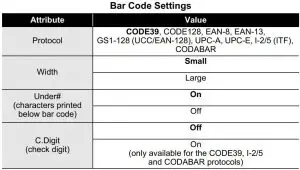
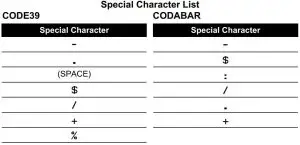
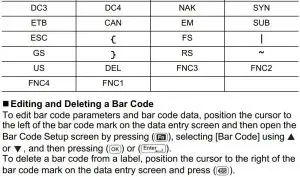
CODE128, GS1-128 (UCC / EAN-128)

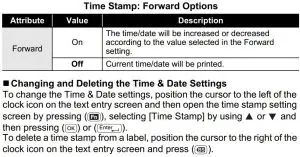
Using Time and Date Function
You can add time and date to your label.

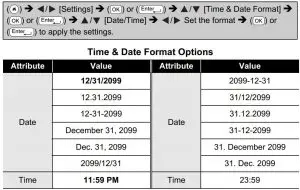
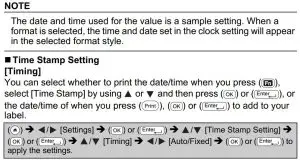


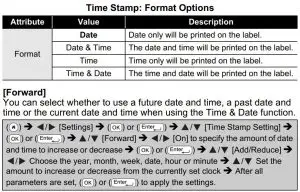
NOTE
You can also set the date and time by typing in the desired numbers.
LABEL PRINTING
Previewing Labels

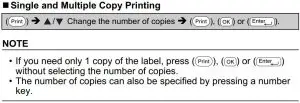
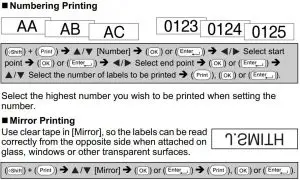
Printing Labels
NOTE
- To prevent damage to the tape, do not touch any key while the message [Printing…Copies] or [Feeding Tape…Please Wait] is displayed.
- Do not pull the label coming out of the tape exit slot. Doing so will cause the ink ribbon to be discharged with the tape, making the tape no longer usable.
- Do not block the tape exit slot during printing or when feeding tape. Doing so will cause the tape to jam.
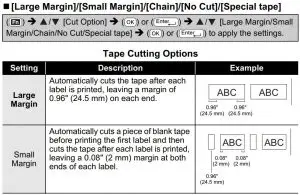
Setting Tape Cutting Options
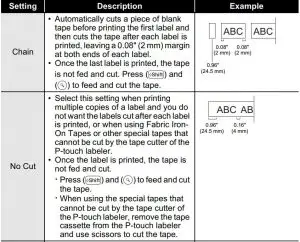
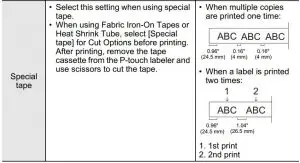
Adjusting the Label Length
When the tape cassette comes to the end, the printed length may be less accurate. In this case, you can adjust the label length.

NOTE
Approximately 1 % of the total label length will be adjusted by 1 level.
Printing from the Label Collection
Printing a label from the label collection stored in the P-touch labeler

NOTE
- Only 0.47″ (12 mm), 0.70″ (18 mm) or 0.94″ (24 mm) tape can be used for Label Collection.
- The tape color will not be displayed when using the Label Collection Feature.
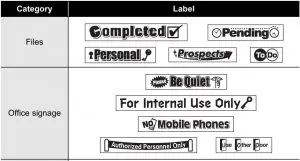
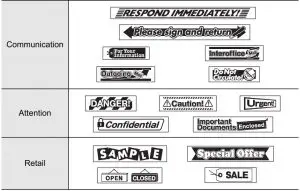
* Labels are for illustrative purposes only.
Downloading a new Label Collection Category
Using the P-touch Update Software, additional label collection categories can be downloaded to your labeler.
To download the new label collection categories, please visit the Brother Solutions Center at: http://support.brother.com
USING THE FILE MEMORY
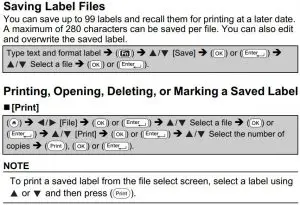
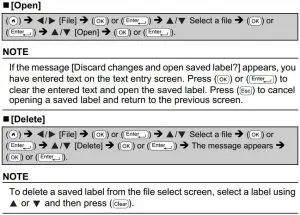

RESETTING and MAINTAINING YOUR P-TOUCH LABELER
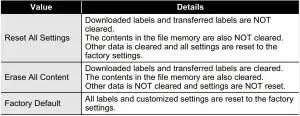
Resetting the P-touch Labeler
You can reset the internal memory of your P-touch labeler when you want to clear all saved label files, or in the event the P-touch labeler is not operating correctly.
Resetting the Data Using the home key

NOTE
When selecting [Reset All Settings] or [Factory Default] for the resetting method, you are asked to set default language at the end of the resetting procedure.
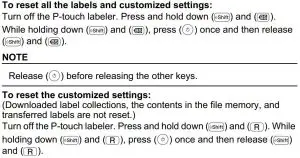
Resetting the Data to Factory Settings Using the P-touch Labeler Keyboard
NOTE
- All text, format settings, option settings and saved label files are cleared when you reset the P-touch labeler. Language and unit settings will also be cleared.
- You are asked to set the default language at the end of the resetting procedure. For details, refer to “Setting Language and Unit” on page 11.
NOTE
Release ( ) before releasing the other keys.
Maintenance
NOTE
Always remove the batteries and disconnect the AC adapter before cleaning the P-touch labeler.
Cleaning the Unit
Wipe any dust and marks from the main unit using a soft, dry cloth. Use a slightly dampened cloth on difficult to remove marks.
NOTE
Do not use paint thinner, benzene, alcohol or any other organic solvent. These may deform the case or damage the appearance of your P-touch labeler.
Cleaning the Print Head
Streaks or poor quality characters on printed labels generally indicates that the print head is dirty. Clean the print head using a cotton swab or the optional print head cleaning cassette (TZe-CL4).
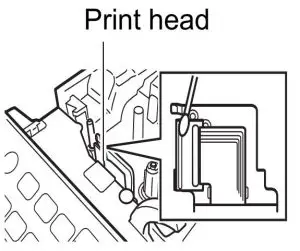
NOTE
- Do not touch the print head directly with your bare hands.
- Refer to the instructions provided with the print head cleaning cassette for directions on how to use it.
Cleaning the Tape Cutter
Tape adhesive can build up on the cutter blade after repeated use, taking the edge off the blade which may result in the tape jamming in the cutter.
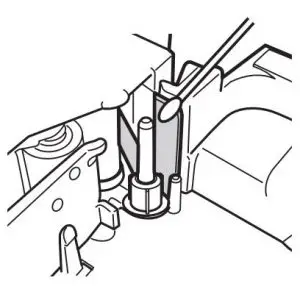
NOTE
- About once every year, wipe the cutter blade using a cotton swab moistened with Isopropyl alcohol (rubbing alcohol).
- Do not touch the cutter blade directly with your bare hands.
TROUBLESHOOTING
What to do when…


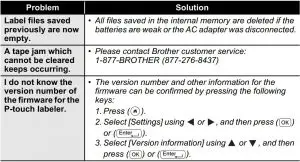
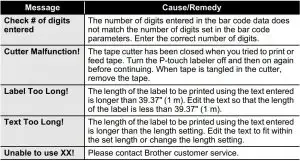
When an error message appears on the display
When an error message appears on the display, follow the directions provided below.
APPENDIX
Specifications
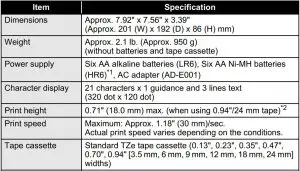
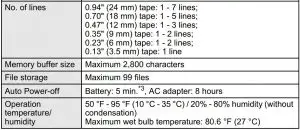
- Visit us at http://support.brother.com/ for the latest information about the recommended batteries.
- Actual character size may be smaller than maximum print height.
- When using P-touch labeler only. When connected to a PC, 1 hour.
System Requirements

Please see the Brother Solutions Center (http://support.brother.com) for the latest compatible OS.
Should you encounter any problems with your product, please do not return your
product to the store! After referring to the User’s guide, if you still need
assistance, call Brother Customer Service at:
Voice: 1-877-BROTHER
Web: www.brother-usa.com
Fax: 1-901-379-1210
If you need to locate a service center, please call 1-877-BROTHER or visit us at
www.brother-usa.com
FAQS
How do I change the language to English?
Press the “MENU” button, then press the “OK” button. Press the “UP” or “DOWN” button to select “Language”, and then press the “OK” button. Press the “UP” or “DOWN” button to select “English”, and then press the “OK” button.
With another Brother label maker, 1″ of tape was wasted from the last letter to the cut. Is this the same w/this model?
Are there any models that don’t have this wasted 1″ issue? I find it very annoying to take the extra step to cut.
How do I change the font size?
Press the “MENU” button, then press the “OK” button. Press the “UP” or “DOWN” button to select “Font Size”, and then press the “OK” button. Press the “UP” or “DOWN” button to select a font size, and then press the “OK” button.
How do I change between upper case and lower case letters?
Press the “MENU” button, then press the “OK” button. Press the “UP” or “DOWN” button to select “Case”, and then press the “OK” button. Press the “UP” or “DOWN” button to select a case, and then press the “OK” button.
How do I change between normal printing and draft printing?
Press the “MENU” button, then press “OK” button. Press “UP” or “DOWN” button to select “Print Mode”, and then press “OK” button. Press “UP” or “DOWN” button to select a print mode, and then press “OK” button.
What replacement cartridges does it take? Are they easy to find/acquire?
The machine came with an lengthy order sheet for more label cartridges and any of those will fit.
Does the base model come with ink? Or does that have to be purchased seperately?
The “ink” is built into the tape. There is none in the label maker itself.
Is there a way to delete what’s been printed on the last label w/out back spacing the whole thing? I can’t seem to figure this out?
Hit SHIFT+BS. This enables the underlying function of “clear”
Are the labels easy to peel?
Yes. Very easy
Are the keys/buttons on this made of rubber?
The PT-D210 has soft rubber keys.
how Long of a label can you print?
The longest length this machine can print a label is 12″ long.
Can it use metal tape?
Metal tapes are not available for the Brother PT-D210 label maker.
is there a way to avoid the 1 inch tape waste at the beginning of each print? (not using chain print)?
There is no way to avoid the one inch tape lead for the PT-D210.
How do you get the letters to print in reverse for using fabric tape?
No, the label maker cannot perform reverse printing.
Is the display window have a light?
No, the Brother PT-D210 label maker does not have a backlit display.
font size?
The actual printed font size depends on the tape width, number of characters, and number of lines. The font sizes are available in Small, Medium, and Large. The PT-D210 can print on “TZe” tape sizes 3.5mm, 6mm, 9mm, and 12mm.
Is the display lighted?
No, the display does not have a backlit feature.
can it play Doom?
Unfortunately the Brother PTD210 machine does not include or is compatible with any game.
Is there a glow in the dark tape available for it?
No, we do not have any glow in the dark tape at this time.
VIDEO

