![]()
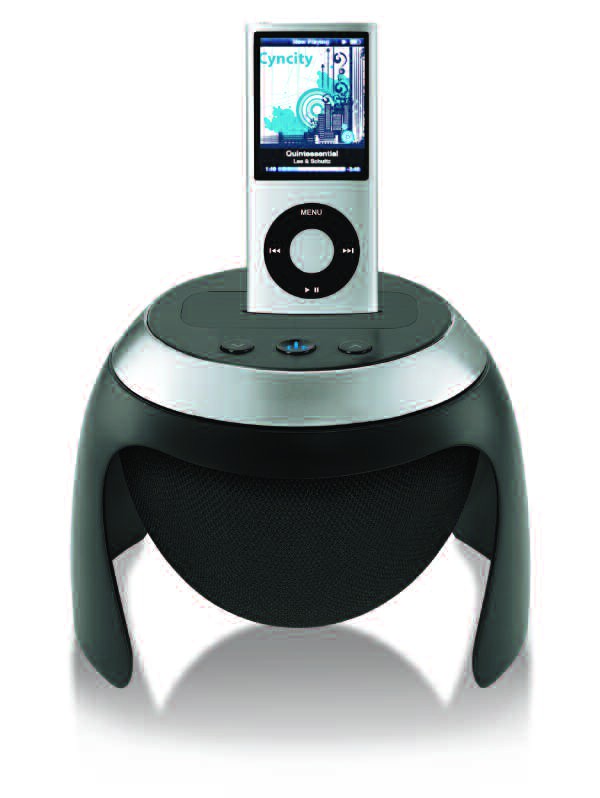
Speaker Dock for iPod

HMDX-S10
Instruction Manual and Warranty Information
1 year limited warranty
Thank you for purchasing the HMDX S10 iPod Speaker. This, like the entire HMDX product line, is built with high-quality craftsmanship to provide you with years of dependable service. We hope you will find it to be the finest product of its kind.
IMPORTANT SAFETY INSTRUCTIONS:
When using an electrical appliance, basic precautions should always be followed, including the following:
READ ALL INSTRUCTIONS BEFORE USING
DANGER – To reduce the risk of electric shock:
- Always unplug the appliance from the electrical outlet immediately after using and before cleaning.
- Do not reach for an appliance that has fallen into water. Unplug it immediately.
- Do not place or store appliance where it can fall or be pulled into a tub or sink.
- Do not place in or drop into water or other liquid.
WARNING – To reduce the risk of burns, fire, electric shock or injury to persons:
- Close supervision is necessary when this appliance is used by or near children, invalids or disabled persons.
- Use this appliance only for its intended use as described in this manual. Do not use attachments not recommended by HMDX; specifically, any attachments not provided with the unit.
- Never operate this appliance if it has a damaged cord, plug, cable, or housing.
If it is not working properly, if it has been dropped or damaged, return it to HMDX Service Center for examination and repair. - Keep cord away from heated surfaces.
- Never drop or insert any object into any opening.
- Do not operate where aerosol (spray) products are being used or where oxygen is being administered.
- Do not carry this appliance by the power cord or use cord as handle.
- To disconnect, remove the plug from the outlet.
- This appliance is designed for indoor use only. Do not use the outdoors.
- Only set on dry surfaces. Do not place on surface wet from water or cleaning solvents.
Caution: All servicing of this product must be performed by authorized HMDX Service Personnel only.
Caution – Please read all instructions carefully before operating.
- Never leave the appliance unattended, especially if children are present.
- Never cover the appliance when it is in operation.
- This unit should not be used by children without adult supervision.
- Always keep the cord away from high temperature and fire.
- Do not lift, carry, hang, or pull the product by the power cord.
- If the adaptor sustains damage, you must stop using this product immediately and contact the HMDX Service Center. (See the warranty section for the HMDX address.)
SAVE THESE INSTRUCTIONS


Getting Started
1. Attach the DC adaptor to the DC Jack located on the back of the unit. (Fig. 3)
2. Plug the cord into 120V household outlet.
Charging your iPod™
Select the correct insert for your particular iPod model from the chart below:

When you want to connect a different-size iPod, remove the insert from the dock and replace with the correct size insert. To remove dock insert, place fingernail in slot on insert (Fig. 2) and gently pull up. You must always use the appropriate size insert for your iPod. If you do not find the correct matching dock insert listed above to your iPod model, you may use the dock adapter insert that was included with your original iPod purchase or call HMDX AUDIO Service Center at 1.800.466.3342 to purchase one.
Note: Make sure you are using the correct insert for your iPod and that it is properly placed in the dock of the unit. Failure to do so may damage your iPod.
WARNING: INSERTS AND PIN CONNECTOR ARE DESIGNED FOR APPLE iPOD MUSIC PLAYERS ONLY. ATTEMPTING TO ATTACH OR FORCE ANY NON-iPOD MUSIC PLAYER INTO ENCLOSED INSERTS OR ONTO THE PIN CONNECTOR WILL DAMAGE AND EVEN DESTROY YOUR DEVICE.
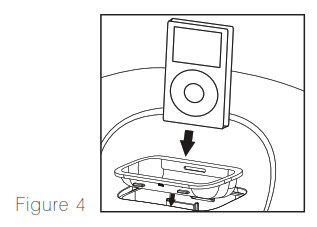
- Before you begin, remove your iPod from its case or ‘skin’. Place insert in dock, being sure that the two plastic tabs face the front of the unit. Press insert into place, ensuring it is firmly placed in the dock (Fig. 2). Carefully place your iPod into the docking area so that the pin connector in the dock is fully connected to the pin socket on the bottom of your iPod (Fig. 4). You will hear a “chirp”, indicating that your iPod is properly connected.
- Your iPod will begin charging until fully charged.
Note: Your iPod will charge even if the POWER button is turned off. The unit only needs to be plugged in for the iPod to charge. - To remove/replace an insert, first, remove your iPod then insert fingernail in slot on insert (Fig. 2), and gently pull up.

Listening to Your iPod
- Press the POWER button on the top of the unit to turn it on (Fig. 1).
- Press the PLAY/PAUSE button on your iPod to pause play; press again to resume play.
- Press the ‘ /’ or ‘/’ button on the unit to adjust volume (Fig. 1).
- Press the


- To turn off the unit, press the POWER button on the top of the unit. The iPod will continue charging in the dock.


Listening to a non-docking iPod or other portable audio devices
If you are using an iPod without a docking port, other MP3 players, or other portable audio devices, you can play it through the unit via the LINE IN jack located on the back of the unit. (Fig. 5)
- Plug one end of the Connection Cable (included) (Fig. 1) into the headphone or line-out jack on your audio device and the other end of the Connection Cable into the unit’s LINE IN jack located on the back of the unit (Fig. 5).
- Press the POWER button on the unit to turn it on (Fig. 1).
- Turn on and play the external audio device.
- Press the ‘ /’ or ‘/’ button on the unit to adjust volume (Fig. 1).
Note: You may need to adjust the volume on an external device too. - To turn the unit off, press the POWER button on the back of the unit. Note: You also need to turn off your external audio device as well.

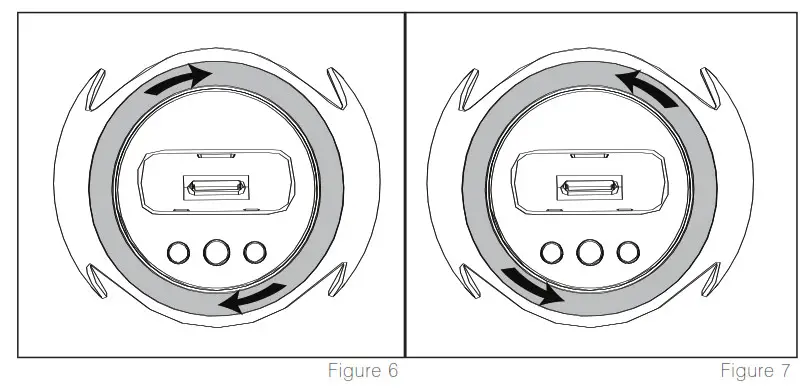
Changing the Colored Faceplates
Attaching Faceplate
- Choose a faceplate.
- Place faceplate on top of unit, so 3 notches are lined up.
- With one hand on top of unit, apply pressure and gently rotate the faceplate clockwise, ensuring all 3 notches lock in place. (Fig. 6)
Removing Faceplate
- With one hand on top of unit, apply pressure and gently rotate the faceplate ring counterclockwise, releasing all 3 notches from the base of the unit. (Fig. 7)
- Grasp the faceplate and pull up. Be sure not to force or pull too hard so that the notches do not break.
- See ATTACHING FACEPLATE for directions on replacing the faceplate.
Maintenance
To Store
You may leave the unit on display, or you can store it in its box in a cool, dry place.
To Clean
Use only a soft dry cloth to clean the enclosure of the unit.
NEVER use liquids or abrasive cleaner to clean.
Modifications not authorized by the manufacturer may void user warranty.
Note: This equipment has been tested and found to comply with the limits for a Class B digital device, pursuant to Part 15 of the FCC Rules. These limits are designed to provide reasonable protection against harmful interference in a residential installation. This equipment generates, uses and can radiate radio frequency energy and, if not installed and used in accordance with the instructions, may cause harmful interference to radio communications. However, there is no guarantee that interference will not occur in a particular installation. If this equipment does cause harmful interference to radio or television reception, which can be determined by turning the equipment off and on, the user is encouraged to try to correct the interference by one or more of the following measures:
- Reorient or relocate the receiving antenna.
- Increase the separation between the equipment and receiver.
- Connect the equipment into an outlet on a circuit different from that to which the receiver is connected.
- Consult the dealer or an experienced radio/TV technician for help.
LIMITED ONE YEAR WARRANTY
HMDX AUDIO sells its products with the intent that they are free of defects in manufacture and workmanship for a period of one year from the date of original purchase, except as noted below. HMDX AUDIO warrants that its products will be free of defects in material and workmanship under normal use and service. This warranty extends only to consumers and does not extend to Retailers.
To obtain warranty service on your HMDX AUDIO product, mail the product and your dated sales receipt (as proof of purchase), postpaid, to the following address:
HMDX AUDIO Consumer Relations
Service Center Dept. 168
3000 Pontiac Trail
Commerce Township, MI 48390
No COD’s will be accepted.
HMDX AUDIO does not authorize anyone, including, but not limited to, Retailers, the subsequent consumer purchaser of the product from a Retailer or remote purchasers, to obligate HMDX AUDIO in any way beyond the terms set forth herein. This warranty does not cover damage caused by misuse or abuse; accident; the attachment of any unauthorized accessory; alteration to the product; improper installation; unauthorized repairs or modifications; improper use of electrical/power supply; loss of power; dropped product; malfunction or damage of an operating part from failure to provide manufacturer’s recommended maintenance; transportation damage; theft; neglect; vandalism; or environmental conditions; loss of use during the period the product is at a repair facility or otherwise awaiting parts or repair; or any other conditions whatsoever that are beyond the control of HMDX AUDIO.
This warranty is effective only if the product is purchased and operated in the country in which the product is purchased. A product that requires modifications or adoption to enable it to operate in any other country than the country for which it was designed, manufactured, approved, and/or authorized, or repair of products damaged by these modifications is not covered under this warranty.
THE WARRANTY PROVIDED HEREIN SHALL BE THE SOLE AND EXCLUSIVE WARRANTY. THERE SHALL BE NO OTHER WARRANTIES EXPRESS OR IMPLIED INCLUDING ANY IMPLIED WARRANTY OF MERCHANTABILITY OR FITNESS OR ANY OTHER OBLIGATION ON THE PART OF THE COMPANY WITH RESPECT TO PRODUCTS COVERED BY THIS WARRANTY. HMDX AUDIO SHALL HAVE NO LIABILITY FOR ANY INCIDENTAL, CONSEQUENTIAL OR SPECIAL DAMAGES. IN NO EVENT SHALL THIS WARRANTY REQUIRE MORE THAN THE REPAIR OR REPLACEMENT OF ANY PART OR PARTS WHICH ARE FOUND TO BE DEFECTIVE WITHIN THE EFFECTIVE PERIOD OF THE WARRANTY. NO REFUNDS WILL BE GIVEN. IF REPLACEMENT PARTS FOR DEFECTIVE MATERIALS ARE NOT AVAILABLE, HMDX AUDIO RESERVES THE RIGHT TO MAKE PRODUCT SUBSTITUTIONS IN LIEU OF REPAIR OR REPLACEMENT.
This warranty does not extend to the purchase of opened, used, repaired, repackaged, and/or resealed products, including but not limited to sale of such products on Internet auction sites and/or sales of such products by surplus or bulk resellers. Any and all warranties or guarantees shall immediately cease and terminate as to any products or parts thereof which are repaired, replaced, altered, or modified, without the prior express and written consent of HMDX AUDIO.
This warranty provides you with specific legal rights. You may have additional rights which may vary from country to country. Because of individual country regulations, some of the above limitations and exclusions may not apply to you.
For more information regarding our product line in the USA, please visit: www.hmdxaudio.com
HMDX AUDIO Service Center
1.800.466.3342
8:30 – 5:00 p.m. (EST) M – F
Mail To:
HMDX AUDIO
Consumer Relations
Service Center Dept. 168
3000 Pontiac Trail
Commerce Township, MI
48390
e-mail: [email protected]
©2009 HMDX AUDIO and its affiliated companies, all rights reserved. HMDX AUDIO™ is a registered trademark of HMDX AUDIO and its affiliated companies. All rights reserved.iPod®, iPod nano®, nano® and the iPod® design are trademarks of Apple Inc.
IB-HMDXS10B