JOY TAB™ 2
 USER MANUAL
www.us.alcatelmobile.com
About this Manual:
Thank you for choosing the Alcatel JOY TAB™ 2 9032W. In order to maintain your device in optimal condition, please read this manual and keep it for future reference.
Your device …………………………
1.1 Keys and connectors
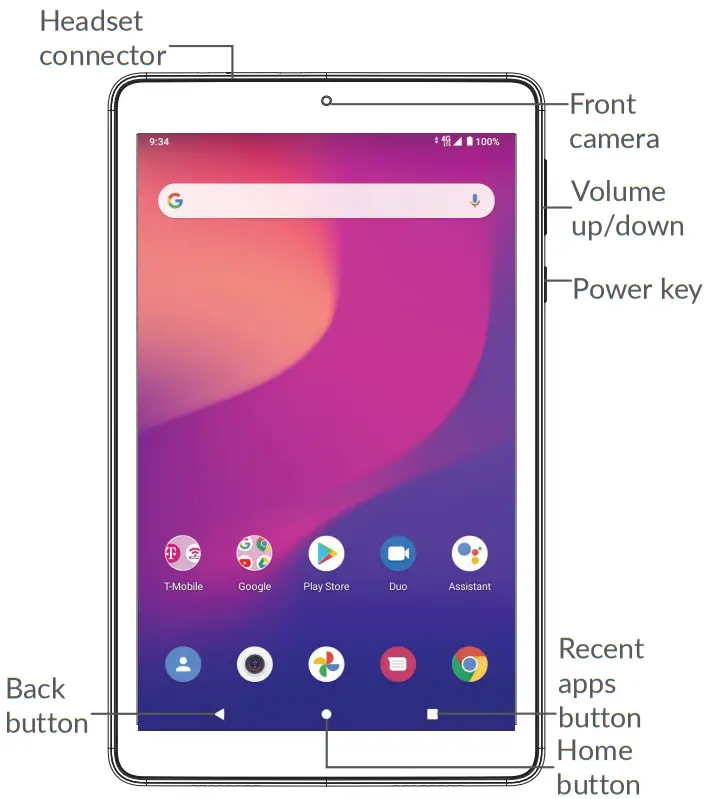
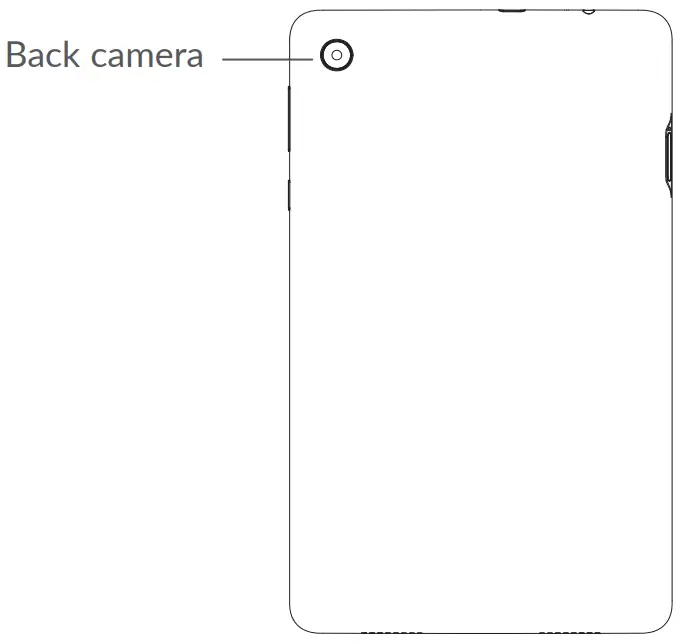 Back button
- Touch to go back to the previous screen, or close a dialog box, options menu, the Notification panel, etc.
 Home button
- From any application or screen, touch to return to the Home screen.
- Long press to turn on Google Assistant. You can get help such as getting directions and restaurant information based on the content detected on the screen.
 Recent Apps button
- Touch to view applications you’ve recently accessed.
 Power key
- Press: Lock the screen/Light up the screen.
- Press and hold: Show the popup menu to select from Restart/Power off/Screenshot
- Press and hold the Power key and Volume down key to take a screenshot.
- Press and hold the Power key for at least 10 seconds to force a reboot.
 Volume keys
- Adjust the media volume while listening to music or a video, or streaming content.
- While using the Camera app, press the Volume Up or Down key to take a photo or touch and hold to take several photos.
1.2 Getting started
1.2.1 Setting up
Insert or remove your SIM card or microSD card.

![]() Your tablet only supports Nano-SIM cards. In order to avoid damaging your device, do not attempt to insert other SIM types, such as Mini or Micro cards.
Your tablet only supports Nano-SIM cards. In order to avoid damaging your device, do not attempt to insert other SIM types, such as Mini or Micro cards.
Charging the battery

You are advised to fully charge the battery (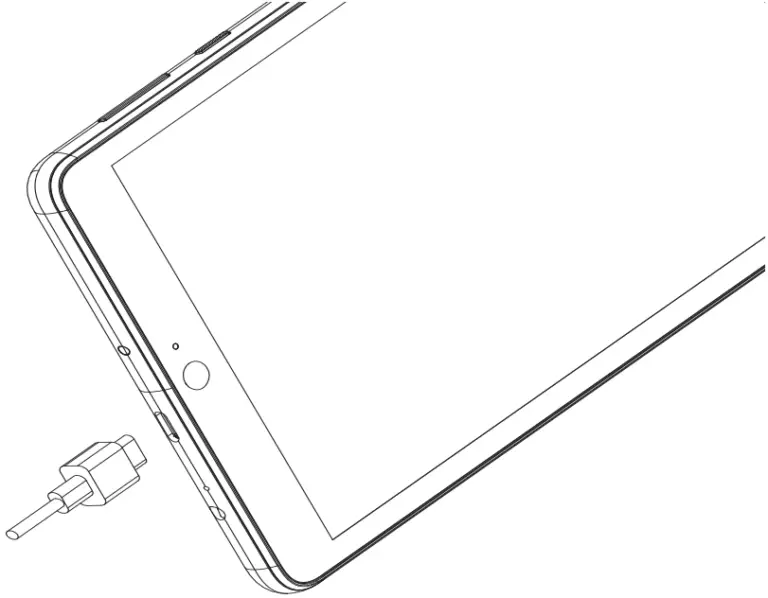 ). Charging status is indicated by a percentage displayed on the screen. The percentage increases as the tablet are charged.
![]() To reduce power consumption and energy waste when the battery is fully charged, disconnect your charger from the tablet; switch off Wi-Fi, GPS, Bluetooth, or background-running applications when not in use; reduce the backlight time, etc.
To reduce power consumption and energy waste when the battery is fully charged, disconnect your charger from the tablet; switch off Wi-Fi, GPS, Bluetooth, or background-running applications when not in use; reduce the backlight time, etc.
1.2.2 Powering on your tablet
Hold down the Power key until the tablet powers on, unlock your tablet (Swipe, PIN, Password, or Pattern) if necessary, and confirm. The Home screen is displayed. If you do not know your PIN code or forget it, contact Customer Care. Be sure to keep your PIN code in a safe place.
1.2.3 Powering off your tablet
Press and hold the Power key until options appear, then select Power off.
1.3 Home screen
You can bring all of the items that you use most frequently (applications, shortcuts, widgets, folders) to your Home screen for quick access. Touch the Home button to switch to the Home screen.

1. Status bar
- Status/Notification indicators
- Swipe down to open the Notification panel.
4. Google Search bar
- Touch 2 to enter the text search screen
- Touch 3 to enter the voice search screen
5. Favorite tray applications
- Enter the application.
- Long press to move or remove applications.
Auto-rotate screen
From the app list, touch Settings > Display > Advanced > Auto-rotate screen to enable the function.
1.3.1 Using the touchscreen
Touch 
To access an application, touch it with your finger.
Long press 
To enter the available options for an item, long press the item. For example, select a contact in Contacts, long press this contact, and an options list will appear.
Drag 
Long-press an item and drag it to another location.
Slide/Swipe 
Slide the screen to scroll up and down the applications, images, and web pages. You can slide the screen horizontally too.
Flick 
Similar to swiping, flicking is a lighter and quicker stroke.
Pinch/Spread 
Place two fingers on the screen surface and draw them apart or together to scale an element on the screen.
The tablet also supports one-finger zooming in Camera and Gallery. Double touch the screen to zoom in/out.
Rotate 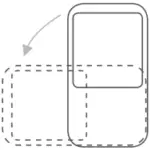
Automatically change the screen orientation from portrait to landscape by turning the tablet sideways to have a better screen view.
1.3.2 Status bar
From the Status bar, you can view both tablet status (on the right side) and notification information (on the left side).
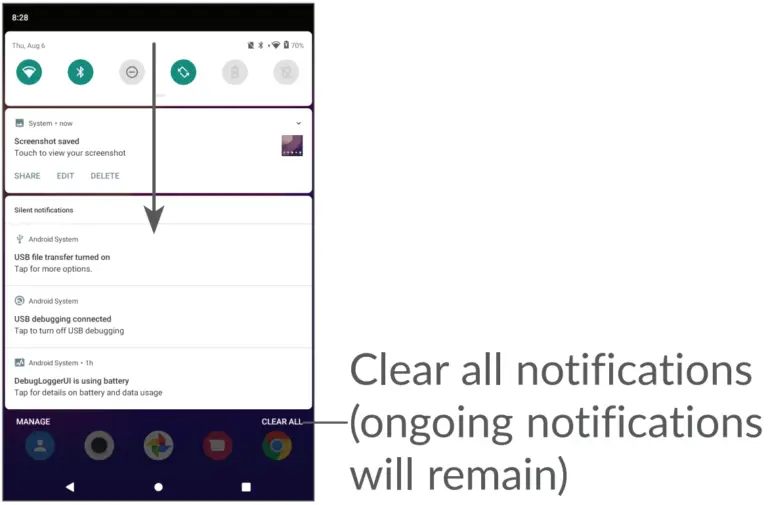
Swipe down the status bar to view notifications and swipe down again to enter the Quick settings panel. Swipe up to close it.
Notification panel
Swipe down the Status bar to open the Notification panel to read detailed information.
Quick Settings panel
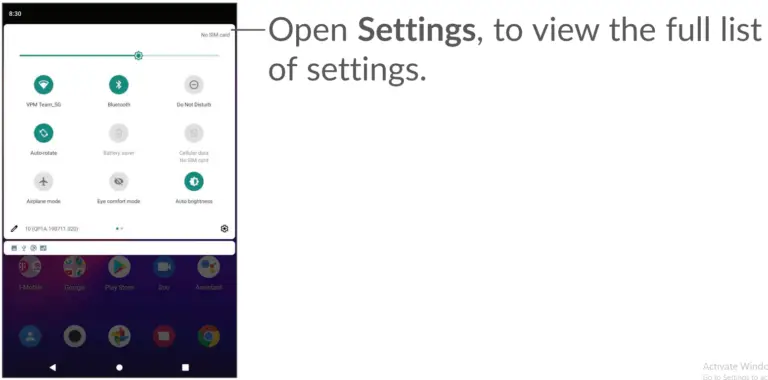
Swipe down the Status bar twice to access the Quick Settings panel where you can enable or disable functions or change modes by tapping the icons
1.3.3 Locking and unlocking your screen
To protect your tablet and privacy, you can lock the tablet with a pattern, PIN, or password, etc.
To create a screen unlock pattern
- Swipe up the Home screen, and then touch Settings > Security > Screen lock.
- Set your own pattern.
To lock the tablet screen
If your tablet remains inactive for a period of time, it will automatically lock the screen and enter sleep mode to save power. Go to Settings > Display > Screen timeout and select a screen timeout period. You can also manually lock the screen by pressing the Power key once.
To unlock the tablet screen
Press the Power key once to light up the screen, swipe up and unlock the screen with the method you have set.
If you have chosen Swipe as the screen lock, you can press the Power key to light up the screen, then swipe up to unlock the screen.

1.3.4 Personalizing your Home screen
Add
You can long-press a folder, an application, or a widget and drag the item to your preferred Home screen.
Reposition
Long-press an item and drag it to the desired position and then release. You can move items both on the Home screen and the Favorite tray. Hold the icon on the left or right edge of the screen to drag the item to another Home screen.
Remove
Long-press an item and drag it up to the top of the Remove icon, then release.
Create folders
To improve the organization of shortcuts or applications on the Home screen and the Favorite tray, you can add them to a folder by stacking one item on top of another. To rename a folder, open it and touch the folder’s title bar to input the new name.
Wallpaper customization
Long-press an empty area on the Home screen, then touch Wallpapers to customize wallpaper.
1.3.5 Widgets and recently used applications
Consult widgets
Long press the empty area on the Home screen, then touch Widgets to display all widgets.
Touch the selected widget and slide it to move to your preferred screen.
Consult recently used applications
To consult recently used applications, touch the Recent Apps button  . Touch a thumbnail in the window to open the application.

Touch one thumbnail and slide it up to close an application.
Slide the screen left or right to view all running applications. Touch Clear all to the left of the final screen to close all of them.
1.3.6 Volume adjustment
Using the volume key
Press the Volume key to adjust the volume. To activate the silent mode, press the Volume down key until the tablet is silent.
Using the settings menu
Swipe up the Home screen, and then touch Settings> Sound to set the volume for media, alarms, and notifications.
Text input ……………………………
2.1 Using the onscreen keyboard
Onscreen keyboard settings
Go to Settings > System > Languages & input > Virtual keyboard, touch the keyboard you want to set up and a series of settings will become available.
Adjust the onscreen keyboard orientation
Turn the tablet sideways or upright to adjust the onscreen keyboard orientation. You can adjust it by changing the settings (Touch Settings > Display > Advanced > Auto-rotate screen).
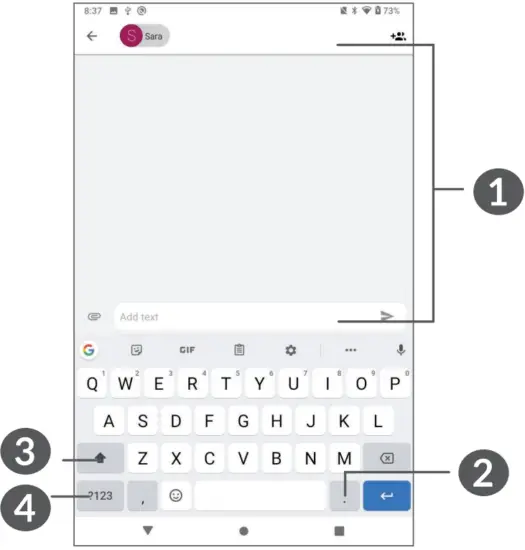
- Enter text or numbers.
- Long press to select symbols.
- Switch between “ABC/Abc” mode; Press twice quickly to switch to “ABC” mode always.
- Switch between symbol and numeric keyboard.
2.2 Text editing
You can edit the text which you have entered.
- Long-press or double-tap within the text you want to edit.
- Drag the tabs to change the selected text.
- The following options will appear: Cut, Copy, Share and Select all.
- If you have previously cut or copied any text, touch the tab to show Paste which allows you then paste the text at the current location.
Contacts …………………………….
Contacts enable quick and easy access to the contact you want to reach.
You can view and create contacts on your tablet and synchronize them with your Gmail contacts or other applications.
3.2.1 Consult your Contacts
To see your contacts, touch  from the App drawer.
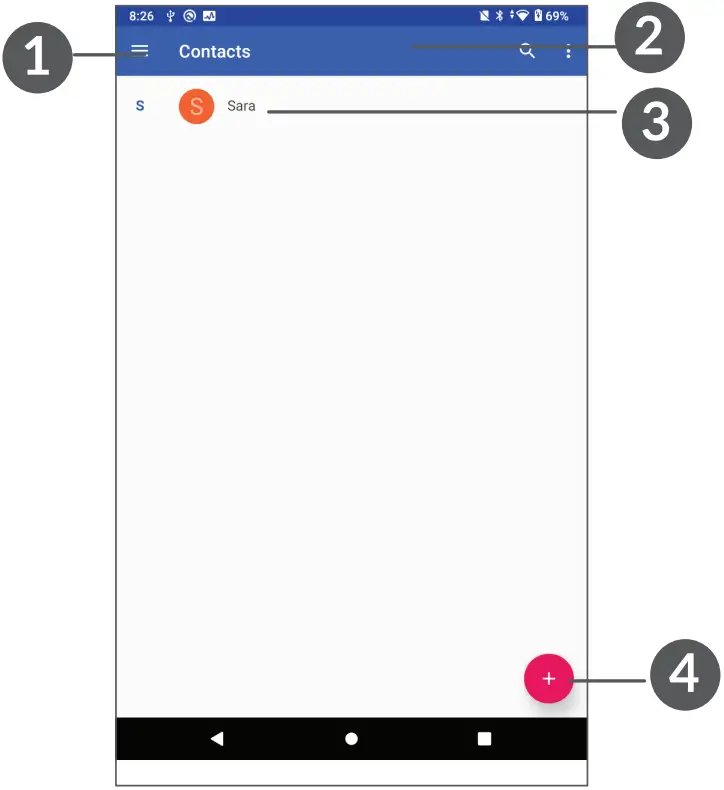
- Display the contacts list option menu
- Touch to search contacts
- Long press to select the contact(s) to delete
- Add new contact
![]() Deleted contacts will also be removed from other applications on the tablet or web the next time you synchronize your tablet.
Deleted contacts will also be removed from other applications on the tablet or web the next time you synchronize your tablet.
3.2.2 Adding a contact
Touch 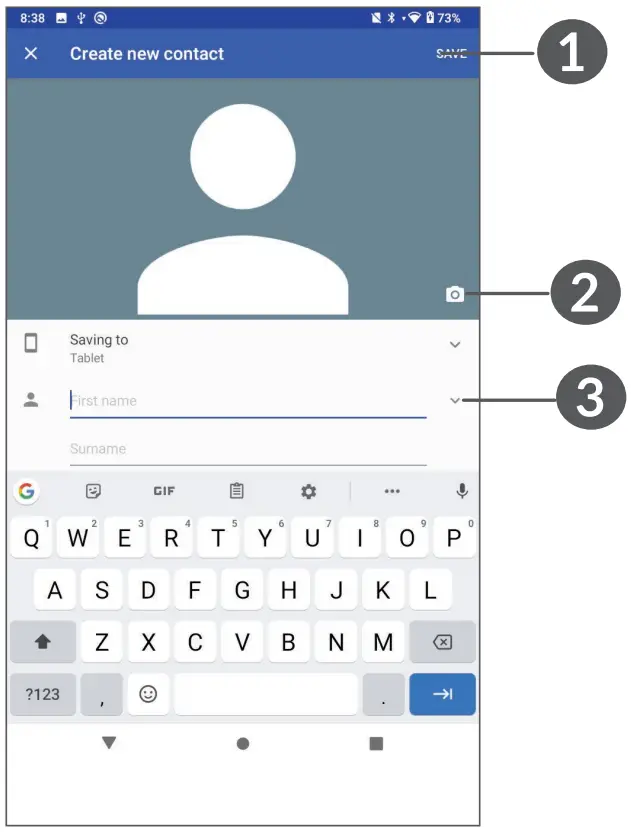 in the contact list to create a new contact.
You are required to enter the contact’s name and other contact information. By scrolling up and down on the screen, you can move from one field to another.

- When finished, touch this icon to save
- Select a picture or take a photo for the contact
- Touch to open available labels
Add to/Remove from Favorites(¹)
To add a contact to favorites, you can touch a contact to view details then touch  to add the contact to favorites.
To remove a contact from favorites, touch  on the contact details screen.
3.1 Editing your contacts
To edit contact information, touch  on the contact details screen.
When finished, touch Save to save.
3.2 Use Quick contact for Android
Touch a contact to open the Quick contact panel for Android. To send a message, touch 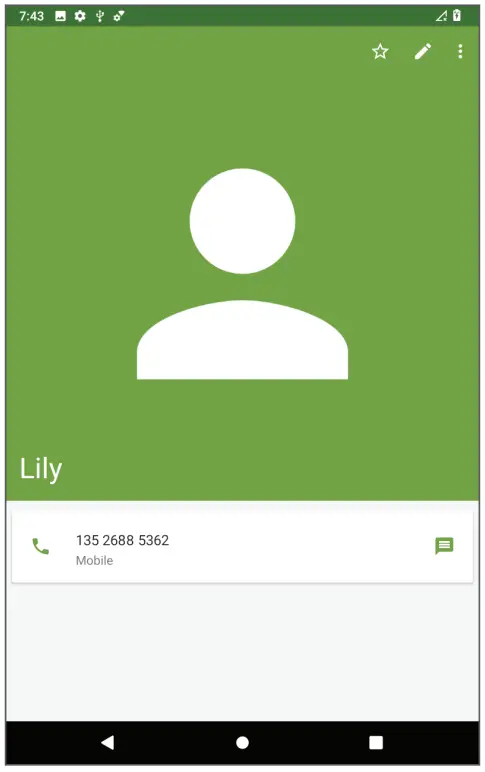 .
.
- Only tablet contacts and account contacts can be added to Favorites.

The icons available on the Quick contact panel depend on the information you have for the contact and the applications and accounts on your tablet.
3.3 Importing, exporting & sharing contacts
To import contacts:
From the Contacts screen, tap 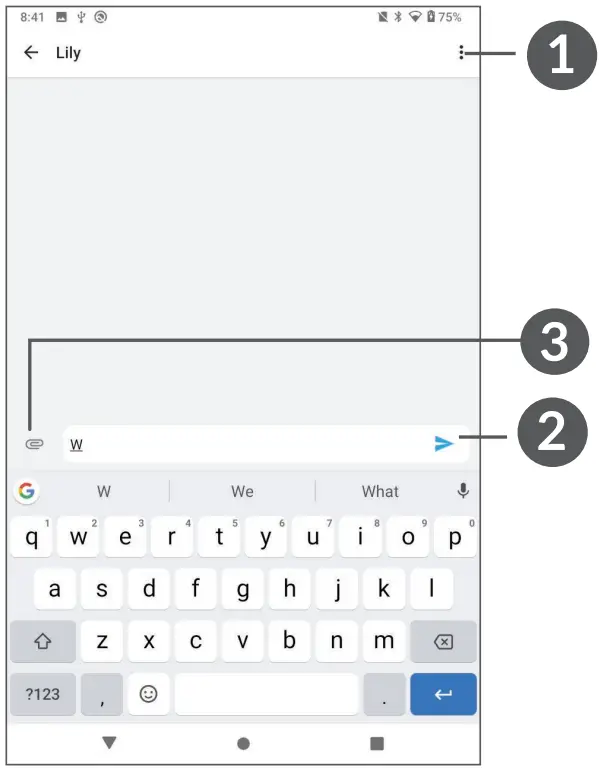 to open the options menu. tap Settings > Import, then select import contacts from SD card, or .vcf file from internal storage.
To export and share contacts:
From the Contacts screen, tap  to open the options menu. Touch Settings > export, then select export to .vcf file to export contacts to your tablet. or select Share all contacts to share the contact’s vCard via Bluetooth, Gmail, or Messaging.
Touch a contact from the contacts screen you want to share, touch  > Share on the contact details screen, and then select the application to perform this action.
3.4 Displaying contacts
Touch  and then Settings, select Sort by > First name or Surname to sort the contacts list as well as viewing contact names by the First name first or Surname first through the Name format menu.
3.5 Synchronizing contacts
Contacts, data, or other information can be synchronized from multiple accounts, depending on the applications installed on your tablet.
To add an account, touch  from the contacts list and touch Settings > Accounts, or from the app list, then Settings > Accounts > Add account.
You are required to select the type of account you are adding, such as DUO, Exchange, and Google.
As with other account setups, you need to enter detailed information, such as username, password, etc.
You can remove an account and all associated information from the tablet. Touch the account you want to delete > Select REMOVE ACCOUNT.
Auto-sync
On the Accounts screen, touch Automatically sync data, when activated, all changes to information on the tablet or online will be automatically synchronized with each other.
Messaging …………………………..
4.1 Write a new message
You can create, edit, and receive SMS and MMS with this tablet.
To access Messaging, touch  .
.
On the message list screen, touch  to write text/ multimedia messages.

- More option
- Send the text message
- Touch to attach a video, picture, audio, or contact card.
Sending a text message
Enter the name or the phone number of the recipient in the To bar or touch  to add recipients. Touch the Add text bar to enter the text of the message. Touch
  to insert emoticons. When finished, touch
  to send the text message.
![]() Specific letters (accented) will also increase the size of the SMS. This may cause multiple SMS to be sent to your recipient.
Specific letters (accented) will also increase the size of the SMS. This may cause multiple SMS to be sent to your recipient.
Sending a multimedia message
An SMS will be converted to MMS automatically when media files (image, video, audio, etc.) are attached or subject or email addresses are added.
To send a multimedia message, enter the recipient’s phone number in the To bar.
Touch the Add text bar to enter the text of the message.
Touch  to attach a picture, video, audio, or contact.
When finished, touch  to send the multimedia message.
4.2 Manage messages
When receiving a message,  will appear on the Status bar as a notification. Swipe down the Status bar to open the Notification panel. Touch the new message
to open and read it. You can also access the Messaging application and touch the message to open it.
Messages are displayed as a conversation.
Touch a message to enter the message composing screen:

To adjust message settings, touch  and select Settings on the message list screen.
Calendar, Clock, and Calculator……………………………
5.1 Calendar
You can use a Calendar to keep track of important meetings, appointments, etc.
To view the calendar and create events, open the Google apps folder from the Home screen, then touch Calendar.
5.1.1 Multimode view
You can display the Calendar by Schedule, Day, 3Day, Week, or Month, touch  to select.
5.1.2 To create new events
You can add new events from any calendar view.
- Touch +.
- Fill in all required information for this new event. If it is a whole-day event, you can select All-day.
- Invite guests to the event. Enter the email addresses of the guests you want to invite with commas to separate. The guests will receive an invitation from Calendar and Email.
- When finished, touch Save from the top of the screen.
To quickly create an event from the Week view screens, touch an empty spot to select a target area which will then turn  , then touch the icon to create the new event.
5.1.3 To delete or edit an event
To delete or edit an event, touch the event to enter its details screen. Touch  to edit the event, or touch
 ![]() and then Delete to delete.
and then Delete to delete.
5.1.4 Event reminder
If a reminder is set for an event, the upcoming event icon  will appear on the Status bar as a notification when the reminder time arrives.
Swipe down the Status bar to open the Notification panel and touch an event name to view the Calendar notification list.
Touch the Back button to keep the reminders pending in the Status bar and the Notification panel.
5.2 Clock
Your tablet has a built-in clock. swipe up the Home screen, then touch Clock.
5.2.1 Clock
To view the world clock, touch  on the Time screen.
Touch  to add a time zone.
5.2.2 Alarm
From the Clock screen, touch  to enter the Alarm screen.
Turn on 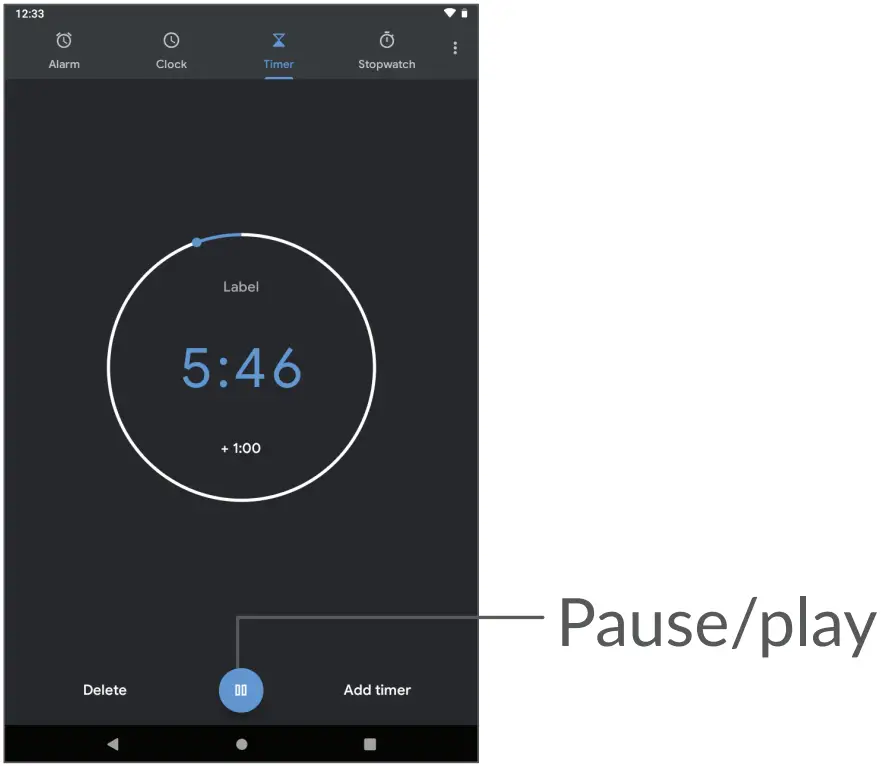 to enable the alarm.
Touch  to add a new alarm:
Touch a currently existing alarm to enter the alarm editing screen.
Touch to delete the selected alarm.
5.2.3 Timer
From the Clock screen, touch  to enter the Timer screen.
- Enter the time. The time should be typed in an hour, minute, and second number sequence.
- Touch
 to start the countdown.
5.2.4 Stopwatch
From the Clock screen, touch to enter the Stopwatch screen.
- Touch
 to start the Stopwatch.
 - Touch Lap to show a list of records according to the updated time.
- Touch
 to halt the total and lap times. These will only restart after
  being touched.
 - Touch RESET to delete the record.
- Touch SHARE to share.
5.2.5 Adjust Clock settings
Touch ![]() and then Settings to access Clock and Alarms settings.
and then Settings to access Clock and Alarms settings.
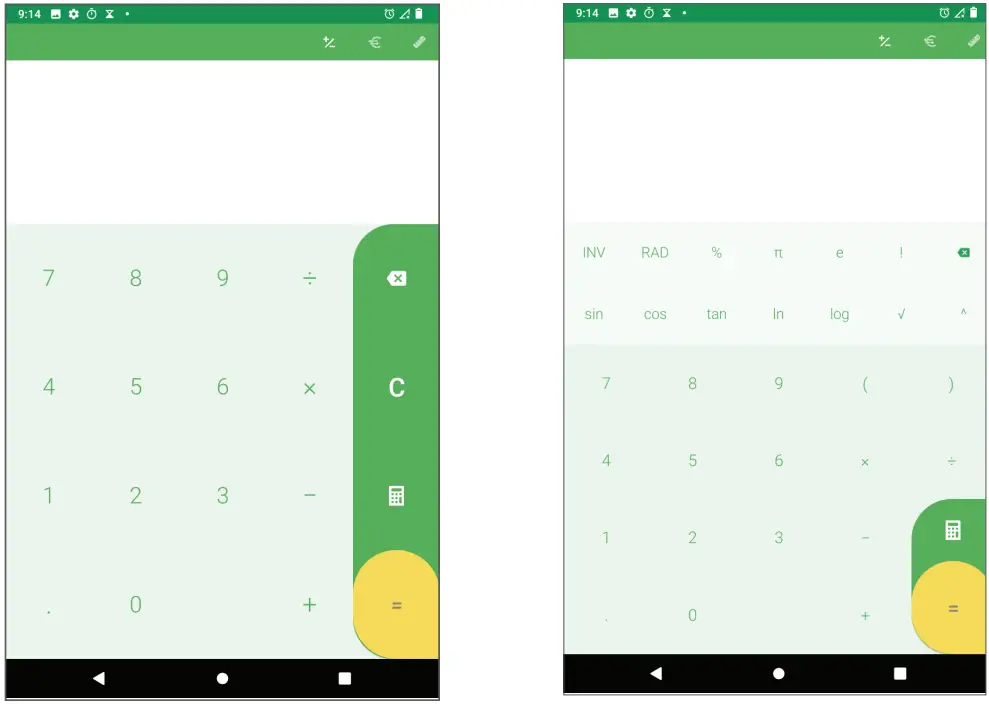
5.3 Calculator
To solve mathematical problems with Calculator, swipe up from the home screen, then touch Calculator.
There are two panels available: The basic panel and the Advanced panel. Touch  to switch between panels, select one of the following two options:

Multimedia applications …….
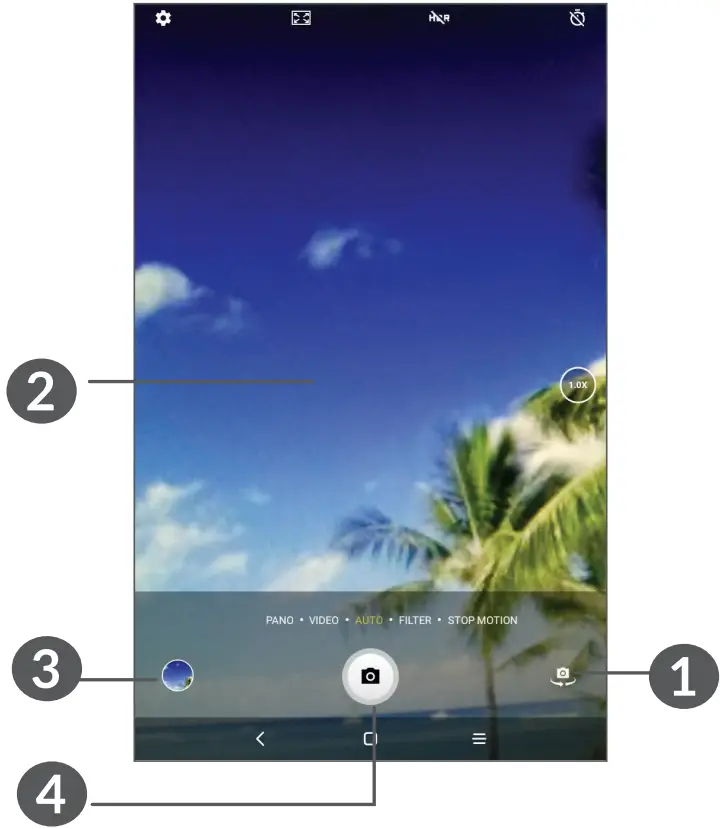
6.1 Camera
Before using the camera, make sure that you remove the protective lens cover to avoid it affecting your picture quality.
To take a photo or video, touch 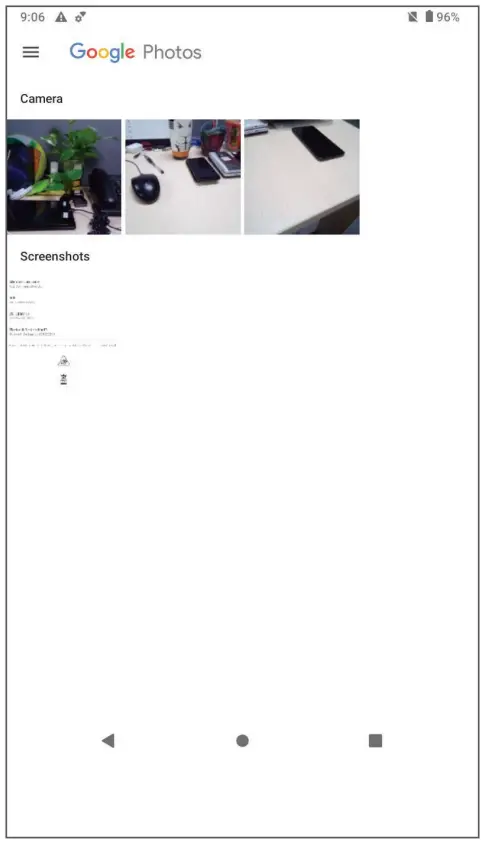 from the Home screen.

- Switch between front and rear camera
- Pinch fingers together to zoom out, or spread fingers apart to zoom in
- View the photos or videos you have taken
- Take a photo
To take a photo
Touch  to capture. The photo will be automatically saved. You can also long-press
  to take burst shots.
To take a video
Touch VIDEO to change the camera mode to video, then touch  to start video recording. You can also touch the right icon
  to take a picture during video recording.
Touch  to pause video recording and touch
  to continue. Touch
  to stop recording. The video will be automatically saved.
6.2 Photos
Photos act as a media player for you to view photos and play videos.
To view the photos you have taken, slide up from the Home screen, then touch Photos.
Pictures and videos are displayed as moments and albums in Photos.

Working with pictures
Find the picture you want to work on and touch the picture to enter the full-screen picture view.
Touch  to share the picture.
Touch  to move to trash.
Touch  the following operators are available:
- Slideshow to view all pictures in full screen.
- Use as to set the picture as a Contact photo or Wallpaper.
- Print to print picture.
- Delete from the device to permanently delete pictures.
Tap  to edit the picture or video.
Batch operation
Photos provide a multi-select function so that you can work with pictures/videos in batches.
On the Photos screen, long-press a picture or video to activate batch operation mode, then touch the videos/ pictures you want to work with. Touch to  delete selected files. Touch
  to share selected files.
Google applications ………..
Google apps are preinstalled on your tablet to improve work efficiency and help you enjoy life.
This manual briefly introduces the apps. For detailed features and user guides, refer to related websites or the introduction provided in the apps.
You are recommended to register with a Google Account to enjoy full functionality.
7.1 Chrome
Your bookmarks, browsing history, and settings across all devices on which the browser is installed can be synchronized with your Google Account.
7.2 Gmail
As Google’s web-based email service, Gmail is configured when you first set up your tablet. With this application, you can send and receive emails, manage emails by labels, archive emails, etc. Emails can be automatically synchronized with your Gmail account.
7.3 Maps
Google Maps offers satellite imagery, street maps, 360° panoramic views of streets, real-time traffic conditions, and route planning for traveling by foot, car, or public transportation. By using this application, you can get your own location, search for a place, and get suggested route planning for your trips.
7.4 YouTube
YouTube is an online video-sharing application where users can upload, view, and share videos. Available content includes video clips, TV clips, music videos, and other content such as video blogging, short original videos, and educational videos. It supports a streaming function that allows you to start watching videos almost as soon as they begin downloading from the internet.
7.5 Play Store
Serves as the official app store for the Android operating system, allowing users to browse and download applications and games. Applications are either free of charge or at a cost.
In-Play Store, search for the app you need, download it and then follow the installation guide to install the app. You can also uninstall, update an app, and manage your downloads.
7.6 Duo
This is a video chat mobile app that allows users to make video calls to people in their contact list once their phone numbers are verified.
Settings ……………………………
To go to Settings, swipe up from the Home screen and touch Settings.
You can also swipe down from the notification panel and touch ![]() .
.
8.1 Network & Internet
8.1.1 Wi-Fi
You can connect to the internet when your tablet is within range of a wireless network. Wi-Fi can be used on your tablet even without a SIM card inserted.
To turn Wi-Fi on and connect to a wireless network
- Touch Settings > Network & Internet > Wi-Fi.
- Turn on
 .
. - Once Wi-Fi is turned on, detected Wi-Fi networks are listed.
- Touch a Wi-Fi network to connect to it. If the network you selected is secured, you are required to enter a password or other credentials (you should contact the network operator for details). When finished, touch CONNECT.
To add a Wi-Fi network
When Wi-Fi is on, you can add new Wi-Fi networks according to your preference.
- Touch Settings > Network & Internet > Wi-Fi.
- Touch Add network.
- Enter the name of the network and any required network information.
- Touch SAVE.
To forget a Wi-Fi network
The following steps prevent automatic connections to networks that you no longer wish to use.
- Turn on Wi-Fi, if it’s not already on.
- On the Wi-Fi screen, touch the name of the saved network.
- Touch FORGET in the dialog that opens.
8.1.2 Mobile network
Go to To Settings > Network & internet > Mobile network to enable data roaming, set your preferred network type, check the network connection you are using or create a new access point, etc.
8.1.3 Data usage
The first time you turn on your tablet with your SIM card inserted, it will automatically configure your network service: GPRS, GSM, 3G, or 4G. If the network is not connected, you can turn on mobile data in Settings > Network & internet > Data usage.
Data saver
By enabling a Data saver, you can reduce data usage by preventing some apps from sending or receiving data in the background.
Cellular data
If you do not need to transmit data on mobile networks, turn off Cellular data to avoid incurring significant charges for data use on local operator mobile networks, particularly if you do not have a mobile data agreement.
![]() Data usage is measured by your tablet, and your operator may count differently.
Data usage is measured by your tablet, and your operator may count differently.
8.2 Tethering & Mobile hotspot
To share your tablet’s data connection via USB and Bluetooth, or as a mobile hotspot, go to Settings > Network & Internet > Tethering and Mobile HotSpot to activate these functions.
8.2.1 VPN
Virtual private networks (VPNs) allow you to connect to the resources inside a secured local network from outside that network. VPNs are commonly deployed by corporations, schools, and other institutions so that their users can access local network resources when not inside that network, or when connected to a wireless network.
To add a VPN
• Touch Settings > Network & Internet > Advanced >VPN and then touch +.
• On the screen that opens, follow your network administrator’s instructions to configure each component of the VPN settings.
• Touch SAVE.
The VPN is added to the list on the VPN settings screen.
To connect/disconnect to/from VPN
To connect to a VPN:
Touch Settings > Network & Internet > Advanced > VPN.
- The VPNs you have added are listed. Touch the VPN you want to connect with.
- In the dialog that opens, enter any requested credentials and touch CONNECT.
To disconnect from a VPN:
- Touch the VPN you want to disconnect from. In the dialog that opens, touch DISCONNECT.
To edit/delete a VPN
To edit a VPN:
- Touch Settings > Network & Internet > VPN.
- The VPNs you have added are listed. Touch the
 icon next to the VPN you want to edit.
 - After editing, touch SAVE.
To delete a VPN:
- Touch the
 icon next to the selected VPN, then touch FORGET to delete it.
8.2.2 Airplane mode
Turn on Airplane mode ![]() to simultaneously disable all wireless connections including Wi-Fi, Bluetooth, and more.
to simultaneously disable all wireless connections including Wi-Fi, Bluetooth, and more.
8.2.3 Private DNS
Touch to select private DNS mode.
8.3 Connected devices
8.3.1 Bluetooth
Bluetooth is a short-range wireless communication technology that you can use to exchange data or connect to other Bluetooth devices for various uses. To turn on Bluetooth
- Touch Settings > Connected devices > Connection preferences > Bluetooth.
- Turn on Bluetooth
 .
.
Your device name and other available devices will appear on the screen.
To rename your device
- Touch Settings > Connected devices > Connection preferences > Bluetooth.
- Touch Device name.
- Enter a name, and touch RENAME to confirm.
To pair/connect your tablet with a Bluetooth device
To exchange data with another device, you need to turn Bluetooth on and pair your tablet with the Bluetooth device with which you want to exchange data.
- Touch Settings > Connected devices > Connection preferences > Bluetooth.
- Touch + Pair new device.
- Touch a Bluetooth device you want to pair your tablet with from the list.
- In the dialog that pops up, touch PAIR to confirm.
- If the pairing is successful, your tablet will be connected to the device.
To unpair from a Bluetooth device
- Touch
 beside the device you want to unpair from.
 - Touch FORGET to confirm.
8.4 Apps & notifications
Tap to view details about the applications installed on your tablet, to manage their data usage or force them to stop.
In the Notifications menu, you can configure whether to block the notifications from this app, hide sensitive content, etc.
In the Permission manager menu of an application, you can grant permissions for the app, such as allowing the app to access your Camera, Contacts, Location, etc.
8.5 Battery
Tap ![]() > Battery usage from the battery management screen to view its power consumption.
> Battery usage from the battery management screen to view its power consumption.
8.6 Display
Adjust your screen brightness, wallpaper, sleep time, font size, etc.
To rotate screen contents when the device is rotated, touch the Auto-rotate screen.
8.7 Sound
Touch to adjust notification ringtones, music, and other audio settings.
8.8 Storage
Use these settings to monitor the total and available space on your tablet and microSD card.
8.9 Security
- Screen lock
Select one method such as Swipe, Pattern, PIN, or password to unlock the screen. - Others
You can also set Device administrators, SIM card lock, Screen pinning, etc. in Settings > Security.
8.10 Accounts
Touch to add, remove, and manage your email and other supported accounts. You can also use these settings to control how and whether all applications send, receive, and synchronize data on their own schedules, and whether all applications can synchronize user data automatically.
Touch Add account to add an account for the selected app.
8.11 Accessibility
Use the Accessibility settings to configure any accessibility plug-ins you have installed on your tablet.
8.12 Privacy
To protect your privacy, you can set an app to be allowed or forbidden to access your location, SMS, phone, etc. Also, whether or not to show passwords or choose the activities and info that you want Google to save.
8.13 Location
Tap to set whether to allow an app to access your device’s location. You can set allowing continual access, or only while the app is in use.
8.14 Digital Wellbeing & parental controls
Use this menu to find how much time you have spent on the tablet and even on each app. You can customize the time limit for using the tablet.
In addition, parents can restrict their children’s usage time and manage their browsing habits.
8.15 Google
Touch to configure your Google Account and services settings.
8.16 Smart Manager
Smart Manager ensures your tablet is operating in top form by automatically scanning and optimizing data usage to preserve battery levels, manage storage and protect against security threats. You can also do some manual settings for further optimization.
8.17 System
8.17.1 Languages & input
Touch to configure language settings, the on-screen keyboard, pointer speed, etc.
8.17.2 Gestures
You can check to set the function for Double tap screen/Press power button twice for camera/ 3 fingers screenshot.
8.17.3 Date & time
Use Date & time settings to customize your preferences for how date and time are displayed.
8.17.4 Backup
Turn on ![]() to back up your tablet’s settings and other application data to Google servers. If you replace your tablet, the settings and data you’ve backed up will be restored onto the new device when you sign in with your Google Account.
to back up your tablet’s settings and other application data to Google servers. If you replace your tablet, the settings and data you’ve backed up will be restored onto the new device when you sign in with your Google Account.
8.17.5 Reset options
Touch to reset Wi-Fi, cellular & Bluetooth, Reset app preferences, Erase all data, and to collect diagnostics data for troubleshooting to improve the network quality and device experience.
8.17.6 Multiple users
Turning this function on can allow guests to use your tablet with some apps and content restricted. The guest user will be allowed to build their own apps and content.
8.17.7 Update APPs
Touch to check apps’ new version and update.
8.18 About tablet
This contains information such as IMEI, SIM status, Legal information, Model, Kernel version, Build number, etc.
Making the most of your tablet ……………………………….
9.1 FOTA Upgrade
Use the FOTA (Firmware Over The Air) Upgrade tool to update your tablet’s software. To access Update, from the app list, touch Settings > System > Advanced > System Update.
If you want to update the system, touch CHECK FOR UPDATES and when that’s finished, your tablet will have the latest version of the software.
During FOTA downloading or updating, to avoid errors in locating the correct update packages, do not change your default storage location.
Troubleshooting ………………
Before contacting the service center, here are some instructions to help you troubleshoot your device:
- For optimal operation, fully charge the battery.
- To improve the tablet’s performance, remove unnecessary files or apps on your tablet.
- Update your tablet’s software, go to Settings > System > Advanced > System Update.
- Reset your tablet via Erase all data (factory reset).
Touch Settings > System > Advanced > Reset options > Erase all data (factory reset). Another method is to hold down the Power key and the Volume up key at the same time when your tablet is powered off. All of your tablet data will be lost permanently. It is strongly advised to fully back up your tablet data before resetting.
My tablet can’t be switched on or is frozen
- If the tablet can’t be switched on, charge for at least 20 minutes to ensure the minimum battery power needed. Then switch it on again.
- If the tablet falls into a loop during power-on animation and the user interface can’t be accessed, press and hold the Power key to reset. This eliminates any abnormal OS booting issues caused by third-party applications.
- If neither method is effective, reset the tablet by pressing the Power key and the Volume up the key at the same time, and then selecting Wipe data/factory reset by pressing the Volume key, and press the Power key to confirm each selection.
My tablet has not responded for several minutes
- If your tablet doesn’t respond, turn off your tablet by pressing and holding the Power key until it turns off and then restart it again.
- If your tablet has a removable battery, remove the battery and reinsert it, then restart the tablet.
- If it still doesn’t work, reset the tablet.
My tablet turns off by itself
- Check that your screen is locked when you are not using your tablet, and make sure that the Power key is not accidentally pressed while the screen is unlocked.
- Check the battery charge level.
- If it still doesn’t work, reset the tablet or update the software.
My tablet can’t charge properly
- Make sure that you are using the Alcatel charger that is included with the tablet.
- If your tablet has a removable battery, make sure that your battery is inserted properly and clean the battery contacts if it’s dirty. It must be inserted before plugging in the charger.
- Make sure that your battery is not completely discharged; if the battery power has been empty for a long time, it may take around 20 minutes to display the battery charging indicator on the screen.
- Make sure that charging is carried out under normal conditions (0°C (32°F) to 40°C (104°F)).
- When abroad, check that the voltage input is compatible.
My tablet can’t connect to a network or “No service” is displayed
- Try connecting to the network by moving to another physical location.
- Verify the network coverage with your operator.
- Check with your operator that your SIM card is valid.
- Try connecting at a later time if the network is overloaded.
My tablet can’t connect to the internet
- Make sure that the internet access service of your SIM card is available.
- Check your tablet’s internet connection settings. Go to Settings > Network & internet > Mobile network to make sure Cellular data or Roaming is turned on.
- Make sure that you are in a place with the network coverage.
- Try connecting at a later time or at another location.
Invalid SIM card
- Make sure that the SIM card has been correctly inserted.
- Make sure that the chip on your SIM card is not damaged.
- Make sure that the service of your SIM card is available.
I can’t find my contacts
- Make sure that your SIM card is not broken.
- Make sure that your SIM card is inserted properly.
- Import all contacts stored on the SIM card to tablet.
I can’t use the features described in the manual
- Check with your operator to make sure that your subscription includes this service.
- Make sure that this feature doesn’t require an Alcatel accessory.
I can’t add a contact
- Make sure that your SIM card or tablet has enough space; long press contact from the Contacts list to delete some contacts.
I can’t send and receive MMS
- Check your tablet storage as it might be full.
- Contact your network operator to check service availability and MMS parameters.
- Verify the server center number or your MMS profile with your operator.
- The service center may be swamped. Try again later.
SIM card PIN locked
- Contact your network operator to obtain the PUK (Personal Unblocking Key) code.
I can’t connect my tablet to my computer
- Check to make sure the USB port is not broken. If it’s not working, try another USB port on your computer.
- Make sure USB drivers are properly installed.
- If you are using a Windows computer, make sure it supports MTP mode. If you are using a Mac, make sure to install Android File Transfer from
www.android.com/filetransfer/.
I can’t download new files
- Make sure that there is sufficient tablet storage space for your download.
- Select the microSD card as the location to store downloaded files.
- Check your subscription status with your operator.
The tablet can’t be detected by others via Bluetooth
- Make sure that Bluetooth is turned on and your tablet is visible to other users.
- Make sure that the two tablets are within Bluetooth’s detection range.
The battery drains too fast
- Make sure that you follow the complete charge time (minimum 400 minutes).
- After a partial charge, the battery level indicator may not be exact. Wait for at least 20 minutes after removing the charger to obtain an exact indication.
- Adjust the brightness of the screen as appropriate.
- Extend the email auto-check interval for as long as possible.
- Update news and weather information on manual demand or increase their auto-check interval.
- Exit background-running applications if they are not being used for extended periods of time.
- Turn off Bluetooth, Wi-Fi, or GPS when not in use.
The tablet becomes warm during heavy use
- This heating is a normal consequence of the CPU handling excessive data (game playing, internet surfing, or running other complex applications). Ending the actions above will make your tablet return to normal temperature.
- Avoid using multiple applications while the tablet is charging.
After a factory data reset is performed, I can’t use my tablet without entering Google Account credentials
- After a reset is performed, you must enter the original Google Account credentials that were used on this tablet.
- If you don’t remember your Google Account credentials, complete Google Account recovery procedures.
- If you still cannot access your tablet, apply to the authorized repair center, but remember that it will not be regarded as a warranty case.
I forget some passwords/codes/keys on the tablet
- Perform a factory data reset.
- If you still cannot access your tablet, apply to the authorized repair center, but remember that it will not be regarded as a warranty case.
Specifications ………………….
Processor: MT8766B
Platform: Android Q
Memory: 32GB ROM + 3GB RAM
Dimensions (LxWxT): 209.4×125.2×8.7mm
Weight: 310g
Display: 800 X 1280 IPS
Network: GSM: 850/900/1800/1900MHz UMTS: 2/4/5
LTE: 2/4/5/7/12(MFBI)/13/17/25/26/41(HP UE)/66/71 (Band frequency and data speed are operator dependent.)
GPS:
Connectivity:
- Bluetooth BT5.0
- Wi-Fi 802.11a/b/g/n/ac
- 3.5mm audio jack
- USB Type C
Camera:
- 5-megapixel front camera
- 5-megapixel rear camera
Audio supported formats:
AAC LC, HE-AACv1 (AAC+), HE-AACv2 (enhanced AAC+), AAC ELD (enhanced low delay AAC), AMR-NB, AMR-WB, FLAC, MP3, MIDI, Vorbis, PCM/WAVE
Battery(¹):
Capacity: 4080mAh
Expansion Slot: microSD™ memory card (Availability of microSD card depends on the market)
Note: Specifications are subject to change without prior notice.
(1) The original battery has undergone rigorous safety inspections to meet qualification standards, the use of non-original batteries may be dangerous.
 For more information on using this device, or for frequently asked questions,
please visit us.alcatelmobile.com
BC
