
Use HomeKit Secure Video
Customize your video recording, notification, storage, and sharing options—all with HomeKit Secure Video.
What you need
- An iPhone, iPad, or iPod Touch with iOS 13.2 or later.
- The Home app set up on your iPhone, iPad, or iPod touch with the Apple ID that you use with iCloud.
- A home hub set up on an iPad, HomePod, or Apple TV.
- One or more HomeKit Secure Video cameras.
- A supported iCloud storage plan.
Set up your camera
- Check with your camera manufacturer if you need to install their iOS or iPadOS camera app for setup.
- Add your camera as an accessory in the Home app. You’ll see a notification on your device that says your camera is added. Make sure that you add your camera to the same network that your Home app is on and that the network is stable. If your network disconnects while your camera is recording, your video might not be stored.
- Follow the onscreen instructions to choose your streaming and recording settings, user permissions, and more. You can also change these settings later. When you’re finished, tap Done.
Use these steps to add all of your HomeKit Secure Video cameras to the Home app. You’ll get a notification if you reach the maximum number of recording-enabled cameras supported with your iCloud storage plan.

Change your settings
To adjust camera settings, open the Home app on your iPhone, iPad, or iPod touch. Tap the video feed, then tap Settings 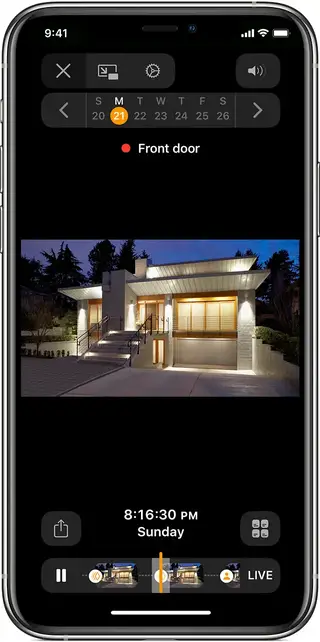 . On Mac,* Control-click the video feed, then select Settings .
- Change the name of your camera and room where it’s located. Turn on Include in Favorites to access and control your accessory in the Home tab in the Home app, in Control Center on iOS, iPadOS, or Apple TV, and with some features on your Apple Watch.
- Tap Notifications to change how you receive notifications. You can turn notifications on or off, receive them when certain motion is detected, when no one is home, and more. Notification settings might vary by camera manufacturer.
- Adjust Recording Options to choose what is recorded and which video clips are stored. Choose to stream and record when household members are at home or away, record with or without sound, or when certain motion is detected. Streaming and recording settings might vary by camera manufacturer.
- Turn on Face Recognition to be notified when people you’ve tagged in the Photos app come to your door.
Review and share your video
View your video streams and recordings in the Home tab of the Home app under Favorite Cameras, or in the room in Home app where you’ve put the camera. Members of your home can also view video streams in Control Center on Apple TV, in the Home app on Mac, or on Apple Watch. The primary Home app user can restrict which home users can view all video recordings.

To review video clips, tap the video feed in the Home app on your iPhone, iPad, or iPod touch. On Mac,* double-click the video feed in the Home app.
- Look above the video to see what time and day you’re viewing. Use the calendar above the video to view recordings on a specific day. You can view the last ten days of recorded video clip history that’s stored in iCloud.
- Use the video timeline at the bottom of the screen to play or pause the recording, or use the timeline to move back or forward in the video. If you see a person, animal, or car icon on the timeline, tap or click the icon to watch a recorded video clip from when your home hub detected motion. On iPhone, iPad, or iPod touch, pinch the timeline with two fingers to zoom in and see your frames in more detail.
- To share your video clips with other people, apps, or save them to iCloud or Photos, tap or click
 .
.
- Tap or click to view other accessories located in the same room as your camera in the Home app.
Do more with the Home app
- Set up Face Recognition in the Home app to get notified the moment a visitor arrives at your door.
- Create home automations based on time, who’s home, when an accessory detects something, and more.
- Invite others to control your home and edit user permissions.
- Turn on notifications and check the status of your home.