User Manual
Dashboard Camera
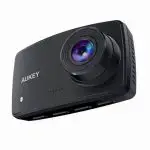
Thank you for purchasing the AUKEY DRS1 4K Dash Camera. Please read this user manual carefully and keep it for future reference. If you need any assistance, please contact our support team with your product model number and Amazon order number.
Package Contents
4K Dash Camera
Dual-Port USB Car Charger
4m / 13ft USB Mini-B Cable
Sticker Mount
Two 3M Stickers
Suction Mount
Six Cable Clips
Trim Removal Tool
User Manual
Warranty Card
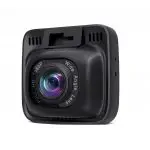
Product Diagram

Specifications
| Model | DRSI |
| Image Sensor | IMX415 |
| CPU | NT96670 |
| Screen | 2″ LCD |
| Angle of View | 170° |
| Aperture | f/1.8 |
| Exposure Value | -1.0. -2/3. -1/3. +0.0, +1/3, +2/3, +1.0 |
| Recording Resolutions | 4K 130(ps), 1600p 130(ps). 1440p (30fps)•
1296P 130114. 1060P (120fPs). 1080P 160flps6 720p (1201p). 720p (60f psi, 720p paps) |
| Recording Modes | Loop, Motion Defection, Time-lapse-and Emergency Recording |
| Video Format | MOV |
| Recording Modes | Loop, Motion Defection, Time-Lapse, and Emergency Recording |
| Image Format | JPEG |
| Sound Recording | On / Off |
| Gravity Sensor Sensitivity | Low / Medium / High / Off |
| RAM | 2GB DDR3 |
| Internal Storage | 8MB SPI Flash |
| MicroSD Card | Class 10 or higher, 128GB Max |
| Input | DC 5V 1.5A |
| Operating Temperature | 0°C – 65°C / 32°F – 149°F |
| Materials | ABS, PC. glass |
| Dimensions | 63.2 x 63.5 x 33.4mm / 2.49″ x 2.5″ x 1.32″ |
| Weight | 70g |
System LED Indicators
| LED Status Indicator | Meaning |
| Solid Green | On; not recording |
| Flashing Green | On; recording |
Control Buttons
| Button | Recording Mode | Playlist & Setup Menu | Playback Mode |
 |
Enter Emergency Recording mode |
Return to previous menu | Return to playlist / Stop |
 |
View playlist (short press) Turn on/off Audio Recording (long press) | Move up | Delete/Rewind |
| Open Setup menu (short press)
Take a snapshot (long press) |
Move down | Lock & Unlock / Fast-forward | |
| OK | Turn on/off the screen (short press)
Turn on/off dash camera Wi-H (long press) |
Enter/Confirm | Play/Pause |
 |
Long-press to turn off the dash camera when connected to car power. Long-press again to turn it back on | ||
| Reset Button | Press and hold for 7 seconds to restart the dash camera (this won’t affect saved files) | ||
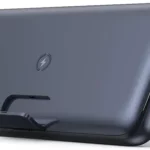
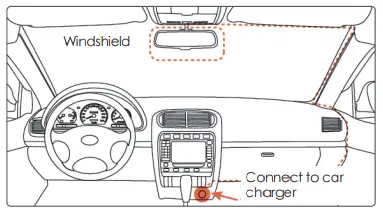
Installing the Dash Camera
For optimal performance, install the AUKEY DRS1 in the top center of your windshield, facing directly ahead. Use the cable clips to help fix the power cable conveniently and safely like in the picture below.

Caution: AUKEY is not responsible for any damage caused to or by the airbag due to the incorrect placement of the device or its cables. To power on, insert the car charger into your car’s 12V socket, then connect the included cable to the car charger and to the mini-B port of the DRS1. Insert a microSD card into the microSD card slot and format it using the ‘Format’ option in Dash Camera ‘Setup.’ After powering on each time, the system will start recording automatically. To power off, long-press the power button or disconnect the USB mini-B cable.
Note: Use the included cable to ensure the optimum performance of AUKEY DRS1.
Setting Up the AukeyDash App
Install and use the ‘AukeyDash’ dash camera app to download, view, and share your footage, and to conveniently change dash camera settings with a smartphone or tablet.
- Download the ‘AukeyDash’ app from the Apple App Store / Google Play and install it
- Open the app. Tap ‘Get Started’ and then ‘Add a dash cam’
- Power on the dash camera and then tap ‘Next’ in the app
- Long-press the dash camera ‘OK’ button to turn on dash camera Wi-Fi (an icon will appear in the top-left of the screen)
- Tap ‘Next’ and then ‘WiFi settings in the app
- Find and connect to the dash camera Wi-Fi on your phone. The Wi-Fi name and password is displayed at the bottom of the dash camera screen. Tap the ‘Connect succeeded’ confirmation
- To watch the dash camera videos on your phone, tap ‘View’
Video Recording
- Loop Recording: Recording will begin automatically after powering on with a microSD card in the dash camera. Each recorded file is up to ten minutes long, with old footage being replaced when microSD card storage is full
- Motion Detection Recording: Switch on motion detection in ‘Setup.’ This function is designed to monitor when you’ve parked and left your vehicle but requires a continuous power supply. It will record video each time motion is detected
- Time-Lapse Recording: Switch on time-lapse recording in ‘Setup.’ This function will capture a picture per second to make a video played at 30fps. The videos will be saved in the ‘Video File’ folder
Note: Time-Lapse Recording isn’t suitable for monitoring purposes while driving.
Emergency Recording
- Manual File Backup
Pressto back up the current file so that it won’t be overwritten. A an icon will appear in the top left of the LCD screen to indicate a protected emergency recording is in progress - Auto File Backup
Once the G-sensor is activated by a sudden impact, the dash camera will automatically make a recording and protect it from being overwritten. Adjust G-sensor sensitivity in the ‘Setup’ menu
Note: Enter the playlist or setup menu (or disconnect power) to end emergency recording mode
Snapshot
- Hold down
 for 3 seconds to take a snapshot while in recording mode
 - The snapshot files are located in the AUKEYPHOTO folder on the microSD card
- The
 icon will be shown after you take a snapshot. This won’t interrupt the video recording
Audio Recording
Turn on/off audio recording by long-pressing when in recording mode (or by adjusting in the ‘Setup’ menu). Voicing details of possible hazards that may develop, especially when off-camera, may provide useful information. You can even use it to record car license plate numbers that may not be captured on the video.
Viewing Photos and Videos
Viewing Photos and Videos
- Press to enter the playlist
- View photos or videos by choosing either Photo File’ or ‘Video File’
- Select the file you want to view and press OK
- For videos, press OK again to begin playback
Deleting and Locking/Unlocking Photos and Videos
- Pressto delete or lock/unlock a photo or video file after selecting it from the playlist. If a video is being played, pressto stop it and then press to delete orto lock/unlock
- Once deleted, photos and videos can’t be recovered
- If you lock a photo or video, it will be protected and not overwritten
MicroSD Card File Transfer
- Shut down the dash camera and eject the microSD card
- Insert the microSD card Into a computer microSD card slot or reader and your computer will automatically detect the microSD card
- Find the video recording files located in the AUKEYWOVIE folder for AUKEY PHOTO for snapshots)
- Copy the files to your computer
Product Care and Use
- Keep away from liquids, extreme heat, and strong magnetic fields
- Avoid touching the lens surface. It may be cleaned with a cotton swab or lens cleaning paper. If any dirt is difficult to remove, a non-abrasive glasses lens cleaner may be used. Don’t use corrosive solutions
- Keep important videos and photos backed up elsewhere to protect against file corruption or loss caused by any SD card issues
- If the dash camera stops working, press and hold the reset button for 7 seconds to restart it (this won’t affect saved files)
Warranty and Customer Support
For questions. support, or warranty claims, contact us at the address below that corresponds with your region. Please include your Amazon order number and product model number.
Amazon US orders: [email protected]
Amazon EU orders: [email protected]
Amazon CA orders: [email protected]
*Please note. AUKEY con only provide offer sales service for products purchased Madly from AUKEY. If you have purchased from o different seller. please contact them directly for service or warranty issues.
FCC Statement
Any changes or modifications not expressly approved by the party responsible for compliance could void the user’s authority to operate the equipment. This equipment has been tested and found to comply with the knits for a Coss B digital device, pursuant to Part 15 of the FCC Rules. These limits are designed to provide reasonable protection against harmful interference in a residential installation. This equipment generates uses and can radiate radio frequency energy and, if not installed and used in accordance with the instructions, may cause harmful interference to radio communications. However, there is no guarantee that interference wit did not occur in a particular installation. If this equipment does cause harmful interference to radio or television reception, which can be determined by turning the equipment off and on, the user is encouraged to try to correct the interference by one or more of the following measures:
— Reorient or relocate the receiving antenna.
— Increase the separation between the equipment and receiver.
— Connect the equipment into an outlet on a circuit different from that to which the receiver is connected.
— Consult the dealer or an experienced radio/TV technician for help. This device complies with part 15 of the FCC Rules. Operation is subject to the following Iwo conditions:(I) This device may not cause harmful interference, and (2) this device must accept any interference received, including interference that may cause undesired operation. Changes or modifications not expressly approved by the party responsible for compliance could void the user’s authority to operate the equipment. This equipment complies with FCC radiation exposure limits set forth for an uncontrolled environment. This equipment should be installed and operated with a minimum distance of 20cm between the radiator & your body.
Aukey Technology Co., Ltd
www.aukey.com | [email protected]
Room 102, Building P09, South China City
Electronic trading center, Longgang District,
Shenzhen, Guangdong, 518111, CN

FCC ID: 2ATIH-DRS1