
Avantree Audition Pro Low Latency Bluetooth Headphones
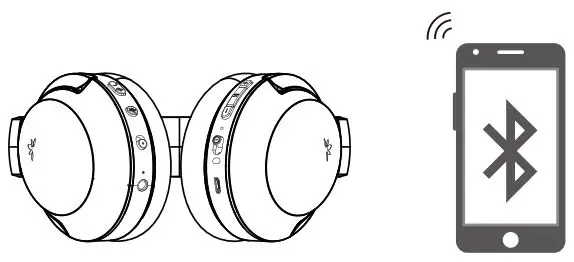
Connect Audition Pro with Phone/ Tablet/ Bluetooth-enabled TV
Set
Search
Connect
Connect Audition Pro with Bluetooth Transmitter (eg. Priva II) for watching TV
Step 1:
Connect the transmitter with 1V. For details, please visit support.avantree.com, search Priva II connect to 1V.
Step 2:
Connect Audition Pro with the Bluetooth transmitter.
Pair
Connect
Enjoy
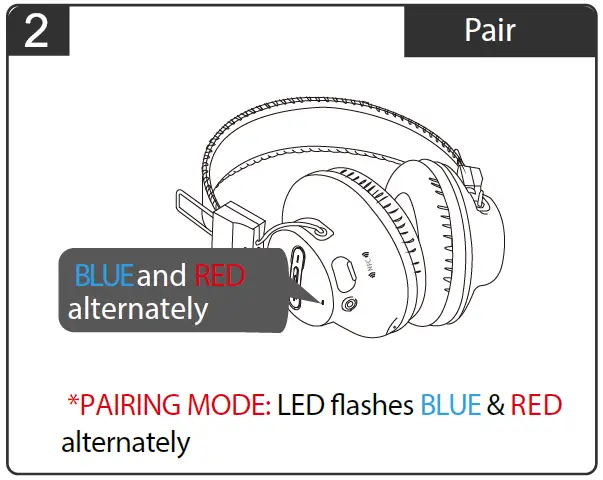
*PAIRING MODE: Discoverable mode for Bluetooth devic.e, normally the LED blinks quickly or flashes two colors alternately.
Connect with Windows PC, Macbook, Saturn Pro, Priva II, DG405 Visit support.avantree.com, search Audition Pro for video guide and instructions.
]]>![]()
User Manual
![]()
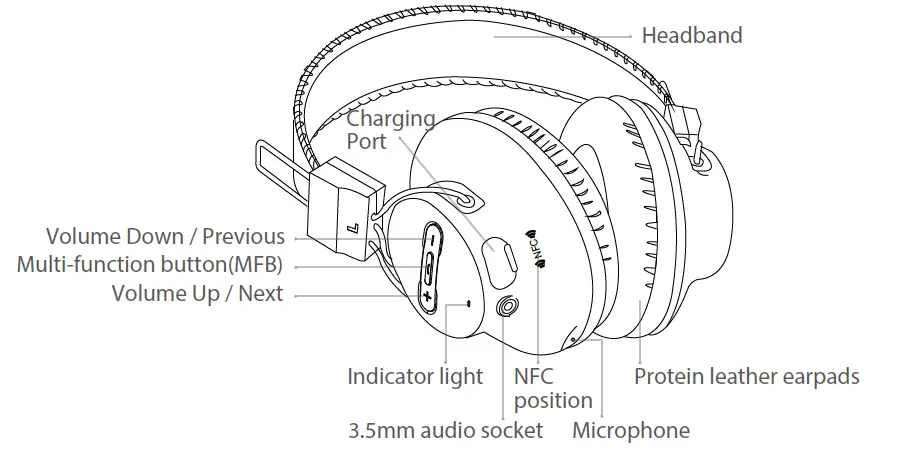
Overview
![]()
LED indication
| Status | LED Indicator |
| Power on | All LED light up for 2 seconds |
| Pairing |  flash and alternately flash and alternately |
| Connected | turn solid |
| Reconnecting | flash every 2 seconds |
| Valid optical audio signal | OPT lights up |
| Invalid optical audio signal | OPT flashes |
| Valid analogue audio signal | AUX lights up |
| Invalid analogue audio signal | AUX flashes |
| Audio Playing on PC | USB lights up |
| Connected using the aptX LOW LATENCY codec | LL turn solid light |
| Connected using the aptX codec | APTX turn solid light |
| Connected using the FastStream codec | FS turn solid light |
| Connected using the SBC codec | SBC turn solid light |
1
Pair and connect to Bluetooth headphones
Powering up the transmitter
Power up the transmitter using the USB cable provided. Connect it to either TV USB port (TV must be ON to provide power) or a 5V/500mA-2A rated USB charger (e.g. your phone charger should work.) Then slide the ON/OFF switch to ON. All LED lights will light up for 2 seconds upon powering on.
Enter the transmitter into PAIRING MODE
For first time use, the transmitter will enter pairing mode automatically, the next to A will flash and alternately. For non-first-time use, press and hold A for 1 second to enter pairing mode.
Enter your headphones/speakers into PAIRING MODE
Please refer to relevant user manual (Usually LED on headphone flash and alternately or flash quickly)
Connecting
During the pairing process, keep the devices close to each other and wait. Once connected, the next to A will turn SOLID .
Reconnect
NO need to manually reconnect the transmitter to your device before each use. The transmitter will automatically reconnect to the last connected device within 5-10 seconds after both devices had been powered on. Alternatively, reboot the transmitter and wait 5 -10 seconds for them to reconnect.
If the next to A on the transmitter turn solid , it confirms that the connection between the transmitter and headphones is working normally. The next step is to feed the audio from your TV into the transmitter.
After you’ve connected the transmitter to your TV/audio while following the steps shown in the sections below, if you still cannot hear anything through your headphones, please either adjust your TV audio output setting as suggested or contact your TV manufacturer for support.
Use with your TV
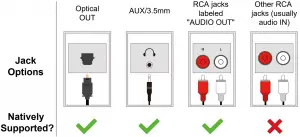
Check your TV output options before the set up
2
TVs with OPTICAL audio out
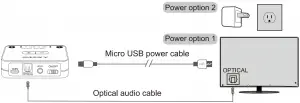
After connecting your optical cable as above, go to your TV audio settings and change your “audio format” to “PCM”. Usually, now the “OPT” indicator on the Audikast Plus will change to SOLID WHITE, and now you should be able to hear your TV/audio source through your headphones.
If not:
1) Ensure that your TV Speaker is set to “External Speaker.”
2) Ensure that your TV’s “DOLBY/DTS” is set to OFF (NOT auto.)
3) Ensure the audio cable is good and fully plugged.
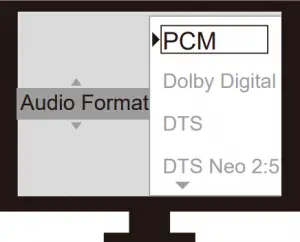
Set TV Audio Format to “PCM” (IMPORTANT)
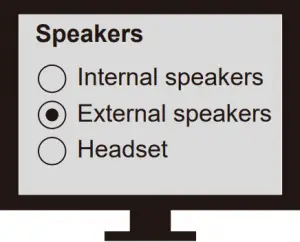
Set TV speaker to “External Speaker”
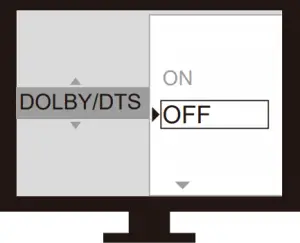
Set “DOLBY/DTS” to OFF
Note:
Please make sure that you keep the 3.5mm AUX jack “vacant” while using the OPTICAL out. (If anything is plugged into the AUX jack, the transmitter will default to the AUX signal and ignore any OPTICAL input.)
TVs with AUX 3.5mm audio out

3
After connecting your audio cable as above, once the VALID audio signal is detected, the “AUX” indicator on the Audikast Plus will light up SOLID WHITE, and you should be able to hear your TV/audio source through your headphones.
If not:
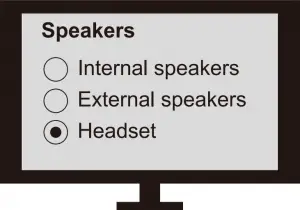
1) Ensure your TV speaker setting is set to “Headset.”
2) Plug a pair of wired headphones into the headphones jack you’re using with the Audikast Plus on TV. See if you can hear anything.
3) Turn up the volume and see if it helps.
4) Ensure the audio cable is good and fully plugged.
TVs with RCA audio out(Red/White ports labeled “AUDIO OUT”)
After connecting your audio cable as above, once the VALID audio signal is detected, the “AUX” indicator on the Audikast Plus will light up SOLID WHITE, and you should be able to hear your TV/audio source through your headphones;
If not:
1) Ensure that you’re using the TV Red/White ports labeled “” other Red/White ports will NOT work.
2) Ensure that your TV Speaker setting is set to “External Speaker.”
3) Plug a pair of wired headphones into the RCA jack you’re using with the Audikast Plus on TV. See if you can hear anything.
4) Turn up the volume and see if it helps
4
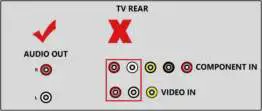
Use the right RCA ports Set TV speaker to “External Speaker”
Use with your AV Receiver with 6.35mm PHONE jack
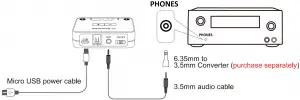
Notes:
1) If you’d like to connect the Audikast Plus to your AV Receiver, please ONLY use the “PHONES” jack on front side of your receiver to avoid damaging the Audikast Plus. You WILL need to purchase an additional “6.35mm to 3.5mm” adapter.
2) To avoid damaging your hearing, we recommended turning down the volume of your receiver before use.
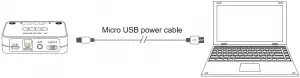
Use with your PC/Laptop
5
Note:
If you’d like to use an USB cable that’s not provided by us, please ensure that the USB cable supports both data syncing and power.
After connecting the micro USB cable as above, you should be able to hear from your computer through your headphones, and the “USB” indicator on the transmitter will light up; if not:
Right-click the speaker icon on the bottom-right corner of the PC/laptop screen and select “Playback devices.” In there, set “Avantree Audikast Plus” as “Default Device.”

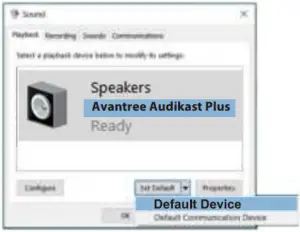
Set Avantree Audikast Plus as the playback device
To use the Audikast Plus as a microphone device, please go to your audio settings and select “Avantree Audikast Plus” as “Microphone and Speaker device.”
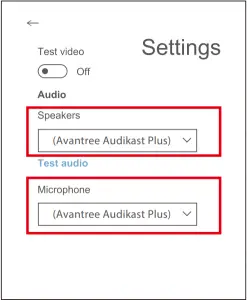
Set Avantree Audikast Plus as the Speakers and Microphone
Add a 2
Step 1: Pair and connect the transmitter to the 1st Bluetooth headphone.
Step 2: Enter the transmitter into PAIRING MODE manually – press and hold B for 1 second. The close to B will flash and alternately.
Step 3: Place your 2nd set of headphones into Bluetooth PAIRING MODE (please refer to your 2nd headphones’ user manual.)
Step 4: Keep the two devices close to each other and wait. Once connected, the close to B on the transmitter will turn SOLID .
6
Clear paired history
Press and hold both + and – simultaneously for 7 seconds. BOTH of the indicators will light up and (looks like ) for 5 seconds, indicating that the history has been cleared.
Adjust volume
Click or press volume control +/- once to adjust the volume. “Beep” sounds indicate that it has reached max/min volume level.
Troubleshooting
Not working/ no sound
1. The Audikast Plus and headphones are not connected properly
Re-pair and connect them, once connected successfully, close to A / B turn SOLID .
2. No audio signal into the Audikast Plus
Please adjust your TV audio output setting as suggested in Point Connect the transmitter to your TV/audio source or contact your TV manufacturer for support.
Audio delay
Bluetooth headphone is NOT aptX LL supported – If your Bluetooth headphone does not support aptX LOW LATENCY (e.g. Bose, Beats, Sony), it will work with the Audikast Plus using SBC or aptX codec and will experience a 70-220ms latency.
Short range / audio cuts
Unstable Bluetooth connection – Clear paired history of BOTH Audikast Plus and headphones.
Wireless signal interference – Move away any potential wireless interference devices, such as the WIFI router, Apple TV, Chromecast stick, Roku stick, any other RF audio transmitters etc.
Short work range of headphone – Work range is decided by devices on BOTH ends. Please test the work range of headphone is ok – test it with your smart phone.
Source issue – When you play an internet source from PC, Mac or cellphone, quite often, the audio cuts are Internet bandwidth / speed related. Please test with local source Bluetooth streaming and check again.
More FAQs at:
https://support.avantree.com/hc/en-us/sections/360003285831-TC418P-BTTC-418P-BLK-
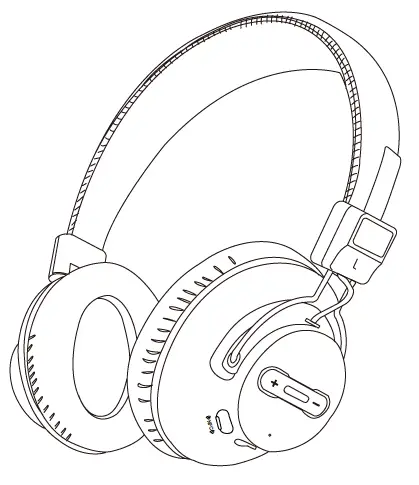
Avantree Wireless ANC Headphones
BTHS-AS90 User Manual
Product Specifications
- Bluetooth version: V4.1
- Support profiles: HFP, HSP, A2DP, AVRCP
- Supported audio format(s): SBC, FastStream
- Driver diameter: 40mm
- Impedance: 32ohm
- Frequency response: 20Hz-20KHz
- Effective Range: Line of sight approx. 30 ft (10m)
- Working time: Up to 35 hours music time
- Charging time: approx. 2 hours
- Ear pads inner diameter: 6cm (length)* 3.7cm(width)
- Ear pads outer diameter: 9.5cm (length)* 7.5cm(width)
- Product weight: 230g
Please read this User Guide carefully and keep it handy
For more AS90 product information please see support.avantree.com or search “AS90” or “Avantree Aria” on www.avantree.com
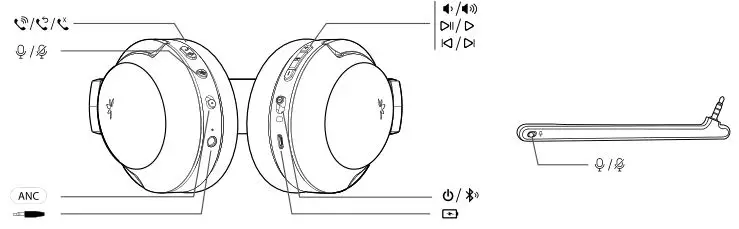
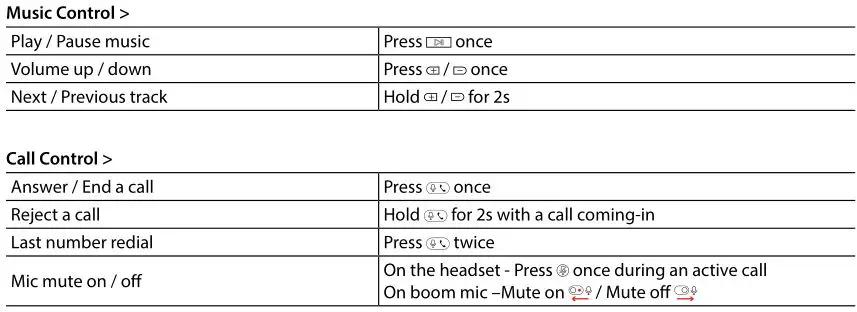
Basic Operation

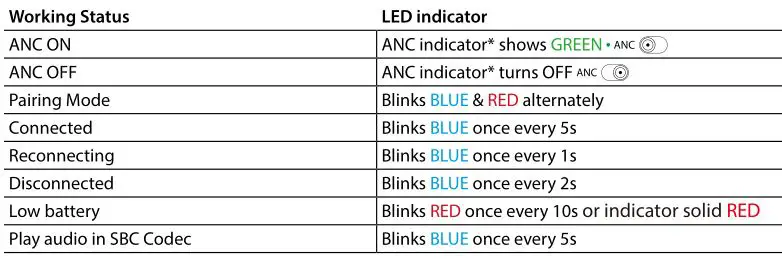
LED indicator
Activate noise cancellation (ANC)

After power ON, slide ANC switch to “ANC” to activate the ANC function. The ANC LED light will turn GREEN.
Slide ANC switch opposite to “ANC” to deactivate ANC function, the ANC LED will turn off.
Note:
• You will NOT be able to use the ANC function when the headphones’ battery is low.
• If you want to use the ANC function in wired mode, please power ON the headphones first.
Connect to a Bluetooth device
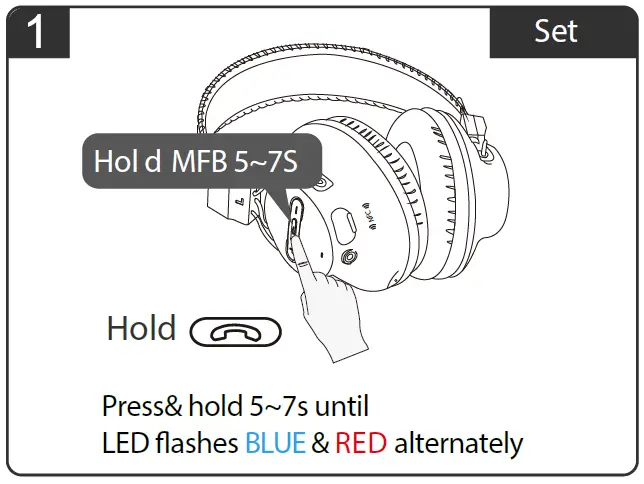
- Enter headphones into PAIRNG MODE – Slide the power switch to position and hold for 3s until the LED flashes BLUE and RED alternately.
- On your mobile device – Turn on Bluetooth and select “Avantree AS90” to connect. If you are using a Bluetooth
transmitter, please enter your transmitter into PAIRING MODE (please refer to your transmitter’s user manual).
Reconnect to Bluetooth device
Normally, once powered on, the headphones will reconnect to the last connected device automatically within 5-10 seconds.
If it doesn’t, please slide the Power Switch to position ONCE, OR select “Avantree AS90” from your device to connect manually. (If you’re using a Bluetooth transmitter, please refer its user manual to reconnect)
Using as a wired headphone
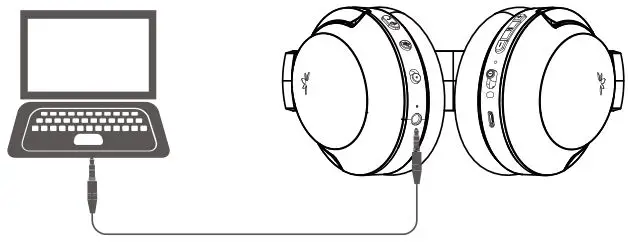
You may use the supplied 3.5mm audio cable to connect to a non-Bluetooth device.
Note: The control buttons, the built-in mic, and the detachable boom mic DOES NOT work in wired mode.
Note: If you wish to use the ANC function in wired mode, please turn on the headphones first.
Charging
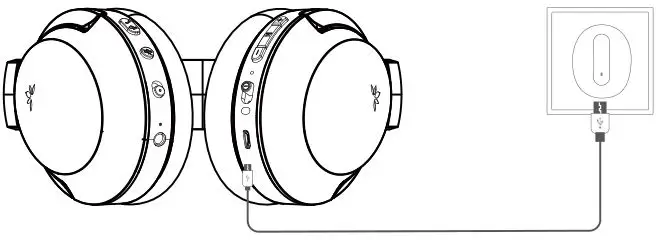
When the LED starts blinking RED once every 10s or indicator solid RED , or when you hear “beep” / prompts sound, you should recharge your headphones. Please plug it into a USB wall charger (DC 5V / 0.5-2A) or a powered USB port via the micro USB cable that we provided.
Normally it takes 2 hours to fully recharge. The LED indicator on the headphones will remain RED while charging and automatically turn o when the charging is complete.
Clear the headphones pairing history
Turn on the headset (Non-calling Status.) Press and hold both and for 5 seconds until the LED blinks PINK for 2 seconds. Now the pairing history has been cleared. The headphones will enter PAIRING MODE automatically (LED blinks Blue and Red alternately) and you’ll be able to pair it with the target Bluetooth device again.
Troubleshooting
No sound with PC?
- Set Avantree AS90 as the default device or output device on the PC.
- When using AS90 to make VOIP calls through apps, please set AS90 Hands-Free as Microphone and Speakers device.
No sound with Bluetooth transmitter when watching TV?
- Ensure Bluetooth transmitter and headphones are connected properly.
- Check to ensure audio source is functioning properly
- AUX & RCA output on TV – test with wired headphones
- OPT output on TV – Set audio format to “PCM/LPCM” or turnoff Dolby/DTS
- Change your TV audio out setting to “External speakers /Headset.”
Headphones do not pair with Bluetooth device?
- Ensure that the AS90 is in Pairing mode – LED flashing BLUE and RED alternately.
- For Bluetooth transmitters, please ensure that the transmitter is in Pairing mode – you may refer to its user manual.
- For Smart phones, tablets and PC
- Turn the Bluetooth off and then on again.
- Delete “Avantree AS90” headphones from your device’s Bluetooth list and try to pair again.
- Clear the headphone’s pairing history and pair again.
Avantree Audition Headphone

Product Info
Pair with your phone
Step-1
Step-2
Step-3
Step-4
More FAQs on support.avantree.com
Video user guide: Search “Product Name” on Youtube.com
Telephone support refer to http://www.avantree.com/contact-us
Email support: [email protected]
]]>User Manual
Wireless Personal Speaker
Model No.: BTSP-NB05
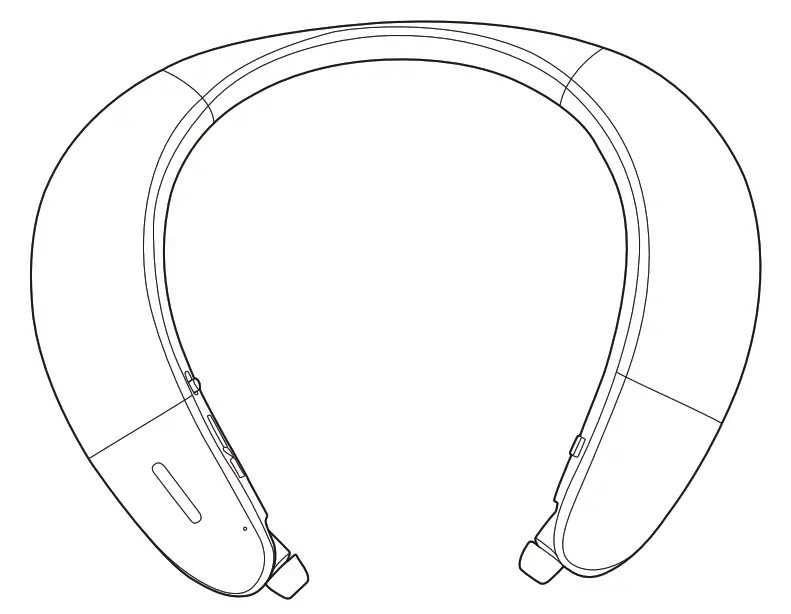
Product Overview
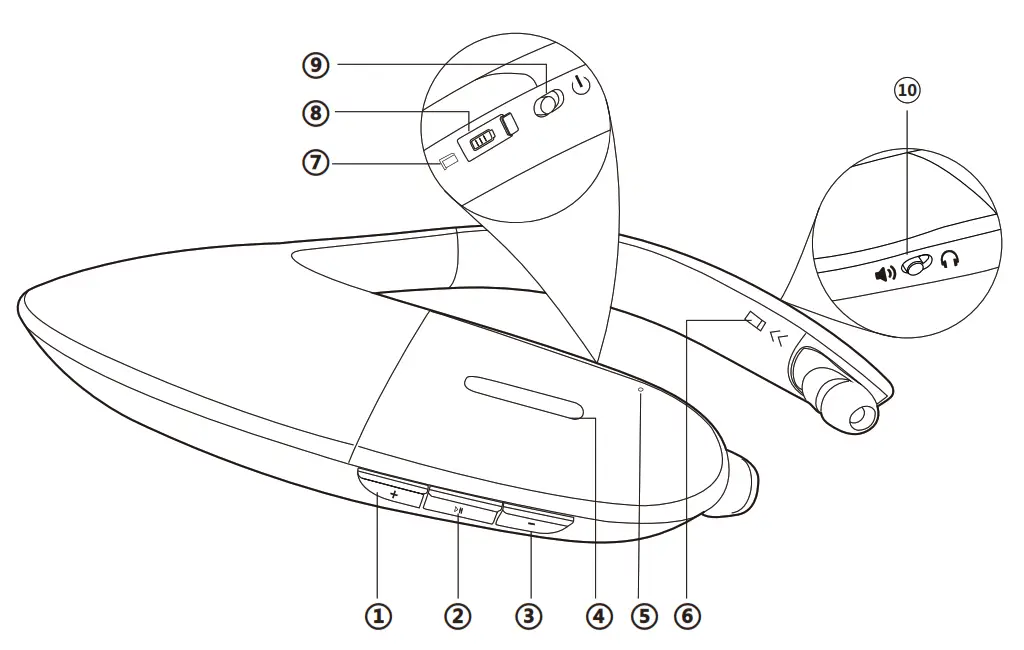
1. Volume up
2. Multi-function button
3. Volume down
4. LED indicator
5. Microphone
6. Retractable earbud control (L)
7. Retractable earbud control (R)
8. Charging port
9. Power/off
10. Speaker/earphone mode switch
Basic operation
| Function | Operation |
| General function | |
| Power on/off | Slide power switch to (lb position for 1 second |
| Pair | Press and hold NI for 5 seconds |
| Switch between speaker and earphone | Slide Speaker/earphone mode switch to  |
| Retract the earphone | Click » to retract the earphone |
| Music control | |
| Play/pause | Click NI once |
| Volume up/down | Click +/- once |
| Next/previous track | Press and hold +/- |
| Call control | |
| Answer/enda call | Click  once once |
| Reject a call | Press and hold |
| Activate Siri | Double click |
| End the 1st call to answer the 2nd call | Click once |
LED indicators
| Status | LED indicator |
| Pairing | LED flashes RED and BLUE alternately |
| Connected via aptX-HD Codec | Flash 4-times every 5 seconds |
| Connected via aptX-LL or FastStream Codec | Solid light |
| Connected via aptX Codec | Triple-Flash every 5 seconds |
| Connected via AAC Codec | Double-Flash every 5 seconds |
| Connected via SBC | Single-Flash every 5 seconds |
| Factory Reset / Clear pairing history | LED lights up RED and BLUE together (looks PINK) for 5 seconds |
| Low battery | LED flashes RED 4timesevery 5 minutes |
Voice prompts
| Status | LED indicator |
| Power on/off | “Power on””Power off” |
| Battery level | After power on: “Battery full” “Battery level high” “Battery level medium” 30 minutes before running out of power: “Battery level low” |
| Connected | “Connected” |
| Factory Reset / Clear Pairing History | Two “beeps” |
| Disconnected manually | “Disconnected” |
| Beyond the range of connections | “Beyond the range of connections” |
| Highest volume | One “beep” |
| Lowest volume | “du” |
Connect to a Bluetooth device
- Enter the NB05 into PAIRING MODE–For 1st use, once turned on, NB05 will enter pairing mode automatically, LED flashes RED & BLUE with a“pairing” voice prompt.For non-1st use, press & hold for 5 secondsto manually enter pairing mode.
- On your device –Activate Bluetooth and select “AvantreeNB05” to connect.If you are using a Bluetooth transmitter, enter your transmitter into PAIRING MODE (Please refer to your transmitter’s user manual).
- Once connected, you’ll hear a“connected” voice prompt from NB05.
Notes:
The NB05 will automatically turn off if 1) it fails to pair with another device within 2 minutes.
2) it’s kept out of the connection range for over 10 minutes.
Connect with two Bluetooth devices simultaneously
- Connect the NB05 to the FIRST device as shown above.
- Enter the NB05 into PAIRING MODE again, your 1st device will disconnect from NB05. Then Activate Bluetooth and select “Avantree NB05” on your 2nd device to connect.
- Now select “Avantree NB05” on your 1st device to connect to NB05.
NB05 is now connected with both of your devices.
Note: This feature only works for two mobile devices, such as cellphones and tablets. It doesn’t work for PCs or Bluetooth transmitters.
Reconnect to Bluetooth device
Once powered on, the NB05 should automatically reconnect to the most recently connected device within 5 seconds. If it can’t reconnect within 5 seconds, please select “Avantree NB05” on your device to connect manually. (If you’re using a Bluetooth transmitter, please refer to its user manual.)
Factory Reset / Clear pairing history
You may need to factory reset the NB05 when you experience short range, audio cuts, or cannot reconnect/pair.
Turn on the NB05. Press and holdthe“+” and the“-“buttons together for 5seconds, the LED indicator will light up RED and BLUE together(looks PINK) for 5seconds, and you’ll hear two “beeps”. Now the NB05 has been successfully reset and will enter pairing mode automatically with the LED indicatorflashing RED and BLUE alternately.
Charging
When you hear “battery level low”, you should recharge the NB05. Please plug it into a USB wall charger (DC 5V / 0.5-2A) or a powered USB port via the micro USB cable that we provided.
Normally it takes 3 hours to fully recharge. LED indicator will show RED while charging and automatically turn off when the charging is complete.
]]>