BALDR B0340WST2H2R-V7 Weather Station
User Manual

1.PRODUCT OVERVIEW
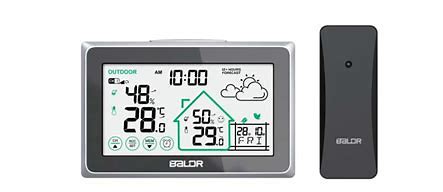
1.1 WEATHER STATION (MAIN UNIT)
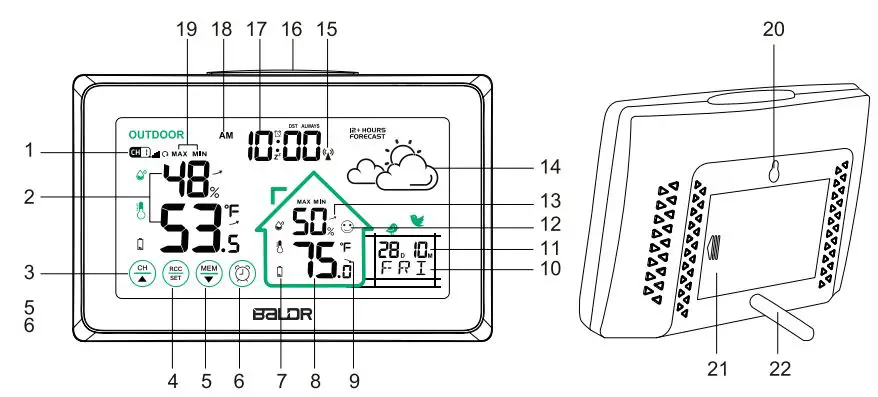
- Outdoor Sensor Channel Indicator From CH1 ,CH2,CH3 to Circular Channels model
- Current Outdoor Temperature and Humidity
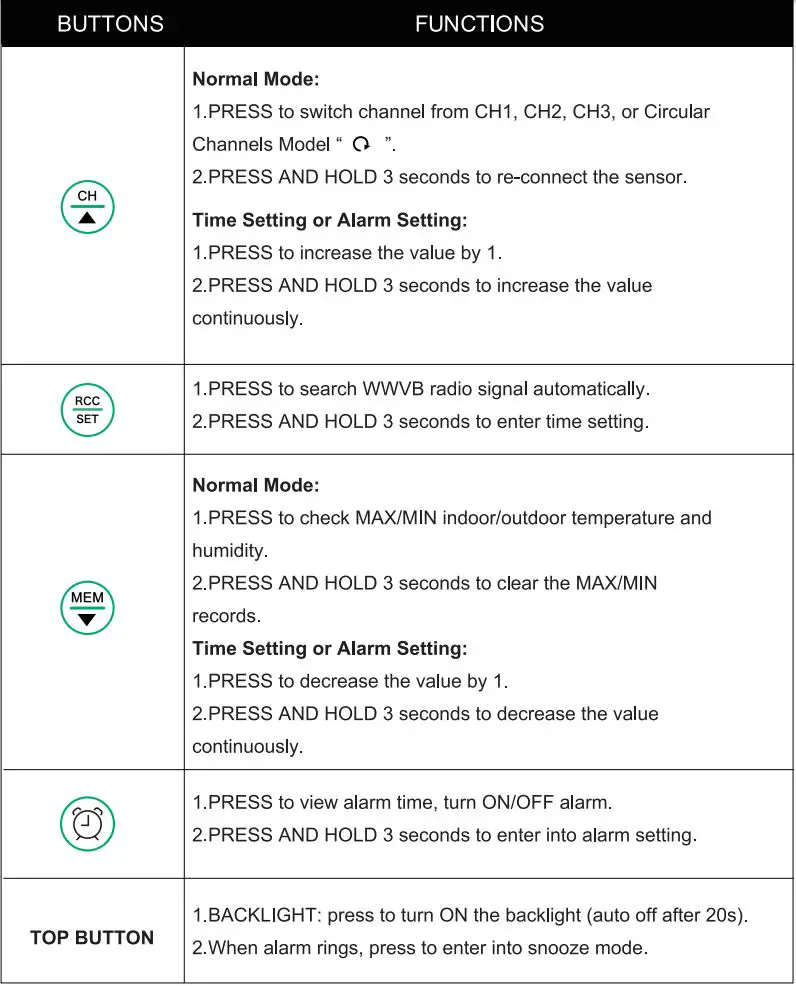
- “CH/▲” Button Switch channel, re-connect to sensor or increase the value
- “RCC/SET” Button RCC function or enter into time setting
- “MEM/▼” Button Check or clear MAX/MIN records, decrease the value
- Button Check or enter into alarm selling
- Low Battery Indicator Remind to replace the new batteries
- Current Indoor Temperature and Humidity
- Temperature Trend Arrow
- Weekday abbreviation in 7 Languages
- Calendar Display Month/date or date/month optional
- Comfort Level Indicator
- Humidity Trend Arrow
- Weather Forecast Icon Weather forecast for next 12-24 hours
- RCC Function Symbol
- Backlight/Snooze Button (at top position) Backlight auto off after 20 seconds, 5 minutes snooze time
- Current Time 12/24 hours display format optional
- AM/PM for 12H Display Format
- Max/Min Records of Indoor/Outdoor Temperature and Humidity Auto update at 0:00 each day
- Hanging Hole
- Battery Compartment Cover
- Removable Stand Stored in the battery compartment
1.2 BUTTONS INTRODUCTION
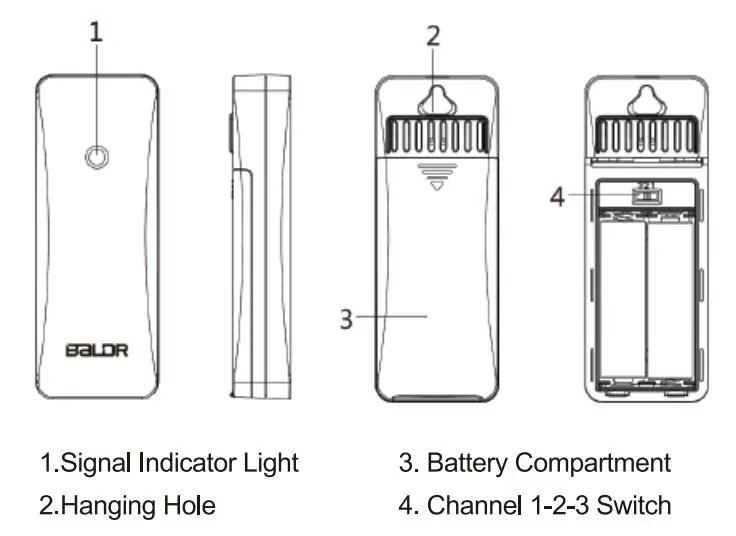
1.3 REMOTE SENSOR
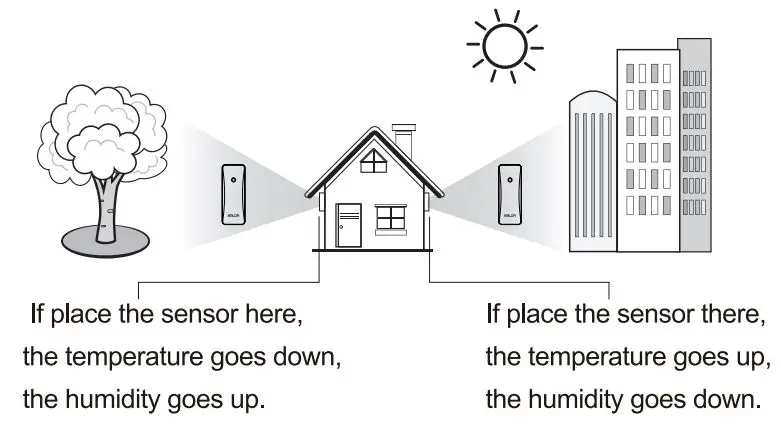
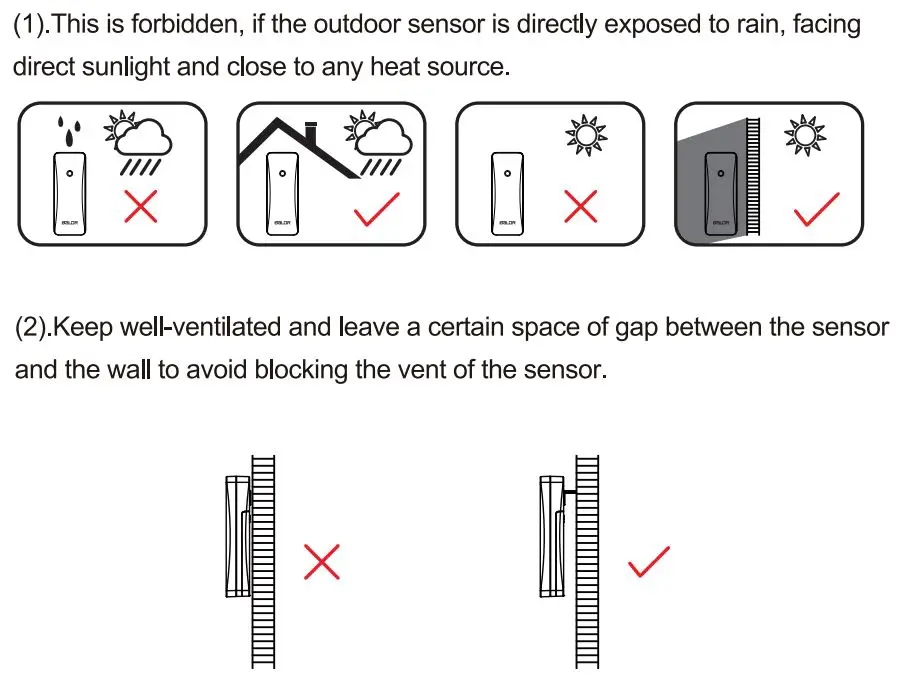
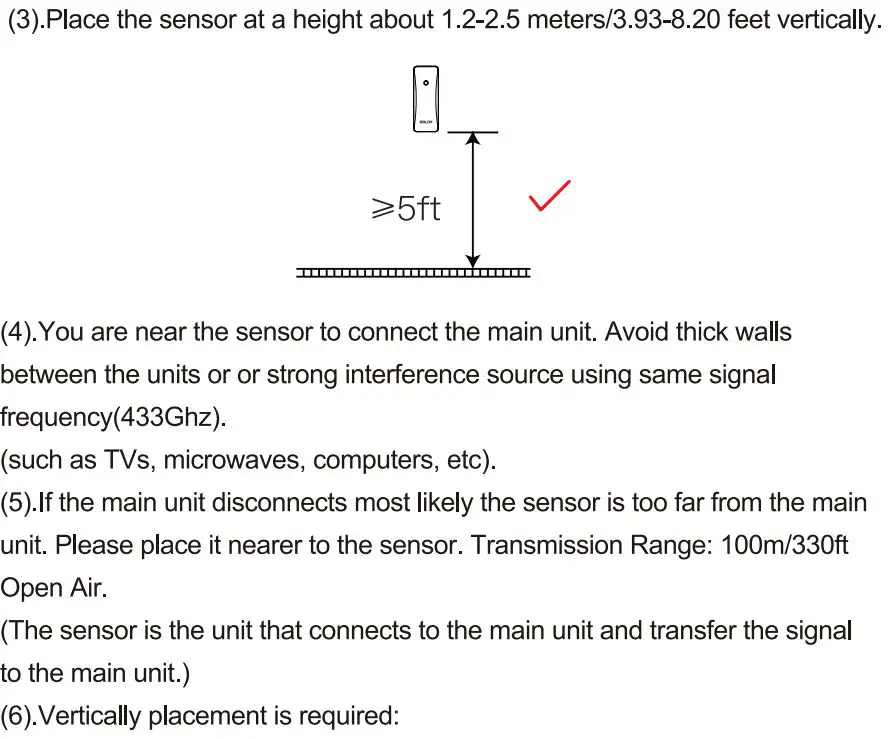
![]() To get accurate readings, please keep the main unit away from any unusual source of heat or cold and make sure that the outdoor sensor is also protected from direct sunlight, rain, or the heat it may experience from being mounted on a warm wall, or be closed near to a warm wall.
To get accurate readings, please keep the main unit away from any unusual source of heat or cold and make sure that the outdoor sensor is also protected from direct sunlight, rain, or the heat it may experience from being mounted on a warm wall, or be closed near to a warm wall.
2. PACKAGING INCLUDES
Following contents are included in the packaging:
1 x Weather Station Main Unit (not included 3 x AAA batteries)
1 x Remote Sensor (not included 2x AA batteries)
1 x User Manual
3. QUICK SET-UP GUIDE
![]() NOTE: Prepare new and high quality alkaline batteries. Do not mix old and new batteries. Heavy duty or rechargeable batteries are not recommended.
NOTE: Prepare new and high quality alkaline batteries. Do not mix old and new batteries. Heavy duty or rechargeable batteries are not recommended.
3.1 POWER UP
- Remove the main unit’s battery compartment cover, insert 3 new AAA batteries in the back of the display console (please take note of the battery polarity before inserting the batteries).
Note: The display will beep once and all of the LCD segments will light up 1 for few seconds to verify all segments are operating properly, then display indoor temperature and humidity immediately. - Take out the metal stand inside the battery compartment and screw it into the hole at the main unit’s backside. Install the battery compartment cover.
- Remove the sensor’s battery compartment cover, set the channel to CH1, then insert 2 new AA batteries of sensor within 3 MINUTES.
Notes:
- Make sure outside sensor and weather station main unit at the same channel.
- Do not touch any buttons in the 3 MINUTES to avoid sensor searching be terminated.
- The main unit will automatically receive sensor’s RF signal in 3 MINUTES after ii powered on. During receiving ,signal icon .
 will flashing, if no signal received within 3 minutes, it will stop receiving, and you can press and hold the “CH/▲” Button 3 seconds to receive again.
3.2 RCC FUNCTION
After the 3 MINUTES RF signal receiving, the main unit will start searching WWVB radio signal for 7 minutes.
- The antenna symbol “▲” will flashing during receiving time, if signal received, the main unit will display the received time/month/date/weekday with symbol “
 “displaying on screen.
 - Auto receiving RCC signal at UTC 7:00, 8:00, 9:00, 10:00, and 11 :00 each day. It starts receiving RCC signal at UTC 7:00 everyday, once signal is received at any above time, it will stop receiving signal that day.
- Manual receiving: press and hold “RCC/SET” button to enter RCC signal receiving.
- During receiving, no response if press other buttons, you can press and hold ”RCC/SET” button to exit RCC receiving.
![]() NOTES:
NOTES:
- Make sure the RCC function is ON or you can set it by 3.3 MANUAL SETTINGS —> Detailed Steps —> refers to point 2.
- Make sure the time zone is correct (Default time zone is Eastern Standard Time) or you can set the time zone by 3.3 MANUAL SETTINGS —> Detailed Steps —> refers to point 3.
- When receiving RCC signal, please keep the weather station close to the window or receive RCC signal outdoors to enhance the signal reception.
*RCC Symbol Display:
- a. When receiving signal , RCC symbol ” ▲ “will be flashing.
- b. When signal successfully received, LCD will display the complete RCC symbol “” and exit RCC receiving.
- c. lf no signal is received, the RCC symbol will disappear.
3.3 MANUAL SETTINGS
![]() NOTE: After RCC signal received, if there is no need for other settings, you can skip the manual settings part. If no RCC signal received or you need to set other settings, please follow the bellow steps to finish setting.
NOTE: After RCC signal received, if there is no need for other settings, you can skip the manual settings part. If no RCC signal received or you need to set other settings, please follow the bellow steps to finish setting.
TIPS:
- Press and hold ”RCC/SET” button to enter time set mode.
- Press “CH/▲” and “MEM/▼” buttons to adjust the value. Hold to adjust quickly.
- Press ”RCC/SET” button to confirm and move to the next setting.
- Press the top button anytime to exit setting.
Setting Order:
RCC ON/OFF-> Time Zone (if RCC ON)->DST ON/OFF-> 12/24H Time Format->Hour->Minute-> Year ->Month & Date Display->Month->Date-> Weekday abbreviation Language-> Temperature Unit-> Exit.
Detailed Steps:
- Press and hold ”RCC/SET” button for 5 seconds to enter setting.
- RCC ON/OFF part: Press “CH/ ▲” or “MEM/▼” button to select ON or OFF. (Note: If RCC OFF is selected, it will skip Time Zone setting and move to 12/24 Hour setting.)
- Press ”RCC/SET” button to TIME ZONE part. Press “CH/ ▲” or “MEM/▼” button to select: AST, EST, CST, MST, PST, AKST, HST. (Default setting: -5 EST).

- Press ”RCC/SET” button to DST ON/OFF part. Default setting: ON. Press “CH/▲” or “MEM/▼” button to select DST ON if you do observe Daylight Saving Time.*DST symbol display:
a. Select “DST ALWAYS”, means DST function is always ON all the year ‘ round.
b. Select “DST”, means DST function will be ON during daylight saving time.
c. Select “DST OFF”, means DST function is OFF. - Press ”RCC/SET” button to 12124H TIME FORMAT part. Default setting :12H format. Press “CH/▲” or “MEM/▼” button to select 12-hour format or 24-hour format.
- Press ”RCC/SET” button to HOUR part. Press “CH/▲” or “MEM/▼” button to adjust the value.
- Press ”RCC/SET” button to MINUTE part. Press “CH/▲” or “MEM/▼” button to adjust the value.
- Press ”RCC/SET” button to YEAR part (year range: 2000-2099). Press “CH/▲” or “MEM/▼” button to adjust the value.
- Press ”RCC/SET” button to MONTH & DATE DISPLAY FORMAT part. Press “CH/▲” or “MEM/▼” button to select M/D or D/M format (M: Month ,D: Date).
- Press “RCC/SET” button to MONTH part. Press “CH/▲” or “MEM/▼” button to adjust the value.
- Press ”RCC/SET” button to DATE part. Press “CH/▲” or “MEM/▼” button to adjust the value.
- Press ”RCC/SET” button to WEEKDAY ABBREVIATION LANGUAGE part. Press “CH/▲” or “MEM/▼” button to select the language: ENG(English), DUT(Dutch), DAN (Danish), SPA (Spanish), ITA (Italian), GER(German), FRE (French).
- Press ”RCC/SET” button to TEMPERATURE UNIT part. Press “CH/▲” or “MEM/▼” button to select Celsius °C or Fahrenheit °F.
- Press “RCC/SET” button to confirm and exit.
NOTE:
- When RCC OFF is selected, will move directly to 12/24 hour time setting.
- Weekday will shows automatically after Year, Month and Date are set.
- During setting, if no operation for 20 seconds, it will automatically save and exit setting.
3.4 REMOTE SENSOR INSTALLATION

3.5 ALARM SETTING
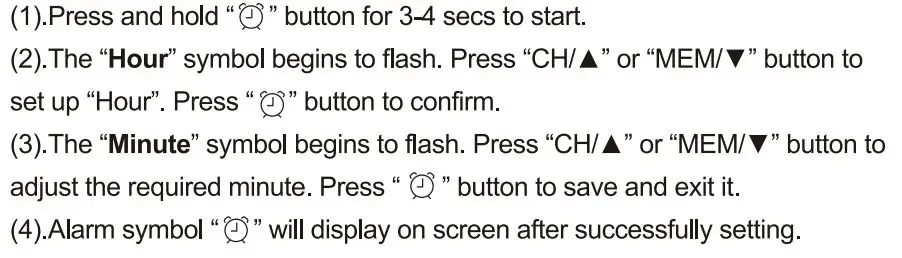
3.5.1 Set Alarm Clock in Order: Hour> Minute> Exit.
3.5.2 Check Alarm Time

3.5.3 Alarm OFF/ON
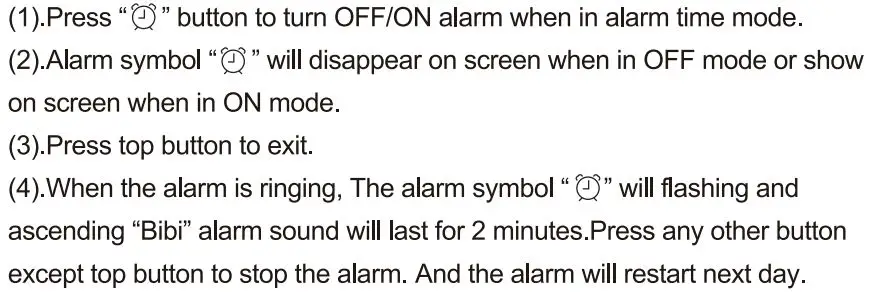
3.6 SNOOZE MODE
- When alarm is ring. press the TOP BUTTON to enter snooze mode, The alarm will ring again in 5 minutes snooze interval. And the” z'” symbol will be flashing on screen to indicate the snooze mode. Press any other button except top button to exit the snooze mode. And the alarm will restart next day.
- When alarm rings, the ascending “Bibi” alarm sound will last for 2 minutes if no operation, or you can press any other button except top button to stop the alarm.
3.7 MAX/MIN TEMPERATURE and HUMIDITY RECORDS
- Check: Press “MEM /▼” button to switch MAX or MIN readings. The readings will shows for 5 seconds and then will tum back to normal model.
- Manually Clear: Press “MEM /▼” button to enter “MAX/MIN” Record Mode. Then press and hold “MEM ▼” button 3-4 seconds to clear all the Max/Min data.
The screen of indoor and outdoor temperature & humidity will show”–“. - Automatically Clear: The records will be cleared at 00:00 automatically daily.
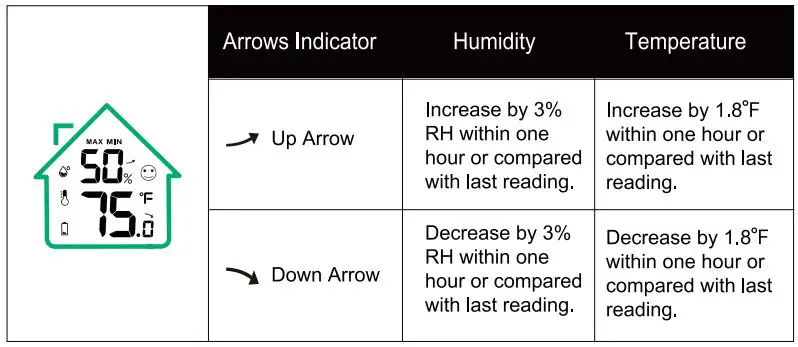
4. TEMPERATURE and HUMIDITY TREND ARROWS
The temperature and humidity trend arrows indicates the temperature or humidity’s change trend.
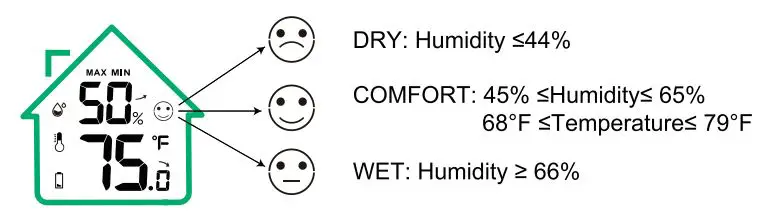
5. COMFORT LEVEL INDICATOR
Indoor comfort level indicator keeps you informed the comfort level in your home, and when to dehumidify or humidify.
6. WEATHER FORECAST

- The weather icon, where data hourly calculated from indoor/outdoor temperature and humidity forecasts the weather in the next 12 hours.
- IT IS NOT THE CURRENT WEATHER. The accuracy will be 70%-75%.
- Please note that this forecast can’t compare with professional weather services supported by satellites and high Performance computers.
- It merely provides an approximate indication of current developments. Please give priority to the weather forecast of the local weather forecast service.
![]() Note: “Sunny To Cloudy” is default after power-on.
Note: “Sunny To Cloudy” is default after power-on.
7. BACKLIGHT FUNCTION
When powered on, press the top button to turn on the backlight, and the backlight will last 20 seconds to save power.
8. LOW BATTERY INDICATOR
- When Battery Indicator
 shows next to the Outdoor Temperature, replace batteries in your remote sensor.
 - When Battery Indicator shows next to the Indoor Temperature, replace batteries in your weather station main unit.
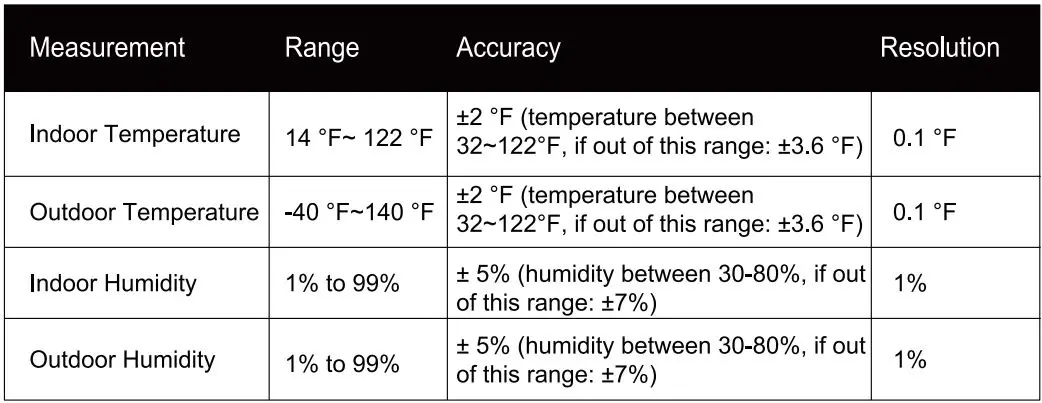
9. SPECIFICATIONS
9.1 TECHNICAL SPECIFICATIONS
- Indoor Temperature Range: 14 °F- 122 °F(-10°C~ 50.0°C).
- Outdoor Temperature Range: -40 °F-140 °F(-40°C~60°C).
- Humidity Range: 1 % to 99% RH.
- Transmission Range: 328 ft (100 meters), 433MHZ (open air).
- Power Requirements:
Main Unit: 3 x AAA Alkaline batteries (not included),
Remote Sensor: 2 x AA Alkaline batteries (not included).
9.2 MEASUREMENT SPECIFICATIONS
The following table provides the specifications of the measurement parameters.
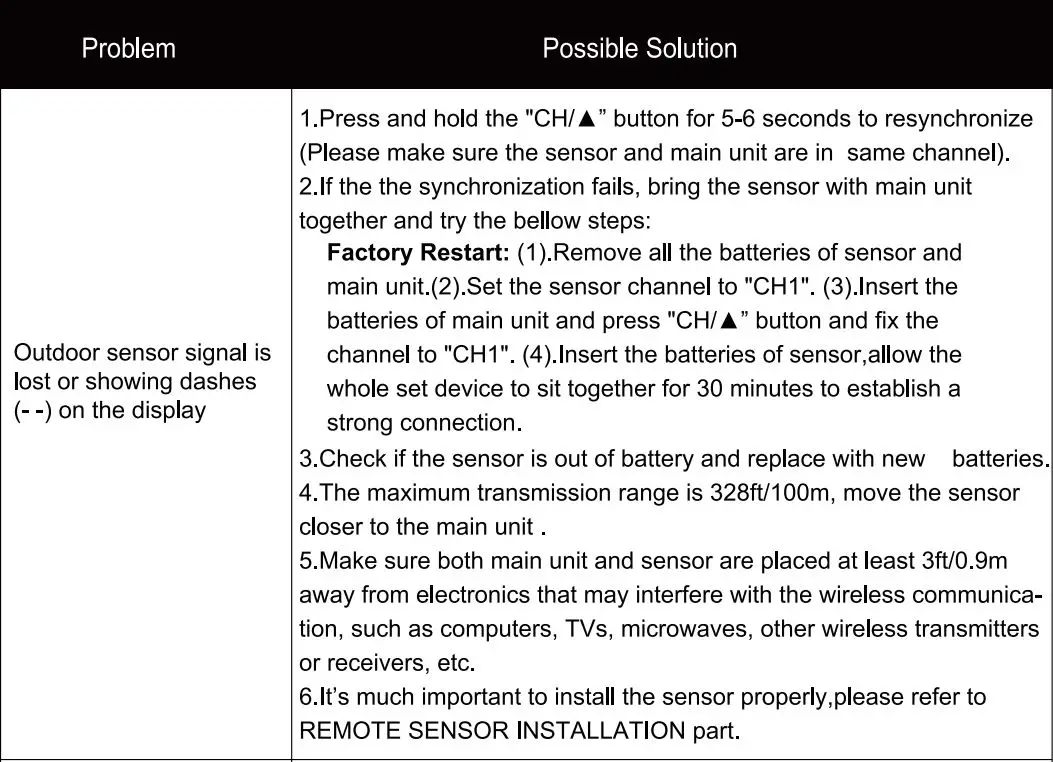
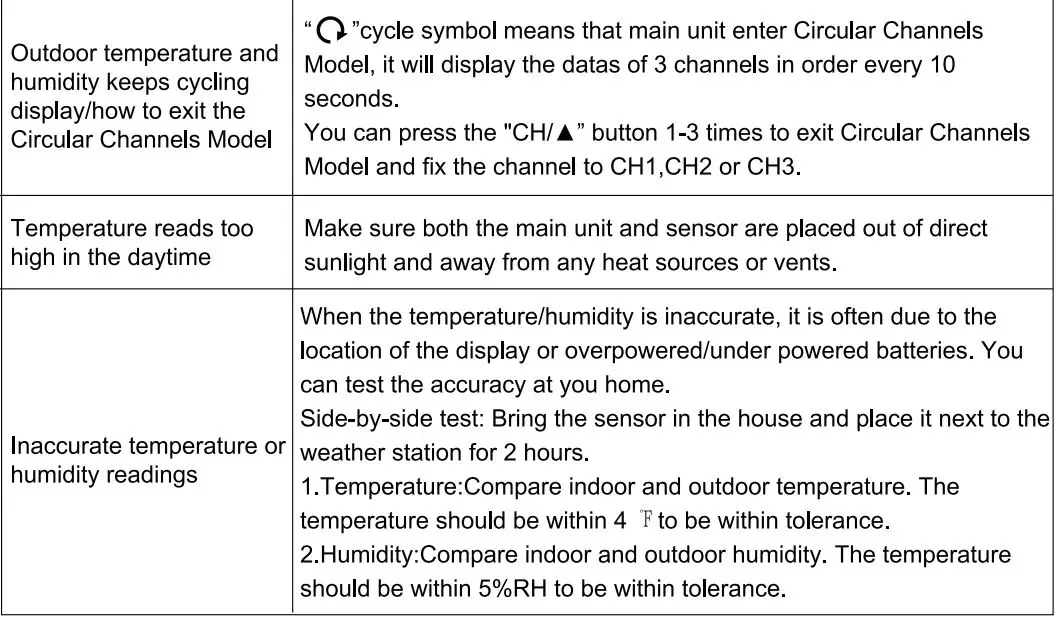
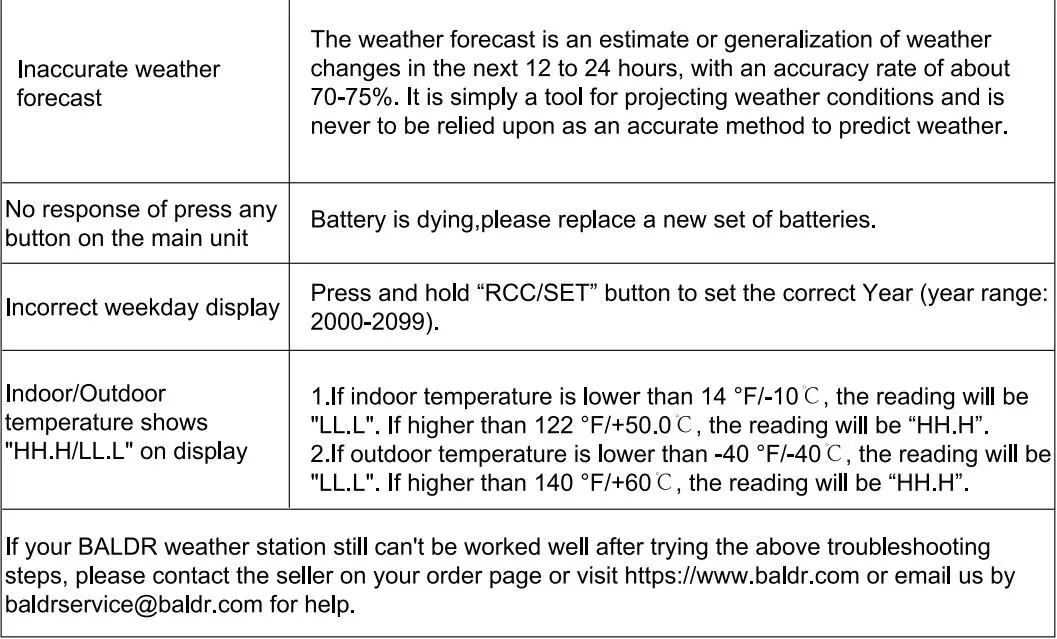
10. TROUBLESHOOTING GUIDE
11. PRECAUTIONS
- Do not mix old and new batteries.
- Do not mix Alkaline, Standard, Lithium, or Rechargeable batteries with this product.
- Remove the batteries if storing this product for a long period of time.
- Ensure the batteries are installed with correct polarity(+ and-).
- Do not clean any part of the product with benzene, thinner or other solvent chemicals. Use a soft cloth to clean it when necessary.
- Never immerse the product in water. This can cause electrical shock and damage the product.
- Do not expose the product to extreme force, shock or temperature or humidity fluctuations.
- Do not tamper with internal components.
12. WARRANTY
Dear customer,
Thank you for choosing BALDR. We provide 1-year limited warranty on this product from the date of purchase. This product has undergone thorough quality inspection at the factory to ensure that the product is in good condition. We will remedy all defects in workmanship or materials within the warranty period.
In order for the warranty to be granted, all warranty claims must be accompanied by proof of purchase from an authorized distribution partner. Damages due to improper installation or use, unauthorized removal/modify/ repair are not covered by the warranty.
If you have any problems with this product or during use, please do not hesitate to contact us, we will try our best to solve it and offer you satisfactory service including replacement or refund.
For Full Warranty Details, contact us by: