Blaupunkt Bluebot XPRO Robot Vacuum Cleaner Instruction Manual

![]()
Enjoy it.
FOREWORD
Congratulations! And thank you for buying a great new product from Blaupunkt.
With the Blaupunkt Bluebot XPRO robot vacuum cleaner, you can clean most floor types with the greatest of ease.
This manual is specific to the Blaupunkt Bluebot XPRO robot vacuum Cleaner. Hereafter the Blaupunkt Bluebot XPRO robot vacuum cleaner will be referred to as‘the robot’.
This manual is intended to help the user to set up and operate the robot.
We kindly ask you to carefully read the information in this manual before using the robot, to familiarise yourself with its intended use and potential dangers and risks.
Support info

All rights reserved. No parts of this work may be reproduced in any form or by any means – (graphic, electronic, or mechanical, including photocopying, recording, taping, or information storage and retrieval systems) – without the written permission of the publisher.
© 2021 Blaupunkt XPRO
SAFETY REGULATIONS
Before using the XPRO robot, please read the following safety instructions and follow all routine safety precautions. Any operations inconsistent with the instruction manual may cause damage.
Note:
- Only authorized technicians can disassemble this robot. Users are not Recommended to disassemble this product by them selves.
- This robot can only use the power adapter provided by the factory. If other adapters are used, the robot may cause damage.
- Do not touch wires, sockets or power adapters when your hands are wet.
- Take care to prevent fabric or body parts from coming into contact with the robot’s drive wheels.
- Do not place this robot near cigarette butts, lighters and other smoldering res.
- Please clean the robot after charging.
- Do not bend wires excessively or place heavy objects and sharp objects on the robot.
- This robot is an indoor household product. Do not use it outdoors.
- Do not sit on the robot.
- Do not use this robot in a wet environment (e.g. bathroom).
- Before using this robot, please remove all vulnerable items (e.g. glasses, lamps, etc.) from the ground as well as items (e.g. wires, paper sheets, curtains) that may get stuck in the side brushes and air suction passages.
- Do not put this robot in a place where it is easy to fall (e.g. on desks and chairs).
- Please carefully check whether the power adapter is connected to the socket before using it, otherwise it may cause battery damage.
- To prevent tripping, please inform other people in the house when the robot is working.
- Please empty the dust container before using this robot when the dust container is full.
- The temperature for this robot to be used in is 0 to 40 degrees Celsius.
- Do not use this robot in high temperature environment.
- Please remove the battery from the robot before disposing of this robot.
- Please make sure that this robot is not powered on when removing the battery.
- Please recycle the discarded batteries safely.
Warning:
- Use only the original rechargeable battery and charging station specially equipped by the manufacturer. Non -rechargeable batteries are strictly prohibited.
- Do not use robot in an environment with open flames or fragile objects.
- Do not use robot in extremely hot (above 40 ) or extremely cold (below 0 ) environments.
- Do not allow human hair, clothes, fingers and other parts to come into contact with the opening and operating parts of the robot.
- Do not use robot on wet or ponding ground.
- Do not allow robot to collect any items such as stones and waste paper, this may clog the robot.
- Do not allow robot to collect any inflammable substances, such as petrol, toner and pastels used for printers or photocopies. Do not use the robot to clean areas with flammable items.
- Do not allow robot to collect any burning items, such as cigarettes, matches, ashes and other articles that may cause fire.
- Do not place articles at the suction opening. Do not use the robot when the suction port is blocked. Use a small item such as dust, cotton wool, hair, etc. at the suction opening to check that the suction air flow is working.
- Use the power cord carefully to avoid damage. Do not use the power cord to drag or pull the product and the robot charging station. Do not use the power cord as a handle. Do not clamp the power cord in the crack of the door. Do not pull the power cord around corners. Do not allow the robot to operate on the power cord, the power cord should be far away from the heat source.
- Do not use a damaged charging station.
- Even if the robot has been severely damaged, burning of the product is prohibited, this may lead to the explosion of the battery of the product.
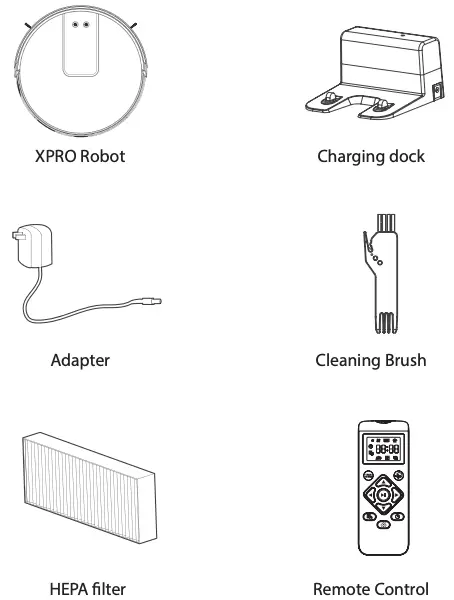
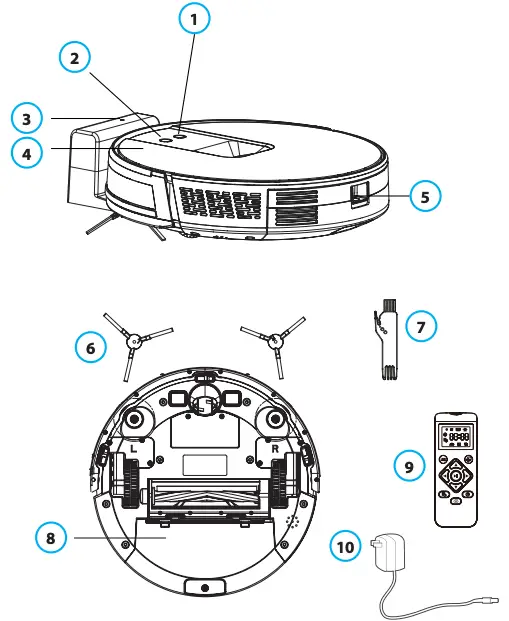
PACKAGE CONTENTS

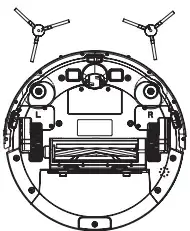
MAIN PARTS

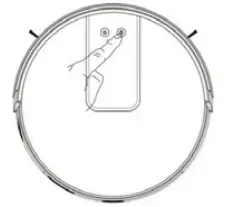
- Power key | on/o button
- Recharge button | return to charging station
- Docking | charging station
- Robot cover
- Dust container button (remove | insert dust container)
- Side brush 1 x left (L) + 1 x right (R)
- Cleaning brush
- Dust container
- Remote control
- Power Adaptor
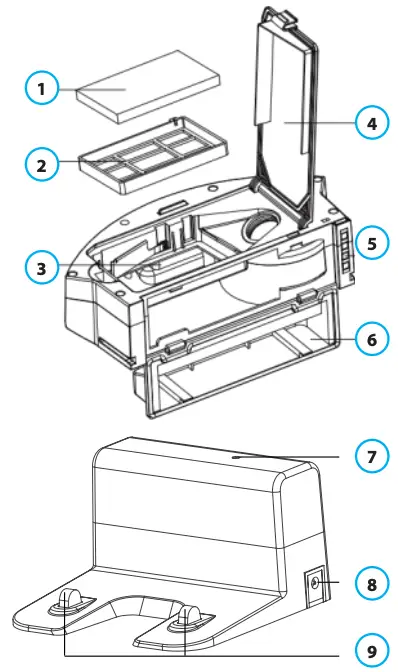
- Main lter HEPA
- Primary Filter
- Dust Box Metal Sheet
- High Eciency Filter Cover
- Dust Box Side Cover
- Dust tank
- Signal Indicator
- Adapter output
- Charging Dock Pins
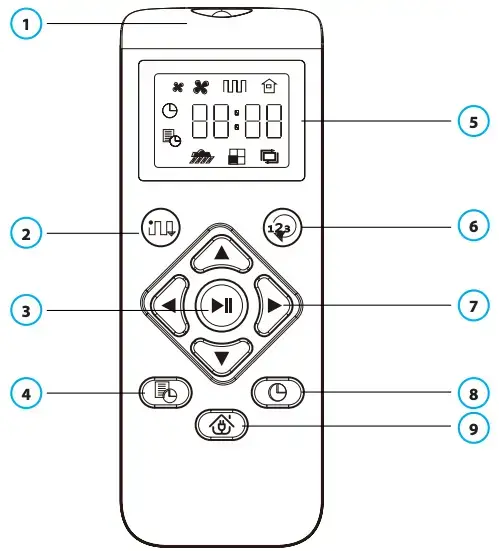
REMOTE CONTROL
- Infrared sensor
- Auto clean mode
- Start | Pause robot
- Set daily program | time schedule cleaning
- Display
- Change mode
- Direction control
- Clock settings
- Back to charge | docking station
PREPARATIONS BEFORE USAGE
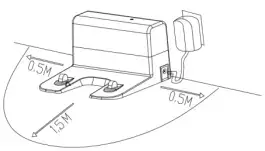
Please remove the protective strip from your robot vacuum cleaner and the protective lm from your docking | charging station.
- Position your docking | charging station correctly against the wall and on a at surface. Do not place any items within a range of 0.5m left + 0.5m right and 1.5m frontal.
- Connect the docking | charging station to the power supply.
- Install the side brushes (L) is left and (R) is right.
- Charging: put the robot vacuum cleaner correctly on the docking station for charging (during charging, the indicator light on the robot ashes. When the robot is fully charged, the light on the robot remains on. The charging time is about 5 hours.
During the cleaning process, the robot can sense that its power is running low. It will than automatically enter “Back to Charge” mode or you can also command the Robot to enter “Back to Charge” mode through the “Back to Charge” button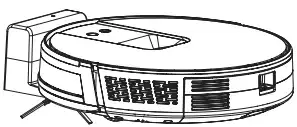 on the remote control.
Charging attention:
- The docking | charging station cannot be used in environments with a strong reflection such as direct sunlight and nearby mirrors. If there are any objects with strong reflection, please cover these 7cm from the bottom. As it can confuse the signal.
- In order to ensure the normal working hours of the Robot, please fully charge it before use.
- When charging, do not attach the water tank to ensure the safety of charging and to prevent possible damage to the floorings
PRODUCT USE
Start Cleaning | Cleaning Modes
You can start your XPRO robot vacuum cleaner with ONE push at the button on the robot or with your remote control. With the remote control you can also select various cleaning modes.
Auto Cleaning
The most commonly used cleaning method is that the Robot uses a bow-shaped (Zigzag) path to plan and clean the house according to the actual home environment.
How to start Auto cleaning: In the shutdown state, press and hold the on/off button, when the indicator light of the Robot is lit, it’s powered on. When you short press the same on/off button now or press the automatic cleaning button  on the remote control, the Robot starts automatic cleaning.
To select the Robot super suction (Turbo) mode, Press the once more.
Single Room Cleaning
Use to clean a single room
Click the “Change mode” button  on the remote control to start the Single Room Cleaning
Remark: please close the door and the Robot will do centralized cleaning in the room.
If this room does not have the docking station inside, the Robot will return to the original starting point after cleaning.
Single Room Cleaning mode is always in super suction (Turbo) cleaning mode.
Edge Cleaning
For indoor edge cleaning, the Robot cleans along the perimeter of fixed objects (such as walls), and returns to the docking station after the edge cleaning is finished.
Click the “Change mode” button on the remote control to select the Edge cleaning mode to start the edge cleaning.
Manual Control
Suitable for manual control cleaning.
Click the “Direction” button on the remote control to control  the Robot to direct the robot: left, right, front, back.
Pause | Sleep mode | Shutdown
Pause: During the operation of the Robot, press the on/off button | robot key or “Pause”  button on the remote control to pause the operation of he Robot.
Sleep mode: If the Robot stops working for more than ten minutes, it will automatically enter sleep mode (all the Robot lights are off).
To wake up the Robot please Tap the on/o button firstly. Than tap the on/off button again / or use the remote control to start operation again.
Shutdown: when the robot stops working and you want to shut it down completely, long press the on/off button | robot key to fully shut down the obot (all the Robot lights are off). Be aware that once the robot is shut down it will not go back to its docking station automatically.
Set a Time Schedule
Tap the “Time Schedule” button  non the remote control to set the Robots cleaning time schedule.
After the setting is completed successfully, the Robot will automatically tart its cleaning cycle at the scheduled time every day.
Remark! Before you schedule a time, you need to set the current time through Clock settings 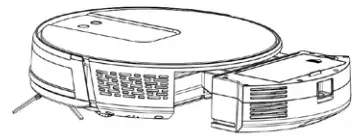 on remote control.
MAINTENANCE | DUST CONTAINER | FILTERS
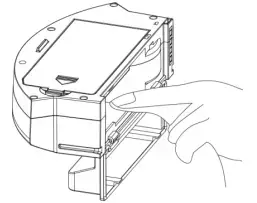
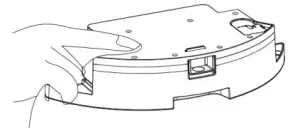
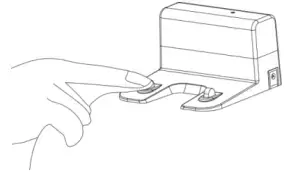
A. Press the dust container button to remove the dust container
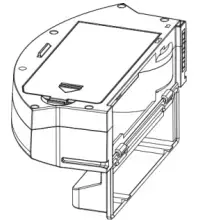
B. Open the dust container side cover
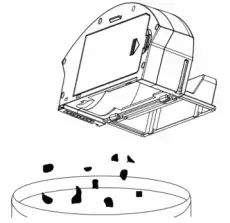
C. Empty the dust container
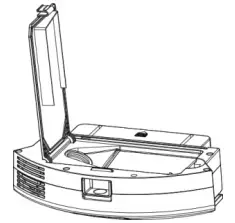
D. Open the high efficiency filter cover
E. Take out the HEPA filter and the primary filter. It is not recommended to clean the HEPA filter with water. Tap gently to remove the dust.
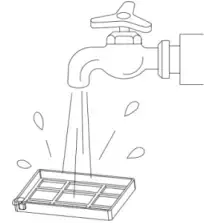
F. Rinse the primary filter
G. The dust container can be cleaned with a soft cloth, brush or i.e. the mop pad. Please pay attention: It is not recommended to wash the dust container with water.
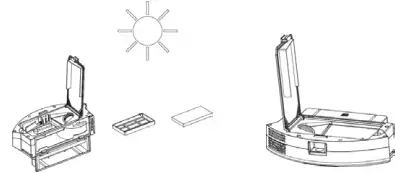
H. Let the wet parts of the dust container fully dry before inserting it again to the Robot to ensure its service life and do NOT dry the primary and HEPA filter in bright sunlight.
Remark!: it is recommended to wash the primary filter with water (after 15 – 30 days) and to replace the HEPA lter each 3 months.
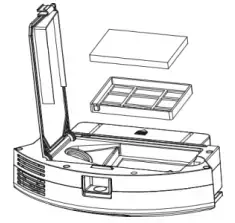
I. Insert the Primary filter and the HEPA filter into the dust container
J. Close the dust container cover and install the dust container in the Robot.
Note: Do not wash the dust container with water.
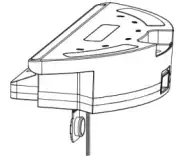
MAINTENANCE | WATER TANK AND MOPPING PAD
- Press the water tank button to remove the water tank
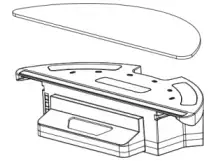
- Remove the mopping cloth
- Empty the Water Tank
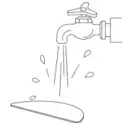
- Wash the mopping cloth
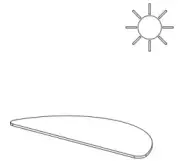
- Dry the mopping cloth
- Dry the water tank
MAINTENANCE | MAIN BRUSH | SIDE BRUSH
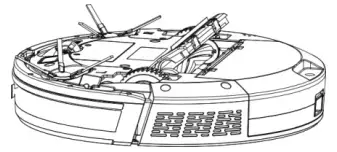
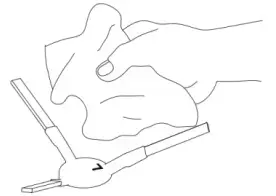
- Open the main brush cover
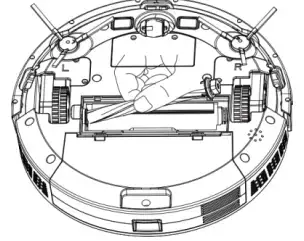
- Take out the main brush shaft
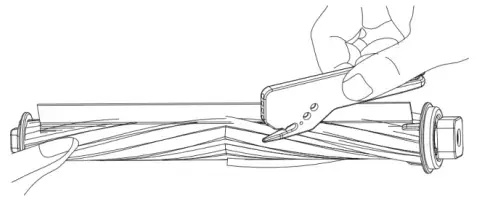
- Use the cleaning tool to remove tangled hair
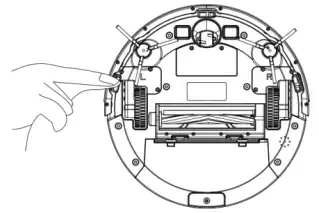
- Clean side brush
MAINTENANCE | CHARGING DOCK PINS | DOWN VIEW SENSOR | DRIVE WHEEL AND UNIVERSAL WHEEL
Kindly reminder: The interior of the charging dock pins, the down-view sensor and the bumper all contain sensitive Electronic components, please use a dry and soft cloth when cleaning, and do not use a wet cloth, to prevent damage caused by water.
Clean the charging dock pins
Clean the down-view sensor

Clean drive wheels and universal wheel
If you do not use the robot for a long time, please fully charge the robot before storing it and before storing it completely shut it down / turn it o. It is still recommended even when not using the robot to charge it every 3 months to maintain the battery life. If the battery is over discharged or is not used for a long time, the robot may not be able to be charged. Please contact our company for after-sales maintenance do not disassemble it yourself.
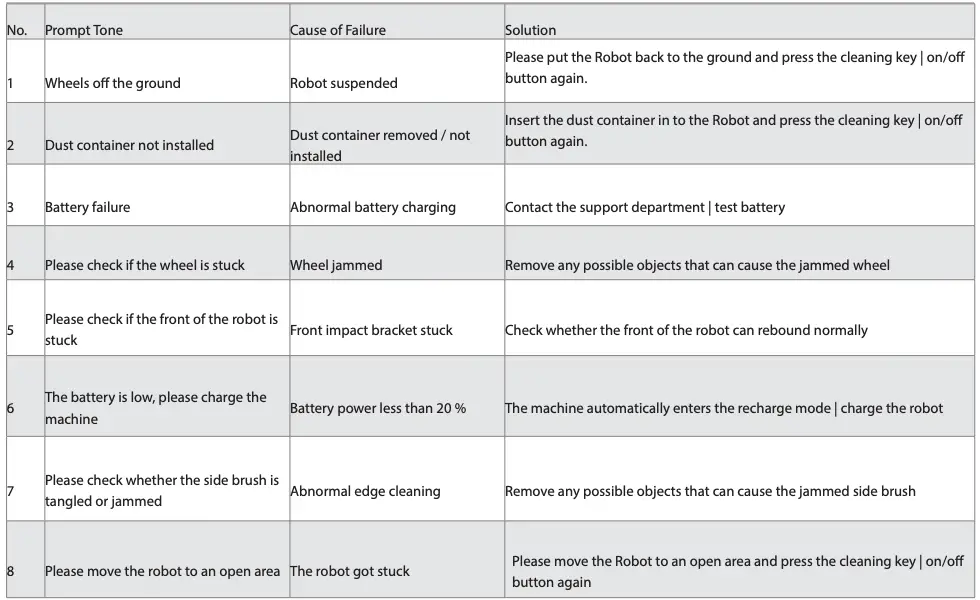
TROUBLESHOOTING
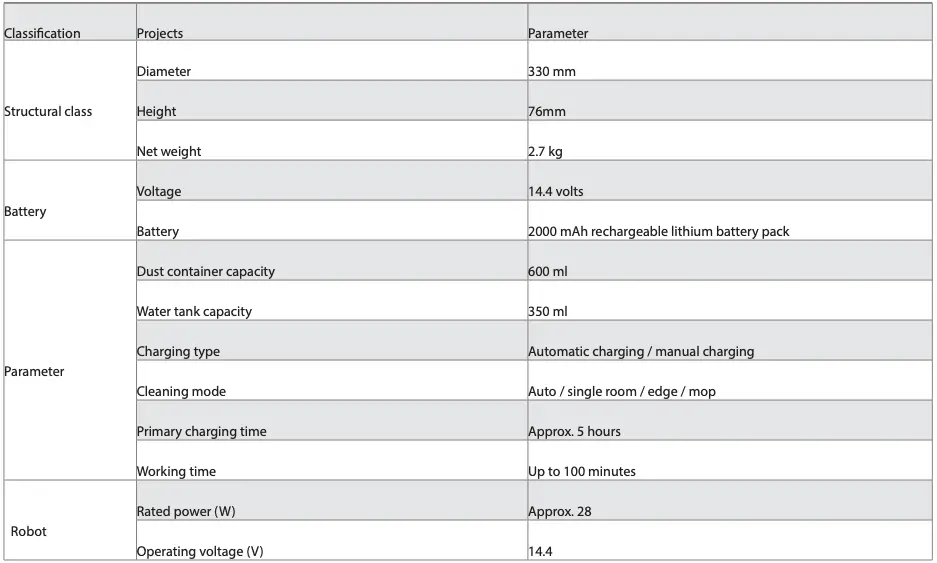
PARÂMETRO DO PRODUTO