The Bose® Acoustimass® 5 Series III Speaker System Owner’s Guide
Introduction
Thank you
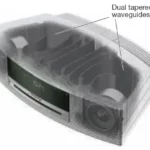
We appreciate your choice of the Bose® Acoustimass® 5 Series III speaker system. It will provide you with many years of listening enjoyment. Your system features new third generation Acoustimass cube speaker arrays, a product of the continuous research and development at Bose Corporation. These cube speakers deliver more lifelike sound and better overall performance, yet are smaller than their predecessors.
Important information
Please read this owner’s guide
The set-up and operation of your Acoustimass 5 Series III speaker system is significantly different from other speakers. Please take the time to read this owner’s guide carefully. It will help you set up and operate your system properly and enjoy all of its advanced features. Save your owner’s guide for future reference.
Setting Up
Before you begin
The Bose® Acoustimass® 5 Series III speaker system offers many advantages over conventional speakers. For one, the system adjusts to deliver the best combination of direct and reflected sound for your listening environment and musical taste. And this Virtually Invisible® speaker system requires very little space to deliver a lifelike musical performance formerly associated with room-dominating loudspeakers.
Sections 1 5 give you step-by-step instructions on how to set up and connect the system to your components, so you can begin enjoying it as soon as possible. The remaining sections provide more detailed information on arranging your system for the best possible performance.
1. Unpacking the carton
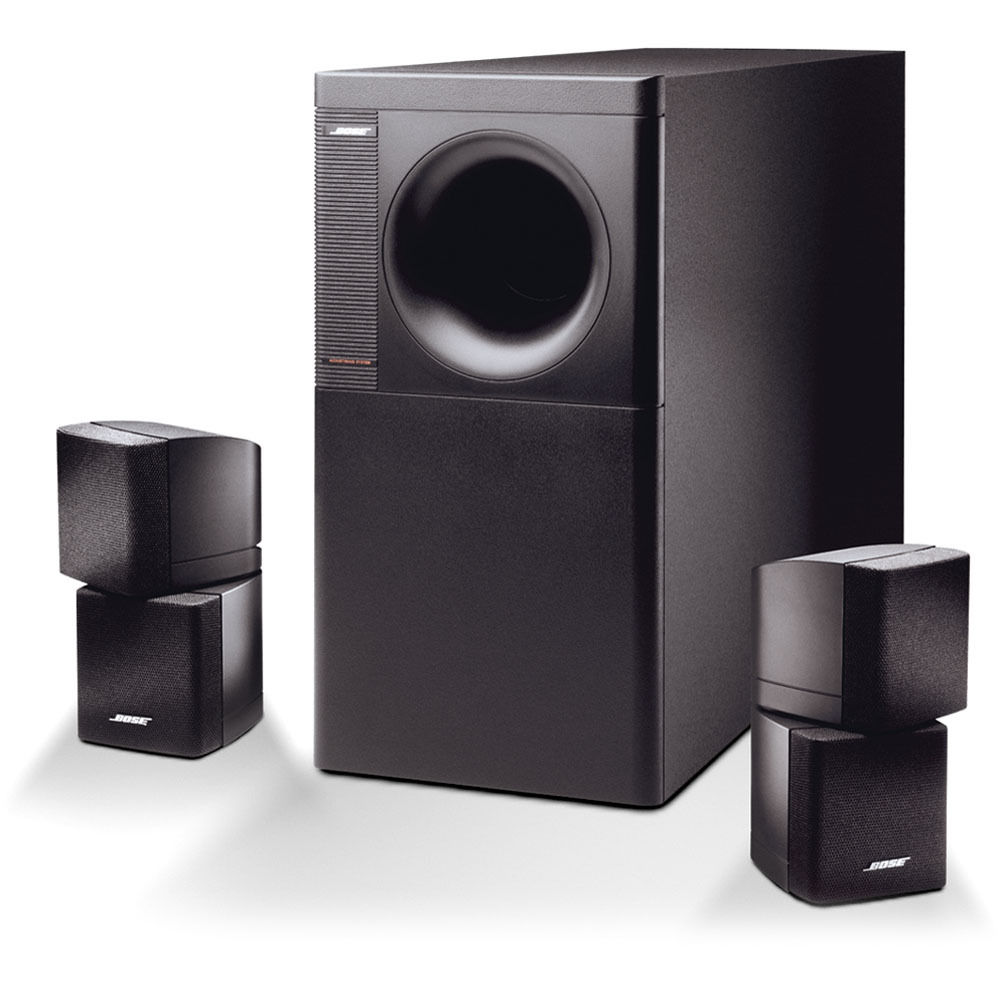
Unpack your system and familiarize yourself with the parts identified in Figure 1. If any part of the product appears damaged, do not attempt to use the system. Repack it in the original carton and notify Bose or your authorized Bose dealer immediately.
- Remove any staples from the opened carton flaps.
- Remove the inner cartons containing the two cube speaker arrays.
- Gently roll the carton over onto its side and then onto its opening.
- Carefully lift the carton from around the Acoustimass module and packing cushions.

Note: Now is a good time to record the serial number of these speakers on page 3 of this guide and on your warranty card. It is a good idea to save all packing materials for possible future use.

What comes in the carton:
- 2 Cube arrays
- 1 Acoustimass module
- 4 Wires
- 4 Adhesive-backed rubber feet
- Owner’s guide
- Quick set up guide
2. Selecting the locations for your Acoustimass® system components
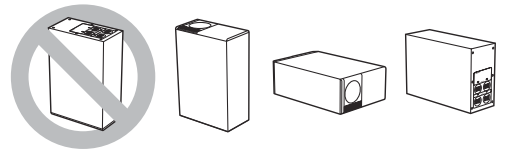
- You can place the Acoustimass module almost anywhere in your listening room, in either a vertical or horizontal position (Figure 2). It can be hidden under a bed or table or even behind a sofa, as long as you remember not to block the round opening in the end of the unit. Allow at least 2 inches (5 cm) of space between that end and any surface. After selecting a place for the Acoustimass module, attach the four rubber feet to the bottom surface for additional stability. If you choose to stand the module on its connection end, the feet must be attached to protect the wire connections.
CAUTION: The Acoustimass module is not magnetically shielded and should be kept at least two feet (.6 m) from a television.
Figure 2
Acoustimass module positions
- Next, select the positions for the left and right cube arrays. Remember that wires from the arrays connect to the Acoustimass module, so you should locate the cube arrays close enough to the module to enable the wires to reach it. The cube arrays are magnetically shielded, so they may be placed near a television.


3. Examining the cables and connections
Locate the four identical pairs of wires packed with the system.
- Two wire pairs connect your cube arrays to the Acoustimass module.
- The other two wire pairs connect the Acoustimass module to your receiver or amplifier.
- Examine the ends of the wires. The marked wire (with a red, striped, or printed marker) connects to the positive (+) terminal at each connection.
- The cube arrays and the Acoustimass module have red positive (+) connections.
4. Connecting the cube arrays to the Acoustimass® module
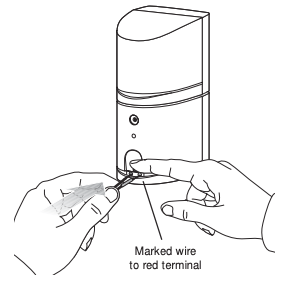
Select one pair of wires, and locate the terminal tab on the rear of the left cube array.
- Just press the terminal tab on the back of the speaker to insert the marked wire into the red (+) terminal and the plain wire into the black (–) terminal (Figure 3).
- Release the terminal tab and both wires will be held securely.
- Repeat this process with the other pair of wires and the right cube array.
Figure 3
Connecting a cube array

- Next, locate the terminals marked OUTPUTS TO CUBE SPEAKERS on the rear of the Acoustimass module (Figure 4).
- Connect the other ends of the wires from the left cube array to the pair of terminals marked L. Make sure that the marked wire is connected to the positive (+) and the plain wire is connected to the negative (–) terminal.
- Now, repeat step 5 for the right cube array, connecting its wires to the terminals marked R.
Figure 4
Connecting cube arrays to the Acoustimass module
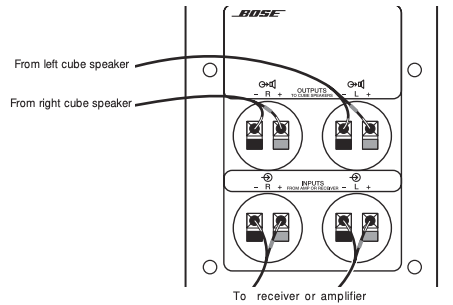


5. Connecting the Acoustimass® 5 Series III system to your receiver
- Select one of the remaining two pairs of wires, and locate the left channel terminals on the Acoustimass module marked INPUTS FROM AMP OR RECEIVER. Depress the red, positive (+) tab, insert the marked wire and release the tab. Repeat the process for the black, negative (–) tab and the plain wire (Figure 5).
- Then follow the same procedure for the right channel, using the last pair of wires.
Figure 5
Connecting the Acoustimass module to your receiver
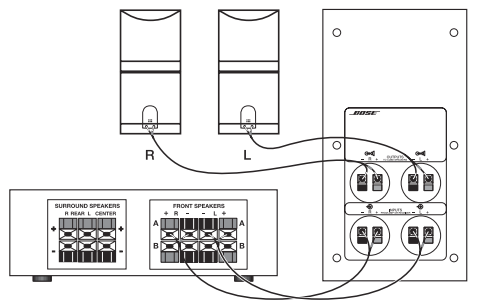
- Disconnect your receiver or amplifier from the AC power (mains) outlet.
- Locate the speaker outputs on your receiver. Connect the other ends of the wire from the left channel of the Acoustimass module to the terminals marked L or LEFT. Make sure that the marked wire is connected to the positive (+) and the plain wire is connected to the negative (–) terminal.
- Repeat these last two steps for the right channel.
- Your set-up is complete. Plug in your receiver, turn the system on, and enjoy your Acoustimass 5 Series III speakers!

Fine Tuning Your Acoustimass® 5 Series III Speaker System
Checking your speaker system
As you begin listening to your Acoustimass 5 Series III speaker system, the following test will help you determine that it is working properly:
A. Turn the balance control on your receiver or amplifier all the way to the left. If you have
connected the cube arrays properly, you will hear the music from the left cube array, but not the right one. You may notice a very faint sound issuing from the right cube array, which is normal.
B. Now, turn the balance control all the way to the right. If your cube arrays are connected properly, this time you will hear music only from the right one. You may also detect a very faint sound from the other cube array.
C. Return the balance control to the center position. Play a musical selection with deep bass. Now turn the balance control all the way to the left and listen, and then turn the balance all the way to the right and listen. If the system is connected properly, the center position should exhibit the same or greater bass response than either the left-only or right-only positions. If it exhibits less, check to make sure that your components are connected as described on pages 6 and 7.
D. Return the balance control to the center position.
If your system does not appear to be working properly, refer to the Troubleshooting section on page 11.
Positioning your speaker system to get the best sound
Your Acoustimass 5 Series III speaker system may be used in a variety of ways. Here are some guidelines.
Cube considerations
A. In average-sized listening rooms, the best stereo effects result when the left and right cube arrays are spaced 6 to 12 feet apart (1.8 3.6 m). However, you can still achieve excellent results with separation as little as 3 feet (1 m) or as great as 15 feet (4.5 m).
B. The cube arrays are magnetically shielded for use with video systems and may be placed near your television without adversely affecting picture quality. However, the Acoustimass module is not shielded and should be kept at least 2 feet (.6 m) from a television.
C. Though there is no “correct” position for the cube arrays or the angle between them, the most lifelike effect will be achieved by providing a balance of direct and reflected sound. Experiment with the positions of the cubes for the results you prefer. Figure 6 shows some typical cube arrangements.
D. You may use the cube arrays with both cubes facing forward. This eliminates the benefits of direct and reflected sound, but may be appropriate for very small listening areas.
Figure 6
Cube array positions

Acoustimass module considerations
Unlike conventional floor standing or bookshelf speakers, you can fine tune the bass response of your Acoustimass 5 Series III speaker system without compromising an accurate stereo image. Just change the location of the Acoustimass module within your listening room. Placing it along a wall 3 to 5 feet (1 1.5 m) from a corner provides a normal balance of frequencies from your speaker system. Moving the Acoustimass module closer to walls or corners increases bass response while moving it away from walls or corners decreases bass. In most rooms, it is easy to find a convenient location that provides pleasing bass response.

Using your speaker system to its best advantage
Your speaker system requires very little attention when set up and connected properly. However, observing the following guidelines will help maximize your enjoyment.
Room Acoustics
The acoustics (sound properties) of your listening room can affect the overall sound quality of any speaker system. The following tips will give you some control over the sound:
A. Rooms with a lot of sound-absorbing furnishings, such as stuffed furniture, wall-to-wall carpet, or heavy drapes, may reduce the treble sound (high frequencies). The missing treble sound can be restored by slightly turning up the treble control on your receiver or amplifier. If convenient, you may remove some of the sound-absorbing material.
B. Rooms with too few sound absorbing furnishings, especially those with bare floors and walls, may sound overly shrill or “bright” because of too much treble. Turning down the treble control or adding sound absorbers such as throw carpets or drapes will usually improve the sound.
C. If your system seems to have too much or too little bass (low frequencies), you can adjust the bass control on your receiver or amplifier. You may also move the Acoustimass module closer to a wall and/or corner to increase bass. Doing the opposite will decrease bass.
D. In general, many problems with acoustics can be solved by the judicious use of your tone controls. Remember, though, that the use of these controls (especially when turned all the way up) may put greater power demands on your receiver or amplifier. Excessive tone adjustment can cause an amplifier or receiver to run out of power and distort, potentially damaging your system.
E. External signal processors (such as graphic and parametric equalizers), while not recommended, can be used with your Acoustimass 5 Series III speaker system if a greater degree of acoustic control is desired. Consult your Bose® dealer for advice.
Automatic System Protection

Receiver/amplifier considerations
Your speaker system is designed for use with receivers or amplifiers rated from 10 to 200 watts per channel with 4 to 8 ohm impedance. For further information, refer to your receiver or amplifier owner’s guide.
Maintaining Your Acoustimass® 5 Series III Speaker System
Maintaining your speaker system
The cabinets of your Acoustimass 5 Series III speaker system may be cleaned with a soft damp cloth. Do not use any sprays near the system or allow liquids to spill into any openings. Also, do not use any solvents, chemicals, or cleaning solutions containing alcohol, ammonia, or abrasives.
The grille assemblies on the cube arrays may be carefully vacuumed if necessary. Please note that the drivers are located directly behind the grille cloth, and are easily damaged if reasonable care is not taken.
Troubleshooting

Product Information
Technical Information
Features
Direct/Reflecting® speaker design
Acoustimass® speaker system
Syncom® II computerized quality control
Automatic system protection circuitry
Driver Complement
Two 5.25 inch (13.3 cm) low-frequency drivers in Acoustimass module
Four 2.5 inch (6.4 cm) magnetically shielded, wide-range drivers in cube arrays
Compatibility
Compatible with receivers or amplifiers rated from 4 – 8 ohms
Compatible with receivers or amplifiers rated from 10 – 200 watts per channel
Finish
Acoustimass module: Scratch-resistant black or white satin finish
Cube arrays: Black or white polymer finish
Size/Weight
Cube arrays: 6.2″H x 3.1″W x 4.0″D (15.7 cm x 7.8 cm x 10.2 cm) 2.4 lb (1.09 kg)
Acoustimass module: 14.0″H x 19.0″W x 7.5″D (35.5 cm x 48.0 cm x 19.1 cm) 18.8 lb (8.5 kg)
Total shipping weight: 30.8 lb (14 kg)
Available Accessories
Floor stands: UFS-20B (black), UFS-20W (white)
Wall brackets: UB-20B (black), UB-20W (white)
Warranty period
The Bose® Acoustimass 5 Series III speaker system is covered by a limited 5-year transferable warranty. Details of the warranty are provided on the warranty card that came with your system. Please fill out the information section on the card and mail it to Bose.
Customer service
For help in ordering accessories or solving problems, contact Bose Customer Service. See the inside back cover for offices and phone numbers.
©2004 Bose Corporation The Mountain, Framingham, MA 01701-9168 USA
196451-ENGvo AM Rev.05