![]()
Congratulations on your purchase of a Corsair Link Kit.
Corsair Link replaces manual controls for fans and lighting with an elegant software interface, while simultaneously offering more advanced control and expansion options than motherboard BIOS settings. Everything is available on your screen with a software interface that’s advanced, intuitive, and fun to use.
This guide will help you install your Corsair Link Kit. It covers the installation of both the Corsair Link Cooling Kit and the Corsair Link Cooling and Lighting Kit.
Package Contents
The Corsair Link Cooling Kit includes:
A Corsair Link Commander with mounting screws
B Corsair Link Cooling Node with double-sided adhesive strip
D Digital cables (3)
E Thermal sensors (3)
F Fan extensions (5)
The Corsair Link Cooling and Lighting Kit includes everything above, plus:
C Corsair Link Lighting Node with double-sided adhesive strip
G RGB LED strips with attached adhesive strips (3)
H RGB LED strip extensions (3)
D Digital cable (1)
Installation Note:
Before proceeding with installation, please read this guide in its entirety. Before you begin, turn off your PC and disconnect the AC cable from the power outlet.

Corsair Link Diagram

Installing the Corsair Link Commander
The Corsair Link Commander (A) is the hub of your Corsair Link system. It is the interface between the Corsair Link Dashboard software and all of your Corsair Link components.
Mount the Corsair Link Commander in any empty 3.5″ drive bay using the provided screws. Then, connect the attached cable to any available USB 2.0 header on your PC’s motherboard. Take care when connecting the USB cable, as it is keyed to prevent incorrect installation.

Installing the Corsair Link Cooling Node
The Cooling Node (B) may be used to control any PC case fan which uses a three-pin or four-pin cable. It is also used to monitor ambient temperatures within your PC case using the provided thermal sensors.
The Cooling Node may be mounted on any interior surface of your PC case using the included double-sided adhesive strip. We recommend making all the required connections first and then attaching the Cooling Node to your PC case as the last step.
- Connect the Cooling Node (B) to the Corsair Link Commander (A) using one of the provided digital cables (D).
- Connect any case fans you wish to control to the Cooling Node, using the four-pin headers on the left side of the Cooling Node. The provided fan extension cables (F) can be used if necessary.
- Connect the thermal sensors (E) to the two-pin headers on the right side of the Cooling Node.
- Connect the Cooling Node power cable to a four-pin molex connector from your power supply.
- Attach the Cooling Node to an interior surface of your PC case using the provided double-sided adhesive tape.
Tips for connecting thermal sensors
The thermal sensors (E) are designed to measure ambient temperatures, so for the most accurate results, they should not directly touch components. You may find it useful to mount the thermal sensors near air intake and exhaust points, and if your PC case has multiple compartments, you can try placing each of the sensors in its own compartment. Since the thermal sensors can easily repositioned, you can try various locations and use what works best for you.

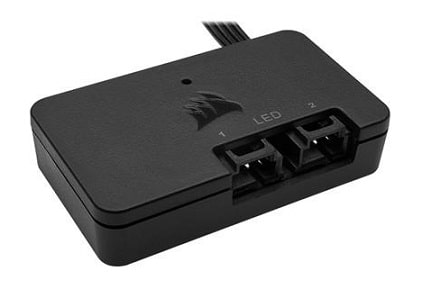
Installing the Corsair Link Lighting Node
The Lighting Node (C) is included with the Corsair Link Cooling and Lighting Kit. This dual-channel lighting controller can be adjusted with the two buttons built into the Lighting Node, or with Corsair Link Dashboard. Three RGB LED strips (G) are included, and the Lighting Node can control up to 33 strips (available separately).
- Connect the Lighting Node (C) to the Corsair Link Commander (A) using one of the provided digital cables (D).
- Connect the RGB LED strips (G) to the connectors on the Lighting Node.
- Connect the Lighting Node power cable to a four-pin molex connector from your power supply.
- Attach the Lighting Node and LED strips to interior surfaces of your PC case using the provided double-sided adhesive strips.
Downloading Corsair Link Dashboard
The software can be downloaded from the following locations:
- Corsair Link Cooling and Lighting Kit corsair.com/link-cool
- Corsair Link Cooling Kit corsair.com/link-light
Installation and operating instructions for Corsair Link Dashboard are included in the download.


EMAIL: [email protected]
FACEBOOK: facebook.com/corsairmemory
BLOG: blog.corsair.com
FORUM: forum.corsair.com
TWITTER: twitter.com/corsairmemory
CORSAIR LINK PAGE: corsair.com/link
1-year corsair Guarantee
USA and CANADA: (800) 205-7657 | INTERNATIONAL: (510) 657-8747 | FAX: (510) 657-8748
![]()
46221 Landing Parkway • Fremont • California • 94538 • USA
© 2011 Corsair Components, Inc. All rights reserved. Corsair and the sails logo are registered trademarks, and Corsair Link is a trademark in the United States and/or other countries.
All other trademarks are the property of their respective owners. Product may vary slightly from those pictured. Document Number: 49-000087 revAA