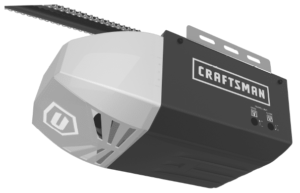
The Craftsman Garage Door Opener manual provides homeowners with information on how to install, maintain, and troubleshoot their garage door opener. The guide includes detailed diagrams for each step of the process, as well as illustrations that show the different tools required for installation.
Sections in this Manual
- Inventory
-
Programming 1– Button Remote
- To Program Remote(s):
- Removing all Remotes:
- Replacing Remote Battery:
- Programming Keyless Entry Pad *
- To Add Personal Codes:
- Removing ALL Personal Code(s):
- Mounting the Keyless Entry:
- Replacing Keyless Entry Battery:
- Operating the Opener
- Actual Operating Scenario
- Door Status vs. Activation
- Courtesy Light Responses
- Maintenance
- Troubleshooting
Manufactured by Craftsman
GARAGE DOOR OPENER
A bridor de puerta de cochera
MODEL/MODELO 200.57933
Read and follow all safety rules and operating instructions before the first use of this product. Fasten the manual near the garage door after installation. Periodic checks of the opener are required to ensure safe operation.
DO NOT install on a one-piece door.
Sears Brands Management Corporation, Hoffman Estates, IL 60179 U.S.A
www.craftsman.com
READ WARNINGS CAREFULLY to prevent SERIOUS INJURY or DEATH caused by electrocution or mechanical hazard.
Inventory
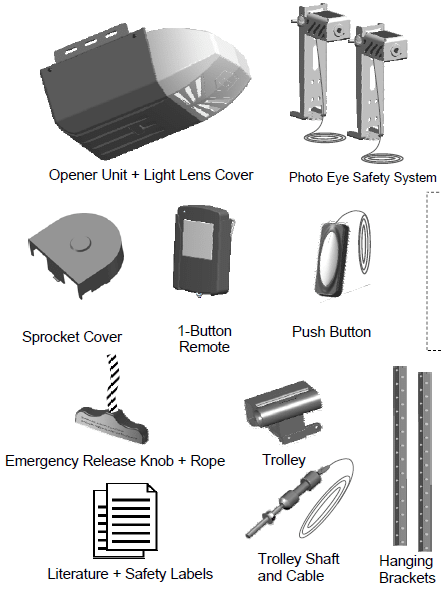
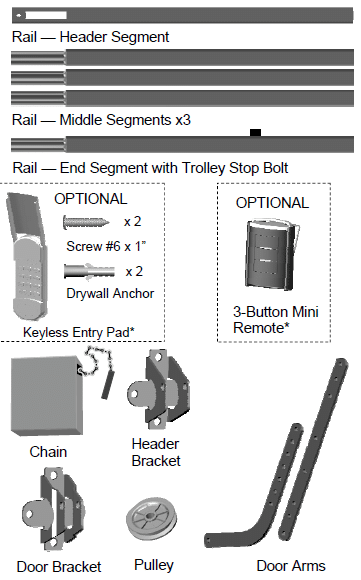
*See Accessories in Repair Parts section of this manual for purchase information.
Programming 1– Button Remote

To prevent SERIOUS INJURY or DEATH:
- Keep remote and battery out of reach of children.
- NEVER permit children to access the wall panel nor remotes.
- Operate the door ONLY when it is properly adjusted, and there are no obstructions present.
- ALWAYS keep a moving door in sight until completely closed. NEVER cross the path of a moving door.
To reduce risk of fire, explosion or electric shock:
- DO NOT short circuit, recharge, dissemble or heat the battery.
- Replace with 23AE 12 volt batteries ONLY. Dispose of batteries properly
To Program Remote(s):
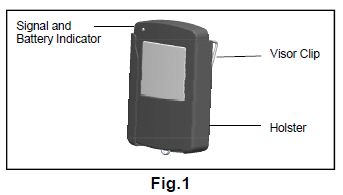
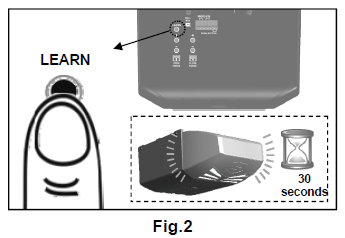
- See Fig.2 to add a remote. Press the “LEARN” button on the rear control panel of the opener. The courtesy light will illuminate with an audible click*. The unit is now ready to learn a remote.
- Within 30 seconds, press the button on the remote.
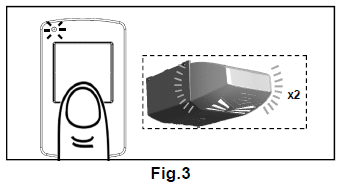
- The courtesy light will flash twice indicating remote has been stored successfully**.
Up to 20 remotes (including keyless entry pad codes) can be added to the unit by repeating the above procedures.
If more than 20 remotes are stored, the first stored remote will be replaced. (i.e. the 21st remote replaces the 1st stored remote.)
- If the courtesy light is already on, it will flash once and stay illuminated for 30 seconds.
** If a remote is not accepted, the courtesy light will stay on for 30 seconds, flash 4 times and then stay on for 2-1/2 minutes. Retry programming the remote by repeating the steps above.
Removing all Remotes:
To remove all remotes from memory, press and hold the “LEARN” button for 5 seconds. The courtesy light will flash 7 times indicating all remotes have been removed from memory.
Replacing Remote Battery:
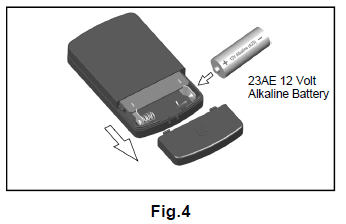
When the battery of the hand held remote is low, the indicator light will become dim and/or the range of the remote will diminish. To replace the battery, remove the battery cover from the remote as shown in Fig 4. Replace with a 23AE 12 volt alkaline battery with polarity shown in Fig.4.
This device complies FCC rules for HOME OR OFFICE USE. Operation is subject to the following two conditions: (1) this device may not cause harmful interference, and (2) this device must accept any interference received, including interference that may cause undesired operation.
Programming Keyless Entry Pad *
To purchase a keyless entry pad, visit a Craftsman outlet, call 1-888-331-4569, or go online to www.craftsman.
Warning: To prevent SERIOUS INJURY or DEATH:
- Keep remote and battery out of reach of children.
- NEVER permit children to access the wall panel, push button nor remotes.
- Operate door only when it is adjusted properly with no obstructions to door travel and is in clear sight.
- ALWAYS keep a moving door in sight until completely closed. NO ONE should cross the path of a moving door.
To reduce risk of fire, explosion or electric shock: - DO NOT short circuit, recharge, disassemble or heat battery.
- Replace with 1.5 volt AAA batteries ONLY. Dispose of batteries properly.
To Add Personal Codes:
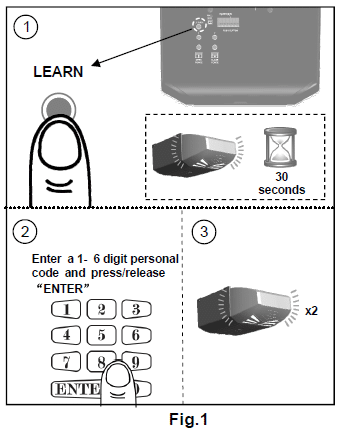
- Press the “LEARN” button on the rear control panel, “OK” LED will glow and beep. The unit is ready to accept a remote in the next 30 seconds as shown in Fig.1.
- Enter a 1 – 6 digit personal code on the keyless entry within 30 seconds and press/release “ENTER” button. “OK” LED will flash and beep twice indicating personal code is stored in memory.
Up to 20 personal codes (including 1-button remotes) can be added to the unit by repeating the above procedures. If more than 20 personal codes are stored, the previously stored one from the very beginning will be replaced, (i.e. the 21st remote replaces the 1st stored one.)
Removing ALL Personal Code(s):
To remove ALL personal code(s) and/or remotes from memory, press and hold the “LEARN” button for 5 seconds. “OK” LED will flash and beep, indicating all codes/remotes have been removed from memory.
Mounting the Keyless Entry:
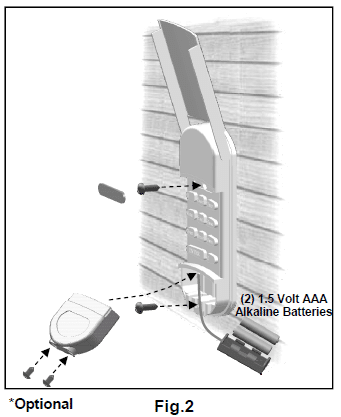
Keyless entry may be secured on door jamb face outside your garage. Locate keyless entry within sight of door at minimum height of 5 feet (1.5m), ensure it is away from reach of children and moving parts of door and hardware. Test the reception of the keyless entry before mounting. Change location for better reception if necessary.
Use the mounting holes on the keyless entry as a template to mark the position on the mounting surface. To attach to a wooden surface use the screws provided. In case of a drywall surface, drill holes and use drywall anchors provided.
Replacing Keyless Entry Battery:
When the battery of keyless entry is low, dimmed illumination is observed. To replace battery, remove the battery cover by loosening the screws underneath, and replace the battery with two1.5 volt AAA batteries.
Operating the Opener
Warning: To prevent SERIOUS INJURY or DEATH:
- READ AND FOLLOW ALL INSTRUCTIONS AND WARNINGS IN THE OWNER’S MANUAL AND LABELS
- Keep remote and battery out of reach of children.
- NEVER permit children to access the wall panel or remotes.
- Operate the door ONLY when it is properly adjusted, and there are no obstructions and is in clear sight.
- ALWAYS keep a moving door in sight until completely closed. NEVER cross the path of a moving door.
- If travel limit adjustment is made, force adjustment may also needed.
- After ANY adjustments, the safety reverse test MUST be performed to ensure the door reverses on contact with a 1-1/2” thick object (2×4 laid flat).
- ALWAYS ensure that your door is balanced and in good working condition.
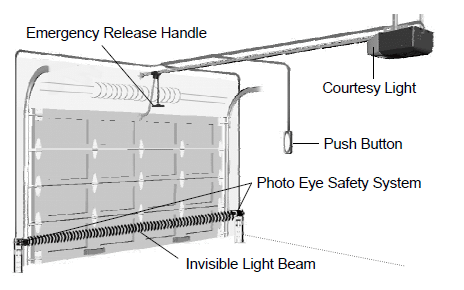
Actual Operating Scenario
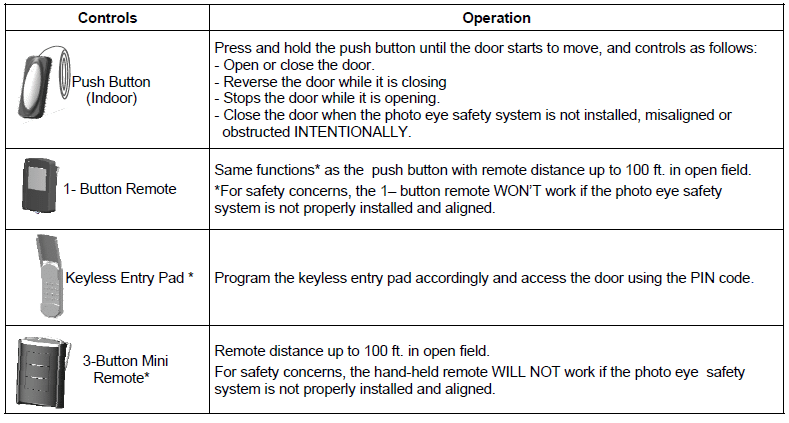
Door Status vs. Activation

Courtesy Light Responses

Warning: To prevent SERIOUS INJURY or DEATH:
- Use emergency release to disconnect trolley ONLY when the door is CLOSED to prevent unexpected rapid falling in case of a unbalanced / poor-conditioned door.
- Use emergency release ONLY when doorway is clear of persons and obstructions.
- DO NOT use emergency release to pull the door open or closed.
In case of a power failure or door obstruction, PULL EMERGENCY knob to release door from opener.
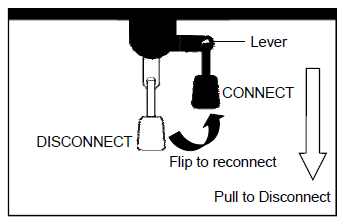
To Disconnect Trolley for Manual Operation
With the door closed, pull down the emergency release knob to the DISCONNECT position. The door can be raised / lowered manually.
To Re-connect Trolley
Pull the knob toward the opener so that the lever will flip up to the CONNECT position. The trolley will reconnect itself when the opener is activated or when the door is manually opened/ closed
Maintenance

Troubleshooting
