![]()
Operation manual
Room thermostat
About this document
Thank you for purchasing this product. Please:
▪ Keep the documentation for future reference.
Target audience
End users
Documentation set
This document is part of a documentation set. The complete set consists of:
- Installation manual:
- Installation instructions
- Format: Paper (supplied in the kit)
- Operation manual:
- Installation instructions
- Format: Paper (supplied in the kit)
The latest revisions of the supplied documentation may be available on the regional Daikin website or via your installer.
The original documentation is written in English. All other languages are translations.
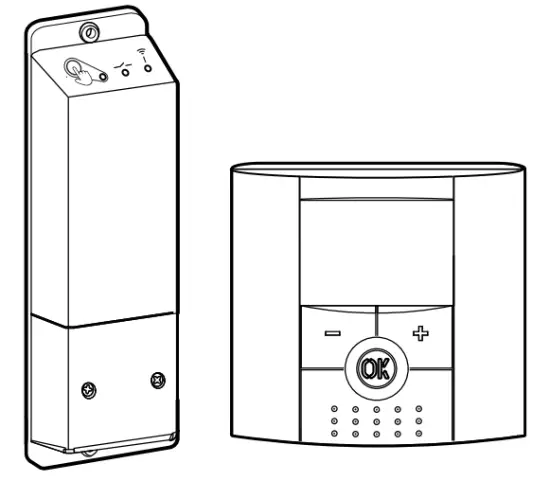
Room thermostat: Overview
The EKRTRB room thermostat is a programmable, wireless digital thermostat, designed to control your Daikin system, where comfort, simplicity and energy-saving go hand in hand. It is mainly used for existing installations.
An optional external temperature sensor (EKRTETS) can be connected to EKRTRB to be used as either a floor temperature sensor or as an external ambient temperature sensor.
2.1 Buttons
Overview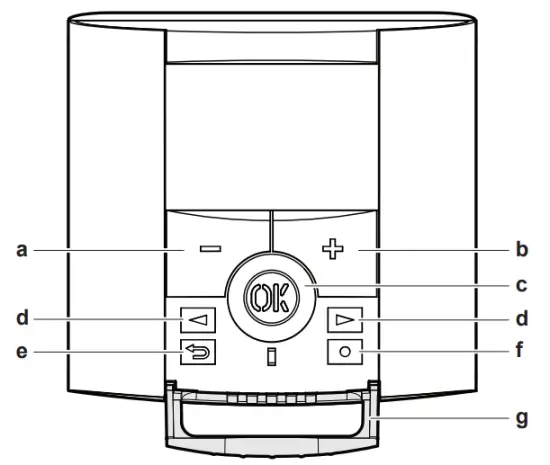
a Decrease button
b Increase button
c OK button
d Left and right navigation buttons
e Back button
f Edit button
g Button cover
Navigation —![]()
- Select an operation mode.
- In program mode, cycle between the days of a program.
- In the parameter menu, select a parameter to modify.
OK —![]()
- Confirm a selection.
- Confirm and save modifications to parameters, programs or date and time (blinking green LED).
- Short press to light up the thermostat backlight when it has become unlit.
- In OFF mode, press to display the current temperature and time.
- Override the open window function (if enabled). The button contains an LED that may display additional information about the system:
| LED state | Meaning |
| Red, fixed | Heating demand |
| Green, fixed | Cooling demand |
| Red, blinking | Sensor or battery error |
| Green, blinking | Confirm and save modifications |
Decrease/Increase — +-
- Adjust the temperature setpoint.
- Adjust values in any of the deeper menus, the user menu or the installer menu.
Back —
- Go back to a previous value or cancel an action.
- Press simultaneously to activate the button lock function.
- On the main screen, press to quickly cycle between which value is visualized: current temperature setpoint, ambient temperature, the temperature measured by the external temperature sensor, or humidity percentage. (1)
- Press and hold for 5 seconds to enter the installer menu.
Edit —
- In normal operation modes, press and hold for 2 seconds to modify the date and time.
- In program mode, press to edit a user program.
- Press and hold for 5 seconds to enter the parameter menu.
- Press in combination with to enable or disable button lock functionality.
2.2 Status icons![]()
a Reversible mode
b Timer mode
c Holiday mode
d Comfort mode
e Automatic mode
f Reduced mode
g OFF mode
h Program mode
i Program or parameter number
j Heating demand
k Cooling demand
l Parameter indicator
m Dew prevention
n Wireless communication with the receiver
o Sensor
p Low battery indicator
q Temperature unit
r Button lock
s Program step (current and in program creation)
t Manual override
u Day of the week
v Current day program
w Time or parameter name
x Temperature, humidity or parameter value
Operation
3.1 Date and time
After inserting the batteries, the room thermostat display will power on and will prompt you to set the current date and time. This is required before you can actually use the room thermostat.
3.1.1 To set date and time
- Adjust the currently selected value with
 The value that is currently being modified flashes.
 - Press
 to confirm a value. Result: The room thermostat jumps to the next value automatically.
 - Set the other values as desired.
- After setting the last value, the room thermostat will ask you to confirm and save your changes. Press (LED blinking green) to save the date and time settings.
Result: The room thermostat date and time are set and the room thermostat shows the main screen.
Values are set in the following order:
- Hour
- Minutes
- Days of the week (1~7 = Monday~Sunday)
- Day number (e.g. 15 April)
- Month number (1~12)
- Year
![]() INFORMATION
INFORMATION
You can access the date and time settings while in any of the normal operating modes at any time by pressing and holding for 2 seconds.
3.2 Operation modes
The room thermostat can be set to operate in several different modes to allow you to adjust your system according to your needs and preferences.
| Icon | Mode | Description |
| Comfort mode | Used for a fixed temperature on comfort level .0′ | |
| Reduced modem | Used for a fixed temperature on a reduced level .`1 | |
| AUTO | Automatic mode | The room thermostat automatically follows the steps defined in the selected program (built-in or user-defined). |
| OFF mode | Switches off your unit. | |
| Holiday mode | Used to set a fixed temperature during a long period of absence. | |
| Timer mode | Used to set a fixed temperature for only a specific period of time | |
| Reversible mode | Used to set the unit operation mode to heating or cooling (only applicable for reversible units). | |
| Program mode | Used to select the program for the room thermostat programs and to create or modify user-defined programs. |
(a) The default temperature setpoint in this mode is 21°C for heating and 24°C for cooling.
(b) If the unit operation mode is cooling, reduced mode acts as OFF mode.
(c) The default temperature setpoint in this mode is 17°C for heating.
3.2.1 To change the operation mode
Prerequisite: You are on the main screen.
- Use
 to move the cursor to the desired mode.
 - Press to activate the selected operation mode.
INFORMATION
![]() Reversible mode is ONLY applicable to installations with reversible units. The reversible mode menu is ONLY available if parameter 21 (MOde) is set to “rEv”. See”To
Reversible mode is ONLY applicable to installations with reversible units. The reversible mode menu is ONLY available if parameter 21 (MOde) is set to “rEv”. See”To
enable reversible mode” [6] for more information.
3.2.2 To change the temperature setpoint
Prerequisite: The room thermostat is in comfort mode ( ![]() ) or reduced mode (
) or reduced mode ( ![]() ).
).
- Press .
Result: The temperature on the room thermostat display blinks. - Use
 set the desired setpoint.
Result: The temperature changes to the desired setpoint.
3.2.3 Automatic mode
AUTO
In automatic mode, the room thermostat automatically follows the steps defined in the selected program. In this mode, the following information about the currently selected program is always visible on the screen.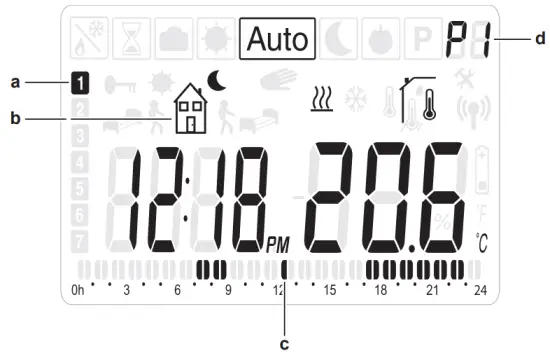
a Day of the week
b Current step in the program
c Current day program (current time bar blinks)
d Currently selected program
Depending on the type of step, the room thermostat will maintain either the comfort (![]() ) or reduced mode (
) or reduced mode (![]() ) temperature setpoint for the duration of that step. You can use one of the built-in programs or create a custom program to be followed by the room thermostat. In order to change, modify or create programs, use program mode.
) temperature setpoint for the duration of that step. You can use one of the built-in programs or create a custom program to be followed by the room thermostat. In order to change, modify or create programs, use program mode.
For more information, see “3.2.5 Program mode” [4 4].
To temporarily override a program
Prerequisite: The room thermostat is in automatic mode.
- Press
. Result: The room thermostat jumps to timer mode automatically. - Select the duration with press to confirm.
- Adjust the desired setpoint with .
- Press to start the function.
Result: The room thermostat displays the remaining duration of the timer and ![]() blinks while the timer is active.
blinks while the timer is active.
To stop the timer function before the end of the duration, press ![]() set the duration to no or use
set the duration to no or use ![]() to switch to a different operation mode.
to switch to a different operation mode.
3.2.4 OFF mode
![]() OFF mode allows you to switch off your unit. In OFF mode, integrated frost protection (fixed, 4°C) remains activated.
OFF mode allows you to switch off your unit. In OFF mode, integrated frost protection (fixed, 4°C) remains activated.
![]() INFORMATION
INFORMATION
In OFF mode, you can still press ![]() on the room thermostat to display the current time and temperature for a few seconds.
on the room thermostat to display the current time and temperature for a few seconds.
To restart your unit again, use ![]() to move the cursor to a different operation mode (e.g. automatic) and press
to move the cursor to a different operation mode (e.g. automatic) and press ![]() to activate it.
to activate it.
3.2.5 Program mode
![]() Program mode is used to select which program you want the room thermostat to follow when in automatic mode. Additionally, program mode is also used for the creation of custom user-defined programs. See “User-defined programs” [5] for more information.
Program mode is used to select which program you want the room thermostat to follow when in automatic mode. Additionally, program mode is also used for the creation of custom user-defined programs. See “User-defined programs” [5] for more information.
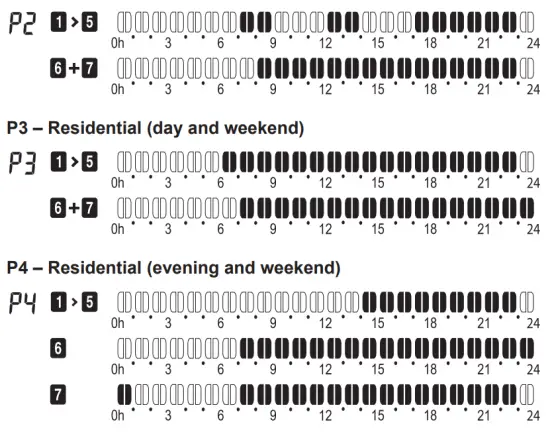
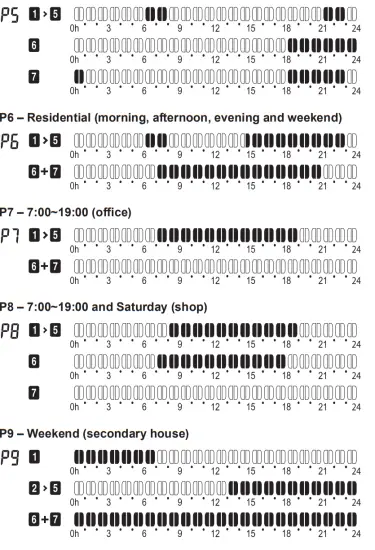
Default programs
The room thermostat comes equipped with 9 default programs (P1~P9) for standard situations. If none of the programs matches your needs, you can create a custom program. See “User-defined programs” [5] for more information. For the built-in programs, see the graphical 24-hour representations below.
![]() Depending on the type of step, the room thermostat follows either the reduced mode temperature setpoint (hollow segment) or the comfort mode temperature setpoint (filled in the segment
Depending on the type of step, the room thermostat follows either the reduced mode temperature setpoint (hollow segment) or the comfort mode temperature setpoint (filled in the segment
To change the active program
Prerequisite: The room thermostat is in program mode.
- Use and cycle between the programs and select the desired program. You can choose between P1~P9 (built-in programs) or U1~U4 (user-defined programs).
- Press and view the other days of each program.
- Press.
Result: The program is selected and now active while in automatic mode.
INFORMATION
![]() If you select a user-defined program, you are able to modify the program after pressing
If you select a user-defined program, you are able to modify the program after pressing![]() . For more information, see “To create or modify a user-defined program” [5].
. For more information, see “To create or modify a user-defined program” [5].
User-defined programs
In addition to the built-in programs (P1~P9), you can also define up to 4 custom schedules (U1~U4).
INFORMATION
![]() By default, all user-defined programs (U1~U4) follow the default reduced mode setpoints for every day of the week.
By default, all user-defined programs (U1~U4) follow the default reduced mode setpoints for every day of the week.
To create or modify a user-defined program
Prerequisite: The room thermostat is in program mode.
Prerequisite: You have changed the active program to one of the user-defined programs (U1~U4).
- Press
 to modify the user-defined program.
 - Use to adjust the hour of the first program step.
- Press to proceed to the next program step.
- Choose the type of step you want to program with .
Depending on the type of step, either the temperature setpoint of either reduced mode or comfort mode is followed by the room thermostat. The duration of each type of step can be set individually (a minimum of 30 minutes).
| Symbol | Setpoint | Meaning |
| The first step of the day: the room thermostat follows the comfort mode temperature setpoint during this step. |
||
| Leaving step (optional): adds an additional step to the current program. The room thermostat follows the reduced mode setpoint during this step. |
||
| Comeback step: used in case a leaving step was added to indicate when the thermostat should switch to the comfort setpoint again. | ||
| Last stop of the day: the room thermostat follows the reduced model temperature setpoint during this step. |
5 Press![]() to select the type of step.
to select the type of step.
6 Adjust the hour of the second step with ![]() . If you chose to add another step to the program earlier, you will also be asked to adjust the hour of the comeback step.
. If you chose to add another step to the program earlier, you will also be asked to adjust the hour of the comeback step.
7 Press ![]() to proceed to the next program step.
to proceed to the next program step.
8 Choose the type of step you want to program next. Again, you can choose to add another step to the program or to conclude the program for that day.
9 Repeat steps 4-6 for as many steps you would like to add in your program.
10 Press ![]() after the last step has been adjusted to save the program.
after the last step has been adjusted to save the program.
Result: “Copy” is visible on the display.
11 Use ![]() select either:
select either:
▪ “no” followed by ![]() modifying the program for the following day.
modifying the program for the following day.
▪ “yes” followed by![]() copying the program to the following day(s). Use
copying the program to the following day(s). Use![]() to select the day(s) and press
to select the day(s) and press![]() to confirm.
to confirm.
12 Define or copy the program for all days of the week and press on![]() the last day (7=Sunday).
the last day (7=Sunday).
Result: “Save” appears on the room thermostat display, and the ![]() LED blinks green.
LED blinks green.
13 Press![]() to save the user-defined program. To cancel instead, press.
to save the user-defined program. To cancel instead, press.
Result: The room thermostat returns to automatic mode, following the user-defined program that was created.
3.2.6 Timer mode
![]() Timer mode is used to set a fixed temperature setpoint for only a specific period of time. When the timer runs out, the room thermostat returns to the mode that was previously active.
Timer mode is used to set a fixed temperature setpoint for only a specific period of time. When the timer runs out, the room thermostat returns to the mode that was previously active.
Operation
To enable timer mode
Prerequisite: The room thermostat is in timer mode.
1 Use ![]() to set the duration of the timer in hours (H) and/ or days (d).
to set the duration of the timer in hours (H) and/ or days (d).
![]() INFORMATION
INFORMATION
By default, all user-defined programs (U1~U4) follow the default reduced mode setpoints for every day of the week.
2 Press![]() .
.
3 Use![]() to adjust the desired temperature setpoint
to adjust the desired temperature setpoint
4 Press![]() .
.
Result: The timer starts and the temperature setpoint is maintained for the programmed duration of the timer. The remaining time is displayed and blinks to indicate that timer mode is enabled. The room thermostat will return to the mode it was previously in when the timer ends.
To disable the timer before the end, press ![]() to set the duration to “no”, or simply use
to set the duration to “no”, or simply use![]() to select a different operation mode, interrupting the timer.
to select a different operation mode, interrupting the timer.
3.2.7 Holiday mode
![]() Holiday mode allows you to set a fixed temperature setpoint (antifreeze temperature) during a long period of absence. The default value is 10°C, but can be set anywhere between 0.5°C and 10°C (in steps of 0.5°C).
Holiday mode allows you to set a fixed temperature setpoint (antifreeze temperature) during a long period of absence. The default value is 10°C, but can be set anywhere between 0.5°C and 10°C (in steps of 0.5°C).
![]() INFORMATION
INFORMATION
The temperature setpoint in holiday mode is NOT equal to the integrated frost protection in OFF mode, which is a fixed 4°C.
![]() INFORMATION
INFORMATION
In cooling mode, this mode acts as OFF mode.
To enable holiday mode
Prerequisite: Parameter 06 (HG) is set to the desired anti-freeze temperature in the user menu. See “3.4.2 To modify parameters in the user menu” [7] for more information.
Prerequisite: The room thermostat is in holiday mode.
1 Use ![]() to set the duration in days (d).
to set the duration in days (d).
![]() INFORMATION
INFORMATION
By default, all user-defined programs (U1~U4) follow the default reduced mode setpoints for every day of the week.
2 Press![]() .
.
Result: The anti-freeze temperature is maintained for the programmed duration. The number of days left is displayed and![]() blinks to indicate that holiday mode is enabled. The room thermostat will return to the mode it was in previously when the duration ends.
blinks to indicate that holiday mode is enabled. The room thermostat will return to the mode it was in previously when the duration ends.
To disable holiday mode before the end of the duration, press ![]() set the duration to “no”.
set the duration to “no”.
3.2.8 Reversible mode
![]() INFORMATION
INFORMATION
Reversible mode is ONLY applicable to installations with reversible units.
![]() Reversible mode allows you to quickly select the operation mode (cooling/heating) of your reversible unit. To make use of reversible mode, it must be enabled in the installer settings first. For more information, see “To enable reversible mode” [4 6]. To change the unit operation mode
Reversible mode allows you to quickly select the operation mode (cooling/heating) of your reversible unit. To make use of reversible mode, it must be enabled in the installer settings first. For more information, see “To enable reversible mode” [4 6]. To change the unit operation mode
Prerequisite: Reversible mode is selected on the room thermostat.
1 Press ![]() .
.
Result: The currently selected unit operation mode blinks.
2 Select the desired unit operation mode using ![]() .
.
| Room thermostat display | Unit operation mode |
| Hot | Heating |
| Cld | Cooling |
3 Press![]() to confirm.
to confirm.
Result: The unit operation mode is set. The ![]() LED lights up green (cooling) or red (heating), depending on the selected mode.
LED lights up green (cooling) or red (heating), depending on the selected mode.
Once the unit operation mode has been set, you can return to the mode the thermostat was in before by pressing
. Alternatively, press ![]() .
.
To enable reversible mode
- Press and hold for 5 seconds.
Result: You are in the installer menu. - Use select parameter 21 (MOde).
- Use set the parameter value to “rEv”.
- Press to confirm the parameter value.
Result: Reversible mode is activated.
Other functionality
3.3.1 Button lock
This function locks the room thermostat buttons, preventing accidental changes to setpoints or other settings. This is useful when the room thermostat is used in public areas or in children’s rooms, for example. When the button lock is active, is permanently visible on the room thermostat display.
To enable or disable button lock
- Press simultaneously.
Result: The button lock indicator appears on the room thermostat display. The room thermostat buttons are locked. - To disable the button lock again, press simultaneously again.
Result: The button lock indicator disappears from the display and the room thermostat buttons are unlocked.
3.3.2 Open window function
If enabled, this function is able to stop heating operation whenever the room thermostat detects unusual temperature drops (usually due to an open window or door). This function is enabled by default. If the measured temperature decreases by 3°C or more during a period of 5 minutes or less, the thermostat will stop all heating operations for 15 minutes. If the temperature keeps dropping after this initial period, the room thermostat will continue to cease all heating operations. Whenever the room thermostat is stopping eating operations, the temperature on the room thermostat display blinks. It is possible to manually override the open window function by pressing ![]() . Once overridden, the temperature no longer blinks.
. Once overridden, the temperature no longer blinks.
![]() INFORMATION
INFORMATION
The open window function will NOT work in the following situations:
- EKRTETS is installed as a floor sensor (parameter 20 – “rEGU” is set to “FLR”).
- The room thermostat is in holiday mode or in OFF mode.
- The temperature drops below the anti-freeze temperature set in the user menu.
- The unit operation mode is set to cool (reversible mode).
![]() INFORMATION
INFORMATION
If enabled, the open window function will still respect the anti-freeze temperature (parameter 06 – “HG” in the user menu). This means that the room thermostat will keep
heating to maintain the anti-freeze temperature (by default 10°C).
To enable or disable the open window function
- Press and hold for 5 seconds.
Result: The first parameter (rEGU) of the installer menu appears. - Use to select parameter 33 (Win).
- Use to change the parameter value to yes (enabled, default value) or no (disabled).
- Press to confirm.
- Use select parameter 37 (End).
- Press to exit the installer menu.
Result: The open window function is enabled/disabled.
3.3.3 Dew prevention
For reversible systems, the room thermostat offers 2 ways of managing humidity in order to prevent condensation while cooling. Humidity percentage threshold You can set a threshold value for the humidity percentage. Whenever the room thermostat detects that the humidity percentage exceeds the set threshold, cooling demand is ceased to prevent condensation. Whenever this is the case, blink on the room thermostat display. To change the threshold value (default 55%), set the value for parameter 34 (“rH”) to the desired value in the installer menu.
Dew prevention function with floor temperature sensor If the optional external temperature sensor EKRTETS is installed as a floor temperature sensor, parameter 35 (“dEv”) can be set to “yes” in the installer menu to enable the dew prevention function. When enabled, this function will continuously compare the temperature measured by the floor temperature sensor against the dew point. The dew point is calculated based on the room temperature and humidity. When the floor temperature drops below or comes too close to the dew point, cooling demand is stopped temporarily to prevent any condensation on the floor. While the dew prevention function is active, blinks on the room thermostat display.
3.4 User menu
The user menu allows you to set basic room thermostat parameters.
3.4.1 To enter the user menu
1 Press ![]() hold for 5 seconds.
hold for 5 seconds.
Result: The first parameter (rF INI) of the user menu appears on the display.
To exit the user menu, use the navigation buttons to select the “End” parameter and press ![]() .
.
3.4.2 To modify parameters in the user menu
Prerequisite: You are in the user menu.
- Use to cycle between parameters.
- Press to select the parameter.
- Modify the desired parameter using .
- After making changes, press to save.
3.4.3 User parameters
![]() INFORMATION
INFORMATION
Some parameters relating to functions described in this manual are NOT available in the user menu and can ONLY be found in the installer menu.
| Parameter | Description | Possible values | |
| # | Name | ||
| 0 | rF INI | Radio configuration mode | |
| 1 | dEG | Temperature unit used on display | •°C •°F |
| 2 | The time format used on display | •24H (24 hour display) •12H (12-hour display) |
|
| 3 | DST | Daylight summertime change | •yes (enabled) •no (disabled) |
| 4 | AIrC | Internal temperature sensor calibration. | See “4 Temperature sensor calibration” [► 8] for more information. |
| 5 | AMC | External temperature sensor calibration | |
| 6 | HG | Anti-freeze temperature in holiday mode | •10°C •Range: 0.5°C-10°C |
| 7 | ITCS | Intelligent Temperature Control System(b} | •yes (enabled) •no (disabled) |
| 8 | Car ALL | Clear user settings: press and hold |
|
| 9 | CHAn | – | |
| 10 | VErS | Software version | |
| 11 | End | Exit the user menu. Press |
|
(a) The default values are listed in bold.
(b) If enabled, this function will activate the installation in advance (up to a maximum of 2 hours) to ensure that the desired setpoint is reached at the appropriate time according to the set program. With every program change, the room thermostat measures the time taken by the installation to reach the setpoint to compensate for any temperature differences that may be present at different times. This allows you to make program changes without needing to adjust the temperature in advance, because the room thermostat does this automatically.
Temperature sensor calibration
Both the internal temperature sensor of the room thermostat and the (optional) external temperature sensor can be calibrated. It is recommended to calibrate the sensor(s) after installation. The procedure is the same for both the internal temperature sensor and the optional external temperature sensor.
4.1 To calibrate the temperature sensor
- Using a thermometer, measure the temperature in the room at 1.5 m distance from the floor for at least 1 hour.
- Press and hold on to the room thermostat for 5 seconds to enter the user menu.
- Use navigation keys to select AirC or AMbC parameters, depending on whether you want to calibrate the internal or (optional) external temperature sensor.
- Press OK to modify the selected parameter. By default, it is set to “no”.
- Use to enter the measured value.
- Press OK to confirm.
Result: The message “yes” is displayed and the value is stored in the internal memory of the room thermostat.
If needed, the stored calibration value can be erased by pressing.
The message “no” will be displayed, confirming the value has been erased.
Maintenance
5.1 Maintenance safety precautions
![]() WARNING
WARNING
Before carrying out any maintenance or repair activities, stop system operation with the room thermostat, and turn off the power supply circuit breaker. Possible consequence: electrical shock or injury.
![]() NOTICE To clean the room thermostat, do NOT use organic solvents, such as paint thinner. Possible consequence: damage, electrical shock, or fire.
NOTICE To clean the room thermostat, do NOT use organic solvents, such as paint thinner. Possible consequence: damage, electrical shock, or fire.
![]() WARNING
WARNING
Do NOT wash the room thermostat. Possible consequence: electric leakage, electrical shock, or fire.
![]() INFORMATION
INFORMATION
When the dirt on the surface cannot be removed easily while cleaning the room thermostat, soak the cloth in neutral detergent diluted with water, squeeze the cloth tightly, and clean the surface. Afterward, wipe dry with a dry cloth.
5.2 To clean the user interface
Wipe the screen and other surface parts of the user interface with a dry cloth.
5.3To replace the batteries
When blinks on the room thermostat display, the batteries of the room thermostat need to be replaced. Once the battery indicator starts blinking, the room thermostat will still be able to function for 30 days before completely shutting down.
- Open the battery compartments on both sides of the room thermostat.
- Remove the old batteries.
- Insert new batteries.
- Close the battery compartments.
Result: The room thermostat is ready for use.
![]() INFORMATION
INFORMATION
After replacing the batteries, the date and time have to be set again. See “3.1.1 To set date and time” [3] for more information.
Troubleshooting
If one of the following malfunctions occurs, take the measures shown below and contact your dealer.
The system MUST be repaired by a qualified service person. If the system does NOT operate properly except for the above-mentioned cases and none of the above-mentioned malfunctions is evident, investigate the system in accordance with the following procedures.
| Malfunction | Measure |
| The thermostat display is blank and the thermostat is not working. | Check whether the battery insulators have been removed from the battery compartments. Check whether the orientation of the batteries in the compartments is correct. Check the battery capacity and replace the batteries if necessary. |
| The room thermostat buttons do not react when pressed. | Check whether key lock function is enabled. If G is visible on the display, |
| press ” |
|
| the room thermostat again. | |
| The room thermostat does not initiate cooling or heating demand according to the setpoint. | Check whether the dew prevention function is active. Check if the receiver is in automatic mode and not in a manual mode by verifying that the push-button LED on the receiver is OFF and not green. |
| The room temperature does not match the setpoint set on the room thermostat. | Recalibrate the room thermostat temperature sensor (or the external temperature sensor). See the installation manual for the calibration procedure. Contact your installer. |
| The schedule timer starts up too early. | Check whether the correct program is selected (P1-P9 or U1-U4). Check whether parameter 07 is enabled in the user menu. |
| The time and date are flashing on the room thermostat display. | Set the clock as described in “3.1 Date and time” [► 3]. |
| There is no communication between the room thermostat and the receiver. | ▪ Check whether the receiver is more than 50 cm away from all other electrical or wireless devices that may interfere (this includes Wi-Fi signals and mobile phones) ▪ Contact your installer. |
In case the ![]() LED blinks red:
LED blinks red:
| Malfunction | Measure |
| Replace the batteries of the room thermostat. | |
| Contact your installer (internal temperature sensor problem). | |
| •Check the sensor connections. •Disconnect the sensor from the room thermostat and check it with an ohmmeter. The measured value should be —10k0. •Contact your installer (floor sensor problem). |
|
| thermostat display. |
Contact your installer (humidity measurement problem). |
If after checking all the above items, it is impossible to fix the problem yourself, contact your installer and state the symptoms, the complete model name of the unit (with manufacturing number if possible), and the installation date (possibly listed on the warranty card).
Disposal
 The batteries supplied with the room thermostat are marked with the following symbol:
This means that the batteries may NOT be mixed with unsorted household waste. If a chemical symbol is printed beneath the symbol, this chemical symbol means that the battery contains a heavy metal above a certain concentration. Possible chemical symbols are: Pb: lead (>0.004%). Waste batteries MUST be treated at a specialized treatment facility for reuse. By ensuring waste batteries are disposed of correctly, you will help to prevent potential negative consequences for the environment and human health.