DELTA 106557 Single Handle Pull-Out Kitchen Faucet

Register Online: www.deltafaucet.com/registerme
To reference replacement parts and access additional technical documents and product info, visit www.deltafaucet.com
1-800-345-3358 [email protected]
Read all instructions prior to installation.
CAUTION
Failure to read these instructions prior to installation may result in personal injury, property damage, or product failure. Manufacturer assumes no responsibility for product failure due to improper installation.
WARNING:
this faucet is not to be used with portable dishwashers.
You may need
Cleaning and Care
Care should be given to the cleaning of this product. Although its finish is extremely durable, it can be damaged by harsh abrasives or polish. To clean, simply wipe gently with a damp cloth and blot dry with a soft towel.
Note: ShieldSpray® not included with all models.
Delta® ShieldSpray® Technology cuts through stubborn messes with a concentrated stream and contains the splatter with an innovative water shield. Now you can power off the mess without making a bigger one.
SINGLE HOLE MOUNTING HARDWARE(S)
(1), (2) & (3)
Mounts above deck/sink and under the faucet hub. Be sure to align trim ring tabs (4) (if your faucet has a trim ring) in base of the hub.
Thin Deck Aid RP37490 is not included with all models. Use to provide stiffness to thin gauge sinks. – To order, visit www.deltafaucet.com. Open your faucet package and determine what type of gasket (1) gasket & trim ring (2), or gasket, base ring & trim ring (3) plus mounting hardware and tools (5) that will be required to install your faucet based on the illustrations above compared to your supplied hardware.’
OPTIONAL
Optional Escutcheon Installation
Not included with all models – To order, visit www.deltafaucet.com. For installations using the 10″ escutcheon, be certain and use the 10″ escutcheon (1) and under cover plate (2). Assemble under cover plate and escutcheon in place of single hole trim ring. Place the shanks (3) of the escutcheon/under cover plate assembly into the mounting holes of the sink. Slide the tubes and shank of the hub (4) through the escutcheon and mounting holes, then install hub onto escutcheon. Ensure that tabs (5) on escutcheon and plate are properly located in slots in bottom of hub. Mount as shown above using the nuts (6), bracket (7) and nut with wrench (8).
Connection
Standard Connections
NOTICE
To avoid risk of property damage, Follow instructions for proper installation. Failure to follow these instructions may result in risk of property damage caused by leaking at this connection. Do not use pipe dope or other sealants on water line connections.
Ensure all fittings and end connections are free of debris. Faucet fittings (1) are 3/8″ compression. Loop tubing (2) if it is too long. Note: Recommended tubing minimum bend diameter is 8″. Secure metal nut (3) to supply valve connection (4). Turn nut until it feels snug. Then tighten nut at least 2 more turns with a wrench. Repeat for other tube. Turn on water, examine for leaks.
Custom Fit Connections
NOTICE
If you determine the PEX supply tubing for this faucet is too long and must be shorter to create an acceptable installation, be sure to read the instructions and plan ahead. When cutting the supply tubing the installer accepts the responsibility to do so in a way that allows a leak-free joint to be created. Delta is not responsible for tubing that is cut too short or cut in a way that will not allow for a leak-free joint. DO NOT use a metal sleeve (ferrule) or gasket (supplied with faucet) in place of the plastic sleeve (ferrule) supplied, it may not create a leak-free joint. Do not use pipe dope or other sealants on water line connections.
For custom fit installations, you must use plastic sleeves (ferrules) supplied with model and nuts included on supply lines. Tube cut must be straight. See plastic sleeve (ferrule) installation instructions found in and included in this document for more information.
Slide nut (1) over plastic sleeve (ferrule) (3). Start nut by hand onto supply valve connection (2) to prevent cross-threading. Turn nut until it feels snug. Then tighten nut at least 2 more turns with a wrench. Repeat for other supply line. Turn on water, examine for leaks.
Potential Problems and Remedies
- Tubing is not cut perpendicular to the axis of the tube: carefully make an additional cut, being careful not to cut the tube too short.
- Tubing is cut too short: buy a coupling union and a replacement supply line that mate together from a store. The coupling union end intended to connect to the faucet must mate to the standard 3/8″ connection nuts and plastic sleeves (ferrules) supplied with the faucet.
- The plastic sleeve (ferrule) or connection nut is lost: purchase a replacement nut and/or plastic sleeve (ferrule) that are designed to seal with PEX tubing.
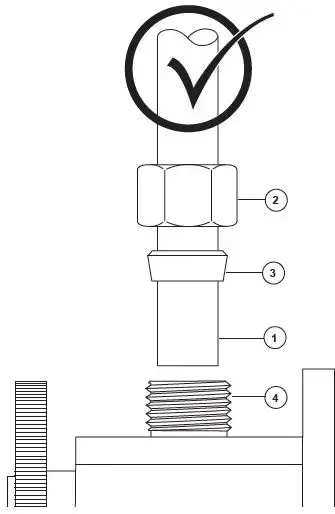
Correct method
NOTICE
Failure to use plastic sleeve (ferrule) in the correct orientation will result in disconnection and possible water damage.
- Determine desired length of supply tube (1). Leave 1″ or 2″ of extra length to allow for easier installation and cut tube. Ensure cut is straight and burr free.
- Slide nut (2) and plastic sleeve (ferrule) (3) onto cut supply tube. Ensure plastic sleeve (ferrule) is oriented as shown.
- Insert supply tube into supply valve connection (4). Supply tube should touch bottom of hole inside supply valve.
- Slide plastic sleeve (ferrule) down supply tube until it contacts the supply valve connection.
- Slide nut over plastic sleeve (ferrule). Start nut by hand to prevent cross-threading. Turn nut until it feels snug. Then tighten nut at least 2 more turns with a wrench. Repeat for other supply line. Turn on water, examine for leaks.
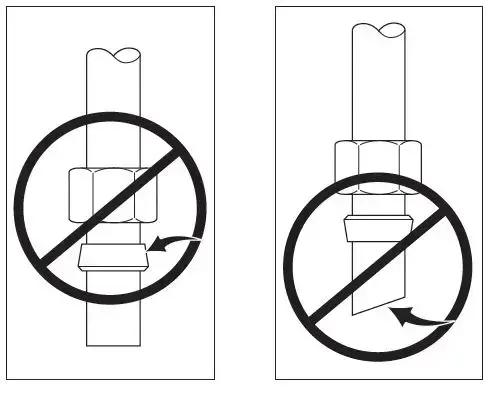
Incorrect Installation Do not install sleeve upside down.
Ensure cut is straight.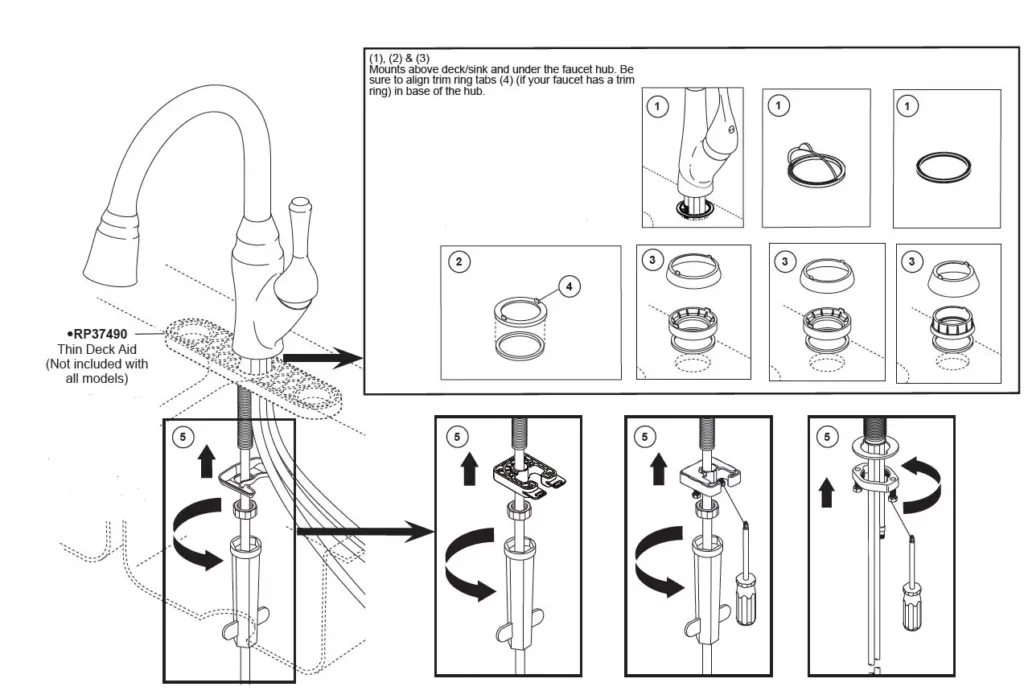 Do not use gasket (1) supplied with PEX tubing or brass ferrule (2) supplied with valve stops.
Ensure tube is fully inserted into stop before sliding sleeve down to engage top of fitting.
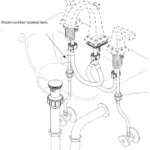
Flush Supply Lines
- A. Place a bucket below outlet tube (1) and move the valve handle (2) to the open mixed position.
Note: To turn on faucet, pull the lever away from the faucet. - B. Then, while holding the outlet tube (1) over the bucket, slowly open and close the supply stops (3). This will prevent debris from being lodged in the hose and sprayer.
- C. Move faucet handle (2) to the off position, and carefully remove container of water.
Hose Installation
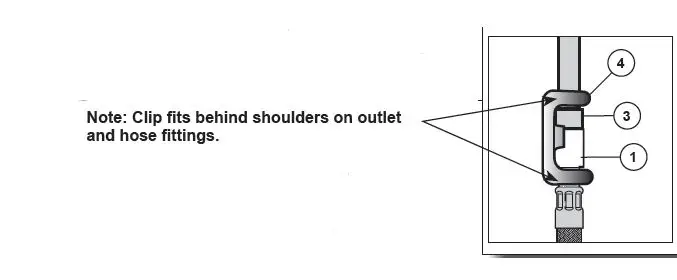
- A. Insert hose end (1) through hose weight assembly (2).
- B. Push hose end (1) onto faucet outlet (3). Attach clip (4) over hose and outlet as shown. Pull down moderately to ensure connection has been made.
B. Side View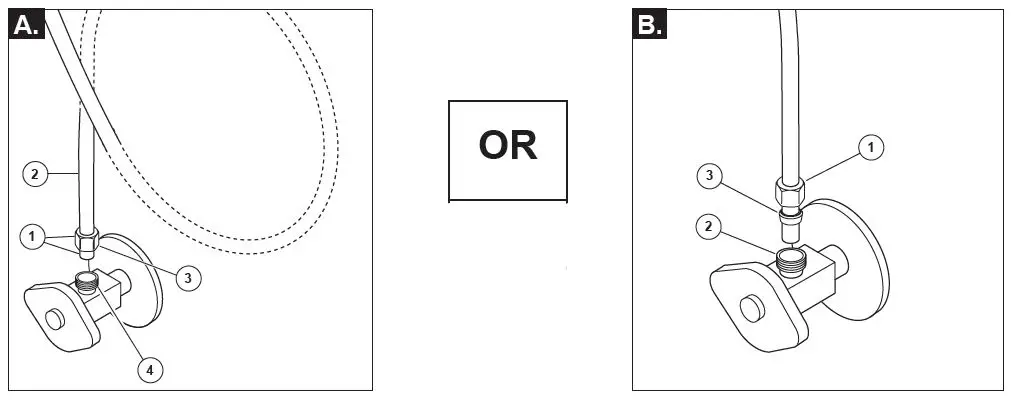
Setting The Handle Limit Stop (Optional) – not supplied with all models
This faucet includes an integrated handle limit stop that has two positions. Position 1, to the left, allows full handle motion (the full range between “all cold” to “all hot”). The faucet is set in position 1 in the factory. Position 2, to the right, allows half of the normal handle motion (“all cold” to “mixed hot/cold”).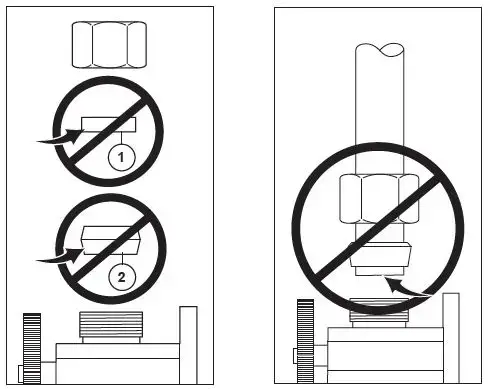
Soap Dispenser Installation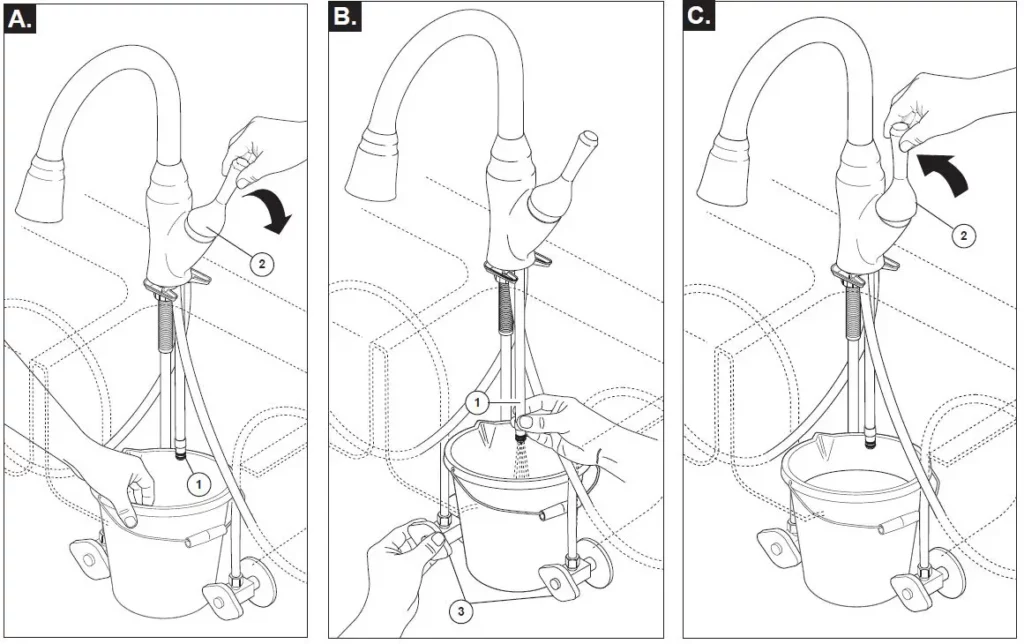 Note: Soap dispenser not included with all models.
Remove nut (1). Separate head (2) from body (3). Insert body (3) and gasket (4) through selected hole in sink. Make sure gasket (4) is properly seated in the base. Secure body to sink with nut (1). From under the sink screw the bottle (5) onto the body assembly shank. Insert pump (6) into head (2), then drop into body (3). NOTE: To fill, lift the head and pump assembly out of the bottle and pour not more than 8 oz. into bottle. DO NOT remove bottle each time as this weakens the neck. Pull pump and head assembly out occasionally to soak and pump warm water through pump to remove soap build-up. Note: Initially it may take up to 12 pumps to bring soap to the pump tip.
A. Turn on water supplies (1) and faucet valve handle (2). Check all connections at arrows for leaks. Refer back to the appropri-ate installation instructions and retighten if necessary. If assembled correctly, check for damage to seals and order appropriate replacements.
B. Sprayer will lock into position when brought into proximity of the spout magnet. The sprayer can be removed by either pulling directly out from the spout or by twisting 90° in either direction which will cause the magnets to repel and the head to decouple from the spout (recommended).
Check the operation of the 2 function sprayer by pushing the trigger (A) from aerator to spray. For models with a 3 function sprayer, check the operation by pushing the buttons to achieve the 3 different modes.
Maintenance
If faucet exhibits very low flow
- A. Remove and clean aerator (1) (Note: some models are not supplied with an areator or a wrench is required (2) to remove aerator.), or
- B. Unscrew hose from spray head and clean debris from screen (the screen is located just inside the spray head (3). Note: Not all models have screens. IMPORTANT: Reinstall screen to the spray head. (Failure to reinstall the screen could damage internal parts.)
If faucet leaks from under handle: Remove handle (4) and cap (5). Using a wrench, ensure bonnet nut (6) is tight.
If leak persists–SHUT OFF WATER SUPPLIES. Replace valve cartridge (7). When reinstalling parts, make sure bonnet nut (6) is tightened securely with a wrench.*
If faucet leaks from spout outlet–SHUT OFF WATER SUPPLIES. Replace valve cartridge (7). When reinstalling parts, make sure bonnet nut (6) is tightened securely with a wrench.*
WARNING: Failure to securely tighten bonnet nut with a wrench could result in water damage.
Note: A small amount of water may run out the spout or drip for a very short period after the faucet is shut off. This is a natural occurrence caused by the long flexible hose.
Note: Do not attempt to disassemble cartridge (7). There are no repairable parts inside.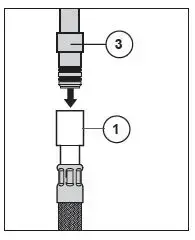 Maintenance
If faucet exhibits very low flow – Unscrew hose from spray head and clean debris from screen (1) (the screen is located just inside the spray) . IMPORTANT: Reinstall screen to the spray head (failure to reinstall the screen could damage internal parts).
If faucet leaks from under handle or from spout outlet – Insert a small screwdriver into slot (2) in button (3) and remove. Loosen set screw (4) inside of handle. Remove handle. Remove cap (5) by rotating counterclockwise. Bonnet may be stiff due to O-ring, but should rotate by hand. Remove bonnet nut (6) by rotating counterclockwise with a wrench. Remove cartridge (7) by pulling directly back on stem. Replace cartridge and reassemble.
WARNING: Failure to securely tighten bonnet nut with a wrench could result in water damage.
Note: A small amount of water may run out the spout or drip for a very short period after the faucet is shut off. This is a natural occurrence caused by the long flexible hose.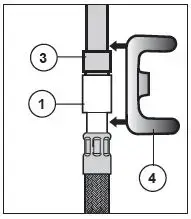
3 Function Wand
- Button 1 – Standard Flow Aerator
- Button 2 – 1.5 gpm at 60 psi Maximum Aerator
- Button 3 – Spray Mode
- Note – 3 Function Sprayer returns to position 2 if left in position 1 when the water is turned off.
ShieldSpray® Models
- Button 1 – ShieldSpray Mode
- Button 2 – Spray Mode
- Button 3 – 1.8 gpm at 60 psi Maximum Aerator
- Note – 3 Function Sprayer returns to position 3 when button 1 is released.
C. With the wand undocked, press button 1 to use the ShieldSpray mode.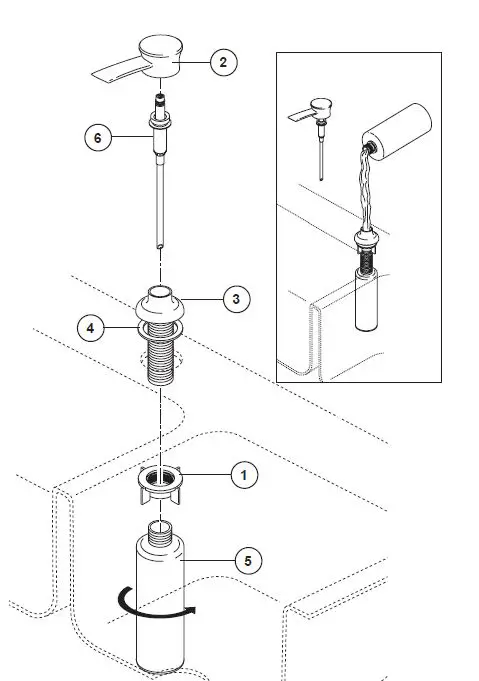 Hold the plate 1/2 way through the bubble.
For optimal performance, use in households with water pressure above 35 psi. The ShieldSpray feature may appear different at lower water pressures.
Tip: Don’t push the button while docked – always pull it close to the plate.
Limited Warranty on Delta® Faucets
Parts and Finish. All parts (other than electronic parts and batteries) and finishes of Delta® faucets purchased from authorized Delta sellers are warranted to the original consumer purchaser to be free from defects in material and workmanship for as long as the original consumer purchaser owns the home in which the faucet was first installed. For commercial purchasers, (a) the warranty period is ten (10) years for multi-family residential applications and (b) five (5) years for all other commercial applications, in each case from the date of original pur-chase. For purposes of this warranty, the term “multi-family residential application” refers to the purchase of the faucet from an authorized Delta seller by a purchaser who owns but does not live in the residential dwelling in which the faucet is initially installed, such as in a rented or leased single unit or multi-unit detached home (duplex or townhome), or a condominium, apartment building or community living center. The following installations are not considered multi-family residential applications, are excluded from the 10-year warranty and are subject to the 5-year warranty: industrial, institutional or other business premises, such as a dormitory, hospitality premises (hotel, motel or extended stay location), airport, educational facility, long- or short-term healthcare facility (hospital, rehabilitation center, nursing, assisted or staged-care liv-ing unit), public space or common area.
Parts and Finish for Delta® Recertified Faucets. Delta Faucet Company offers for sale on deltafaucet.com Delta® Recertified faucets. All parts (other than electronic parts and batteries) and finishes of these Delta® Recertified faucets are warranted to the original consumer pur-chaser to be free from defects in material and workmanship for ten (10) years from the date of original purchase. For commercial purchasers, the warranty period is one (1) year from the date of original purchase.
Electronic Parts. Electronic parts (other than batteries), if any, of Delta® faucets purchased from deltafaucet.com or authorized Delta sell-ers are warranted to the original consumer purchaser to be free from defects in material and workmanship for five (5) years from the date of original purchase or, for commercial purchasers, for one (1) year from the date of original purchase. No warranty is provided on batteries.
What We Will Do. Delta Faucet Company will repair or replace, free of charge, during the applicable warranty period (as described above), any part or finish that proves defective in material and/or workmanship under normal installation, use and service. If repair or replacement is not practical, Delta Faucet Company may elect to refund the purchase price in exchange for the return of the product. These are your exclusive remedies.
What Is Not Covered. Because Delta Faucet Company is unable to control the quality of Delta products sold by unauthorized sellers, unless otherwise prohibited by law, this warranty does not cover Delta products purchased from unauthorized sellers.
Any labor charges incurred by the purchaser to repair, replace, install or remove this product are not covered by this warranty. Delta Faucet Company shall not be liable for any damage to the faucet resulting from reasonable wear and tear, outdoor use, misuse (including use of the product for an unintended application), freezing water, abuse, neglect or improper or incorrectly performed installation, maintenance or repair, including failure to follow the applicable care and cleaning instructions. Delta Faucet Company recommends using a professional plumber for all installation and repair of faucets. We also recommend that you use only genuine Delta® replacement parts.
What You Must Do To Obtain Warranty Service or Replacement Parts. A warranty claim may be made and replacement parts may be obtained by calling 1 800 345 DELTA (3358) or by contacting us by mail or online as follows (please include your model number and date of original purchase):
In the United States and Mexico:
Delta Faucet Company
Product Service
55 E. 111th Street
Indianapolis, IN 46280
Attention: Customer Solutions
www.deltafaucet.com/service-parts/contact-us
In Canada:
Masco Canada Limited, Plumbing Group
Technical Service Centre
350 South Edgeware Road
St. Thomas, Ontario, Canada N5P 4L1
Attention: Customer Service
http://www.deltafaucet.ca/customersupport/assistance.html
Proof of purchase (original sales receipt) from the original purchaser must be made available to Delta Faucet Company for all warranty claims unless the purchaser has registered the product with Delta Faucet Company or the product is a Delta® Recertified product purchased from deltafaucet.com. This warranty applies only to Delta® faucets manufactured after January 1, 2019 and installed in the United States of America, Canada and Mexico.
Limitation on Duration of Implied Warranties. Please note that some states/provinces (including Quebec) do not allow limitations on how long an implied warranty lasts, so the below limitations may not apply to you. TO THE MAXIMUM EXTENT PERMITTED BY APPLICABLE LAW, ANY IMPLIED WARRANTY, INCLUDING THE IMPLIED WARRANTIES OF MERCHANTABILITY AND OF FITNESS FOR A PARTICULAR PURPOSE, IS LIMITED TO THE STATUTORY PERIOD OR THE DURATION OF THIS WARRANTY, WHICHEVER IS SHORTER.
Limitation of Special, Incidental or Consequential Damages. Please note that some states/provinces (including Quebec) do not allow the exclusion or limitation of special, incidental or consequential damages, so the below limitations and exclusions may not apply to you. TO THE MAXIMUM EXTENT PERMITTED BY APPLICABLE LAW, THIS WARRANTY DOES NOT COVER, AND DELTA FAUCET COMPANY SHALL NOT BE LIABLE FOR, ANY SPECIAL, INCIDENTAL OR CONSEQUENTIAL DAMAGES (INCLUDING LABOR CHARGES TO REPAIR, REPLACE, INSTALL OR REMOVE THIS PRODUCT), WHETHER ARISING OUT OF BREACH OF ANY EXPRESS OR IMPLIED WARRANTY, BREACH OF CONTRACT, TORT, OR OTHERWISE. DELTA FAUCET COMPANY SHALL NOT BE LIABLE FOR ANY DAMAGE TO THE FAUCET RESULTING FROM REASONABLE WEAR AND TEAR, OUTDOOR USE, MISUSE (INCLUDING USE OF THE PRODUCT FOR AN UNINTENDED APPLICATION), FREEZING WATER, ABUSE, NEGLECT OR IMPROPER OR INCORRECTLY PERFORMED INSTALLATION, MAINTENANCE OR REPAIR, INCLUDING FAILURE TO FOLLOW THE APPLICABLE INSTALLATION, CARE AND CLEANING INSTRUCTIONS. Notice to residents of the State of New Jersey: The provisions of this warranty, including its limitations, are intended to apply to the fullest extent permitted by the laws of the State of New Jersey.
Additional Rights. This warranty gives you specific legal rights, and you may also have other rights which vary from state/province to state/province.
This is Delta Faucet Company’s exclusive written warranty and the warranty is not transferable.
If you have any questions or concerns regarding our warranty, please contact us as provided above or view our Warranty FAQs at www. deltafaucet.com.