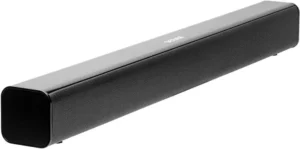

DENVER Bluetooth Soundbar with Wireless Subwoofer
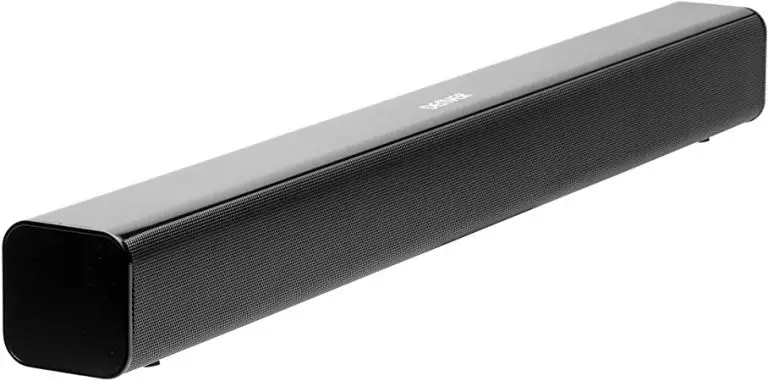
Product overview
Description
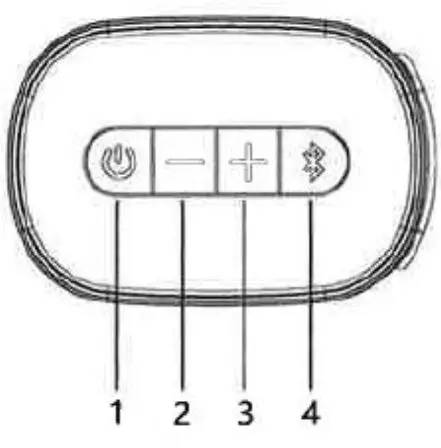
- /SOURCE: Short press to power on, and then short press again for function change, long press to turn off.
- VOL –: Short or long press for volume
- VOL+: Short or long press for volume up.
- Bluetooth disconnect/pair: short press or long press to disconnect BT device. Short press or long press for Bluetooth pairing mode.
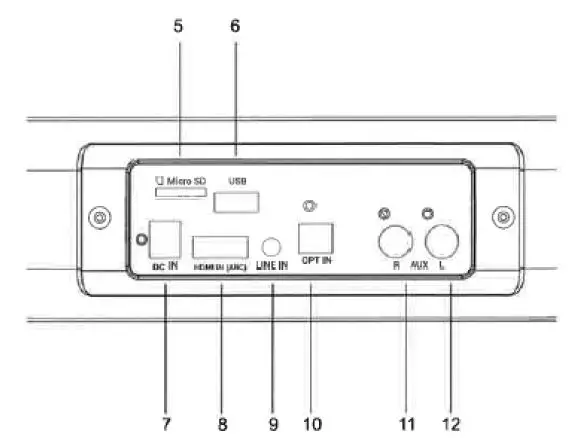
- TF/Micro SD card slot
- USB flashdrive connection
- DC IN
- HDMI IN (ARC)
- LINE IN
- OPTICAL IN
- AUX IN (Right)
- AUX IN (Left)
LED function indicator
- Red light: The soundbar unit is powered off (standby).
- White light: The soundbar unit is powered on.
What’s in the box:
- 1* Soundbar
- 1* Subwoofer
- 2* Power Adaptor
- 1* User Manual
- 1* Remote Control
- 1* Wall Mount Bracket
Remote control
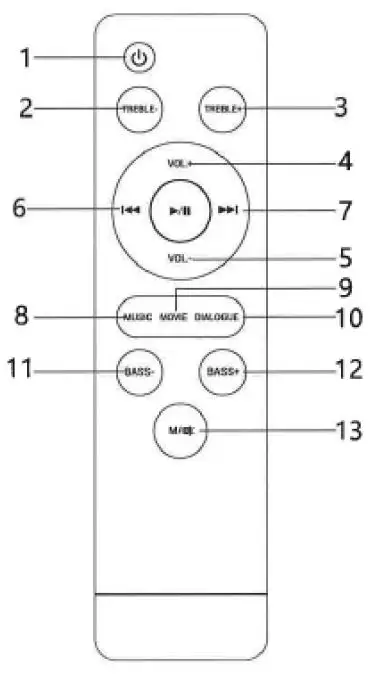
- Short press to switch the soundbar unit on or off (standby).
- TREBLE –: Press to decrease the treble
- TREBLE+: Press to increase the treble effect.
- VOL+: Short or long press to turn the volume up. Short press to switch mute off if mute function is on.
- VOL –: Short or long press to turn the volume down. Short press to switch mute off if mute function is on.
- Press to jump to previous song in Bluetooth/USB/TF mode.
- Press to jump next song in Bluetooth/USB/TF
- MUSIC: Press to select Music sound effect settings.
- MOVIE: Press to select cinema sound effect settings.
- DIALOG: Press to select Speech sound effect setting.
- BASS –: Press to decrease the bass effect. Short press to switch mute off if mute function is on.
- BASS+: Press to increase the bass effect. Short press to switch mute off if mute function is on.
- M: Press to change Input source Long p ress to mute function on or off.
Operation
Inserting Batteries before using the Remote Control Insert AAA batteries to the Remote Control to activate it.
Note: The Remote Control works within a range of 6 meters.
Getting Started:
- Make sure you have made all the necessary cable connections before connecting the Soundbar to a wall outlet, when connected to the wall outlet, the soundbar will enter the standby mode and the power indicator will turn red.
- Make sure the subwoofer is connected to the power source and turn the button to “ON”
- Short press /SOURCE on the unit or on the Remote Control to turn on the soundbar. The power indicator will turn white.
- Press the Source button on unit or remote control to choose the desired input source.
Note: The Soundbar will enter the standby mode if there is no active input signal for 15 minutes.
Pairing with the subwoofer
The wireless subwoofer automatically connects with the soundbar when both units are powered on. If the subwoofer is on and connected, the red LED indicator will be on continuously.
Note: For troubleshooting connection problems, refer to the trouble shooting section.
Bluetooth Pairing:
- Short press the Source button on the Sourndbar and choose the Bluetooth input (voice “Bluetooth”).
- The indicator light will be flashing slowly to indicate that it is searching for a Bluetooth device.
- Long press the Pair button on the side of the unit. The power indicator will start to flash quickly.
- Turn on the Bluetooth function on your smart device and activate Bluetooth device scanning.
- Select “SR250G” from the list of found devices.
- If necessary, enter the password “0000” and press “OK”.
- When successfully paired with your device, the indicator light will be on continuously. You can use the Remote Control to control music playback of the connected Bluetooth device. (The operation range for the Bluetooth connection is10 meters).
Note: if a mobile phone you are playing music receives a call, the music will stop playing. When the call is ended, the devices are connected to each other again and playback will resume.
Removing the connected Bluetooth device
Press and hold the Bluetooth button (3 in below picture) on the soundbar for 3 seconds to disconnect the connected Bluetooth device.
AUX Source:
- Ensure that the soundbar is connected to the TV or other audio device via an AUX cable.
- Short press the “M” button on the Remote Control un til you hear the voice “Auxiliary”. You also can short press the source button on the soundbar to choose the AUX source.
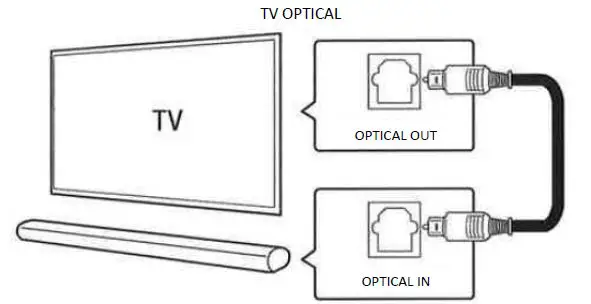
OPTICAL IN Source:
- Ensure that the soundbar is connected to the TV or other audio device via an Optical cable.
- Short press the “M” button on the remote control several times until your hear the voice “optical”. You can also short press the Source button on the soundbar to choose the Optical source.
LINE IN Source:
- Ensure that the soundbar is connected to the TV or other audio device via an audio cable (3.5 mm jack).
- Short press the button on the Remote Control several times until you hear the voice “Line in”. You can also short press the Source button on the soundbar to choose the LINE IN source.
HDMI Source
Ensure that the soundbar is connected to the TV or other audio device via a HDMI cable. Short press the “M” button on the Remote Control several times until you hear the voice “HDMI”. You can also short press the Source button on the soundbar to choose the HDMI source.
Note: If your TV is equipped with H D MI (ARC), the soundbar can synchronize the volume with your TV.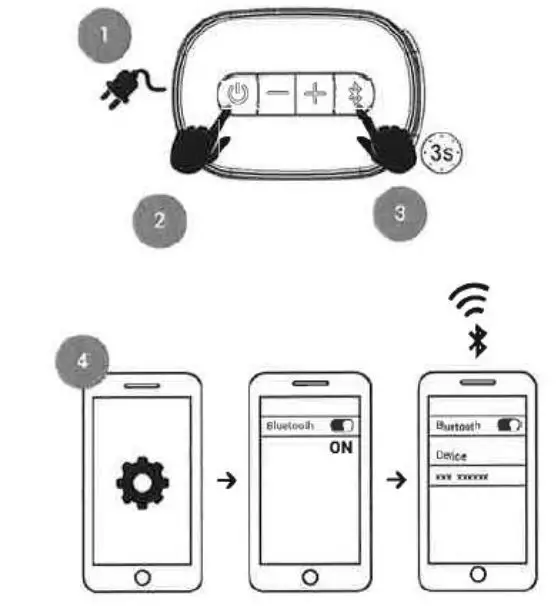
TF CARD (Micro SD card)
Short press the button to turn on the soundbar, insert the TF card into the TF card slot. The soundbar will start to play the music. Short press to play/pause the music. Short press or on the Remote Control to play the previous/next song. You can use MicroSD cards of max 128GB formatted in FAT32 format. The soundbar can play MP3, WAV and WMA files.
USB flashdrive play
- Short press the button to turn on the soundbar, insert a USB flahsdrive into the USB connection. The soundbar will start playing the music from the USB. Short press to play/pause the music. Short press or to play the previous/next song. You can use USB flashdrives of max 128G B formatted in FAT32 format. The soundbar can play MP3, WAV and WMA files.
Note: The USB connection is not intended for charging or connecting other devices.
Please notice
All products are subject to change without any notice. We take reservations for errors and omissions in the manual.
Electric and electronic equipment contains materials, components and substances that can be hazardous to your health and the environment, if the waste material (discarded electric and electronic equipment) is not handled correctly. Electric and electronic equipment is marked with the crossed out trash can symbol, seen above. This symbol signifies that electric and electronic equipment should not be disposed of with other household waste, but should be disposed of separately.
All cities have established collection points, where electric and electronic equipment can either be submitted free of charge at recycling stations and other collection sites, or be collected from the households. Additional information is available at the technical department of your city.
Hereby, Inter Sales A/S declares that the radio equipment type DSS 7020 is in compliance with Directive
2014/53/EU. The full text of the EU declaration of conformity is available at the following internet address:
www.denver-electronics.com and then click the search ICON on topline of website. Write modelnumber: DSS-7020.Now enter product page, and red directive is found under downloads/other downloads
Operating Frequency Range:
2402 2480MHz
Max Output Power: 70w
DENVER ELECTRONICS A/S Omega 5A, Soeften DK n8382 Hinnerup Denmark
www.facebook.com/denverelectronics