Dimplex CDFI-BX1000 or CDFI-BX1500
Electric Fireplace Service Manual
IMPORTANT SAFETY INFORMATION: Always read this manual first before attempting to service this fireplace. For your safety, always comply with all warnings and safety instructions contained in this manual to prevent personal injury or property damage.
Always use a qualified technician or service agency to repair this fireplace.
! NOTE: Procedures and techniques that are considered important enough to emphasize.
CAUTION: Procedures and techniques which, if not carefully followed, will result in damage to the equipment.
WARNING: Procedures and techniques which, if not carefully followed, will expose the user to the risk of fire, serious injury, or death.
Operation
The heater can be controlled by remote, or the tethered controller through the Opti-myst Cassette. Please refer to cassette User’s Guide for details.
! NOTE: The Opti-myst Pro Box Heater cannot be operated independently from the Opti-myst Cassette (no heat only mode).
Resetting the Temperature Cutoff Switch
Should the heater overheat, an automatic switch will turn the heater off and it will not come back on without being reset. The temperature cutoff switch can be reset by disconnecting power to the unit, waiting 5 minutes and reconnecting power to the unit.
CAUTION: If you need to continuously reset the heater, disconnect power to the unit and call Glen Dimplex Americas at 1-888-346-7539 for technical support. Please have your model and serial number ready when calling.
Maintenance
Opti-myst Pro Box Heater Surface Cleaning
To remove fingerprints or other marks, the exterior finish can be cleaned with a damp cloth with a mild detergent. The surface should be completely dried with a lint free cloth to prevent water spots.
Servicing
Except for installation and cleaning described in this manual, an authorized service representative should perform any other servicing.
! NOTE: The heater should not be operated with an accumulation of dust or dirt on or in the unit, as this can cause a build up of heat and eventual damage. For this reason the heater must be inspected regularly, depending upon conditions and at least at yearly intervals.
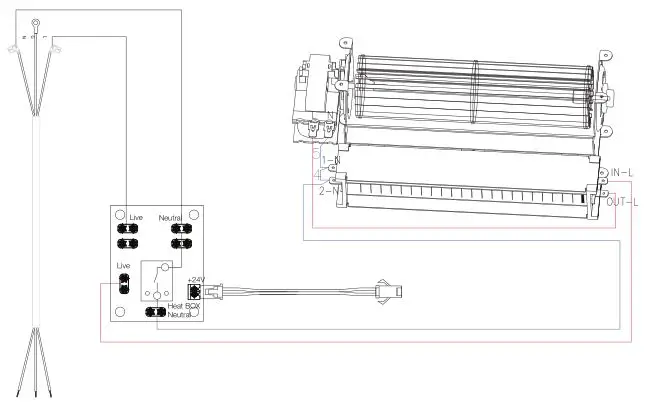
Wiring Diagram
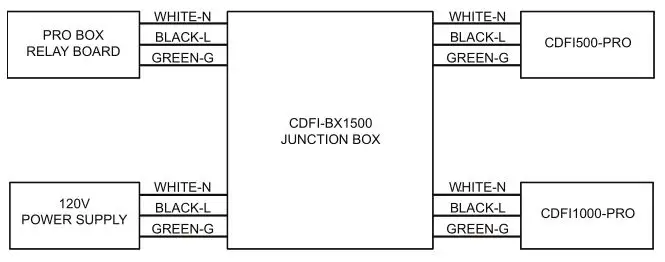
Block Diagram for CDFI-BX1500
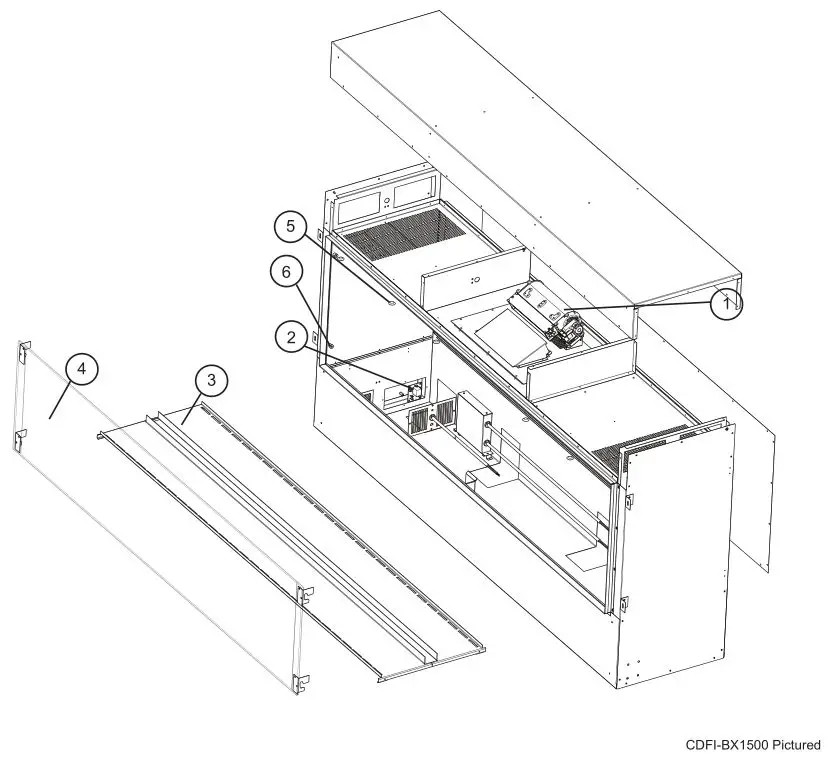
Exploded Parts Diagram
Replacement Parts List
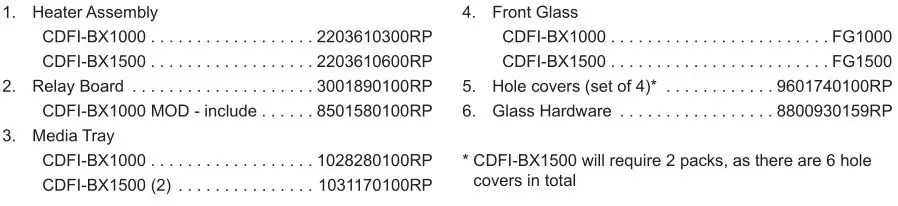
Relay Board Replacement
WARNING: Disconnect power before attempting any maintenance or cleaning to reduce the risk of electric shock or damage to persons.
CAUTION: If unit was operating prior to servicing allow at least 10 minutes for lights and heating elements to cool off to avoid accidental burning of skin.
Tools required: Phillips head screwdriver
- Remove the front glass by pulling it up and out. Ensure that it is kept in a safe place during the service.
- Remove any media on the tray, and lift out the tray.
- Remove the Opti-Myst cassette in order to access the relay board at the bottom left side of the unit. For the CDFI-1500BX, only the cassette on the left needs to be removed. If necessary, disconnect the power supply wires from the cassette, as well as the heater wire.
- Remove the cover plate by unscrewing the four screws that hold it in place. (Figure 1)
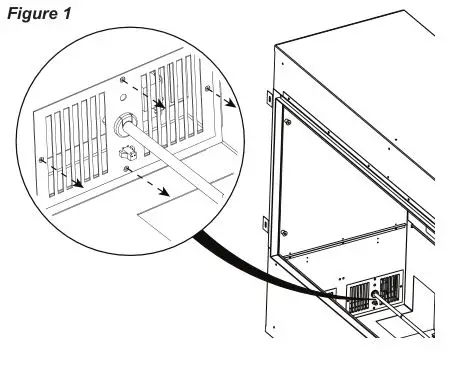
- Disconnect the wires from the relay board, noting their original locations. It can be helpful to take a picture of the relay board before the wires are disconnected in order to keep track of each wire’s place.
- Unscrew the four screws that secure the board to the standoffs. (Figure 2)
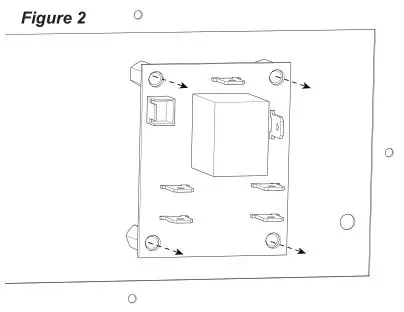 ! NOTE: On the CDFI-BX1000 with no MOD designation, these will instead be snap-in standoffs. The snap-in standoffs will need to be cut, and the new board will need to be installed using self- adhesive standoffs.
 - Properly orient the new relay board and screw it back into place.
- Reconnect the wires in their original locations.
- Reassemble the unit in the reverse order as above
WARNING: Disconnect power before attempting any maintenance or cleaning to reduce the risk of electric shock or damage to persons.
CAUTION: If unit was operating prior to servicing allow at least 10 minutes for lights and heating elements to cool off to avoid accidental burning of skin.
Tools required: Phillips head screwdriver Side cutters
! NOTE: While not necessary, it may be helpful to have a second person to assist in holding the upper components while the other person completes the service on the heater assembly.
- Remove the front glass by pulling it up and out. Ensure that it is kept in a safe place during the service.
- Remove the hole plugs that conceal the holes on the front of the heater exhaust bracket.
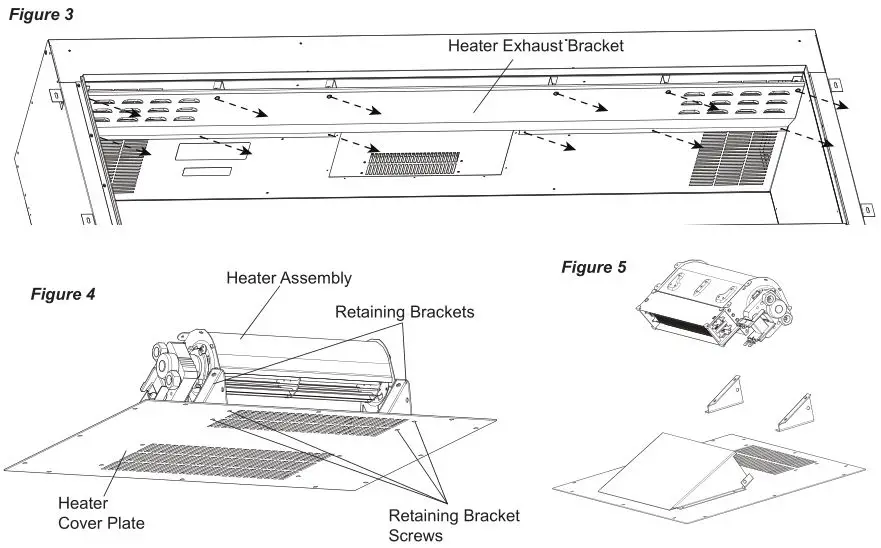
- Remove the heat exhaust bracket at the top of the pro-box by unscrewing the screws in the front which are accessed through the holes, as well as the screws in the back (CDFI-BX1000 has 8 screws in total, and the CDFI-BX1500 has 12 screws in total). (Figure 3)
- Remove the heater cover plate by unscrewing the 12 screws around its periphery. Be sure to hold the heater assembly as it comes down.
- Remove the 4 screws that secure the retaining brackets to the heater cover plate. (Figure 4)
- Remove the 2 screws on each retaining bracket (4 total) that secure each bracket to the heater assembly. Set the brackets aside. (Figure 5)
- Snip the two cable ties that secure the wires to the heater assembly.
- Disconnect the wires from the heater assembly, noting their original locations. It can be helpful to take a picture of the heater assembly connections before the wires are disconnected in order to keep track of each wire’s place.
- Secure each of the two retaining brackets to the new heater assembly.
- Reconnect the wires to the new heater assembly. Use the provided cable ties to secure the wires to the heater assembly, ensuring that they do not interfere with the fan or the element.
- Secure the retaining brackets to the heater cover.
- Reassemble the unit in the reverse order as above.
Troubleshooting Guide
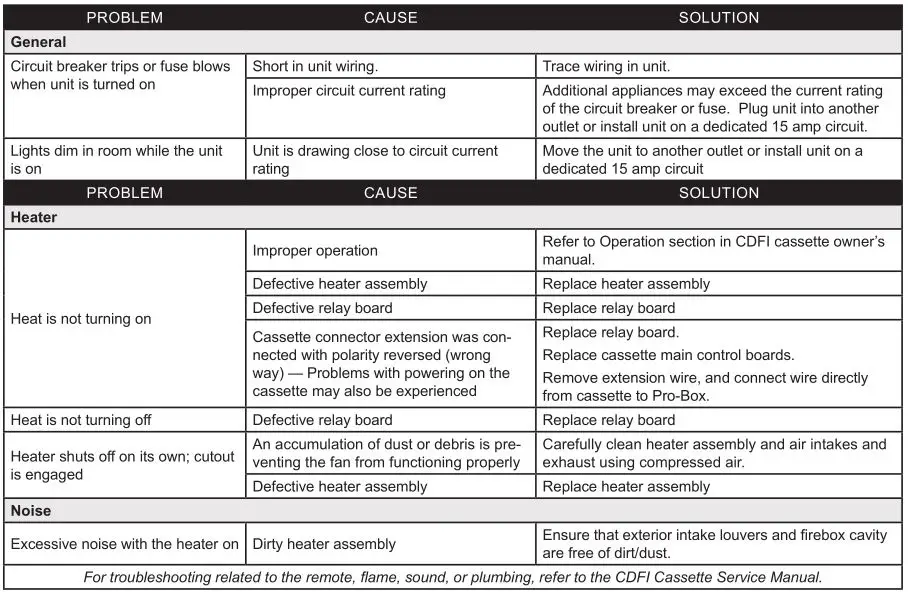
![]()
1-888-346-7539 | www.dimplex.com
In keeping with our policy of continuous product improvement, we reserve the right to make changes without notice.
© 2019 Glen Dimplex Americas