User Manual

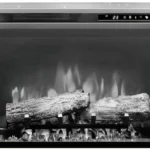
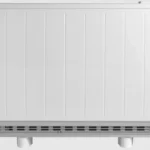
Dimplex Electric Oil-Filled Radiator

R15AG
R20AG & R20TAG
R25AG & R25TAG
R15GG
R20GG & R20TGG
R25GG & R25TGG
R15WG
R20WG & R20TWG
R25WG & R25TWG
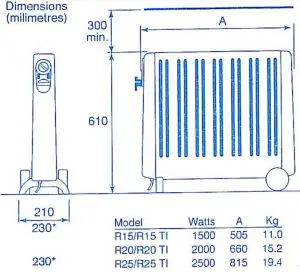
Dimensions
General
THESE INSTRUCTIONS SHOULD BE READ CAREFULLY AND RETAINED FOR FUTURE REFERENCE.
The radiator is designed for operation on an AC electricity supply, and is suitable for use in domestic dwellings and similar indoor locations.
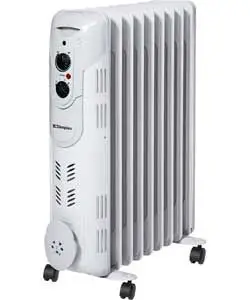
The radiator is provided with wheels or feet and castors and a handle for ease of movement. Selector switches provide a choice of heat output and an adjustable thermostat enables the room temperature to be controlled accordingly. II is supplied with a cord and plug ready for use.
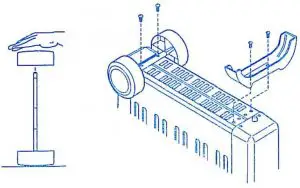
IMPORTANT· The radiator must only be operated with the wheels and foot fitted and in the upright position as shown. (A wall-mounting kit with fixing instructions is available if required, obtainable through your supplier.)
WARNING The heater complies with stringent safety standards but to ensure efficient operation SURFACES OF THE HEATER WILL BECOME HOT AND CONTACT WITH THESE AREAS SHOULD BE /VOIDED, particularly between the air outlet slots on the top and sides.
The control panel area is designed to be at a far lower temperature to allow the safe operation of the controls al any time.
Momentary contact with any part of the heater should not cause injury. However, aged or infirm persons or young children should not be left unsupervised in the vicinity of the heater.
Important safety information
When using electrical appliances, basic precautions should always be followed to reduce risk of fire, electric shock, and injury to persons, including the following:
- If the appliance is damaged, check immediately with the supplier before installation and operation.
- DO NOT use outdoors.
- DO NOT use in the immediate surroundings of a bath, shower or swimming pool.
- DO NOT use in areas where petrol, paint or flammable liquids are used or stored.
- DO NOT COVER THE HEATER. Do not place material or garments on the heater or obstruct the air circulation around the heater, for instance by curtains or furniture, as this could cause overheating.
- DO NOT put objects through the openings of the appliance. This could lead to functional faults, possibly to the ignition of the object.
- DO NOT leave aged or infirm persons or young children unsupervised in the vicinity of the heater.
- In the event of the heater falling over, unplug it and allow to cool before righting the heater.
- Unplug the heater when not required for long periods.
- DO NOT use the heater if it develops a leak. Unplug the heater and contact your supplier or the manufacturer’s Service Agent.
WARNING: This radiator must NOT be located immediately below a fixed socket outlet.
Preparing for use
IMPORTANT Before connecting the heater check that the supply voltage is the same as that stated on the heater. Ensure that all packing material has been removed.
To fit foot and wheels
- Remove foot, wheels, axle and fixing screws from the packing.
- Turn radiator upside down on carpet or other soft surface to avoid damage.
- Fit wheels to axle by applying hand pressure until each wheel is fully engaged. Note – the wheels are designed to be a tight fit on the axle but will rotate in use.
- Fit foot to the underside at control panel end using the screws and washers supplied.
- Fit axle complete with wheels to opposite end using the screws and washers supplied.
- Stand radiator upright.
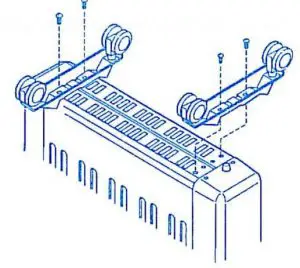
To fit feet and castors
- Remove feet and fixing screws from the packing.
- Turn radiator upside down on carpet or other soft surface to avoid damage.
- Remove the two silver co colored feet fixing r;crews from each end of the radiator base. DO NOT remove any of the smaller black screws.
- Fit feet to the base using the screws removed.
- Stand radiator upright.
Operation
To bring the heater into use plug it in, the neon indicator light will glow when the appliance is actually heating.
A selector switch/switches provide a choice of half or full heat output to suit varying conditions and for economy of operation.
Thermostat operation
The thermostat has four operational zones as follows
Zone 1 · Provided the heater is set to a heating function, the heater will come on when the surrounding air temperature falls to approx. 5°C. This setting can be used to guard against frosty conditions.
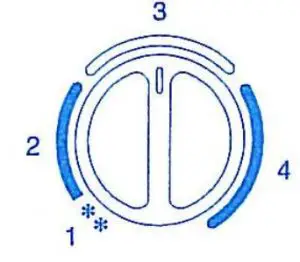
Zone 2 – Provides low heat output on half and full heat setting, giving background heating.
Zone 3 – Provides medium heat output on half and full heat setting.
Zone 4 – Provides high heat output on half and full heat setting.
Setting the thermostat
Plug in the heater and set switches to give full heat output. Turn thermostat knob fully clockwise to high position for maximum heat output to warm the room rapidly. When the room temperature has reached the desired level, turn the thermostat knob back slowly until the thermostat just clicks off and the neon light goes out. The heater will then operate under the control of the thermos tat to maintain the chosen temperature level, provided that the heater is of sufficient size for the room to be heated.
NOTE – Should the heater fail to come on when the thermostat is at a low setting (Zone 2), this may be due to the room temperature being higher than the thermostat setting.
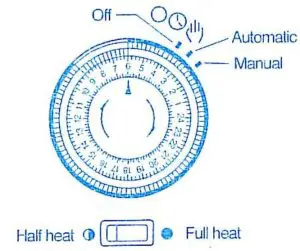
Timer models
Timer models are fitted with a 24 hour programmable timer enabling the heater to be switched ‘ON’ and ‘OFF’ automatically if desired, and a single heat selector switch.
Using the timer
The heater must be connected to the electricity supply for the timer to operate. The switch on the timer controls the electricity supply to the heating elements.
Set the timer by rotating the dial clockwise until the correct time of day is indicated opposite the datum mark. Should the electricity supply to the heater be disconnected it will be necessary to reset the timer to the time of day.
Safety cutout
The heater is fitted with a thermal safety cut-out which will switch off the heat er should it overheat for any reason. If the cut-out operates it is the result of abnormal overheating, and servicing of the appliance by a competent service engineer will be required to ensure the future safe operation of the heater. In this event the manufacturer’s authorized Service Agent should be contacted.
The heater also includes a tilt switch, which ensures that should the heater be accidentally knocked over whilst in use, it will immediately switch off. The heater will resume normal operation once it is righted.
Cleaning
Unplug the heater and allow to cool before commencing cleaning . The heater can be cleaned by wiping it over with a soft damp, not wet, cloth and then dried. DO NOT use abrasive cleaning powders or detergents as these can damage the surface finish.
Storage
If the radiator is not required for long periods, for example during the summer, it should be stored in a dry place and preferably covered to prevent the accumulation of dirt and dust. The supply cord should be neatly coiled around the handle pull ensuring that the plug does not trail on the floor.
After Sales Service
Your product is guaranteed for two years from the date of purchase. We undertake to exchange or repair free of charge within this period any part found to be defective. The inner panel of this heater is filled with a precise quantity of special oil and is permanently sealed. Any oil leakage must be reported to the manufacturer’s Service Agent. Should you require after sales service, please get in touch with the supplier through whom you purchased the appliance, or your nearest Service Agent.