The DJITM MAVICTM Pro is DJI’s smallest flying camera, featuring a fully stabilized camera, Intelligent Flight Modes and Obstacle Avoidance inside a revolutionary folding design. It captures 4K videos and 12 megapixel photos, and is capable of both ActiveTrackTM and TapFlyTM making complex shots effortless.
Mavic Pro boasts a maximum flight speed of 40 mph (65 kph) and a maximum flight time of 27 minutes*.
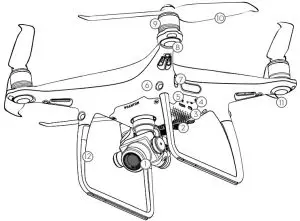
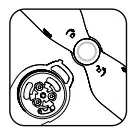
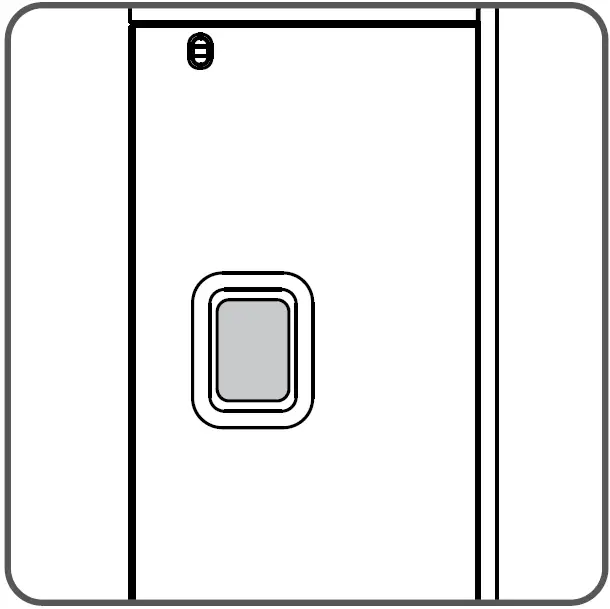
- Gimbal and Camera
- Downward Vision System
- Forward Vision System**
- Micro USB Port
- Motors
- Front LEDs
- Propellers
- Antennas
- Link Button
- Linking Status Indicator
- Camera Micro SD Card Slot
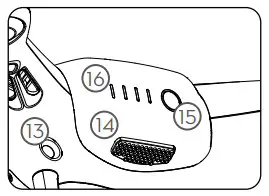
- Control Mode Switch
- Intelligent Flight Battery
- Battery Level LEDs
- Power Button
- Aircraft Status Indicator
- Maximum flight time was tested in 0 wind at a consistent 5 mph (25 kph). This value should be taken for reference only.
* The Forward Vision System is affected by surrounding conditions. Read the Disclaimer and Safety Guidelines and watch the tutorial in the DJI GOTM 4 app or on the Official DJI website to learn more. http://www.dji.com/mavic
Built into the Remote Controller is DJI’s latest long-range transmission technology OCUSYNCTM, offering a maximum transmission range of 4.3 mi (7 km). An on-board LCD screen keeps you updated on aircraft data, and video from the aircraft to the DJI GO 4 app on your mobile device at up to 1080p at close range, and 720p at longer ranges.
The Mavic Pro can also be flown by phone only. Maximum run-time: 2.5 hours*

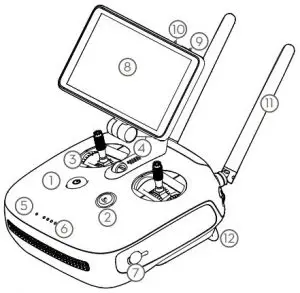
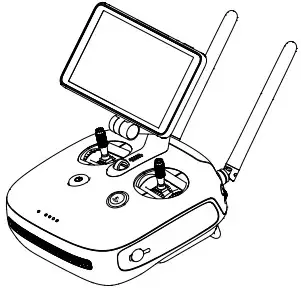
- LCD Screen
- 5D Button
- Control Sticks
- Antennas
- Power Button
- Flight Mode Switch
- Mobile Device Clamp
- USB Port
- Flight Pause Button
- RTH Button
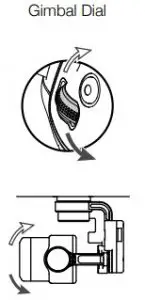
- Gimbal Dial
- Camera Settings Dial
- Record Button
- Shutter Button
- Power Port (Micro USB)
- C1 Button (customizable)
- C2 Button (customizable)
- The remote controller is able to reach its maximum transmission distance (FCC) in a wide open area with no Electro-Magnetic Interference, and at an altitude of about 400 feet (120 meters). The maximum run-time is tested under laboratory environment, only for your reference.
- Aircraft
Weight 1.62 lbs (734 g)
Weight (including gimbal cover)1.64 lbs (743 g)
Max Ascent Speed 16.4 ft/s (5 m/s) in Sport Mode Max Descent Speed 9.8 ft/s (3 m/s)
Max Speed 40 mph (65 kph) in Sport Mode without wind
Max Service Ceiling Above
Sea Level 16404 feet (5000 m)
Max Flight Time 27 minutes (0 wind at a consistent 15.5 mph (25 kph))
Max Hovering Time 24 minutes (0 wind)
Max Flight Distance 8 mi (13 km, 0 wind)
Operating Temperature 32° to 104° F (0° to 40° C) Satellite Positioning Systems GPS/GLONASS
- Gimbal
Controllable Range Pitch: -90° to +30°, Roll: 0°or 90° (Horizontally and vertically) - Forward Vision System
Sensing Range Precision measurement range: 2 ft (0.7 m) to 49 ft (15 m)
Detectable range: 49 ft (15 m) to 98 ft (30 m)
Operating Environment Surfaces with clear patterns and adequate lighting (lux > 15) - Downward Vision System
Velocity Range ≤ 22.4 mph (36 kph) at 6.6 ft (2 m) above ground
Altitude Range 1 – 43 feet (0.3 – 13 m)
Operating Range 1 – 43 feet (0.3 – 13 m)
Operating Environment Surfaces with a clear patterns and adequate lighting (lux > 15)
Velocity Range ≤ 22.4 mph (36 kph) at 6.6 ft (2 m) above ground
Altitude Range 1 – 43 feet (0.3 – 13 m)
Operating Range 1 – 43 feet (0.3 – 13 m)
Operating Environment Surfaces with a clear patterns and adequate lighting (lux > 15) - Camera
Sensor 1/2.3” CMOS Effective pixels:12.35 Megapixels (Total pixels: 12.71 M)
Lens 78.8° FOV, 28 mm (35 mm format equivalent) f/2.2 Distortion <1.5% Focus from 0.5 m to ∞
ISO Range 100 – 3200 (video), 100 – 1600 (photo) Electronic Shutter Speed 8 s to 1/8000 s
Max Image Size 4000×3000
Still Photography Modes Single shot
Burst shooting: 3/5/7 frames Auto Exposure Bracketing (AEB):
3/5 bracketed frames at 0.7EV Bias Interval HDR - Video Recording Modes C4K: 4096×2160 24p, 4K: 3840×2160 24/25/30p 2.7K: 2720×1530 24/25/30p FHD: 1920×1080 24/25/30/48/50/60/96p HD: 1280×720 24/25/30/48/50/60/120p
Video Storage Bitrate 60 Mbps
Supported File Systems FAT32 (≤ 32 GB), exFAT (> 32 GB) Photo JPEG, DNG
Video MP4, MOV (MPEG-4 AVC/H.264)
Supported SD Cards microSDTM. Max capacity: 64 GB Class 10 or UHS-1 rating required - Remote Controller
Operating Frequency 2.4 GHz to 2.4835 GHz Max Transmission Distance FCC Compliant: 4.3 mi (7 km); CE Compliant: 2.5 mi (4 km) Unobstructed and free of interference.
Operating Temperature 32° to 104° F (0° to 40° C)
Battery 2970 mAh
Transmitter Power (avg. EIRP) FCC: ≤ 26 dBm; CE: ≤ 20 dBm Operating Voltage 950 mA @ 3.7 V Supported Mobile Device Size Thickness supported: 6.5 – 8.5 mm, Max length: 160 mm Supported USB port types: Lightning, Micro USB (Type-B), USB Type-CTM - Charger
Voltage 13.05 V
Rated Power 50 W - Intelligent Flight Battery
Capacity 3830 mAhVoltage 11.4 VBattery Type LiPo 3SEnergy 43.6 Wh
Net Weight Approx. 0.5 lbs (240 g) Charging Temperature Range 41° to 104° F (5° to 40° C) Max Charging Power 100 W
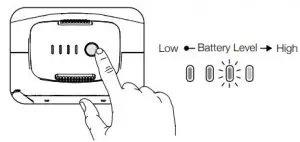
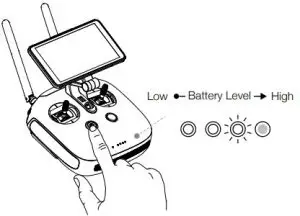
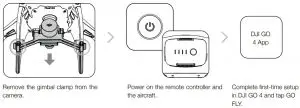
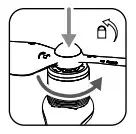
2. Check the Battery Levels
Press once to check the Press once to check the battery level on
battery level. Press once, then LCD screen. Press once, then again and
again and hold to turn on/off. hold to turn on/off the remote controller
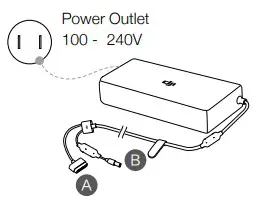
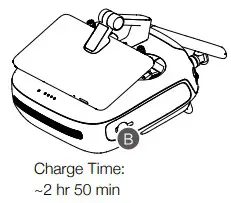
2. Charge the Batteries
4. Prepare the Remote Controller

- Choose an appropriate RC Do not twist the RC cable.
- The RC cable slider must be replaced if using a USB Type-C RC Refer to the User Manual for RC Cable connection.
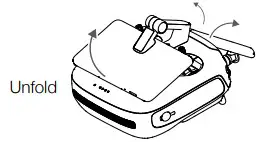
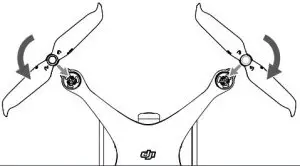
5. Prepare the Aircraft
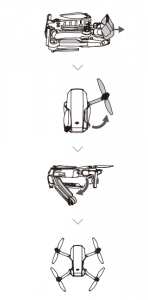
- Unfold the front arms and the propellers before the rear All arms and propellers must be unfolded before takeoff.
- The gimbal cover is used to protect the gimbal. Remove it when necessary
6. Prepare for Takeoff
 Use your DJI account to activate the aircraft. Activation requires an internet Internet connection
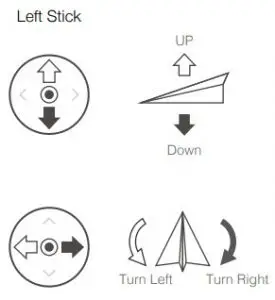
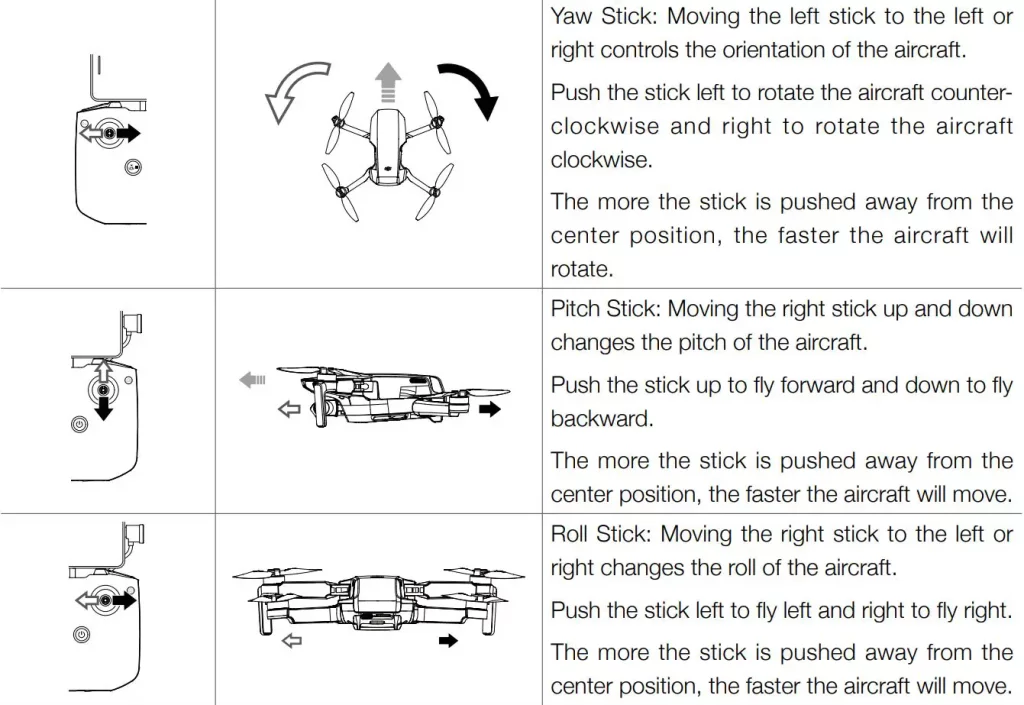
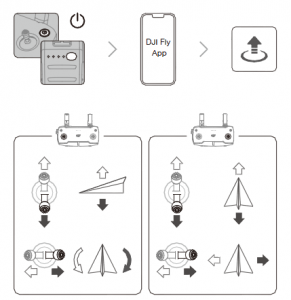
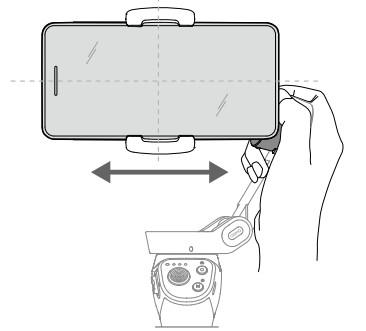
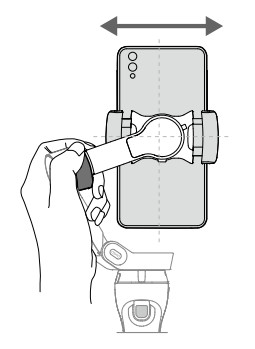
- The Mavic Pro can be controlled using the Remote Controller or Virtual Joysticks. Select control modes by toggling the Control Mode Switch. Only toggle this switch when the aircraft is powered off
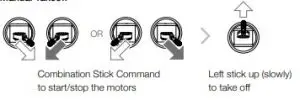
7. Flight
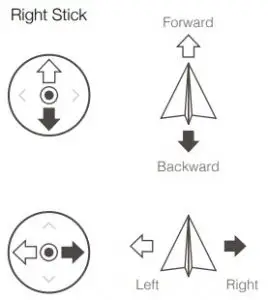
The default flight control is known as Mode 2. The left stick controls the aircraft’s altitude and heading, while the right stick controls its forward, backward, left and right movements. The gimbal dial controls the camera’s tilt.
Before taking off, make sure the Aircraft Status Bar in the DJI GO 4 app or on the Remote Controller LCD screen displays ‘Ready to Go’.
- The motors can only be stopped mid-flight when the flight controller detects critical error.
Controlling flight with Virtual Joysticks on your mobile device via Wi-Fi

- Toggle the Control Mode Switch to turn on Wi-Fi
- Power on the aircraft
- Launch the DJI GO 4 app and tap the icon on the top right of your screen, then scan the Wi-Fi QR Code on the front arm to start connection
- Tap Auto Takeoff
- Fly the aircraft with touch control
- Turn on your mobile device’s Wi-Fi and enter the Wi-Fi password shown on the front arm to connect to the Mavic network if for any reason you cannot scan the QR
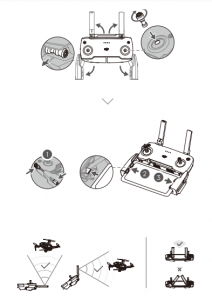
- When using Wi-Fi in a wide open area with no Electro-Magnetic Interference, transmission distance is approximately 262 ft (80 m) at an altitude of 164 ft (50 m)
- The Wi-Fi frequency of your mobile device can be set to 4 Ghz or 5 Ghz. Set your Wi-Fi to 5 Ghz for less interference. Once connected to the Mavic Pro, you can change your Wi-Fi password or reset your Wi-Fi connection. (Refer to the User Manual for more information)
In the DJI GO 4 App
- Watch the tutorial in the DJI GO 4 app or on the Official DJI website to learn more.
- Always set an appropriate RTH altitude before When the aircraft is returning to the Home Point, you should guide it with the control sticks.
8. Fly Safe
Avoid flying over or near obstacles, crowds, high voltage power lines, trees or bodies of water.
DO NOT fly near strong electromagnetic sources such as power lines and base stations as it may affect the onboard compass.

DO NOT use the aircraft in adverse weather conditions such as rain, snow, fog and wind speeds exceeding 10 m/s or 22 mph.
 It’s important to understand basic flight guidelines, for the safety of both you and those around you. Don’t forget to read the Disclaimer and Safety Guidelines.
dji PHANTOM 4 Pro V2.0 User Guide

Phantom 4 Pro+ V2.0
The DJI PHANTOM 4 Pro+ V2.0 is a smart prosumer flying camera capable of shooting 4K video at 60 fps and at up to 100 Mbps, and capturing 20 megapixel stills. 4 directions of obstacle avoidance allow it to intelligently avoid obstacles during flight. Using TapFly and Active Track through the DJI GO 4 app, you can fly anywhere visible on your screen or track a moving subject smoothly and easily with a simple tap. The camera uses a 1-inch CMOS sensor offering unprecedented clarity, lower noise, and better quality images.
In addition to the above features, improved propulsion system efficiency means aircraft noise is 4dB (60%) lower than on the Phantom 4 Pro+ V2.0.
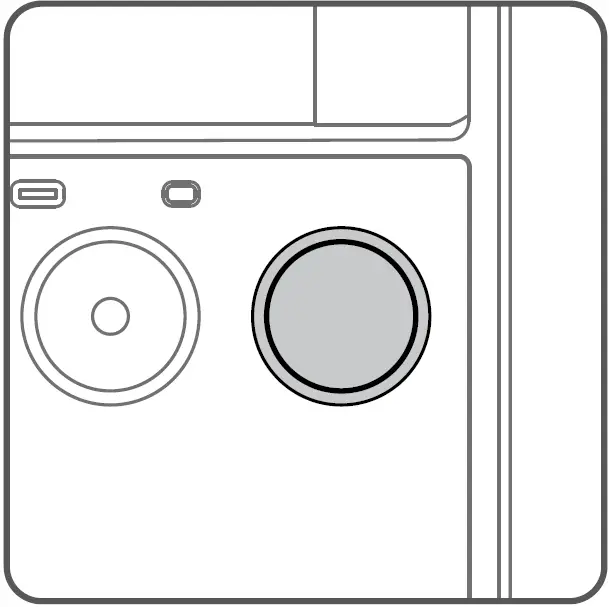
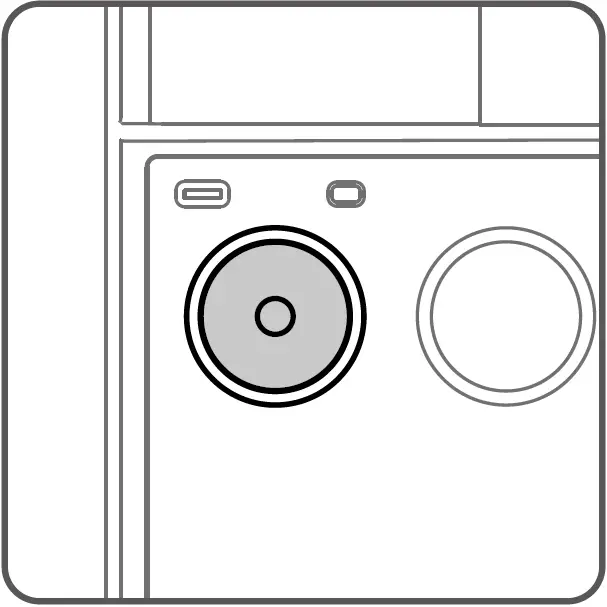
- Gimbal and Camera
- Downward Vision System
- Micro USB Port
- Camera/Linking Status Indicator and Link Button
- Camera Micro SD Card Slot
- Forward Vision System
- Infrared Sensing System
- Front LEDs
- Motors
- Propellers
- Aircraft Status Indicators
- Antennas
- Rear Vision System
- Intelligent Flight Battery
- Power Button
- Battery Level Indicators
* The Vision and Infrared Sensing Systems are affected by surrounding conditions. Read the Disclaimer and Safety Guidelines and watch the tutorials in the DJI GO 4 app or on the official DJI website to learn more. http://www.dji.com/phantom-4-pro-v2.
Remote Controller
The powerful remote controller of the Phantom 4 Pro+ V2.0 has a transmission range extending up to 5 mi (8 km)*. It features physical buttons and dials to control exposure, camera tilt, photo capture, and video recording. Built into the remote controller is DJI’s latest long-range transmission technology OCUSYNC, providing a live HD view from the Phantom’s camera directly on the display. Dual frequency support makes the HD video downlink more stable.

- 1. Power Button
- Return-to-Home (RTH) Button
- Control Sticks
- Speaker
- Status LED
- Battery Level LEDs
- Power Port
- Display Screen
- Sleep/Wake Button
- Microphone
- Antennas
- Handle Bar
- Gimbal Dial
- Camera Settings Dial
- Record Button
- Flight Mode Switch
- Shutter Button
- Intelligent Flight Pause
- C1 and C2 Buttons (customizable)
- Micro USB Port
- HDMI Port
- Micro SD Card Slot
- USB Port
The default flight control is known as Mode 2. The left stick controls the aircraft’s altitude and heading, while the right stick controls its forward, backward, left and right movements. The gimbal dial controls the camera’s tilt.
* The remote controller is able to reach its maximum transmission distance (FCC) in a wide open area with no Electromagnetic Interference, and at an altitude of about 400 feet (120 meters).
Using Phantom 4 Pro+ V2.0
- Watch the Tutorial Videos
Watch the tutorial videos at www.dji.com or in the DJI GO 4 app.

Tutorial Video - Check the Battery Levels
Press once to check the battery level. Press once, then again and hold to turn on/off. - Charge the Batteries

 When charging is complete, the battery level indicators will automatically turn off.
 - Prepare the Remote Controller
- Prepare for Takeoff
 First-time activation requires your DJI account and internet connection.
Black propeller rings go on motors with black dots.
Silver propeller rings go on motors without black dots.
Press the propeller down onto the mounting plate and rotate in the lock direction until secure.
Check that the propellers are secure before each flight. - Flight
Ready to Go (GPS)
Before taking off, make sure the Aircraft Status Bar in the DJI GO 4 app indicates `Ready to Go (GPS)’ or `Ready to Go (Vision)’ if flying indoors.
In the DJI GO 4 App:
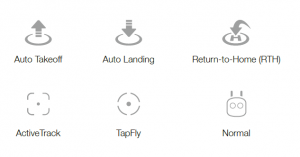
Auto Takeoff The aircraft will take off and hover at an altitude of 4 feet (1.2 meters).

Auto Landing
The aircraft will land vertically and stop its motors.

Return-to-Home (RTH)
Bring the aircraft back to the Home Point. Tap again to stop the procedure.

Normal
You are in control of the Phantom, with satellite and Return-to-Home support.

TapFly
Tap on your screen to fly your Phantom in that direction, avoiding obstacles as it flies.

ActiveTrack
Mark an object on your screen to track it as it moves.

- Watch the tutorial in the DJI GO 4 app or on the official DJI website to learn more.
- Always set an appropriate RTH altitude before takeoff. When the aircraft is returning to the Home Point, you should
guide it with the control sticks. Refer to the Disclaimer and Safety Guidelines for more details.
Manual Takeoff
Manual Landing
Left stick down (slowly) until you touch the ground. Hold a few seconds to stop the motors.
- Rotating propellers can be dangerous. Do not start the motors when there are people nearby.
- Always keep your hands on the remote controller so long as the motor is still spinning.
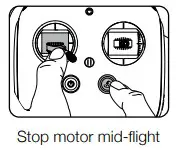
- Stop motor mid-flight: Pull the left stick to the bottom inside corner while simultaneously pressing the RTH button. Only stop motors mid-flight in emergency situations when doing so can reduce the risk of damage or injury. Refer to the user manual for details.
 It’s important to understand basic flight guidelines, for the safety of both and those around you. Don’t forget to read the Disclaimer and Safety Guidelines.
Specifications
| Aircraft | |
| Weight (Battery & Propellers Included) | 1375 g |
| Max Ascent Speed | S-mode: 6m/s; P-mode: 5 m/s |
| Max Descent Speed | S-mode: 4m/s; P-mode: 3m/s |
| Max Speed | 45 mph (72 kph) (S-mode); 36mph (58 kph) (A-mode); 31 mph (50 kph) (P-mode) |
| Max Service Celling Above sea level | 19685 ft (6000 m) |
| Max Flight Time | Approx 30 Minutes |
| Operating Temperature | 32o to 104o F (0o to 40oC) |
| GNSS | GPS + GLONASS |
| Operating Frequency | 2.400-2.483 GHz and 5.725-5.850 GHZ |
| Transmitter Power (EIRP) | 2.4 GHZ: <26 dBm (FCC); <20 dBm (CE); <20 dBm (SRRC)
5.8 GHZ: <26 dBm (FCC); <14 dBm (CE) <26 dBm (SRRC) |
| Hoever Accuracy Range | Vertical + 0.1 m (with vision positioning); 0.5 m (with GPS Positioning) Horizontal: +0.3 m (with vision positioning) +1.5 m (with GPS Positioning). |
| Gimbal | |
| Controllable Range | Pitch -90o to + 30o |
| Vision System | |
| Velocity Range | <31 mph (50 kph) at 6.6 ft (2m) above ground |
| Altitude Range | 0-33 ft (0-10 m) |
| Operating Range | 0-33 ft (0-10 m) |
| Obstacle Sensory Range | 2-98 ft (0.7-30 m) |
| Operating Environment | Surfaces with clear patterns and adequate lighting (> 15 lux) |
| Infrared Sensing System | |
| Obstacle sensory Range | 0.6-23 ft (0.2-7m) |
| Operating Environment | Surface with diffuse reflection material and reflective >8% (such as wall, trees, humans etc( |
| Camera | |
| Sensor | 1” CMOS, Effective pixels: 20m |
| Lens | FOV (Field of View) 84”, 8.8mm (35 mm format equivalent: 24mm) f2.8-f/11 auto focus at 1 m video 100-3200 (Auto) 100-6400 (Manual) Photo 100-3200 (Auto); 100-12800 (Manual) |
| ISO Range | Video: 100-3200 (Auto); 100-6400 (Manual) Photo 100-3200 (Auto) 100-12800 (Manual) |
| Mechanical Shutter | 8-1/2000 s |
| Electronic Shutter | 8-1/8000 s |
| Max Image size | 3.2 Aspect Ratio: 5472 x 3648 Aspect Ratio 4864 x 3648; 16.9 Aspect Ratio 5472 x 30 .78 |
| Still Photography modes | Single Shot |
| Video Recording Modes | H265 |
| Video Storage Bitrate | 100 Mbps |
| Supported File Systems | FAT32 |
| Photo | JPEG, RAW |
| Video | MP4/MOV |
| Supported SD Cards | Mixro SD Max Capacity |
| Remote Controller | |
| Operating Frequency | 2.400-2.483 GHZ and 5.725, 5.850 GHZ |
| Battery | 6000 mAh Lipo |
| Operating Voltage | 1.2A @ 7.4 V |
| Charger | |
| Voltage | 17.4 V |
| Rated Power | 100 W |
| Intelligent Flight Battery (PH4-5870 mAh-15.2V) | |
| Capacity | 5870 mAh |
| Voltage | 15.2 v |
| Battery Type | Lipo 4S |
| Energy | 89.2 wh |
| Net weight | 468 g |
| Max Charging Power | 100 W |
For More Information, read the user Manual:
http://www.dji.com/phantom-4-prov.v2.
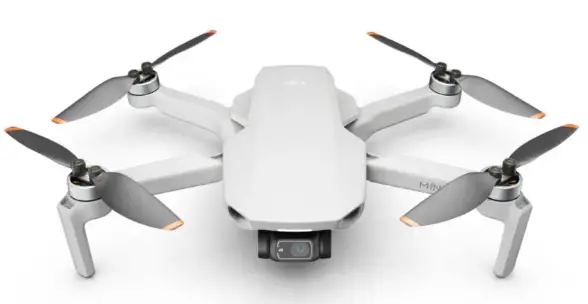
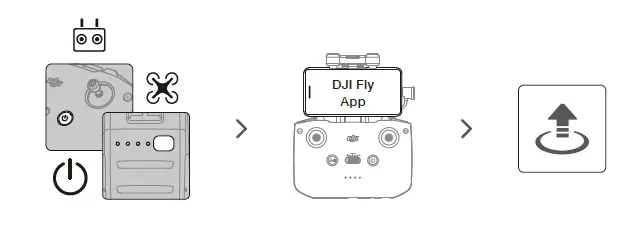
DJI Mini 2 User Guide
Steps:
Step 1:
 |
 |
 |
| DJI Fly APp | ||
Step 2:
Step 3:
Step 4:
Step 5:
Check battery level: press once.
Power on/off: press, then press and hold.
Step 6:

New to Flying Drones?
 |
 |
| Contact DJI Support Via Facebook Messenger |
WeChat scan Get technical support |
dji Mini 2 Ultralight Foldable Drone
User Manual
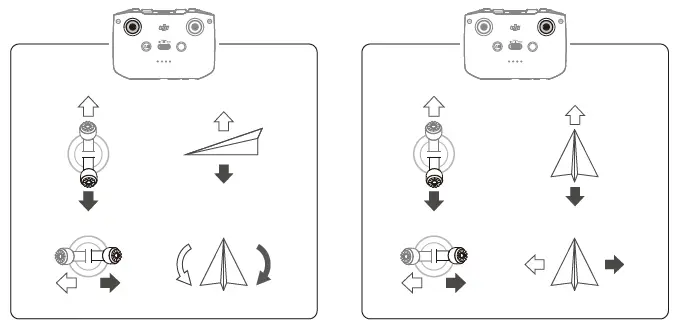
Flight Mode Switch
Toggle the switch to select the desired flight mode.

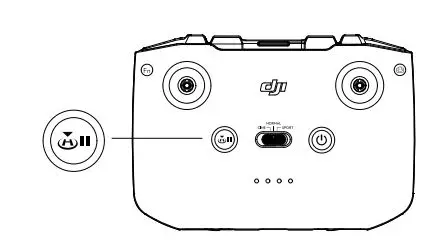
Flight Pause/RTH Button
Press once to make the aircraft brake and hover in place. If the aircraft is performing a Quick Shot, RTH, or auto landing, press once to exit the procedure before braking.
Press and hold the RTH button until the remote controller beeps to start RTH. Press this button again to cancel RTH and regain control of the aircraft. Refer to the Return to Home section for more information about RTH.
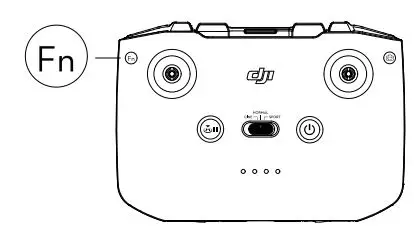
Customizable Button
To customize the function of this button, go to System Settings in DJI Fly and select Control. Customizable functions include re-entering the gimbal and toggling between the map and live view.
Remote Controller Alert
The remote controller sounds an alert during RTH. The alert cannot be cancelled. The remote controller sounds an alert when the battery level is low (6% to 15%). A low battery alert level can be cancelled by pressing the power button. A critical battery level alert (less than 5%), however, cannot be cancelled.
Optimal Transmission Zone
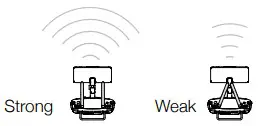
The signal between the aircraft and the remote controller is most reliable when the antennas are positioned in relation to the aircraft as depicted below.
![]()
Linking the Remote Controller
The remote controller is linked to the aircraft before delivery. Linking is only required when using a new remote controller for the first time. Follow these steps to link a new remote controller:
- Power on the remote controller and the aircraft.
- Launch DJI Fly.
- In camera view, tap ••• and select Control and Pair to Aircraft (Link). The remote controller will beep continually.
- Press and hold the power button of the aircraft for more than four seconds. The aircraft beeps once to indicate it is ready to link. The aircraft beeps twice to indicate linking is successful. The battery level LEDs of the remote controller will glow solid.
 Make sure the remote controller is within 0.5 m of the aircraft during linking.
- The remote controller will automatically unlink from an aircraft if a new remote controller is linked to the same aircraft.
- Turn off Bluetooth and Wi-Fi when using OcuSync 2.0 video transmission connection. Otherwise, they may affect the video transmission.
 Fully charge the remote controller before each flight. The remote controller sounds an alert when the battery level is low.
- If the remote controller is powered on and not in use for five minutes, an alert will sound. After six minutes, the aircraft automatically powers off. Move the control sticks or press any button to cancel the alert.
- Adjust the mobile device holder to make sure the mobile device is secure.
- Fully charge the battery at least once every three months to maintain battery health.
DJI Fly App
Home
Launch DJI Fly and enter the home screen.
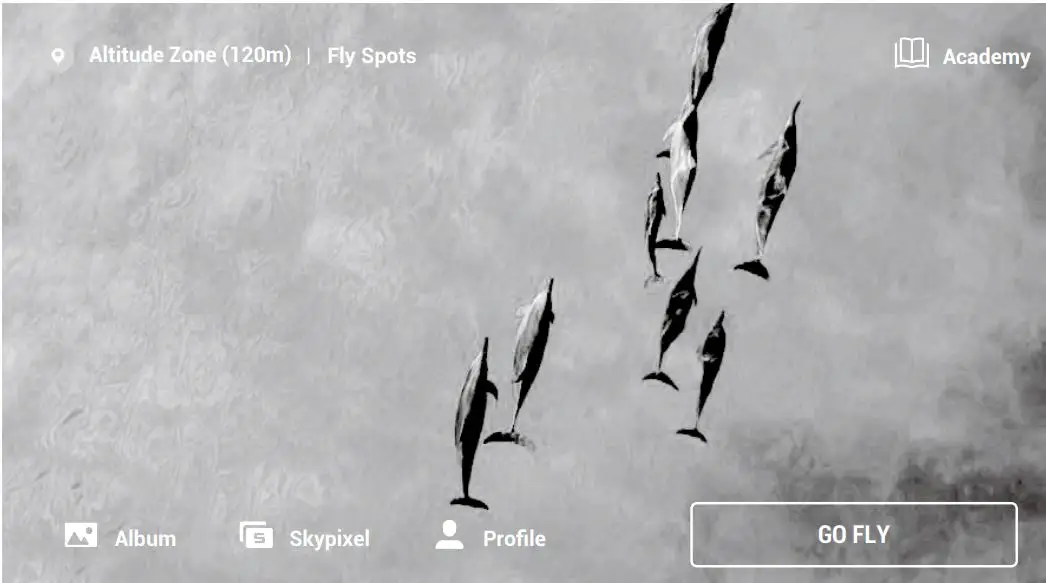
Fly Spots
View or share nearby suitable flight and shooting locations, learn more about GEO zones, and preview aerial photos of different locations taken by other users.
Academy
Tap the icon in the top right corner to enter Academy and view product tutorials, flight tips, flight safety, and manual documents.
Album
View photos and videos from DJI Fly and your mobile device. Trimmed Download is supported when downloading a video. Select the clip to download. Quick Shot videos can be created and viewed after downloading to the mobile device and rendering. Create contains Templates and Pro. Templates automatically edit imported footage. Pro allows users to edit footage manually.
Sky Pixel
Enter Sky Pixel to view videos and photos shared by users.
Profile
View the account information, flight records, DJI forum, online store, Find My Drone feature, and other settings.
![]() Trimmed Download is not supported in the following situations:
Trimmed Download is not supported in the following situations:
- The duration of the video is less than 5 seconds.
- There is no cached video in the mobile device corresponding to the original video. Make sure to download using the mobile device that was used for shooting.
- The difference in duration between the cached video in the mobile device and the original video from the microSD card of the aircraft is too large. This may occur due to the following reasons:
a) Exited DJI Fly while recording such as to answer a phone call or to reply to a message.
b) Video transmission disconnected while recording.
Camera View
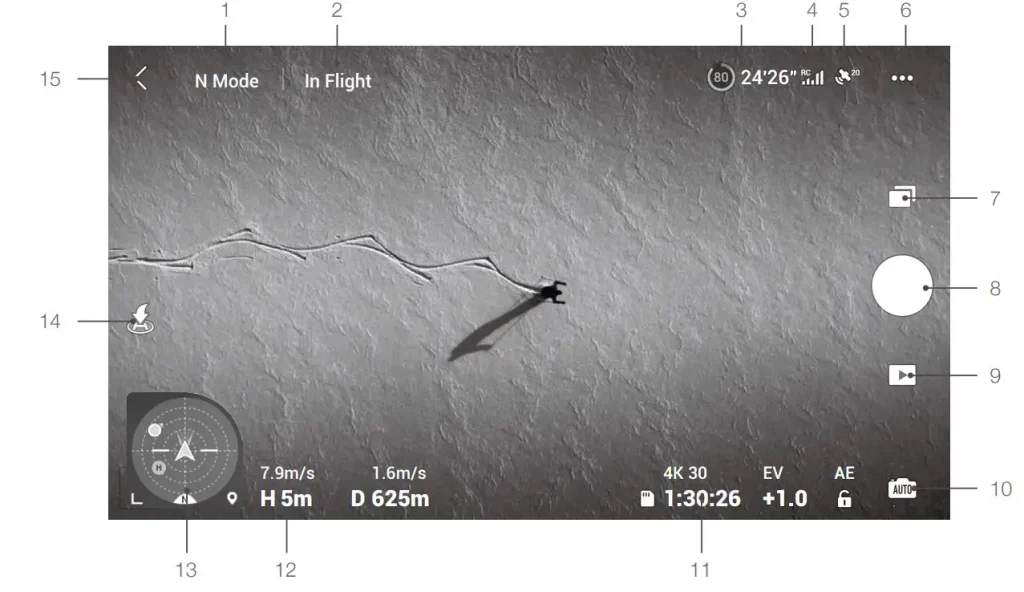
- Flight Mode
N Mode: displays the current flight mode. - System Status Bar
In Flight: indicates the aircraft flight status and displays various warning messages. Tap to view more information when a warning prompt appears. - Battery Information
 24’26”: displays the current battery level and remaining flight time. Tap to view more information about the battery.
 - Video Downlink Signal Strength
 : displays the video downlink signal strength between the aircraft and remote controller.
 - GPS Status
 : displays the current GPS signal strength.
 - System Settings
••• : tap to view information about safety, control, camera, and transmission.
Safety Flight Protection: tap to set the max altitude, max distance, Auto RTH altitude, and to update the Home Point. Sensors: view the IMU and compass status and calibrate if necessary. Advanced Settings: includes Emergency Propeller Stop and Payload mode. “Emergency Only” indicates that the motors can only be stopped mid-flight in an emergency situation such as if there is a collision, a motor has stalled, the aircraft is rolling in the air, or the aircraft is out of control and is ascending or descending very quickly. “Anytime” indicates that the motors can be stopped mid-flight anytime once the user performs a combination stick command (CSC). Stopping the motors mid-flight will cause the aircraft to crash. If accessories such as the propeller guard are mounted to the aircraft, it is recommended to enable Payload mode for enhanced safety. After take off, Payload mode is enabled automatically if a payload is detected. The flight performance will be reduced accordingly when flying with any payload. Note that the max service ceiling above sea level is 2,000 m and the max flight speed and flight range are limited when Payload mode is enabled. The Find My Drone feature helps to find the location of the aircraft on the ground.
Control
Aircraft Settings: tap to set the measurement system. Gimbal Settings: tap to set the gimbal mode, allow upward gimbal rotation, re-enter the gimbal, and to calibrate the gimbal. Advanced gimbal settings include speed and smoothness for pitch and yaw. Remote Controller Settings: tap to set the function of the customizable button, to calibrate the remote controller, to enable phone charging when an iOS device is connected, and to switch control stick modes. Make sure to understand the operations of a control stick mode before changing control stick mode. Beginner Flight Tutorial: view the flight tutorial. Connect to Aircraft: when the aircraft is not linked to the remote controller, tap to start linking.
Camera
Photo: tap to set the photo size. General Settings: tap to view and set histogram, overexposure warning, gridlines, white balance, and auto sync HD photos. Storage: tap to check microSD card capacity and format. Cache Settings: tap to set to cache when recording and the max video cache capacity. Reset Camera Settings: tap to restore all the camera settings to default.
Transmission
Frequency and channel mode settings.
About
View device information, firmware information, app version, battery version, and more. - Shooting Mode
 Photo: Single, AEB, and Timed Shot.
Video: video resolution can be set to 4K 24/25/30 fps, 2.7K 24/25/30/48/50/60 fps, and 1080p 24/25/30/48/ 50/60 fps. Pano: Sphere, 180°, and Wide Angle. The aircraft automatically takes several photos according to the selected type of Pano and generates a panoramic shot in DJI Fly. Quick Shots: choose from Dronie, Circle, Helix, Rocket, and Boomerang. - Shutter/Record Button
⚫: tap to take a photo or to start or stop recording a video.
During video recording, up to 4x digital zoom is supported. Tap 1x to switch the zoom ratio. 1080P supports 4x digital zoom, 2.7K supports 3x digital zoom, and 4K supports 2x digital zoom. Users can also use 2x zoom in photo mode. - Playback
 : tap to enter playback and preview photos and videos as soon as they are captured.
After entering album, tap to switch between Quick Transfer mode (Wi-Fi connection) and flight mode (OcuSync 2.0 video transmission connection).
 - Camera Mode Switch
 : choose between Auto and Manual mode when in photo mode. In Manual mode, shutter and ISO can be set. In Auto mode, AE lock and EV can be set.
 - microSD Card Information
 : displays the remaining number of photos or video recording time of the current microSD card. Tap to view the available capacity of the microSD card.
 - Flight Telemetry
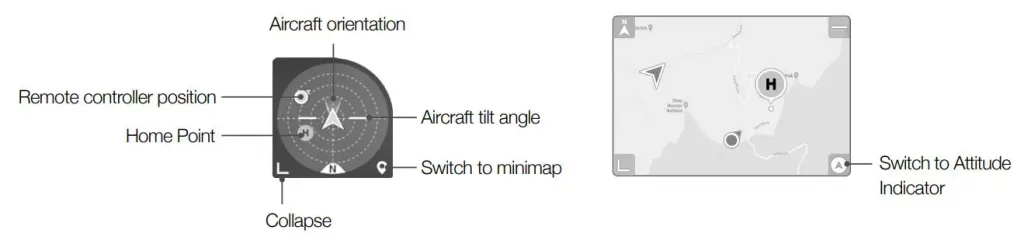
D 12m, H 6m, 1.6m/s, 1m/s: displays the distance between the aircraft and the Home Point, height from the Home Point, aircraft horizontal speed, and aircraft vertical speed. - Attitude Indicator Displays information such as the orientation and tilt angle of the aircraft, position of the remote controller, and position of the Home Point.
- Auto Take-off/Landing/RTH
 : tap the icon. When the prompt appears, press and hold the button to initiate auto take-off or landing.
Tap to initiate Smart RTH and have the aircraft return to the last recorded Home Point.
 - Back
≺: tap to return to the home screen.
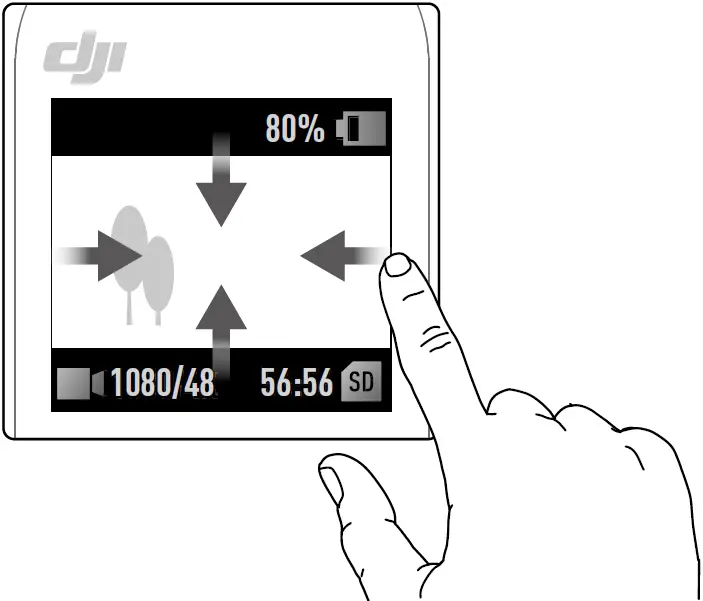
Press the screen until a circle appears and drag the circle up and down to control the tilt of the gimbal.
- Make sure to fully charge your mobile device before launching DJI Fly.
- Mobile cellular data is required when using DJI Fly. Contact your wireless carrier for data charges.
- DO NOT accept phone calls or use texting features during flight if you are using a mobile phone as your display device.
- Read all safety tips, warning messages, and disclaimers carefully. Familiarize yourself with the related regulations in your area. You are solely responsible for being aware of all relevant regulations and flying in a way that is compliant.
a) Read and understand the warning messages before using the auto-take off and auto-landing features.
b) Read and understand the warning messages and disclaimer before setting the altitude beyond the default limit.
c) Read and understand the warning messages and disclaimer before switching between flight modes.
d) Read and understand the warning messages and disclaimer prompts near or in GEO zones.
e) Read and understand the warning messages before using the Intelligent Flight modes. - Land the aircraft immediately at a safe location if a prompt appears in the app instructing you to do so.
- Review all warning messages on the checklist displayed in the app before each flight.
- Use the in-app tutorial to practice your flight skills if you have never operated the aircraft or if you do not have sufficient experience to operate the aircraft with confidence.
- Cache the map data of the area where you intend to fly the aircraft by connecting to the internet before each flight.
- The app is designed to assist your operation. Use sound discretion and DO NOT rely on the app to control the aircraft. The use of the app is subject to DJI Fly Terms of Use and DJI Privacy Policy. Read them carefully in the app.
Flight
Once pre-flight preparation is complete, it is recommended to hone your flight skills and practice flying safely. Make sure that all flights are carried out in an open area. The flying height is limited to 500 m. DO NOT exceed this height. Strictly abide by local laws and regulations when flying. Make sure to read the DJI Mini 2 Disclaimer and Safety Guidelines to understand the safety notices before flying.
Flight Environment Requirements
- Do not use the aircraft in severe weather conditions including wind speeds exceeding 10 m/s, snow, rain, and fog.
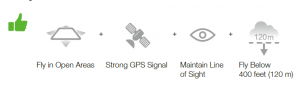
- Only fly in open areas. Tall structures and large metal structures may affect the accuracy of the onboard compass and GPS system. It is recommended to keep the aircraft at least 5 m away from structures.
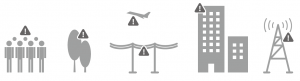
- Avoid obstacles, crowds, high voltage power lines, trees, and bodies of water. It is recommended to keep the aircraft at least 3 m above water.
- Minimize interference by avoiding areas with high levels of electromagnetism such as locations near power lines, base stations, electrical substations, and broadcasting towers.
- Aircraft and battery performance is subject to environmental factors such as air density and temperature. DO NOT fly the aircraft 4,000 m (13,123 ft) or higher above sea level. Otherwise, the battery and aircraft performance may be reduced.
- Aircraft cannot use GPS within the polar regions. Use the Downward Vision System when flying in such locations.
- Fly with caution when taking off from moving surfaces such as a moving boat or vehicle.
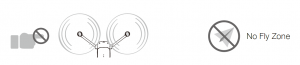
Flight Limits and GEO Zones
Unmanned aerial vehicle (UAV) operators should abide by the regulations from self-regulatory organizations such as the International Civil Aviation Organization, the Federal Aviation Administration, and local aviation authorities. For safety reasons, flight limits are enabled by default to help users operate this aircraft safely and legally. Users can set flight limits on height and distance. Altitude limits, distance limits, and GEO zones function concurrently to manage flight safety when GPS is available. Only altitude can be limited when GPS is unavailable.
Flight Altitude and Distance Limits
The flight altitude and distance limits can be changed in DJI Fly. Based on these settings, the aircraft will fly in a restricted cylinder as shown below:
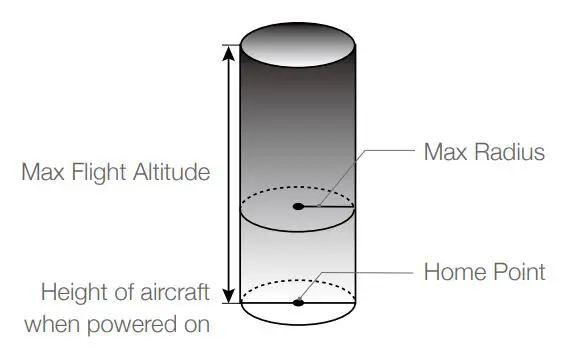
When GPS is available
When GPS is weak
- There will be no altitude limit if the GPS signal becomes weak during flight as long as the GPS signal was stronger than weak (white or yellow signal bars) when the aircraft was powered on.
- If the aircraft is in a GEO zone and there is a weak or no GPS signal, the aircraft status indicator will glow red for five seconds every twelve seconds.
- If the aircraft reaches an altitude or radius limit, you can still control the aircraft, but you cannot fly it any further. If the aircraft flies out of the max radius, it will automatically fly back within range when the GPS signal is strong.
- For safety reasons, do not fly close to airports, highways, railway stations, railway lines, city centres, or other sensitive areas. Fly the aircraft only within your line of sight.
GEO Zones
All GEO zones are listed on the DJI official website at http://www.dji.com/flysafe. GEO zones are divided into different categories and include locations such as airports, airfields where manned aircraft operate at low altitudes, national borders, and sensitive locations such as power plants.
You will receive a prompt in DJI Fly if your aircraft is approaching a GEO zone and the aircraft will be restricted from flying in the area.
Pre-Flight Checklist
- Make sure the remote controller, mobile device, and Intelligent Flight Battery are fully charged.
- Make sure the Intelligent Flight Battery and the propellers are mounted securely and the propellers are spread.
- Make sure the aircraft arms are unfolded.
- Make sure the gimbal and camera are functioning normally.
- Make sure that there is nothing obstructing the motors and that they are functioning normally.
- Make sure that DJI Fly is successfully connected to the aircraft.
- Make sure that the camera lens and Downward Vision System sensors are clean.
- Use only genuine DJI parts or parts certified by DJI. Unauthorized parts or parts from non-DJI certified manufacturers may cause system malfunctions and compromise safety.
Auto Takeoff/Landing
Auto Takeoff
Use auto takeoff when the aircraft status indicator blinks green.
- Launch DJI Fly and enter the camera view.
- Complete all steps in the pre-flight checklist.
- Tap
 . If conditions are safe for takeoff, press and hold the button to confirm.
 - The aircraft will take off and hover approx. 3.9 ft (1.2 m) above the ground.
- The aircraft status indicator blinks green twice repeatedly to indicate that the aircraft is reliant on the Downward Vision System to fly and can only fly stable at altitudes below 30 m. It is recommended to wait until the aircraft status indicator is slowly blinking green before using auto takeoff.
- DO NOT take off from a moving surface such as a moving boat or vehicle.
Auto Landing
Use auto landing when the aircraft status indicator blinks green.
- Tap
 . If conditions are safe to land, press and hold the button to confirm.
 - Auto landing can be cancelled by tapping .
- If the Downward Vision System is working normally, Landing Protection will be enabled.
- Motors stop after landing.
- Choose the proper place for landing.
Starting/Stopping the Motors
Starting the Motors
A Combination Stick Command (CSC) is used to start the motors. Push both sticks to the bottom inner or outer corners to start the motors. Once the motors start spinning, release both sticks simultaneously.
Stopping the Motors
There are two methods to stop the motors.
Method 1: when the aircraft has landed, push and hold the throttle stick down. The motors will stop after three seconds.
Method 2: when the aircraft has landed, push the throttle stick down, and perform the same CSC that was used to start the motors. Release both sticks once the motors have stopped.
Stopping the Motors Mid-Flight
The motors should only be stopped mid-flight in an emergency situation such as if a collision has occurred or if the aircraft is out of control and is ascending or descending very quickly, rolling in the air, or if a motor has stalled. To stop the motors mid-flight, use the same CSC that was used to start the motors. The default setting can be changed in DJI Fly.
- Stopping motors mid-flight will cause the aircraft to crash.
Flight Test
Takeoff/Landing Procedures
- Place the aircraft in an open, flat area with the aircraft status indicator facing towards you.
- Power on the remote controller and the aircraft.
- Launch DJI Fly, connect the mobile device to the aircraft, and enter the camera view.
- Wait until the aircraft status indicator blinks green slowly to indicate that the Home Point has been recorded and it is now safe to fly.
- Gently push the throttle stick to take off or use auto-takeoff.
- Pull the throttle stick or use auto-landing to land the aircraft.
- After landing, push the throttle down and hold. The motors stop after three seconds.
- Power off the aircraft and remote controller.
Video Suggestions and Tips
- The pre-flight checklist is designed to help you fly safely and to ensure that you can shoot video during flight. Go through the full pre-flight checklist before each flight.
- Select the desired gimbal operation mode in DJI Fly.
- It is recommended to take photos or record videos when flying in Normal or Cine mode.
- DO NOT fly in bad weather conditions such as when it is raining or windy.
- Choose the camera settings that best suit your needs.
- Perform flight tests to establish flight routes and to preview scenes.
- Push the control sticks gently to keep the aircraft movement smooth and stable.
It is important to understand the basic flight guidelines for the safety of both you and those around you.
DO NOT forget to read the disclaimer and safety guidelines.
Appendix
Specifications


Calibrating the Compass
It is recommended to calibrate the compass in the following situations when flying outdoors:
- Flying at a location further than 31 miles (50 km) away from the location the aircraft was last flown.
- The aircraft has not been flown for more than 30 days.
- A compass interference warning appears in DJI Fly and/or the aircraft status indicator blinks red and yellow alternatively.
- DO NOT calibrate the compass in locations where magnetic interference may occur such as close to magnetite deposits or large metallic structures such as parking structures, steel reinforced basements, bridges, cars, or scaffolding.
- DO NOT carry objects that contain ferromagnetic materials such as mobile phones near the aircraft during calibration.
- It is not necessary to calibrate the compass when flying indoors.
Calibration Procedure
Choose an open area to carry out the following procedure.
- Tap System Settings in DJI Fly, select Safety, then Calibrate, and follow the on-screen instructions. The aircraft status indicator is solid yellow, indicating calibration has started.
- Hold the aircraft horizontally and rotate it 360°. The aircraft status indicator will turn solid green.
- Hold the aircraft vertically and rotate it 360° around a vertical axis.
- If the aircraft status indicator blinks red, the calibration has failed. Change your location and try the calibration procedure again.
- If the aircraft status indicator blinks red and yellow alternatively after calibration is completed, this indicates that the current location is not suitable for flying the aircraft due to the level of magnetic interference. Choose a new location.
- A prompt will appear in DJI Fly if compass calibration is required before takeoff.
- The aircraft can take off immediately once calibration is complete. If you wait more than three minutes to take off after calibration, you may need to calibrate again.
Updating Firmware
When you connect the aircraft or remote controller to DJI Fly, you will be notified if a new firmware update is available. To update, connect the mobile device to the internet and follow the on-screen instructions. Note that the firmware cannot be updated if the remote controller is not linked to the aircraft.
- Make sure to follow all the steps to update firmware. Otherwise, the update may fail. The aircraft will power off automatically after the firmware update is complete.
- The firmware update will take approx. 10 minutes. It is normal for the gimbal to go limp, aircraft status indicators to blink, and the aircraft to reboot. Wait patiently until the update is complete.
- Before performing an update, make sure the Intelligent Flight Battery is at least 15% charged and the remote controller is at least 20% charged.
- The remote controller may become unlinked from the aircraft after updating. Relink the remote controller and aircraft. Note that the update may reset various main controller settings, such as the RTH altitude and the maximum flight distance, to default settings. Before updating, take note of your preferred DJI Fly settings and readjust them after the update.
After-Sales Information
Visit https://www.dji.com/support to learn more about after-sales service policies, repair services, and support.
DJI Support http://www.dji.com/support
This content is subject to change. Download the latest version from http://www.dji.com/mini-2
If you have any questions about this document, please contact DJI by sending a message to [email protected].
DJI is a trademark of DJI. Copyright © 2021 DJI All Rights Reserved.
1.
2.
3.
4.
EN Press once to check battery level.
Press, then press and hold to turn on/off
5.
Mode 2
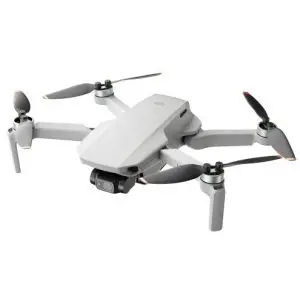
dji Mini 2 Fly More Combo Drone
DJI Fly
Overview
Check battery level: press once.
Power on/off: press, then press and hold.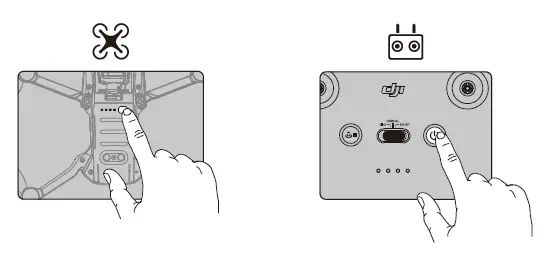
NEW TO FLYING DRONES?
]]>
dji Pocket 2
Read Before First Use
Read the following documents before using DJI Pocket 2
- User Manual
- Quick Start Guide
- Disclaimer and Safety Guidelines
It is recommended to watch all tutorial videos on the DJI Mimo app or official DJITM website (www.dji.com/pocket-2), and read the disclaimer and safety guidelines before using for the first time. Make sure to review the quick start guide before using for the first time and refer to this user manual for more information.
Downloading the DJI Mimo App
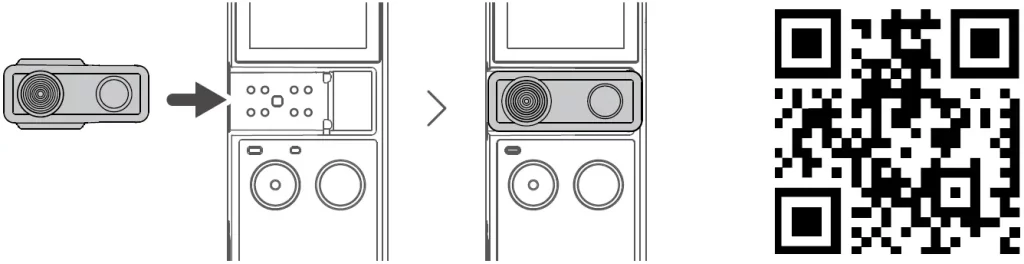
Scan the QR code to the right or search for “DJI Mimo” on the App Store or Google Play.

The Android version of DJI Mimo is compatible with Android v7.0 and later. The iOS version of DJI Mimo is compatible with iOS v11.0 and later.
Introduction
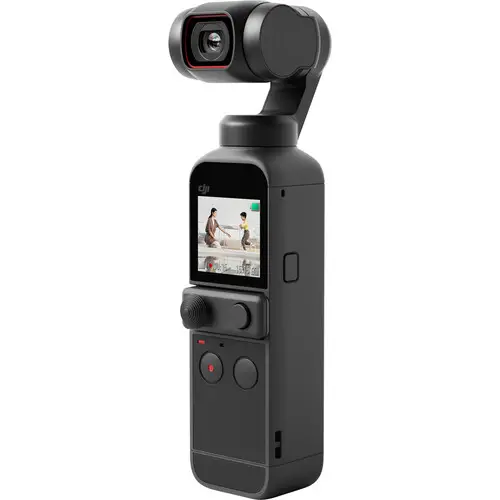
DJI Pocket 2 is a handheld gimbal camera that combines mobility and stability in one device. It shoots sharp 64 MP photos and stable video at up to 4K 60fps. The onboard touchscreen displays a live view from the camera and can control camera and gimbal movements. Create the perfect shot with intelligent modes such as ActiveTrack, Zoom, Panorama, Timelapse, and HDR Video and enjoy high quality sound recording with four microphones that boast wind noise reduction. Connect DJI Pocket 2 to DJI Mimo using a mobile device either wirelessly* or by adapter. The app can be used to create professional-quality videos and to share to social media instantly in Story mode.
Accessories such as the Mini Control Stick, Do-It-All Handle, Wireless Microphone Transmitter, Micro Tripod, Tripod Mount (1/4″), and Wide-Angle Lens can be used to enjoy more DJI Pocket 2 features.
* The Do-It-All Handle is required in order to connect with DJI Mimo wirelessly.
Overview
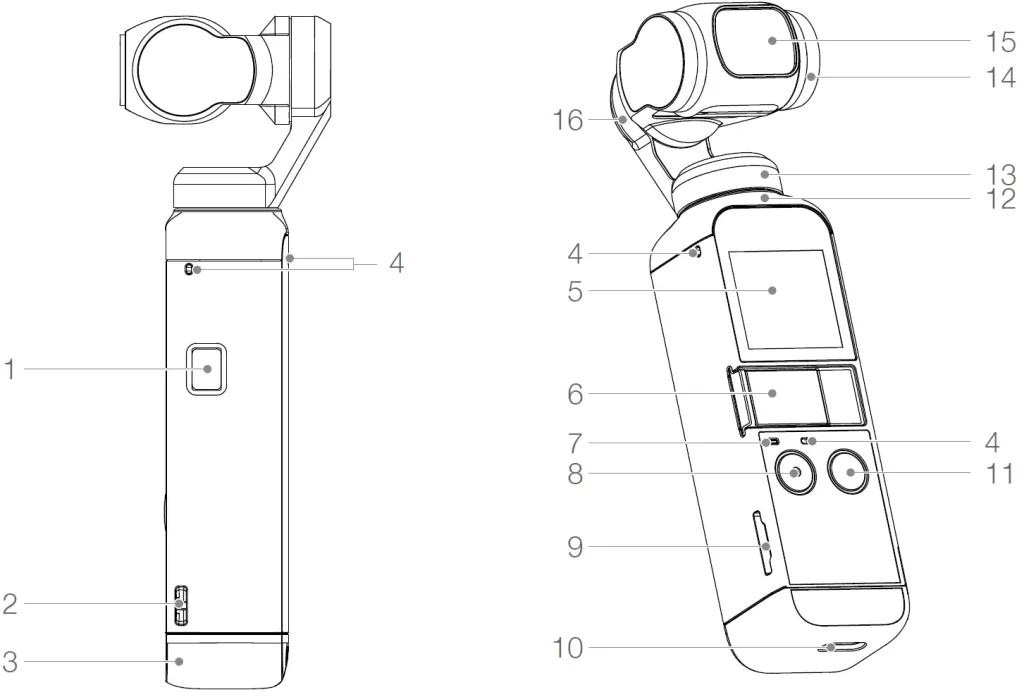
- Power Button
- Lanyard Hole
- Detachable Base
- Microphone*
- Touchscreen
- Universal Port (with Cover)
- Status LED
- Shutter/Record Button
- microSD Card Slot
- USB-C Port
- Function Button
- Heat Dissipation Area
- Pan Motor
- Tilt Motor
- Camera
- Roll Motor
* For better audio quality, DO NOT block the microphone when recording video.
Activating DJI Pocket 2
When using DJI Pocket 2 for the first time, activation is required through DJI Mimo. Follow the steps below to activate.
- Press and hold the Power button to power on.
- Remove the cover on the universal port.
- Choose a Lightning or USB-C smartphone adapter to connect to DJI Pocket 2.
- Launch DJI Mimo and follow the on-screen instructions to activate DJI Pocket 2.
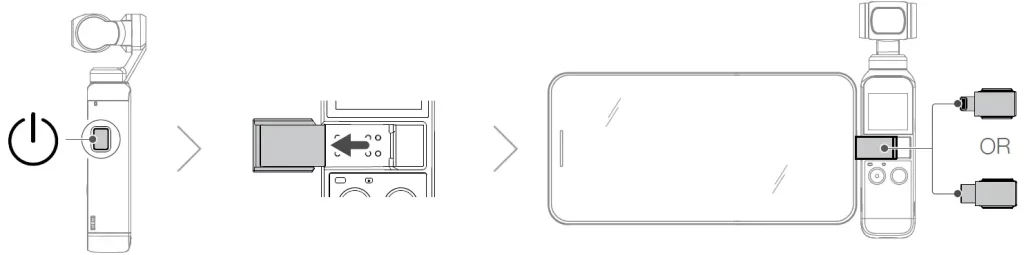
DO NOT touch the gimbal when it is powering on. Otherwise, the performance may be affected.
Operation
Button Feature
Power Button
Press and hold the Power button for one second to power on or off.
Function Button
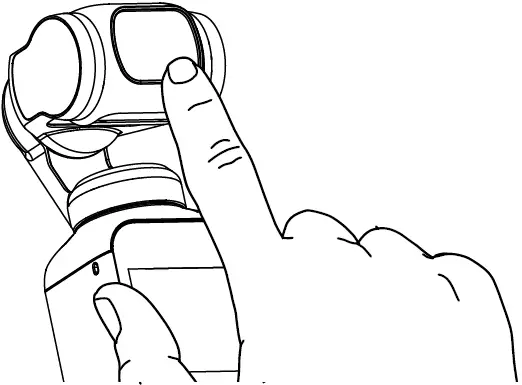
In camera view, press once to switch between Video and Photo mode. Press twice to recenter the gimbal. Press three times to switch the camera between facing forward and backward. Press and hold to completely lock the gimbal, during which time the orientation of the camera will not follow the rotation of the handle. This mode is recommended for scenarios where the subject is moving in a straight line and without abrupt movements.
When DJI Pocket 2 is powered off, press the Function button once to quickly power.
In the settings of the touchscreen, press the Function button once to return to the previous screen.
Shutter/Record Button
In camera view, press the Shutter/Record button once to take a photo or to start or stop recording a video. In settings, press once to return to the camera view. During recording, press and hold to pause recording.
Adjusting the Gimbal Manually
The tilt angle of DJI Pocket 2 can be adjusted manually.
- In Motionlapse, the pan angle can also be adjusted manually.
- DO NOT touch the camera lens. Otherwise, the quality of the image may be affected by fingerprints or dirt.
Operating the Touchscreen
The touchscreen displays the camera view after DJI Pocket 2 is powered on, as well as the shooting mode, battery level, and microSD card information.
Swipe Up
Swipe up on the touchscreen to enter gimbal settings.
- Re-center: tap to re-center the gimbal.
- Flip: tap to switch the camera between facing forward and backward.
- Fast Follow / Slow Follow: tap to switch between Slow Follow and Fast Follow.
- In Fast Follow, the gimbal responds faster, but moves more abruptly. It is recommended for scenarios that require fast transitions.
- In Slow Follow, the gimbal responds slower, but the movement is smoother.
- Follow/Tilt Locked/FPV:
- Follow: the pan and tilt axes follow the handle while the roll axis remains level. This mode is suitable for most scenarios.
- Tilt Locked: Only the pan axis follows. The tilt axis is locked and the roll axis remains level. This mode is suitable for scenarios such as where the camera position switches between high and low.
- FPV: pan, tilt, and roll axes follow. This mode is suitable for scenarios where the camera position is continuously rotating and there is less stability.
Swipe Down
Swipe down on the touchscreen to enter settings. Swipe left or right to select System Settings, Glamour Effects, Pro Settings, 16MP/64MP Settings, and Gimbal Pitch Control/Zoom Control.
- Gimbal Pitch Control/Zoom Control: tap for Gimbal Pitch Control and for Zoom Control.
- System Settings
- Screen Settings: tap the icon to switch between full-screen display and letterbox display.
- Storage: displays the remaining capacity of the microSD card. Tap to enter and tap Format to format the microSD card.
- FT (Selfie): tap to turn FT (Selfie) on and off. With FT (Selfie) turned on, FaceTrack will be automatically enabled when the camera is turned towards the user and a face is detected.
- Accessories: displays information of connected DJI Pocket 2 accessories.
- Calibration: tap to calibrate the gimbal. Calibration is used to reduce drift caused by human error or nearby magnetic interference. Place DJI Pocket 2 on a stable and flat surface and do not touch during calibration.
- Anti-Flicker: tap to select an anti-flicker frequency according to local regulations.
- Key Tone: tap to turn the key tone on and off.
- More: reset to default settings, change language, and view device information such as firmware version, serial number, and battery information.
- Glamour Effects: tap to turn Glamour Effects on and off. Turn on Glamour Effects to beautify your photos or videos.
- 64MP / 16MP Pixel Settings: Tap to switch between High-Pixel (16 MP) and Ultra High-Pixel (64 MP). The selection will take effect once the shooting mode is entered.
- Pro Settings: tap to enable Pro mode. In camera view, tap Pro in the top left corner to adjust settings such as the format, white balance, and exposure parameters.
Swipe Left
Swipe left on the touchscreen to enter the settings of the shooting mode and swipe up or down to select a shooting mode.
- Panorama: swipe left to switch between 180°, 3×3, and Sphere Panorama (coming soon).
- Photo: swipe left to set the photo ratio and the countdown timer.
- Video: swipe left to set the video resolution and frame rate.
- HDR Video: tap to select HDR Video mode (firmware version v1.01 or later is required.)
- Slow Motion: swipe left to check the speed.
- Timelapse: swipe left and then up and down to choose between Timelapse, Motionlapse, and Hyperlapse. Tap the icon in the camera view to set the duration and interval time for Timelapse and Motionlapse, and the resolution and speed for Hyperlapse. Once set, tap OK to confirm. To begin a Motionlapse, point the camera at the start point and tap the icon. Next, point the camera at the end point and tap the icon again.
Swipe Right
Swipe up or down to scroll through photos and videos. Tap to playback videos and tap to select multiple photos and videos. Swipe right to add favorites ( ) or delete ( ) photos and videos.
Double Tap
When in Photo, Video, or Slow Motion mode, double-tap the touchscreen to enable ActiveTrack. FaceTrack will be enabled if a face is detected and will enable automatically if the camera is facing toward the user. Press the Function button or tap on the touchscreen to exit ActiveTrack.
- ActiveTrack is disabled in the following scenarios: in FPV mode or Video mode at 4K/60fps, when wirelessly connected to DJI Mimo and in Video mode at 4K 48/50/60fps, in Video mode set to High Quality video mode at 4K 30fps, and in 8x Slow Motion mode.
- When connected to DJI Mimo, the touchscreen turns off and cannot be used.
Storing Photos and Videos
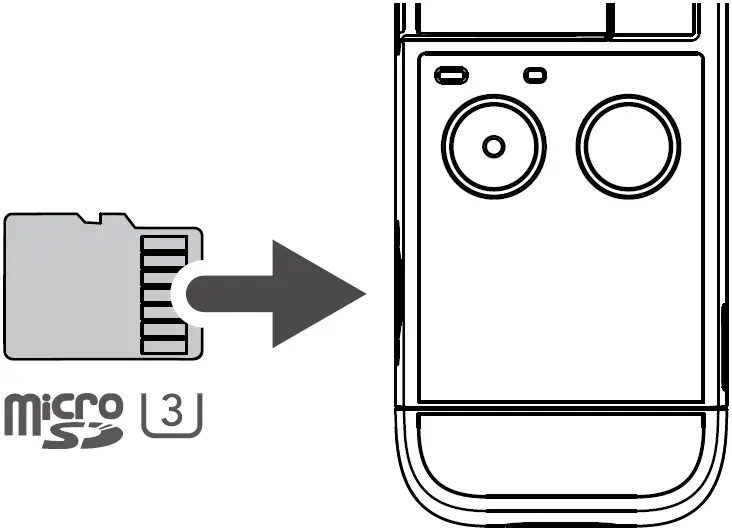
Footage shot on DJI Pocket 2 can be stored on a microSD card (not provided). A UHS-I Speed Grade 3 rating microSD card is required due to the fast read and write speeds necessary for high-resolution video data. Insert the microSD card into the microSD card slot as shown.
Status LED Descriptions
| Blinking Pattern | Description |
| Blinks red three times quickly | Battery level is low and device is about to power off |
| Blinks red and green alternatively | Updating firmware |
| Solid red | Temperature is too high |
| Blinks red slowly | Recording video |
| Blinks yellow | No serial number |
| Solid yellow | Device not activated |
| Solid green | Working normally with microSD card inserted |
| Blinks green “X” times (“X” is the time of the countdown) | Interval countdown |
DJI Mimo App
Home Screen
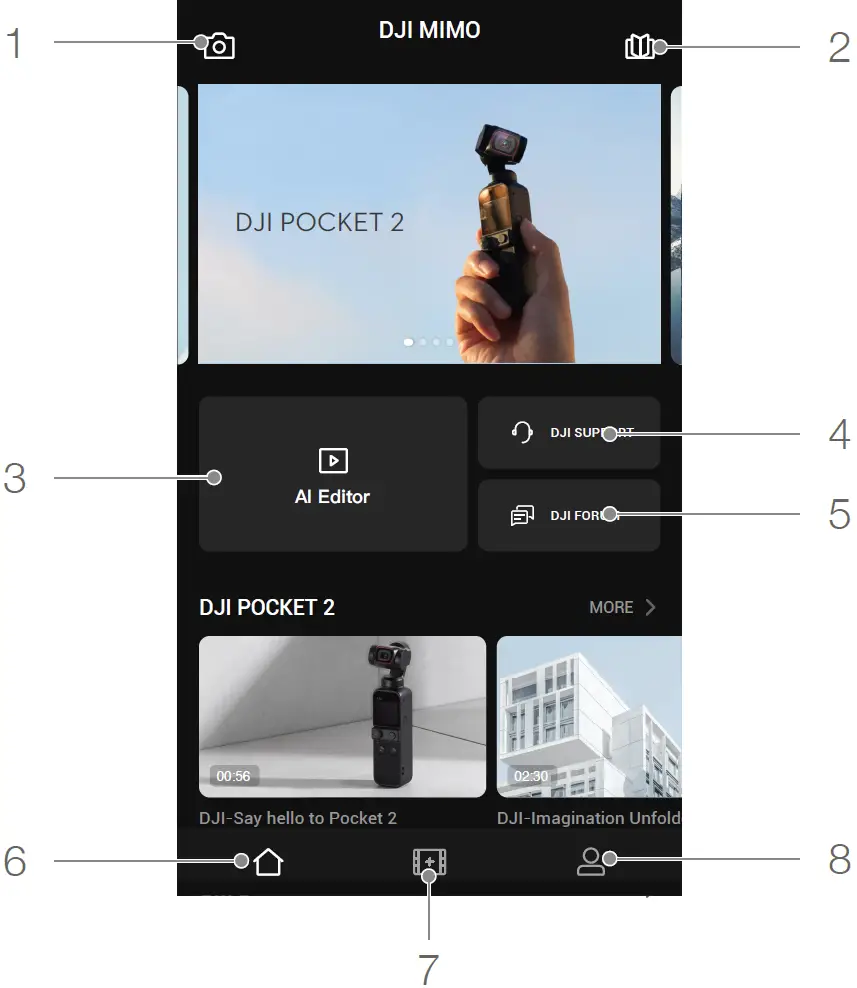
- Camera View: tap to enter the camera view.
- Academy: tap to watch tutorial videos and view manual documents.
- AI Editor: tap to select videos to edit. AI Editor will automatically edit videos with music and transitions that can be shared directly.
- DJI Support: tap to enter the official DJI product support page.
- Forum: tap to enter the official DJI forum page.
- Home: tap to return to the home screen.
- Edit: tap to edit footage from DJI Pocket 2 or import and edit footage from a mobile device.
- Profile: register or log in to a DJI account. View works and settings and connect to the DJI Store.
Camera View
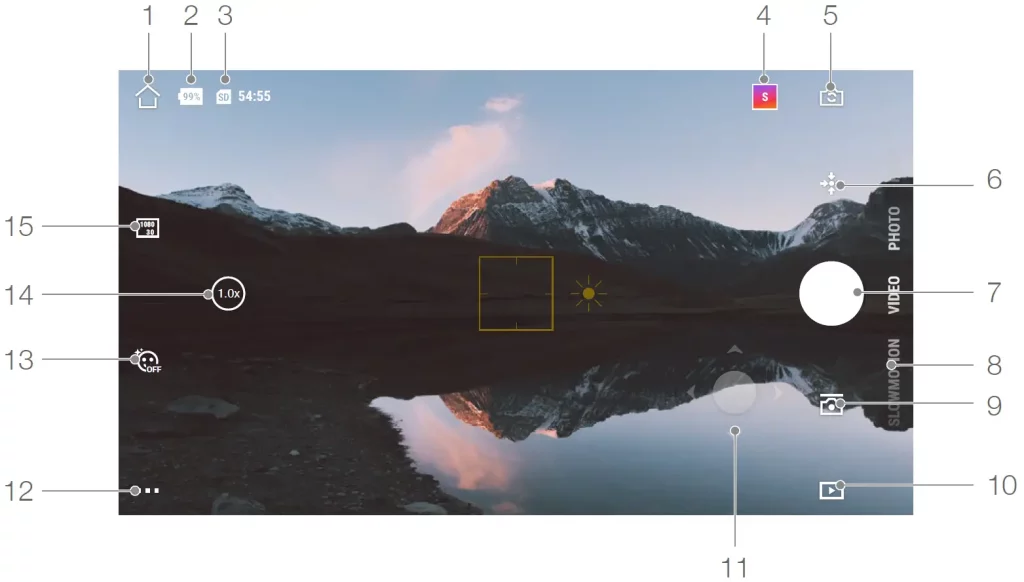
The camera view display may differ depending on the shooting mode. This display is for reference only.
Tap on the touchscreen for focusing and metering. For ActiveTrack, drag a box on the screen and DJI Pocket 2 will track the subject. For FaceTrack, DJI Pocket 2 automatically detects faces and will track the subject.
- Home
Home Button: Tap to return to the home screen. - Battery Level
Battery Symbol: Displays current battery level of DJI Pocket 2. - microSD Card Information
SD Card Symbol: Displays either the remaining number of photos that can be taken or the duration of video that can be recorded according to the current shooting mode. - Story
S-Symbol: Tap to select Story template. - Flip
Symbol: Tap to switch the gimbal from facing forward or backward. - Re-Center
Symbol: Tap to re-center the gimbal. - Shutter Button
Tap to take a photo or to start or stop recording video. - Shooting Mode
Scroll to select the shooting mode. Choose between Story, Panorama, Photo, Video, HDR Video, Slow Motion, Timelapse, and Motionlapse (enabled in Timelapse settings.) - Gimbal Settings
Camera Symbol: Select Slow Follow or Fast Follow and choose between Tilt Locked, Follow, and FPV mode. - Playback
Play Symbol: Tap to preview photos and videos as soon as they are captured. - Virtual Joystick
4 Arrows Symbol: Move the virtual joystick left and right to control the pan axis, and up and down to control the tilt axis. - Settings
3 Dots Symbol: choose Basic or Pro mode for the selected shooting mode. Various parameters can be set when in different shooting modes. Video mode is used as an example below:- Video Settings
Basic: Grid, FT (Selfie), and Anti-Flicker are available.
Pro: More settings are available once Pro is enabled including Focus Mode, White Balance, Overexposure Alert, Histogram, and sound settings (e.g. volume amplification level). - Gimbal and Handle Settings
Calibrate the gimbal and turn Gimbal Easy Control on and off. Turn on Gimbal Easy Control to control tilt and pan axes with one virtual joystick. Turn off to control tilt and pan axes on two separate virtual joysticks. - General Settings
View device name, device serial number, and version info, and format the microSD card.
- Video Settings
- Glamour Effects
Tap to turn Glamour Effects on and off. Turn on Glamour Effects to beautify your photos or videos. - Zoom
Tap and drag to set the zoom ratio. - Quality
Tap to set the resolution, frame rate, and image quality.
Charging DJI Pocket 2
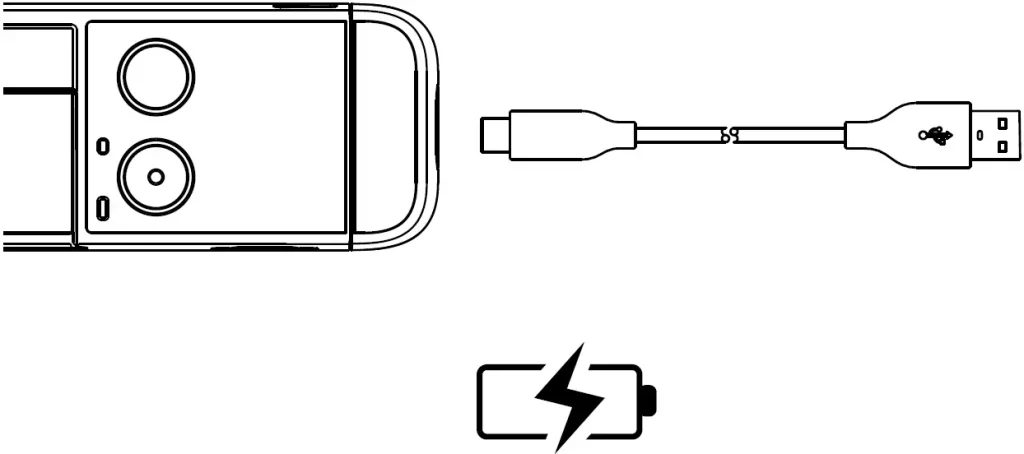
To charge DJI Pocket 2, connect a USB adapter (not provided) to the USB-C port using the provided power cable. The battery is fully charged when the status LED turns off. The battery level is displayed on the touchscreen after powering on DJI Pocket 2.
Charging time: approx. 1 hour 13 minutes (when using a 5V/2A USB adapter).
The status LED indicates the battery level during charging. Refer to the table below for more information.
| Blinking Pattern | Battery Level |
| Blinks green | 0-24% |
| Blinks green twice | 25%-49% |
| Blinks green three times | 50%-74% |
| Blinks green four times | 75%-99% |
| Glows solid green for six seconds and turns off | 100% |
- It is recommended to use a 5V/2A USB adapter for optimal charging.
- Make sure to charge DJI Pocket 2 in an environment where the temperature is between 5° and 60°C (41° and 140°F). For safety reasons, DJI Pocket 2 limits the charge current when its temperature is between 45° and 60°C (113° and 140°F). In such scenarios, DJI Pocket 2 cannot be fully charged.
Updating Firmware
The firmware of DJI Pocket 2 must be updated through DJI Mimo. A prompt will appear when new firmware is available. Follow the on-screen instructions to update the firmware.
- A microSD card is required to update firmware.
- Make sure that the battery level of DJI Pocket 2 is at least 15% before updating firmware.
Maintenance
Storing DJI Pocket 2
Store the smartphone adapters in the cover. With DJI Pocket 2 powered off and in storage mode and the microSD card slot facing upward, place DJI Pocket 2 into the cover as shown for safer transportation and storage.
- To prevent unnecessary gimbal damage, make sure to place DJI Pocket 2 into the cover correctly.
Usage Notices
- DJI Pocket 2 contains delicate components that may be damaged upon impact, which may cause the gimbal to malfunction.
- Make sure there is nothing obstructing the gimbal when DJI Pocket 2 is powered on.
- DJI Pocket 2 is not water resistant. DO NOT use any liquid cleansers. Only use a soft, dry cloth to clean DJI Pocket 2.
- Keep DJI Pocket 2 away from sand and dust to safeguard the sensors and the motors.
- When DJI Pocket 2 is not in use, it is recommended to use the cover to protect the universal port. Avoid touching the universal port during use as it may become hot.
- DO NOT cover or touch the heat dissipation area of DJI Pocket 2 as it may become hot during use. DJI Pocket 2 will stop shooting if it starts to overheat.
- Make sure to hold DJI Pocket 2 and your smartphone firmly when using the smartphone adapter to mount your smartphone to DJI Pocket 2.
Specifications
| General | |
| Name | DJI POCKET 2 |
| Model | OT-210 |
| Dimensions | 124.7×38.1×30 mm |
| Weight | 117 g |
| Input Voltage/Current | 5V/2A or 5V/1A |
| Gimbal | |
| Angular Vibration Range | ±0.005° |
| Controllable Range | Pan: -230° to +70°, Roll: ±45°, Tilt: -100° to +50° |
| Mechanical Range | Pan: -250° to +90°, Roll: ±90°, Tilt: -180° to +70° |
| Max Controllable Speed | 120° /s |
| Stabilization | 3 axis |
| Camera | |
| Sensor | 1/1.7” CMOS, Effective pixels: 64 MP |
| Lens | FOV 93°, F1.8 (Format Equivalent: 20 mm) |
| ISO | Photo: 100-6400 (16 MP), 100-3200 (64 MP)
Video: 100-6400 Slow Motion: 100-3200 |
| Electronic Shutter Speed | 1/8000 – 8 s |
| Max Image Size | 9216×6912 |
| Still Photography Modes | Single Shot, Countdown, Panorama |
| Video Resolution | 4K Ultra HD: 3840×2160 24/25/30/48/50/60p
2.7K: 2720×1530 24/25/30/48/50/60p FHD: 1920×1080 24/25/30/48/50/60p |
| Video Recording Modes | Video/HDR Video/Timelapse/Slow Motion (video resolution: 1080 120/240p) |
| Max Video Bitrate | 100 Mbps |
| Supported File Formats | FAT32 (≤32 GB)/exFAT (>32 GB) |
| Photo Formats | JPEG/DNG |
| Video Formats | MP4 (MPEG-4 AVC/H.264) |
| Supported SD Cards | Max. 256 GB SDHC/SDXC UHS-I Speed Grade 1 or UHS-I Speed Grade 3 microSD
The following microSD cards are recommended: Samsung EVO Plus 32GB UHS-I Speed Grade 1 microSDHC, Samsung Pro 64GB UHS-I Speed Grade 3 microSDXC, Samsung Pro Endurance 64GB UHS-I Speed Grade 1 microSDXC, Samsung Evo Plus 64GB UHS-I Speed Grade 3 microSDXC, SanDisk Extreme 16/32GB UHS-I Speed Grade 3 microSDHC, SanDisk Extreme Plus 128GB V30 A1 UHS-I Speed Grade 3 microSDXC, SanDisk Extreme Pro 64GB V30 A1 UHS-I Speed Grade 3 microSDXC, Lexar 633X 32GB UHS-I Speed Grade 1 microSDHC. |
| Operating Temperature | 0° to 40° C (32° to 104° F) |
| Audio Output | 48 kHz, AAC |
| Battery | |
| Type | LiPo |
| Capacity | 875 mAh |
| Energy | 6.738 Wh |
| Voltage | 7.7 V |
| Charging Voltage Limit | 8.8 V |
| Charging Environment Temperature | 5° to 60° C (41° to 140° F) |
| Operating Temperature | 0° to 40° C (32° to 104° F) |
| Operating Time | 2 hours 20 minutes (this value is tested in a laboratory environment when recording 1080 24fps video and should be used for reference only) |
| Charging Time | 1 hour 13 minutes (when using a 5V/2A USB adapter) |
| App | |
| App | DJI Mimo |
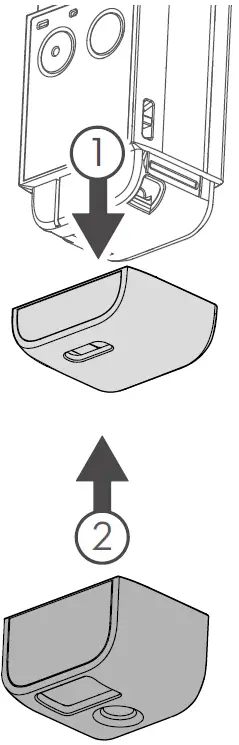
Replacing the Detachable Base
The detachable base can be removed by pulling down as shown and can be replaced with the provided DJI Pocket 2 Tripod Mount (1/4″).
Using the DJI Pocket 2 Mini Control Stick
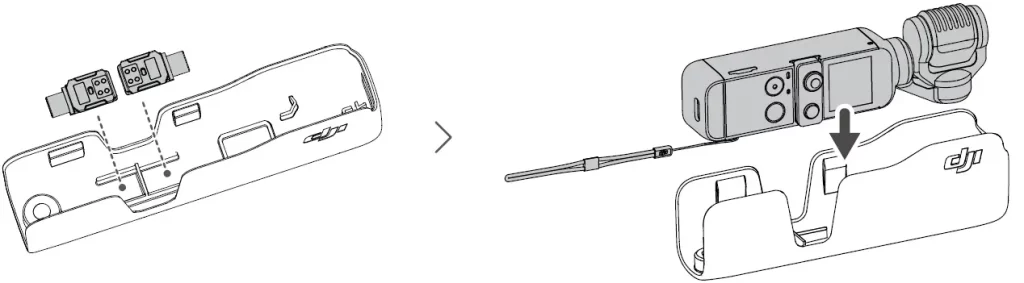
The provided DJI Pocket 2 Mini Control Stick can be used for gimbal movements and zoom control. Scan the QR code or read the user guide on the official DJI website (www.dji.com/pocket-2).
Using Other Accessories
| Accessory List | Diagram |
| DJI Pocket 2 Do-It-All Handle | 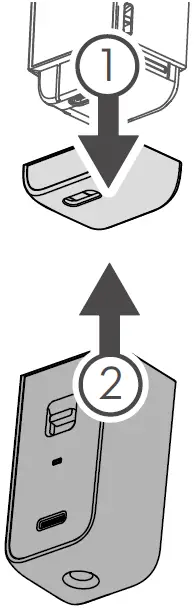 |
| DJI Wireless Microphone Transmitter |  |
| DJI Pocket 2 Micro Tripod |  |
| D JI Pocket 2 Wide-Angle Lens |  |
| Storing DJI Pocket 2 and other accessories |  |
| Scan the QR code or read the corresponding user guide on the official DJI website (www.dji.com/pocket-2) |  |
After-Sales Information
Visit https://www.dji.com/support to learn more about after-sales service policies, repair services, and support.
This content is subject to change.
Download the latest version from www.dji.com/pocket-2
OSMO is a trademark of DJI OSMO.
Copyright © 2020 DJI OSMO All Rights Reserved.
![]()
![]()
OSMO MOBILE 3
User Manual
v1.0 2019.08
 Searching for Keywords
Search for keywords such as “battery” and “install” to find a topic. If you are using Adobe Acrobat Reader to read this document, press Ctrl+F on Windows or Command+F on Mac to begin a search.
 Navigating to a Topic
View a complete list of topics in the table of contents. Click on a topic to navigate to that section.
 Printing this Document
This document supports high-resolution printing.
Using this Manual
Legend
 Important
 Hints and Tips
Download the DJI Mimo App
Scan the QR code or search for “DJI Mimo” on the App Store or Google Play.

The Android version of DJI Mimo is compatible with Android v7.0 and later. The iOS version of DJI Mimo is compatible with iOS v10.0 and later.
© 2019 DJI OSMO All Rights Reserved.
Introduction
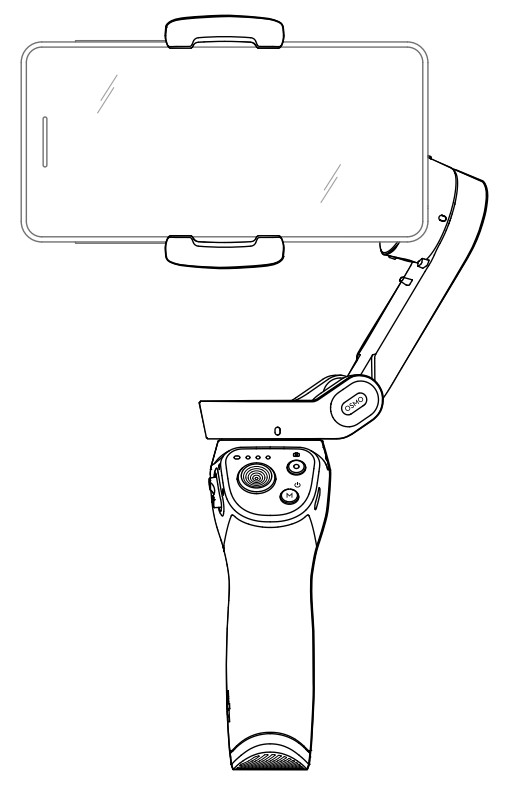
Equipped with 3-axis stabilization, OSMOTM Mobile 3 turns your mobile phone into a camera that can deliver a stabilized and super-smooth image. The foldable design makes Osmo Mobile 3 easy to transport and store. Lightweight and ergonomic, Osmo Mobile 3 puts seamlessly smooth video creation at your fingertips.
Osmo Mobile 3 is easy to use and the mobile phone can be manually adjusted by hand in Follow mode. Get creative with features such as Story mode, ActiveTrackTM 3.0, Hyperlapse, Timelapse, and Pano that are available through the DJI Mimo app.
Overview
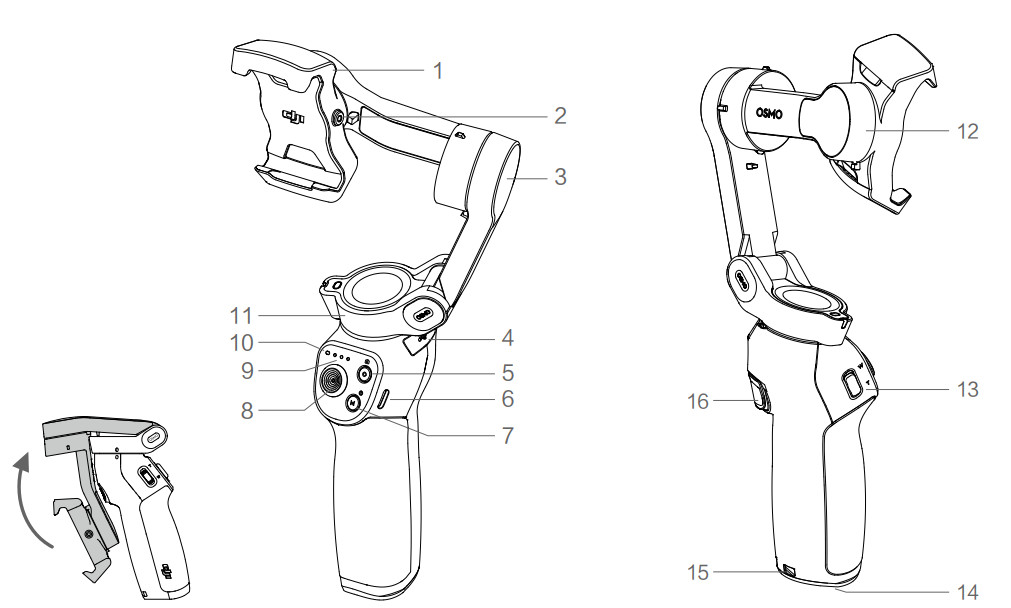
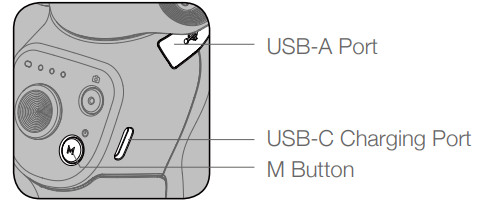
| 1. Mobile Phone Holder 2. M3×0.5 Screw Hole* 3. Tilt Motor 4. USB-A Port 5. Shutter/Record Button 6. USB-C Charging Port 7. M Button** 8. Joystick |
9. Battery Level Indicators 10. LED Status Indicator 11. Pan Motor 12. Roll Motor 13. Zoom Slider 14. 1/4″-20 UNC Port 15. Lanyard Hole 16. Trigger |
* Used for mounting counterweights.
** Used as the power/function button.
Getting Started
Charging
- To charge Osmo Mobile 3, connect a USB adapter (not included) to the charging port using the power cable (included). The battery is fully charged when the battery level indicators turn off. Charging time: 2.5 hours (when using a 10 W charger) Max. runtime: 15 hours*
- Connect your mobile phone to the USB-A port. If Osmo Mobile 3 is powered on, the mobile phone will begin to charge. If Osmo Mobile 3 is powered off, press the M button once to start charging.
* Max. runtime was tested with the gimbal balanced and held steadily. This value should be taken as a reference only.
Mounting and Balancing a Mobile Phone
Only mount and balance a mobile phone while Osmo Mobile 3 is powered off.
- Make sure the phone holder is vertical before mounting a mobile phone.
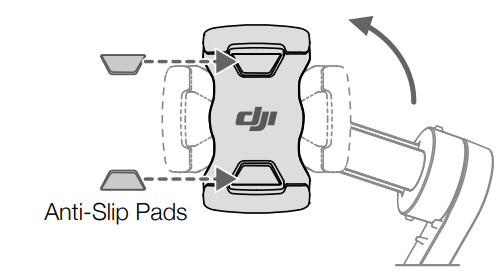
If required, use the anti-slip pads (included) to secure the mobile phone in the phone holder. - Hold the tilt motor and move the mobile phone left or right until the mobile phone remains balanced when released.
- Hold the tilt motor and move the phone holder left or right until the mobile phone remains balanced when released.
- Make sure the mobile phone is properly installed and balanced on the holder of Osmo Mobile 3 before each use.
- Mount your mobile phone before powering on Osmo Mobile 3. Osmo Mobile 3 will enter standby mode when no mobile phone is detected.
Using Osmo Mobile 3
Controls and Operations
The buttons on the handle allow greater control over the gimbal and mobile phone. The gimbal converts joystick movements into smooth pan and tilt transitions and reduces the impact of natural vibrations. In Follow mode, the mobile phone can by adjusted by hand.
- M Button
Press and hold to power on. After powering on, press and hold until you hear a beep to enter or exit standby mode. Press and hold until you hear two beeps to power off. When powered off, press once to check the battery level. When powered on, press to switch between photo and video mode or enter or exit the quick menu. Press twice to switch between landscape and portrait mode.* Press three times to enter or exit standby mode. * Landscape and portrait mode can also be switched by adjusting the phone holder directly. - Shutter Button
Press once to take a photo or start or stop recording. Press and hold for burst shooting when in photo mode. - Battery Level Indicators
Indicates the battery level of Osmo Mobile With Osmo Mobile 3 powered off, press the M button once to check the battery level.
- System Status LED
Indicates the current status of Osmo Mobile 3.Blinking Pattern Descriptions Solid yellow Bluetooth disconnected Solid green Bluetooth connected Pulses yellow or green Standby mode Blinks red and green alternatively Firmware update required or firmware update failed Solid red Gimbal abnormality (such as temperature is too low or too high, the battery is over-discharged) - Joystick
Move vertically to tilt the mobile phone. Move horizontally to pan the mobile phone. The joystick control direction can be set in DJI Mimo.
When using ActiveTrack 3.0, move the joystick to adjust the camera view.
ActiveTrack 3.0: ActiveTrack 3.0 has been optimized for tracking human subjects with a head and shoulder model along with face detection using deep learning algorithms. The subject will remain in the center of the camera view. The default position is the center of the camera view. Users can also adjust the camera view manually. There are three ways to use ActiveTrack 3.0:
a. Drag a box on the screen in the camera view in DJI Mimo. A green box around the subject indicates ActiveTrack 3.0 is successfully enabled. Tap the X icon on the top corner to stop tracking.
b. Enable One-press ActiveTrack in DJI Mimo, and press the trigger once to start or stop ActiveTrack 3.0.
c. Enable Gesture Control in DJI Mimo and then perform a palm or V gesture for one to two seconds when facing the camera. The back camera will detect the nearest head and shoulders and start to track the subject. The front camera will detect the nearest face and start to track the subject.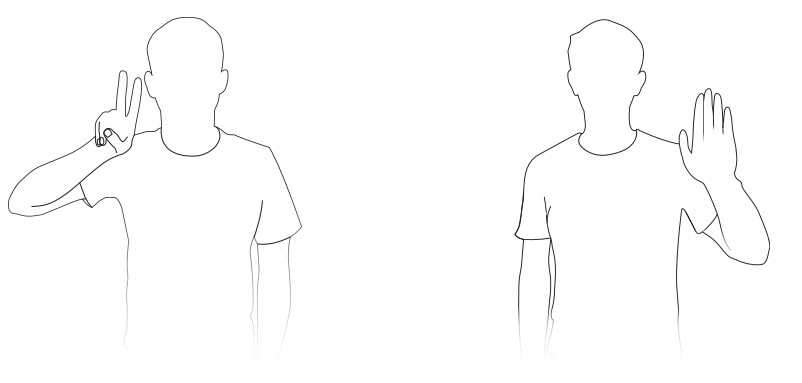
The differences between head and shoulder tracking and face tracking are that head and shoulder tracking supports 360° tracking while face tracking does not. Also, the detection range of the camera are different. The detection range between the back camera and the gesture is 0.5 to 3 m, and the distance between the front camera and the gesture is 0.5 to 2 m. Note that ActiveTrack 3.0 may increase the power consumption and the temperature of the mobile phone. See the DJI Mimo App section for more information. - Zoom Slider
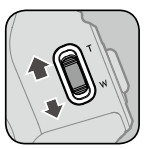 Push up or down to zoom in or out. Push the slider to the T position to enlarge the subject and push the slider to the W position to shrink.
 - Trigger
Press and hold to enter lock mode. In lock mode, the gimbal will not follow the handle movements. Release to exit lock mode.
When ActiveTrack 3.0 is enabled in DJI Mimo, press once to start or stop ActiveTrack 3.0. Press twice to recenter the gimbal.
When using ActiveTrack 3.0, the gimbal will recenter to the center of the camera view. Press three times to switch between front and back cameras. Press once, and then press and hold to enter Sport mode. Release to exit. In Sport mode, the following the speed of the gimbal increases for capturing quick movements. - USB-C Charging Port
Charge Osmo Mobile 3 by connecting a USB adapter to this port. Refer to the Charging section for more information. - USB-A Port
The USB-A port can be used to charge mobile phones. - 1/4″-20 UNC Port
The 1/4″-20 UNC port can be used to attach a tripod. - Lanyard Hole
The lanyard hole can be used to attach a wrist strap. - Combination Operation
Press the M button, shutter button, and trigger simultaneously to reset the Bluetooth connection.
Osmo Mobile 3 will be powered off automatically if there is no operation for 10 minutes in standby mode.
Operation Modes
The figures below depict the operation modes when using Osmo Mobile 3 in landscape mode. The same operation modes apply when used in portrait mode.
Upright Mode
An upright mode can be used without any further user input. In this mode, press the M button twice quickly to center the mobile phone.
Underslung Mode
Hold Osmo Mobile 3 upside down to enter Underslung mode, in which the mobile phone can easily capture images from a lower position.
Side Grip Mode
Rotate Osmo Mobile 3 to the right or left by 90° to go from Upright to Side Grip mode.
- Due to sensor noise, the handle may vibrate slightly when the gimbal is moving. This phenomenon is normal and does not affect shooting stability.
- Note that in Follow mode, to make sure the gimbal can be centered quickly and resume tracking, the mobile phone will be within ±3° of the true center after re-centering. The joystick can be used to fine-tune the position of the mobile phone.
DJI Mimo App
Watch a live HD video feed on your mobile screen through the DJI Mimo app. The app also allows you to use Story mode, Hyperlapse, Timelapse, ActiveTrack 3.0, and Pano, or configure the camera and gimbal settings in just a few taps.
 Camera View: tap to connect to Osmo Mobile 3. Once connected, DJI Mimo enters the camera view.
 Home: tap to return to home.
+ Edit: tap to edit photos or video from Osmo Mobile 3 or import and edit from a mobile device.
 Profile: register or log in to a DJI account. View works and settings, check likes and followers, send messages to other users, and connect with the DJI Store.
 Academy: tap to watch tutorials and manuals.
Connecting to the DJI Mimo App
- Power on Osmo Mobile 3.
- Enable Bluetooth on the mobile phone, and connect the device with an OM3 prefix name in DJI Mimo.
- When using Osmo Mobile 3 for the first time, activation is required using DJI Mimo. Follow the instructions to activate.
- Enter camera view after activation is complete.
When connected via Bluetooth, Osmo Mobile 3 is able to control the camera of the mobile phone without DJI Mimo. This feature is available with a mobile phone which supports camera control using the volume button.
DJI Mimo App Settings
Camera View
- Home
: Tap to return to home page. - Gimbal Battery Level
 : Displays the current battery level of the gimbal.
 - Mobile Phone Battery Level
 : Displays the current battery level of the mobile phone.
 - Flash
 : Displays the flash status.
 - Gimbal Mode
 : Displays the current gimbal mode: Follow, Tilt Locked, and FPV.
 - Story Mode
S: Story mode provides several templates for recording video. When you are finished shooting, a video will be generated automatically according to the selected shooting template. - Front/Back Camera Switch
 : Tap to switch between the front and back cameras of your mobile phone.
 - Shutter Button
 : Tap to take a photo or to start or stop recording the video.
 - Shooting Mode
Scroll to select the shooting mode. Choose between Hyperlapse, Timelapse, Slow Motion, Video, Photo, Pano, and Story mode.
Hyperlapse: enable to shoot a Timelapse photo while moving the mobile phone. Tap the shutter button to begin.
Timelapse: there are two types of Timelapse, Position, and Path. After selecting the Timelapse, tap the settings at the top of the screen. For Position Timelapse, set the interval and duration time and start to shoot. For Path Timelapse, up to four positions can be selected, and then the gimbal will travel through the positions in order.
Slow Motion: tap to shoot video at 8x slow motion. Only available on iOS devices. Video: tap to shoot a normal video.
Photo: tap to take a single shot or interval photo. Press and hold for burst shooting. Pano: tap to take a 3×3 or 180° panorama photo.
Story: Refer to Number 6 for more information about Story mode. - Playback
 : Tap to preview photos and videos.
 - Settings • • •
 : Shooting Mode Settings
Shooting Mode Settings Hyperlapse Flash. White Balance Grid. One-press ActiveTrack Timelapse Flash. White Balance. Grid Slow Motion Flash. White Balance. Grid. One-press ActiveTrack Video Flash. White Balance. Grid, One-press ActiveTrack, Gesture Control Photo Flash. White Balance Grid. One-press ActiveTrack. Gesture Control Pano Flash. White Balance Grid. Save Unstitched Pano Photos  Gimbal Settings
Follow Mode:
a. Follow pan and tilt axes
b. Tilt Locked: only the pan axis
c. FPV: pan, tilt, and roll axes follow.
Sport Mode Switch: tap to enable or disable Sport modeZoom Speed: tap to set the zoom speed when using the zoom slider.
Joystick Speed: tap to set the maximum speed when controlling the joystick. There are Fast, Medium, and Slow options.
Joystick Control Direction: choose from Free and HorizNert. Free enables the gimbal to be controlled in 360°. HorizNert enables the gimbal to be controlled in a horizontal or vertical direction.
Invert Pan Control: after enabling this feature, the pan axis movement direction is the reverse of the joystick direction.
Invert Tilt Control: after enabling this feature, the tilt axis movement direction is the reverse of the joystick direction.
Press M Button: define the feature when pressing the M button once. Select from switching between photo and video mode or enter or exit the quick menu.
Gimbal Auto Calibration: reduces drift caused by nearby magnetic interference or human error. Do not touch the gimbal and hold Osmo Mobile 3 still and upright during calibration.
 General Settings
Device Management, Device Name, Firmware Version, and SN. - Camera Settings
| Shooting Mode | Settings |
| Hyperlapse | Resolution and FPS*, Speed, ISO, Shutter, and EV* |
| Timelapse | Resolution and FPS*, Video Frame Rate, ISO, Shutter, and EV* |
| Slow Motion | ISO, Shutter, and EV* |
| Video | Glamour Effects**, Resolution and FPS*, Video Frame Rate, ISO, Shutter, and EV* |
| Photo | Glamour Effects, Count Down, ISO, Shutter, and EV* |
| Pano | 3×3 and 180° Pano, ISO, Shutter, and EV* |
* FPS, ISO, Shutter, and EV settings are only available for iOS devices.
** When enabling Glamour Effects, the video resolution is set to 720p.
Zooming
Place two fingers on the screen and move them apart to zoom in or move them together to zoom out. Note that zooming is only available when using the back camera of your mobile phone.
Updating the Firmware
Use the DJI Mimo app to update the Osmo Mobile 3 firmware. It takes approximately three minutes to complete an update.
How to Update
Before starting an update, make sure that the battery level is at least 15% (at least two battery level indicators lit). Connect Osmo Mobile 3 to your mobile device and launch DJI Mimo. You will be prompted if a new firmware update is available. To start updating, connect your mobile device to the internet and follow the on-screen instructions.
Do not exit DJI Mimo while updating the firmware. Pay attention to on-screen prompts. The LEDs status indicator will blink green and red alternatively and become solid green once the firmware update has been completed successfully.
If an update is unsuccessful, restart Osmo Mobile 3 and DJI Mimo, and reconnect the Bluetooth, and then retry.
Maintenance
Osmo Mobile 3 is designed to be folded for easier storage and transportation. Ensure to fold the Osmo Mobile 3 when it is powered off. Rotate the pan and tilt axis to align with the marks on the gimbal, and then fold Osmo Mobile 3. Note that the hole on the pan motor should be matched with the marker on the arm. Press the M button to power off Osmo Mobile 3. Osmo Mobile 3 will enter storage mode and can be folded.
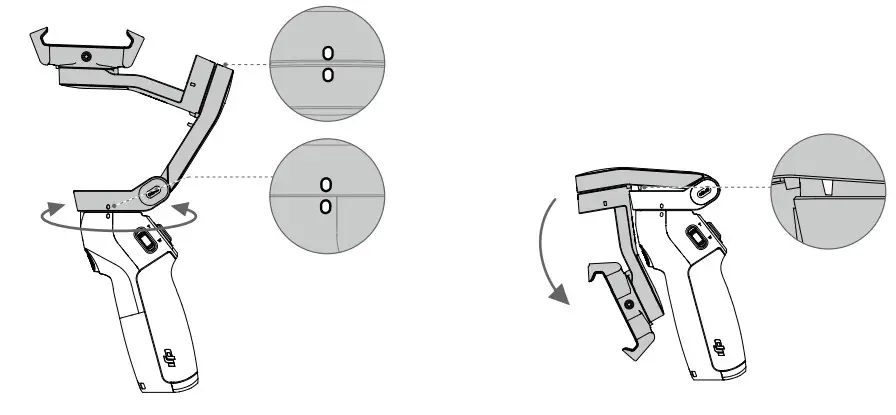
Specifications
| Name | OSMO MOBILE 3 |
| Model | OF100 |
| Dimensions | Unfolded: 285x 125x 103 mm Folded: 157x130x46 mm |
| Weight | 405 g |
| Consumption | 1.2 W (steady and balanced status) |
| Mechanical Range | Pan: -162.5° to 170.3° Roll: -85.1° to 252.2° Tilt: -104.5° to 235.7° |
| Max Controllable Speed | 120°/s |
| Compatible Phones | Weight: 200 ± 30 g Dimension: Diagonal 180 mm (ors 7.08 in) Thickness 9.5 mm Width: 62-88 mm |
| Mode | Bluetooth Low Energy 5.0 |
| Transmitter Power (EIRP) | s4 dBm |
| Operation Frequency | 2.400-2.4835 GHz |
| Battery Type | 18650 Li-ion |
| Capacity | 2450 mAh |
| Energy | 17.64 Wh |
| Voltage | 7.2 V |
| Charging Temperature | 5° to 40° C (41° to 104° F) |
| Operating Temperature | 0° to 40° C (32° to 104° F) |
| Charging Time | 2.5 hours (Measured with a 10W charger) |
| Operating Time | 15 hours (Under ideal conditions with the gimbal fully balanced) |
After-Sales Information
![]()
Visit https://www.dji.com/support to learn more about after-sales service policies, repair services, and support.
For online support, please scan this code with Facebook Messenger.
This content is subject to change.
Download the latest version from www.dji.com/osmo-mobile-3
OSMO is a trademark of DJI OSMO.
Copyright © 2019 DJI OSMO All Rights Reserved.
DJI Ronin-S

Ronin-S Release Notes
V2.3.1.20
| Date | 2020.06.10 |
| Firmware | V2.3.1.20 |
| Ronin App iOS | v1.2.8 |
| Ronin App Android | v1.2.8 |
| DJI Pro Assistant for Ronin (PC) | v2.0.2 |
| DJI Pro Assistant for Ronin (Mac) | v2.0.2 |
| User Manual: | v1.6 |
What’s New?
- Added photo capture, video recording, autofocus, and focus pull support for Fujifilm X-T4 cameras with supported X mount lenses using the Multi-Camera Control Cable (MCC-C). Requires Fujifilm X-T4 firmware v1.0 or later. To use autofocus on the Fujifilm X-T4, press halfway down on the camera control button of the gimbal. Note that the camera is unable to auto focus in video recording mode.
- Added photo capture, video recording, autofocus, and focus pull support for Canon EOS 90D cameras with supported EF mount lenses using the Multi-Camera Control Cable (MCC-B). To use autofocus on the Canon EOS 90D, press halfway down on the camera control button of the gimbal.
- Added photo capture, video recording, autofocus, and focus pull support for Canon EOS 70D, EOS 77D, and EOS 800D cameras with supported EF mount lenses using the Multi Camera Control Cable (MCC-Mini). To use autofocus, press halfway down on the camera control button of the gimbal.
- Fixed issue: Gimbal did not follow the preset path when using Track in Underslung mode.
- Optimized gimbal performance when the deadband is set to low.
Notes:
- Make sure that the DJI Ronin App is the latest version when updating the firmware.
- Make sure Ronin-S is powered off and update the firmware through the DJI Pro Assistant for Ronin by connecting the USB-C port on Ronin-S to your computer. Do not disconnect the gimbal from the computer while updating.
- After the update is complete, unplug the USB-C cable from Ronin-S and proceed to power on the gimbal.
- If Ronin-S has a camera attached and is turned on while updating the firmware, make sure to protect the camera and lens as the motors will shut off during the update.
- If the firmware update fails, restart the Ronin-S and retry.
V2.2.1.10
| Date | 2020.01.09 |
| Firmware | V2.2.1.10 |
| Ronin App iOS | v1.2.8 |
| Ronin App Android | v1.2.8 |
| DJI Pro Assistant for Ronin (PC) | v2.0.2 |
| DJI Pro Assistant for Ronin (Mac) | v2.0.2 |
| User Manual: | v1.6 |
What’s New?
- Added video recording and focus pull support for Fujifilm X-T3 cameras with supported X mount lenses using the Multi-Camera Control Cable (MCC-C). Requires Fujifilm X-T3 firmware v3.1.0 or later. Note that the camera is unable to auto focus in video recording mode.
- Added photo capture, video recording, autofocus, and focus pull support for Canon EOS 200D cameras with supported EF mount lenses using the Multi-Camera Control Cable (MCC-Mini). To use autofocus on the Canon EOS 200D, press halfway down on the gimbal’s camera control button.
- Added photo capture, video recording, autofocus, and focus pull support for Canon EOS M6 Mark II cameras with supported EF-M mount lenses using the Multi-Camera Control Cable (MCC-C). To use autofocus on the Canon EOS M6 Mark II, press halfway down on the camera control button of the gimbal.
- Fixed issue: the Tethered Control Handle could not be used with the Command Unit.
- Fixed issue: camera settings failed to save after firmware updates when using the Infrared Camera Cable.
- Optimized UI of Create and Settings pages of Command Unit.
Notes:
- Make sure that the DJI Ronin App is the latest version when updating the firmware.
- Make sure Ronin-S is powered off and update the firmware through the DJI Pro Assistant for Ronin by connecting the USB-C port on Ronin-S to your computer. Do not disconnect the gimbal from the computer while updating.
- After the update is complete, unplug the USB-C cable from Ronin-S and proceed to power on the gimbal.
- If Ronin-S has a camera attached and is turned on while updating the firmware, make sure to protect the camera and lens as the motors will shut off during the update.
- If the firmware update fails, restart the Ronin-S and retry.
V2.1.1. 0
| Date | 2019.11.19 |
| Firmware | V2.1.1. 0 |
| Ronin App iOS | v1.2.6 |
| Ronin App Android | v1.2.6 |
| DJI Pro Assistant for Ronin (PC) | v2.0.2 |
| DJI Pro Assistant for Ronin (Mac) | v2.0.2 |
| User Manual: | v1.2 |
What’s New?
- Added ability to create a Motionlapse through photo capture in ActiveTrack in the Ronin app. It is recommended to create the Motionlapse of a building, and keep the subject in the same position of the frame during shooting (requires Ronin app v1.2.6 or higher).
- Added a quick switching function to Portrait mode. Press M button twice to enter/exit Portrait mode.
Portrait mode requires using Ronin-S in Flashlight mode and the joystick control is not available. Portrait mode can be disabled on the Ronin app Status page (requires Ronin app v1.2.6 or later). Note that the tilt axis will rotate 90° when switched to Portrait mode. Make sure the camera will not collide with the gimbal. - Added Advanced Calibration feature. If the roll axis drifts after recentering the gimbal, enter the DJI Ronin app then System Status and select Advanced Calibration to fix the issue (requires DJI Ronin app v1.2.6 or later).
- Added support for using PS4 DualShock and Xbox controllers to control the gimbal and camera. Photo capture, video recording, focus, zoom, profile switch, and gimbal movements can be controlled after connecting the controller to the mobile device and gimbal. Enter the Ronin app and select Create, and then open and stay on the Gaming Controller screen when using the PS4 DualShock controller or Xbox controller to control the gimbal. The speed and smoothness of the control sticks can be adjusted. Set the focus value within 10 for optimal performance. iOS 13 or higher, Android 9.0 or higher, and Ronin app v1.2.6 or higher are required.
In order to control the gimbal, connect the PS4 DualShock controller or Xbox controller to the mobile device via Bluetooth. Follow the steps below for Bluetooth connection:
When using a PS4 DualShock controller,
a. Press and hold the power button and the Share button simultaneously. Release them when the indicator on the controller flashes quickly.
b. Enable Bluetooth on the mobile device and select DualShock controller. When using a Xbox controller,
a. Power on the controller, and press and hold the connect button for three seconds.
b. Enable the Bluetooth in the mobile device and select Xbox controller.
Notes:
a. If the gaming controller is connected to a mobile device, press the power button and the controller will automatically connect to the mobile device if the Bluetooth is disconnected. If the gaming controller and the mobile device cannot reconnect, unpair the device on the mobile device and try again.
b. If the PS4 DualShock controller is connected to a mobile device and needs to be connected to a PS4 console, use the USB Cable to reconnect the PS4 controller and the PS4. If the Xbox controller is connected to a mobile device and needs to be reconnected to an Xbox console, use the USB cable or press and hold the power button and the connect button simultaneously to connect the Xbox controller and the Xbox console. - Added photo capture, video recording, and autofocus for Panasonic G95 cameras using a RSS control cable for Panasonic (RSS-P). To use autofocus on the Panasonic G95, press halfway down on the camera control button of the gimbal.
- Added photo capture, video recording, autofocus, and focus pull support for Panasonic S1H cameras with supported L-mount lens using a Multi-Camera Control Cable (MCC-C). To use autofocus on the Panasonic S1H, press halfway down on the camera control button of the gimbal.
- Added photo capture, video recording, autofocus, and focus pull support for Nikon Z50 cameras with supported Nikkor lens using a Multi-Camera Control Cable (MCC-B). To use autofocus on the Nikon Z50, press halfway down on the camera control button of the gimbal.
- Added disable 3D Roll 360 feature in the Ronin app (requires Ronin app v1.2.6 or later).
- Fixed issue: zoom settings on Sony cameras could not be saved after the gimbal rebooted.
- Fixed issue: focus control failed for the Cannon EOS series cameras.
- Optimized Auto Tune in the Ronin app.
- Optimized SmoothTrack settings in the Ronin app.
Notes:
- Make sure that the DJI Ronin App is the latest version when updating the firmware.
- Make sure Ronin-S is powered off and update the firmware through the DJI Pro Assistant for Ronin by connecting the USB-C port on Ronin-S to your computer. Do not disconnect the gimbal from the computer while updating.
- After the update is complete, unplug the USB-C cable from Ronin-S and proceed to power on the gimbal.
- If Ronin-S has a camera attached and is turned on while updating the firmware, make sure to protect the camera and lens as the motors will shut off during the update.
- If the firmware update fails, restart the Ronin-S and retry
V2.0.0.90
| Date | 2019.09.26 |
| Firmware | V2.0.0.90 |
| Ronin App iOS | v1.2.4 |
| Ronin App Android | v1.2.4 |
| DJI Pro Assistant for Ronin (PC) | v2.0.2 |
| DJI Pro Assistant for Ronin (Mac) | v2.0.2 |
| User Manual: | v1.2 |
What’s New?
- Added ActiveTrack 3.0 (requires Ronin app v1.2.4 or later).
- Added Force Mobile (requires Ronin app v1.2.4 or later).
- Added quick switch to 3D Roll 360 mode. Press M button three times to enter, and press three times again to exit.
- Added Auto 3D Roll 360. When the gimbal is in 3D Roll 360 mode, push the joystick left or right twice to enable Auto 3D Roll 360. The gimbal rotates continuously without needing to hold the joystick. Press the trigger twice to stop Auto 3D Roll 360.
- Added video recording, autofocus, and focus pull support for Sony A7R4 cameras with supported E-mount lenses using a Multi-Camera Control Cable (MCC-C). To use autofocus on the A7R4, press halfway down on the camera control button of the gimbal.
- Added photo capture, video recording, zoom, and focus pull support for Sony A7R4 cameras using a Multi-Camera Control Cable (Multi USB). To use autofocus on the A7R4, press halfway down on the camera control button of the gimbal.
- Optimized 3D Roll 360.
- Added Track mode settings for Command Unit.
- Optimized follow experience in Flashlight mode.
- Optimized the Profile LED display by changing the pulsing frequency when gimbal in sleep mode, and the LED will become red to indicate low battery warning when battery level is less than 20%.
- Sleep mode can be enabled by pressing once or twice of the gimbal power button.
- Optimized zoom adjustment when using Sony cameras’ multi-port with Power Zoom lens, The zoom speed can be set from 1 to 100 (requires DJI Ronin v1.2.4 app or later).
- Fixed other minor bugs.
Notes:
- Make sure that the DJI Ronin App is the latest version when updating the firmware.
- Make sure Ronin-S is powered off and update the firmware through the DJI Pro Assistant for Ronin by connecting the USB-C port on Ronin-S to your computer. Do not disconnect the gimbal from the computer while updating.
- After the update is complete, unplug the USB-C cable from Ronin-S and proceed to power on the gimbal.
- If Ronin-S has a camera attached and is turned on while updating the firmware, make sure to protect the
camera and lens as the motors will shut off during the update. - If the firmware update fails, restart the Ronin-S and retry.
V1.9.0.80
| Date | 2019.08.28 |
| Firmware | v1.9.0.80 |
| Ronin App iOS | v1.2.2 |
| Ronin App Android | v1.2.2 |
| DJI Pro Assistant for Ronin (PC) | v2.0.2 |
| DJI Pro Assistant for Ronin (Mac) | v2.0.2 |
| User Manual: | v1.2 |
What’s New?
- Added video recording, autofocus, and focus pull support for Sony A9 and A6400 cameras with supported E-mount lenses using a Multi-Camera Control Cable (Micro-USB). To use autofocus on the Sony A9 and A6400, press halfway down on the camera control button of the gimbal.
- Added photo capture, video recording, autofocus, and focus pull support for Canon EOS RP cameras with supported RF mount lenses using a Multi-Camera Control Cable (Type-C). To use autofocus on the Canon EOS RP, press halfway down on the camera control button of the gimbal.
- Added photo capture, video recording, autofocus, and focus pull support for Canon M50 cameras with supported EF-M mount lenses using a Multi-Camera Control Cable (Micro USB). To use autofocus on the Canon M50, press halfway down on the camera control button on the gimbal.
- Added photo capture, video recording, autofocus, and focus pull support for Canon EOS 6D and EOS 80D cameras with supported EF mount lenses using a Multi-Camera Control Cable (Mini USB). To use autofocus on the Canon EOS 6D and EOS 80D, press halfway down on the camera control button of the gimbal.
- Added photo capture, video recording, autofocus, and focus pull support for Panasonic G9 cameras with supported Macro 4/3 mount lenses using a Multi-Camera Control Cable (Micro USB). To use autofocus on the Panasonic G9, press halfway down on the camera control button of the gimbal.
- Added photo capture, autofocus, video recording, and focus pull support for Panasonic S1 cameras with supported L mount lenses using a Multi-Camera Control Cable (Type-C). To use autofocus on the Panasonic S1, press halfway down on the camera control button of the gimbal.
- Added photo capture and autofocus for Fujifilm XT2 cameras using a Multi-Camera Control Cable (Micro USB). To use autofocus on the Fujifilm XT2, press halfway down on the camera control button of the gimbal.
- Added photo capture and autofocus for Fujifilm XT3 camera using a Multi Camera Control Cable (Type-C).
To use autofocus on the Fujifilm XT3, press halfway down on the camera control button of the gimbal. - Added support for Ronin 2 Remote Controller. The DJI Pro Wireless Receiver and Ronin-MX/S CAN Cable are required to use the Ronin 2 Remote Controller with Ronin-S. Note that the mode switch feature is not currently available (requires Ronin 2 Remote Controller firmware v1.4.0.30 and DJI Pro Wireless Receiver firmware v1.2.0.10).
- Optimized autofocus for Sony cameras. When the camera is in AF mode, press halfway on the camera control button to focus and release to stop focus.
- Optimized focus for Canon, Sony, Nikon, and Panasonic cameras. The focus speed can be set from 1 to 100, replacing the previous settings of Slow, Medium, and Fast (requires DJI Ronin v1.2.2 app or later).
- When using Canon, Nikon, and Fujifilm cameras, press the Ronin-S power button twice to disable the USB connection so that playback can be viewed and camera parameters can be set. Press twice again to enable the USB connection.
- When using a Nikon D850, press the power button twice to enable camera view instead of pressing the trigger twice.
- Fixed issue: when recording video on a Nikon Z6 camera, footage could not be displayed on an HDMI monitor.
Notes:
- Make sure that the DJI Ronin App is the latest version when updating the firmware.
- Make sure Ronin-S is powered off and update the firmware through the DJI Pro Assistant for Ronin by connecting the USB-C port on Ronin-S to your computer. Do not disconnect the gimbal from the computer while updating.
- After the update is complete, unplug the USB-C cable from Ronin-S and proceed to power on the gimbal.
- If Ronin-S has a camera attached and is turned on while updating the firmware, make sure to protect the camera and lens as the motors will shut off during the update.
- If the firmware update fails, restart the Ronin-S and retry.
V1.8.0.70
| Date | 2019.03.14 |
| Firmware | v1.8.0.70 |
| Ronin App iOS | v1.1.8 |
| Ronin App Android | v1.1.8 |
| DJI Pro Assistant for Ronin (PC) | v2.0.2 |
| DJI Pro Assistant for Ronin (Mac) | v2.0.2 |
| User Manual: | v1.2 |
What’s New?
- Added five speed settings of focus for Nikon cameras (requires Ronin app v1.1.8 or later).
- Added three speed settings of focus for Canon cameras (requires Ronin app v1.1.8 or later).
- Added two speed settings of focus for Panasonic cameras (requires Ronin app v1.1.8 or later).
- Added photo capture, video recording, autofocus, and focus pull support for Canon EOS 6D Mark II cameras with supported EF lenses. To use autofocus on the Canon EOS 6D Mark II, press halfway down on the gimbal’s camera control button.
- Added photo capture, video recording, autofocus, and focus pull support for Canon EOS R cameras with supported RF mount lenses. To use autofocus on the Canon EOS R, press halfway down on the gimbal’s camera control button.
- Added photo capture, video recording, autofocus, and focus pull support for Nikon Z6 cameras with supported Nikkor lenses. To use autofocus on the Nikon Z6, press halfway down on the gimbal’s camera control button.
- Added video recording, autofocus, and focus pull support for Sony A7M3 and A7R3 cameras with supported E-mount lenses using MCC-C cable. Photo capture is not currently available. To use autofocus on the Sony A7M3 and A7R3 cameras, press halfway down on the gimbal’s camera control button.
- Now press the Ronin-S trigger twice to switch back to live view after using playback for Nikon D850.
- Reduced shaking when switching between 3D Roll 360 and normal mode. 3D Roll 360 is now disabled when the roll axis angle is larger than 180°.
- Fixed other minor bugs
Notes:
- Make sure that the Ronin App is the latest version when updating the firmware.
- Leave the Ronin-S turned off and update the firmware through the DJI Pro Assistant for Ronin by connecting the USB-C port on the Ronin-S to your computer. Then proceed with the firmware update. Do not disconnect the gimbal from the computer while updating.
- After the update is complete, unplug the USB-C cable from the Ronin-S and proceed to turn on the gimbal.
- If the Ronin-S has a camera attached and is turned on while updating the firmware, make sure to protect the camera and lens as the motors will shut off during the update.
- If the firmware update fails, restart the Ronin-S and retry.
V1.7.0.60
| Date | 2018.11.29 |
| Firmware | v1.7.0.60 |
| Ronin App iOS | v1.1.6 |
| Ronin App Android | v1.1.6 |
| DJI Pro Assistant for Ronin (PC) | v2.0.0 |
| DJI Pro Assistant for Ronin (Mac) | v2.0.0 |
| User Manual: | v1.2 |
What’s New?
- Fixed the occasional issue when using shutter control for Canon EOS 5D Mark IV cameras where the camera froze, and the issue where the shutter control was disconnected after initializing video recording mode.
- Fixed the issue where the focus wheel could not reverse the control orientation.
- Fixed other minor bugs.
Notes:
- Ensure that the Ronin App is the latest version when updating the firmware.
- Leave the Ronin-S turned off and update the firmware through the DJI Pro Assistant for Ronin by connecting the USB-C port on the Ronin-S to your computer. Then proceed with the firmware update. Do not disconnect the gimbal from the computer while updating.
- After the update is complete, unplug the USB-C cable from the Ronin-S and proceed to turn on the gimbal.
- If the Ronin-S has a camera attached and is turned on while updating the firmware, make sure to protect the camera and lens as the motors will shut off during the update.
- If the firmware update fails, restart the Ronin-S and retry.
V1.6.0.50
| Date | 2018.11.19 |
| Firmware | v1.6.0.50 |
| Ronin App iOS | v1.1.6 |
| Ronin App Android | v1.1.6 |
| DJI Pro Assistant for Ronin (PC) | v2.0.0 |
| DJI Pro Assistant for Ronin (Mac) | v2.0.0 |
| User Manual: | v1.2 |
What’s New?
- Added option to set zoom speed for Sony cameras (requires Ronin app v1.1.6 or later).
- Added 3D Roll 360 feature. Enable 3D Roll 360 in the control settings of the Ronin app. The gimbal can switch between the three operation modes by pressing the trigger twice. Rotate the gimbal roll axis using the joystick.
Note: only motor parameters, system calibration, and pan axis control settings can be set in 3D Roll 360. - Added Auto Roll 360 feature. When gimbal is in Flashlight mode, assign roll axis control to channel 3, and push the joystick left or right twice to enable Auto Roll 360. The gimbal rotates continuously without needing to hold the joystick. Press the trigger twice to stop Auto Roll 360.
Note: Auto Roll 360 only works when 3D Roll 360 is disabled. - Added camera settings for Panasonic GH5 and GH5S cameras (requires Ronin app v1.1.6 or later).
- Added photo capture, video recording, autofocus, and focus pull support for Nikon Z7 cameras with supported lenses. To use autofocus on the Nikon Z7, press halfway down on the gimbal’s camera control button.
- Added photo capture, video recording, autofocus, and focus pull support for EOS-1D X Mark II cameras with supported EF lenses. To use autofocus on the EOS-1D X Mark II, press halfway down on the gimbal’s camera control button (requires RSS-P control cable connection).
- Added option to disable the selfie mode that is activated when the trigger is pressed three times (requires Ronin app v1.1.6 or later).
- Fixed the occasional issue when using shutter control for Canon 5D Mark IV cameras where the camera froze.
- Fixed the occasional issue when using shutter control with an HDMI monitor for Panasonic GH5 and GH5S cameras where the gimbal stopped working.
- Fixed other minor bugs.
Notes:
- Ensure that the Ronin App is the latest version when updating the firmware.
- Leave the Ronin-S turned off and update the firmware through the DJI Pro Assistant for Ronin by connecting the USB-C port on the Ronin-S to your computer. Then proceed with the firmware update. Do not disconnect the gimbal from the computer while updating.
- After the update is complete, unplug the USB-C cable from the Ronin-S and proceed to turn on the gimbal.
- If the Ronin-S has a camera attached and is turned on while updating the firmware, make sure to protect the camera and lens as the motors will shut off during the update.
- If the firmware update fails, restart the Ronin-S and retry.
V1.5.0.40
| Date | 2018.09.20 |
| Firmware | v 1.5.0.40 |
| Ronin App iOS | v 1.1.4 |
| Ronin App Android | v 1.1.4 |
| DJI Pro Assistant for Ronin (PC) | v2.0.0 |
| DJI Pro Assistant for Ronin (Mac) | v2.0.0 |
| User Manual: | v 1.0 |
What’s New?
- Added ability to take photos, record videos, and control zoom for Sony cameras using the Multi-Camera Control Cable (Multi-USB). To use autofocus on Sony cameras, press halfway down on the gimbal’s camera control button.
- Added autofocus and focus pull support for Canon EOS 5D Mk III with supported EF lenses. To use autofocus on the Canon EOS 5D Mk III, press halfway down on the gimbal’s camera control button.
- Improved the method to use Sport mode. It is no longer necessary to hold the M button to stay in Sport mode. Press and hold the M button to enter Sport mode, and then press the trigger twice to remain in Sport mode. Repeat the steps to exit Sport mode.
Notes:
- Ensure that the Ronin App is the latest version when updating the firmware.
- Leave the Ronin-S turned off and update the firmware through the DJI Pro Assistant for Ronin by connecting the USB -C port on the Ronin-S to your computer. Then proceed with the firmware update. Do not disconnect the gimbal from the computer while updating.
- After the update is complete, unplug the USB-C cable from the Ronin-S and then proceed to turn on the gimbal.
- If the Ronin-S is turned on when updating firmware and a camera is attached, make sure to protect the camera and lens from collision as the motors will shut off during the update process.
- If the firmware update fails, restart the Ronin-S and retry.
- Please note that firmware update may reset various profile settings.
V1.4.0.30
| Date | 2018.08.30 |
| Firmware | v 1.4.0.30 |
| Ronin App iOS | v 1.1.4 |
| Ronin App Android | v 1.1.4 |
| DJI Pro Assistant for Ronin (PC) | v2.0.0 |
| DJI Pro Assistant for Ronin (Mac) | v2.0.0 |
| User Manual: | v 1.0 |
What’s New?
- Added an alarm tone when the gimbal motor is blocked. The gimbal will pause its motors if the blocking issue persists for over 30 seconds.
- Added automatic motor pause in the rare case the gimbal loses orientation data.
- Added continuous auto focus triggering when the Camera Control Button is held down halfway.
- Improved delay algorithm between pressing the Camera Control Button halfway and in full to avoid a focus coupling issue.
- Improved preset profiles settings, providing smoother footage.
SmoothTrack Control Settings Motor Parameters Speed Deadband Sensitivity Status Deadband Max Speed
Smoothing Auto Tune Grade User 1 Pan Axis Low Medium Low On Medium Medium Medium Medium Tilt Axis Medium Low Low On Medium Medium Medium Roll Axis Low Medium Low Off Medium Medium Medium User 2 Pan Axis Low Medium Low On Medium Medium Medium Medium Tilt Axis Medium Low Low Off Medium Medium Medium Roll Axis Low Medium Low Off Medium Medium Medium User 3 Pan Axis High Low High On Low High Low Medium Tilt Axis High Low High On Low High Low Roll Axis High Low High Off Low High Low - Fixed an issue where Roll Axis does not hold its attitude when the gimbal’s Pan Axis is manually pushed 180° backward.
- Fixed an issue where the gimbal vibrates when rotating clockwise to switch from Upright mode to Underslung mode.
- Fixed the Balance Test algorithm for Pan Axis. Please tilt the gimbal sideways when Balance Test is performed for a more accurate result.
- Fixed a rare issue where the gimbal system fails if the M button is pressed six times in quick succession.
Notes:
- Ensure that the Ronin App is the latest version when updating the firmware.
- Leave the Ronin-S turned off and update the firmware through the DJI Pro Assistant for Ronin by connecting the USB -C port on the Ronin-S to your computer. Then proceed with the firmware update. Do not disconnect the gimbal from the computer while updating.
- After the update is complete, unplug the USB-C cable from the Ronin-S and then proceed to turn on the gimbal.
- If the Ronin-S is turned on when updating firmware and a camera is attached, make sure to protect the camera and lens from collision as the motors will shut off during the update process.
- If the firmware update fails, restart the Ronin-S and retry.
- Please note that firmware update may reset various profile settings.
V1.3.0.20
| Date | 2018.07.19 |
| Firmware | v 1.3.0.20 |
| Ronin App iOS | v 1.1.2 |
| Ronin App Android | v 1.1.2 |
| DJI Pro Assistant for Ronin (PC) | v2.0.0 |
| DJI Pro Assistant for Ronin (Mac) | v2.0.0 |
| User Manual: | v 1.0 |
What’s New?
- Added focus pulling support and autofocus triggering feature for Nikon D5 with supported NIKKOR lenses.
Press halfway down on the gimbal’s camera control button to use autofocus. - Added photo capture and video start/stop control for Panasonic GH3/GH4 using the optional RSS control cable for Panasonic (RSS-P).
- Added selectable Camera Type in the Ronin App (version must be 1.1.2 or later) for increased camera shutter control stability when using IR. Go to Ronin App->Create->Camera Control to select the camera type when using the RSS-IR cable.
- Optimized Motionlapse.
- Improved the stability and image quality when taking long exposure shots in Timelapse and Motionlapse.
The gimbal will no longer exit these modes when the gimbal is disturbed but pop up a notice in the Ronin app. - Fixed the micro stutter issue when the gimbal rotates quickly and fixed the issue where the roll axis goes off level when controlling the pan axis.
- Fixed the issue where the correct result did not display when using the Balance Test for the pan axis. Tilt the Ronin-S sideways when performing the Balance Test so that the Ronin-S can correctly calculate the test result.
Notes:
- Ensure that the Ronin App is the latest version when updating the firmware.
- Leave the Ronin-S turned off and update the firmware through the DJI Pro Assistant for Ronin by connecting the USB -C port on the Ronin-S to your computer. Then proceed with the firmware update. Do not disconnect the gimbal from the computer while updating.
- After the update is complete, unplug the USB-C cable from the Ronin-S and then proceed to turn on the gimbal.
- If the Ronin-S is turned on when updating firmware and a camera is attached, make sure to protect the camera and lens from collision as the motors will shut off during the update process.
- If the firmware update fails, restart the Ronin-S and retry.
- It is possible to revert back to the previous firmware version.
- When setting the interval time for Motionlapse, always add at least one second on top of your exposure time to allow for gimbal movement.
V1.2.0.10
What’s New?
- Added focus pulling support and autofocus triggering for Canon 5D MKIV with supported EF lenses. Autofocus can be used by pressing halfway on the gimbal’s camera control button.
- Added focus pulling support and autofocus triggering feature for Nikon D850 with supported NIKKOR lenses. Autofocus can be used by pressing halfway on the gimbal’s camera control button.
- Added autofocus triggering feature for Panasonic GH5/GH5S with supported lenses, which can be used by pressing halfway on the gimbal’s camera control button.
- Optimized IR control.
- Improved the image quality under low-light conditions or when taking long exposure shots in Motionlapse mode by implementing shoot-move-shoot capturing style.
- Fixed an issue where some photos would be lost when using Create features on supported Sony cameras.
- Enhanced SmoothTrack smoothing when the Push function is enabled.
- Fixed an issue when using the gimbal where the trigger response was too slow.
Notes:
- Leave the Ronin-S turned off and update the firmware through the DJI Pro Assistant for Ronin by connecting the USB -C port on the Ronin-S to your computer. Then proceed with the firmware update. Do not disconnect the gimbal from the computer while updating.
- After the update is complete, unplug the USB-C cable from the Ronin-S and then proceed to turn on the gimbal.
- If the Ronin-S is turned on when updating firmware and a camera is attached, make sure to protect the camera and lens from collision as the motors will shut off during the update process.
- If the firmware update fails, restart the Ronin-S and retry.
- It is possible to revert back to the previous firmware version.
- When setting the interval time for Motionlapse, always add at least one second on top of your exposure time to allow for gimbal movement.
Copyright © 2018 DJI OSMO All Rights Reserved
]]> Inspire 2 CINESSD Station
Thunderbolt 3 Supported
Quick Start Guide
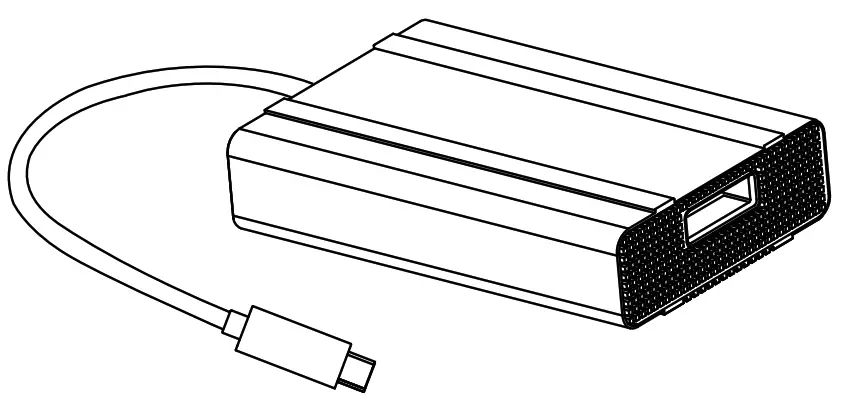
Disclaimer
Congratulations on purchasing your new DJI™ product. The information in this document affects your safety and your legal rights and responsibilities. Read this entire document carefully to ensure proper configuration before use. Failure to read and follow instructions and warnings in this document may result in serious injury to yourself or others, damage to your DJI product, or damage to other objects in the vicinity. This document and all other collateral documents are subject to change at the sole discretion of DJI.
By using this product, you hereby signify that you have read this disclaimer and warning carefully and that you understand and agree to abide by the terms and conditions herein. You agree that you are solely responsible for your own conduct while using this product, and for any consequences thereof. You agree to use this product only for purposes that are proper and in accordance with all applicable laws, rules, and regulations, and all terms, precautions, practices, policies, and guidelines DJI has made and may make available.
DJI accepts no liability for damage, injury, or any legal responsibility incurred directly or indirectly from the use of this product. The user shall observe safe and lawful practices including, but not limited to, those set forth in this document. Notwithstanding the above, your statutory rights under applicable national legislation are not affected by this disclaimer.
DJI is a trademark of SZ DJI TECHNOLOGY CO., LTD. (abbreviated as “DJI”) and its affiliated companies. Names of products, brands, etc., appearing in this document are trademarks or registered trademarks of their respective owner companies. This product and document are copyrighted by DJI with all rights reserved. No part of this product or document shall be reproduced in any form without prior written consent of or authorization from DJI.
Warnings
1. Only use genuine DJI parts or parts certified by DJI. Unauthorized parts or parts from nonDJI-certified manufacturers may cause system malfunctions and
compromise safety.
2. Ensure the CINESSD Station and its components are free from contamination (e.g. water, oil, soil, and sand).
Introduction
This CINESSD Station is specially designed to export DJI CINESSD files. It’s compatible with computers with Thunderbolt 3 ports.
Usage
Exporting Files
- Insert the CINESSD into the station then connect the station to a computer.
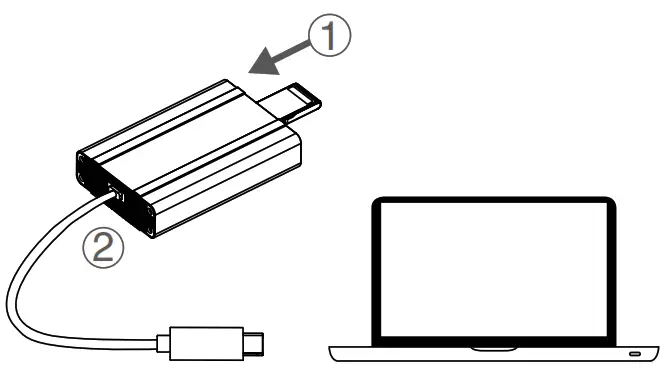
- When connected, an icon named “DJI_A” followed by a number sequence will appear.
Click to start exporting files. - Safely remove the station on your operating system before unplugging it from your computer.
 The CINESSD Station should be used with computers with Thunderbolt 3 ports.
Following computer operating systems support Thunderbolt 3:
- Windows: Win10 or above.
- Mac: macOS High Sierra or above.
![]() DO NOT remove the CINESSD when it is powered on.
DO NOT remove the CINESSD when it is powered on.
Insert the CINESSD before connecting the station to the computer.
The station icon will vary based on your computer’s operating system.
Specifications
| Size | 130 mm×86.5 mm×30.1 mm |
| Weight | 380 g |
| Operation Temperature Range | 32° to 104° F (0° to 40° C) |
This content is subject to change.
Download the latest version from http://www.dji.com/inspire-2
INSPIRE and CINESSD is trademarks of DJI.
Copyright © 2018 DJI All Rights Reserved.
Compliance Information
FCC Compliance
This device complies with Part 15 of the FCC Rules. Operation is subject to the following two conditions:
(1) This device may not cause harmful interference, and
(2) This device must accept any interference received, including interference that may cause undesired operation.
Any changes or modifications not expressly approved by the party responsible for compliance could void the user’s authority to operate the equipment.

Environmentally-friendly disposal
 Old electrical appliances must not be disposed of together with the residual waste, but have to be disposed of separately. The disposal at the communal collecting point via private persons is for free. The owner of old appliances is responsible to bring the appliances to these collecting points or to similar collection points. With this little personal effort, you contribute to recycling valuable raw materials and the treatment of toxic substances.
IC Compliance
This device complies with ICES-003 standards. Operation is subject to the following two conditions: (1) this device may not cause interference, and (2) this device must accept any interference, including interference that may cause undesired operation of the device.
Manufactured by:
14th floor, West Wing, Skyworth Semiconductor Design Building NO.18 Gaoxin South 4th Ave, Nanshan District, Shenzhen, Guangdong, China
If you have any questions about this document, please contact DJI by sending a message to [email protected].
]]>