dji Mini 2 Ultralight Foldable Drone
User Manual
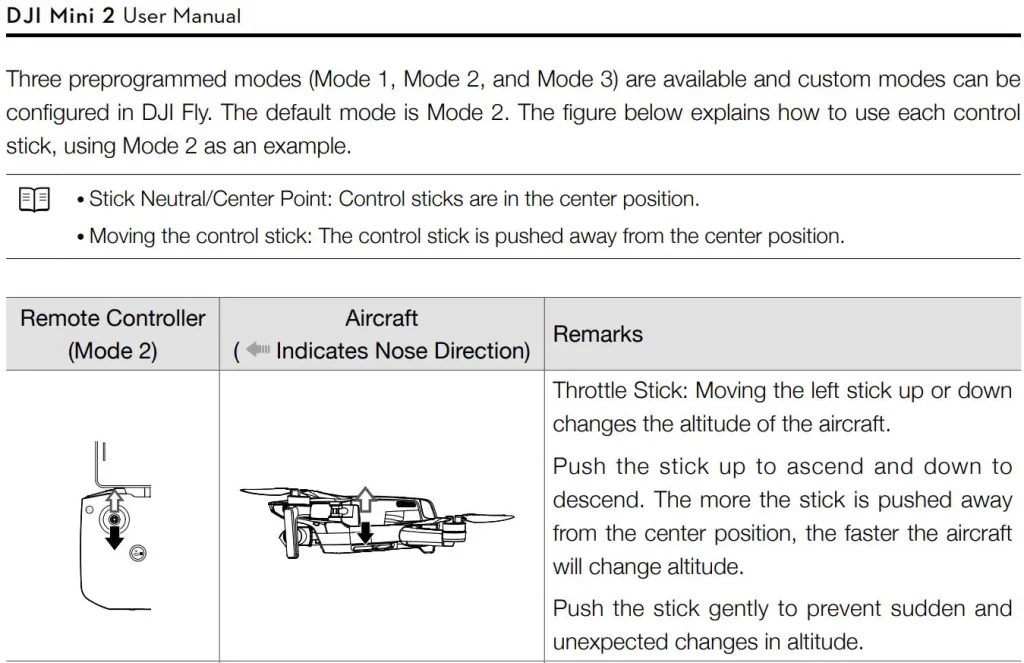
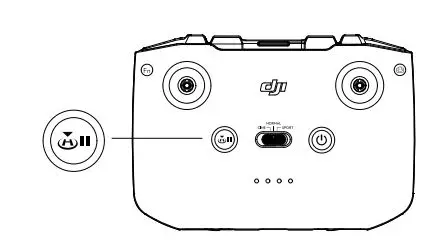
Flight Mode Switch
Toggle the switch to select the desired flight mode.

Flight Pause/RTH Button
Press once to make the aircraft brake and hover in place. If the aircraft is performing a Quick Shot, RTH, or auto landing, press once to exit the procedure before braking.
Press and hold the RTH button until the remote controller beeps to start RTH. Press this button again to cancel RTH and regain control of the aircraft. Refer to the Return to Home section for more information about RTH.
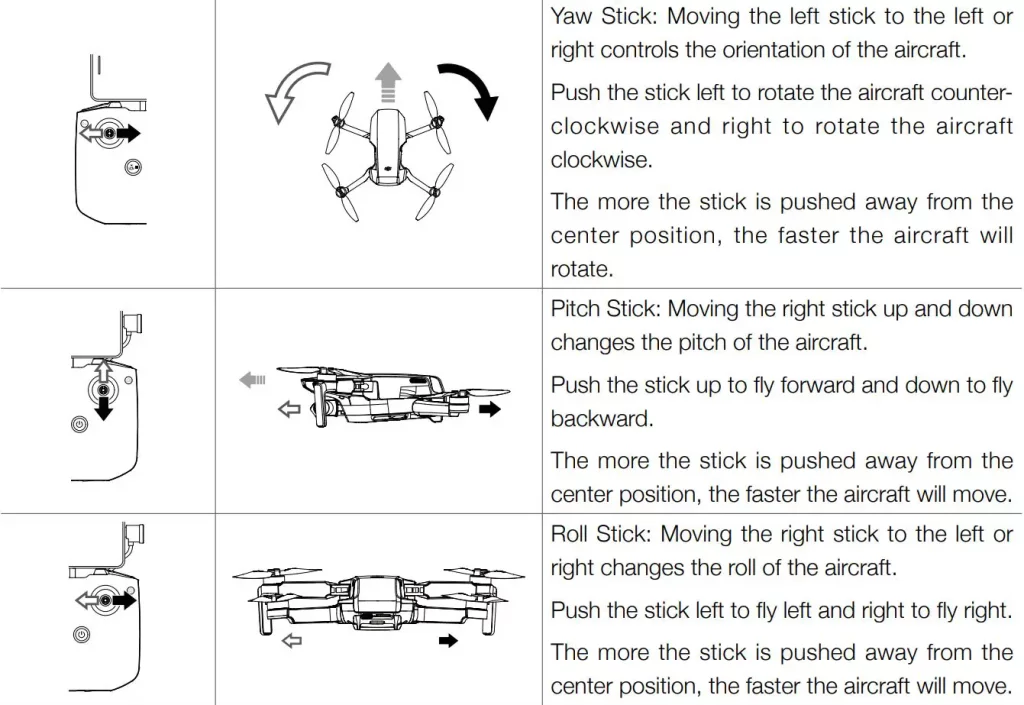
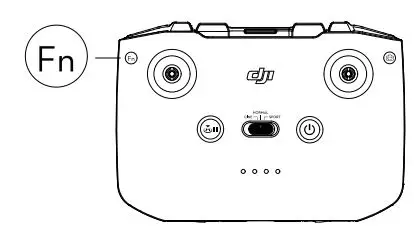
Customizable Button
To customize the function of this button, go to System Settings in DJI Fly and select Control. Customizable functions include re-entering the gimbal and toggling between the map and live view.
Remote Controller Alert
The remote controller sounds an alert during RTH. The alert cannot be cancelled. The remote controller sounds an alert when the battery level is low (6% to 15%). A low battery alert level can be cancelled by pressing the power button. A critical battery level alert (less than 5%), however, cannot be cancelled.
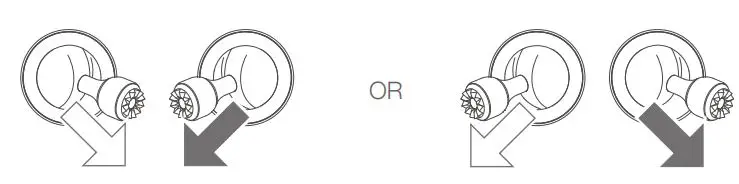
Optimal Transmission Zone
The signal between the aircraft and the remote controller is most reliable when the antennas are positioned in relation to the aircraft as depicted below.
![]()
Linking the Remote Controller
The remote controller is linked to the aircraft before delivery. Linking is only required when using a new remote controller for the first time. Follow these steps to link a new remote controller:
- Power on the remote controller and the aircraft.
- Launch DJI Fly.
- In camera view, tap ••• and select Control and Pair to Aircraft (Link). The remote controller will beep continually.
- Press and hold the power button of the aircraft for more than four seconds. The aircraft beeps once to indicate it is ready to link. The aircraft beeps twice to indicate linking is successful. The battery level LEDs of the remote controller will glow solid.
 Make sure the remote controller is within 0.5 m of the aircraft during linking.
- The remote controller will automatically unlink from an aircraft if a new remote controller is linked to the same aircraft.
- Turn off Bluetooth and Wi-Fi when using OcuSync 2.0 video transmission connection. Otherwise, they may affect the video transmission.
 Fully charge the remote controller before each flight. The remote controller sounds an alert when the battery level is low.
- If the remote controller is powered on and not in use for five minutes, an alert will sound. After six minutes, the aircraft automatically powers off. Move the control sticks or press any button to cancel the alert.
- Adjust the mobile device holder to make sure the mobile device is secure.
- Fully charge the battery at least once every three months to maintain battery health.
DJI Fly App
Home
Launch DJI Fly and enter the home screen.
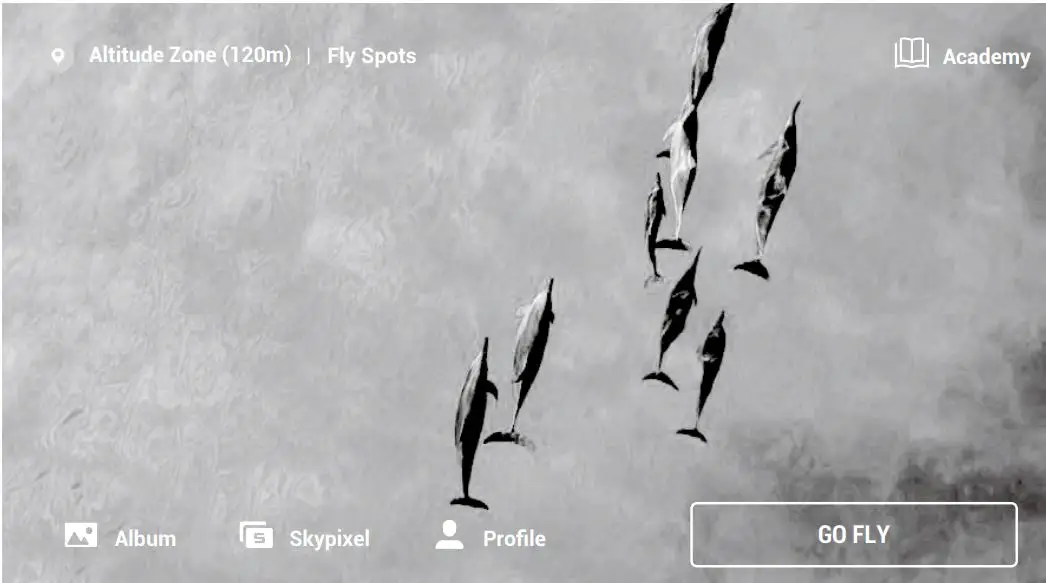
Fly Spots
View or share nearby suitable flight and shooting locations, learn more about GEO zones, and preview aerial photos of different locations taken by other users.
Academy
Tap the icon in the top right corner to enter Academy and view product tutorials, flight tips, flight safety, and manual documents.
Album
View photos and videos from DJI Fly and your mobile device. Trimmed Download is supported when downloading a video. Select the clip to download. Quick Shot videos can be created and viewed after downloading to the mobile device and rendering. Create contains Templates and Pro. Templates automatically edit imported footage. Pro allows users to edit footage manually.
Sky Pixel
Enter Sky Pixel to view videos and photos shared by users.
Profile
View the account information, flight records, DJI forum, online store, Find My Drone feature, and other settings.
![]() Trimmed Download is not supported in the following situations:
Trimmed Download is not supported in the following situations:
- The duration of the video is less than 5 seconds.
- There is no cached video in the mobile device corresponding to the original video. Make sure to download using the mobile device that was used for shooting.
- The difference in duration between the cached video in the mobile device and the original video from the microSD card of the aircraft is too large. This may occur due to the following reasons:
a) Exited DJI Fly while recording such as to answer a phone call or to reply to a message.
b) Video transmission disconnected while recording.
Camera View
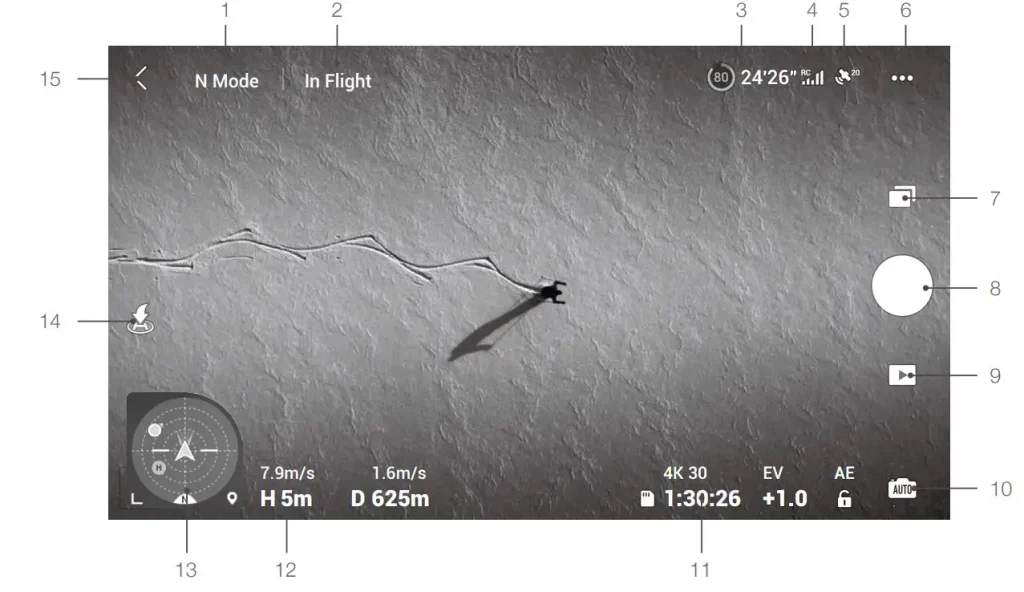
- Flight Mode
N Mode: displays the current flight mode. - System Status Bar
In Flight: indicates the aircraft flight status and displays various warning messages. Tap to view more information when a warning prompt appears. - Battery Information
 24’26”: displays the current battery level and remaining flight time. Tap to view more information about the battery.
 - Video Downlink Signal Strength
 : displays the video downlink signal strength between the aircraft and remote controller.
 - GPS Status
 : displays the current GPS signal strength.
 - System Settings
••• : tap to view information about safety, control, camera, and transmission.
Safety Flight Protection: tap to set the max altitude, max distance, Auto RTH altitude, and to update the Home Point. Sensors: view the IMU and compass status and calibrate if necessary. Advanced Settings: includes Emergency Propeller Stop and Payload mode. “Emergency Only” indicates that the motors can only be stopped mid-flight in an emergency situation such as if there is a collision, a motor has stalled, the aircraft is rolling in the air, or the aircraft is out of control and is ascending or descending very quickly. “Anytime” indicates that the motors can be stopped mid-flight anytime once the user performs a combination stick command (CSC). Stopping the motors mid-flight will cause the aircraft to crash. If accessories such as the propeller guard are mounted to the aircraft, it is recommended to enable Payload mode for enhanced safety. After take off, Payload mode is enabled automatically if a payload is detected. The flight performance will be reduced accordingly when flying with any payload. Note that the max service ceiling above sea level is 2,000 m and the max flight speed and flight range are limited when Payload mode is enabled. The Find My Drone feature helps to find the location of the aircraft on the ground.
Control
Aircraft Settings: tap to set the measurement system. Gimbal Settings: tap to set the gimbal mode, allow upward gimbal rotation, re-enter the gimbal, and to calibrate the gimbal. Advanced gimbal settings include speed and smoothness for pitch and yaw. Remote Controller Settings: tap to set the function of the customizable button, to calibrate the remote controller, to enable phone charging when an iOS device is connected, and to switch control stick modes. Make sure to understand the operations of a control stick mode before changing control stick mode. Beginner Flight Tutorial: view the flight tutorial. Connect to Aircraft: when the aircraft is not linked to the remote controller, tap to start linking.
Camera
Photo: tap to set the photo size. General Settings: tap to view and set histogram, overexposure warning, gridlines, white balance, and auto sync HD photos. Storage: tap to check microSD card capacity and format. Cache Settings: tap to set to cache when recording and the max video cache capacity. Reset Camera Settings: tap to restore all the camera settings to default.
Transmission
Frequency and channel mode settings.
About
View device information, firmware information, app version, battery version, and more. - Shooting Mode
 Photo: Single, AEB, and Timed Shot.
Video: video resolution can be set to 4K 24/25/30 fps, 2.7K 24/25/30/48/50/60 fps, and 1080p 24/25/30/48/ 50/60 fps. Pano: Sphere, 180°, and Wide Angle. The aircraft automatically takes several photos according to the selected type of Pano and generates a panoramic shot in DJI Fly. Quick Shots: choose from Dronie, Circle, Helix, Rocket, and Boomerang. - Shutter/Record Button
⚫: tap to take a photo or to start or stop recording a video.
During video recording, up to 4x digital zoom is supported. Tap 1x to switch the zoom ratio. 1080P supports 4x digital zoom, 2.7K supports 3x digital zoom, and 4K supports 2x digital zoom. Users can also use 2x zoom in photo mode. - Playback
 : tap to enter playback and preview photos and videos as soon as they are captured.
After entering album, tap to switch between Quick Transfer mode (Wi-Fi connection) and flight mode (OcuSync 2.0 video transmission connection).
 - Camera Mode Switch
 : choose between Auto and Manual mode when in photo mode. In Manual mode, shutter and ISO can be set. In Auto mode, AE lock and EV can be set.
 - microSD Card Information
 : displays the remaining number of photos or video recording time of the current microSD card. Tap to view the available capacity of the microSD card.
 - Flight Telemetry
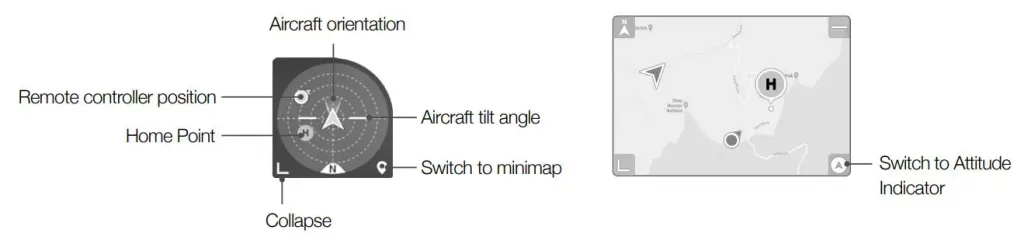
D 12m, H 6m, 1.6m/s, 1m/s: displays the distance between the aircraft and the Home Point, height from the Home Point, aircraft horizontal speed, and aircraft vertical speed. - Attitude Indicator Displays information such as the orientation and tilt angle of the aircraft, position of the remote controller, and position of the Home Point.
- Auto Take-off/Landing/RTH
 : tap the icon. When the prompt appears, press and hold the button to initiate auto take-off or landing.
Tap to initiate Smart RTH and have the aircraft return to the last recorded Home Point.
 - Back
≺: tap to return to the home screen.
Press the screen until a circle appears and drag the circle up and down to control the tilt of the gimbal.
- Make sure to fully charge your mobile device before launching DJI Fly.
- Mobile cellular data is required when using DJI Fly. Contact your wireless carrier for data charges.
- DO NOT accept phone calls or use texting features during flight if you are using a mobile phone as your display device.
- Read all safety tips, warning messages, and disclaimers carefully. Familiarize yourself with the related regulations in your area. You are solely responsible for being aware of all relevant regulations and flying in a way that is compliant.
a) Read and understand the warning messages before using the auto-take off and auto-landing features.
b) Read and understand the warning messages and disclaimer before setting the altitude beyond the default limit.
c) Read and understand the warning messages and disclaimer before switching between flight modes.
d) Read and understand the warning messages and disclaimer prompts near or in GEO zones.
e) Read and understand the warning messages before using the Intelligent Flight modes. - Land the aircraft immediately at a safe location if a prompt appears in the app instructing you to do so.
- Review all warning messages on the checklist displayed in the app before each flight.
- Use the in-app tutorial to practice your flight skills if you have never operated the aircraft or if you do not have sufficient experience to operate the aircraft with confidence.
- Cache the map data of the area where you intend to fly the aircraft by connecting to the internet before each flight.
- The app is designed to assist your operation. Use sound discretion and DO NOT rely on the app to control the aircraft. The use of the app is subject to DJI Fly Terms of Use and DJI Privacy Policy. Read them carefully in the app.
Flight
Once pre-flight preparation is complete, it is recommended to hone your flight skills and practice flying safely. Make sure that all flights are carried out in an open area. The flying height is limited to 500 m. DO NOT exceed this height. Strictly abide by local laws and regulations when flying. Make sure to read the DJI Mini 2 Disclaimer and Safety Guidelines to understand the safety notices before flying.
Flight Environment Requirements
- Do not use the aircraft in severe weather conditions including wind speeds exceeding 10 m/s, snow, rain, and fog.
- Only fly in open areas. Tall structures and large metal structures may affect the accuracy of the onboard compass and GPS system. It is recommended to keep the aircraft at least 5 m away from structures.
- Avoid obstacles, crowds, high voltage power lines, trees, and bodies of water. It is recommended to keep the aircraft at least 3 m above water.
- Minimize interference by avoiding areas with high levels of electromagnetism such as locations near power lines, base stations, electrical substations, and broadcasting towers.
- Aircraft and battery performance is subject to environmental factors such as air density and temperature. DO NOT fly the aircraft 4,000 m (13,123 ft) or higher above sea level. Otherwise, the battery and aircraft performance may be reduced.
- Aircraft cannot use GPS within the polar regions. Use the Downward Vision System when flying in such locations.
- Fly with caution when taking off from moving surfaces such as a moving boat or vehicle.
Flight Limits and GEO Zones
Unmanned aerial vehicle (UAV) operators should abide by the regulations from self-regulatory organizations such as the International Civil Aviation Organization, the Federal Aviation Administration, and local aviation authorities. For safety reasons, flight limits are enabled by default to help users operate this aircraft safely and legally. Users can set flight limits on height and distance. Altitude limits, distance limits, and GEO zones function concurrently to manage flight safety when GPS is available. Only altitude can be limited when GPS is unavailable.
Flight Altitude and Distance Limits
The flight altitude and distance limits can be changed in DJI Fly. Based on these settings, the aircraft will fly in a restricted cylinder as shown below:
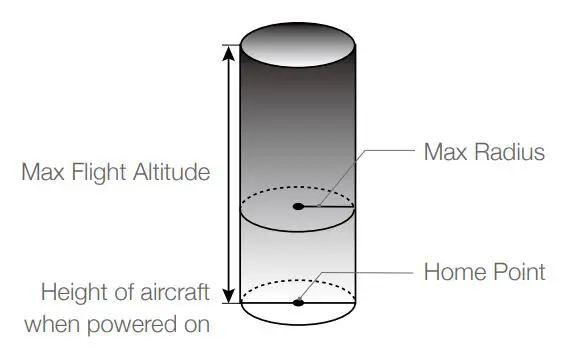
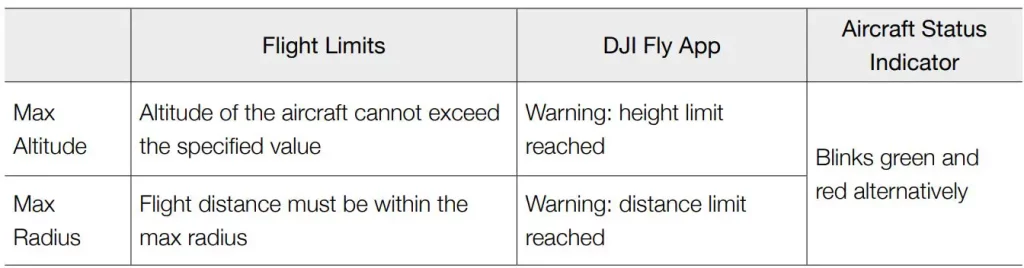
When GPS is available
When GPS is weak
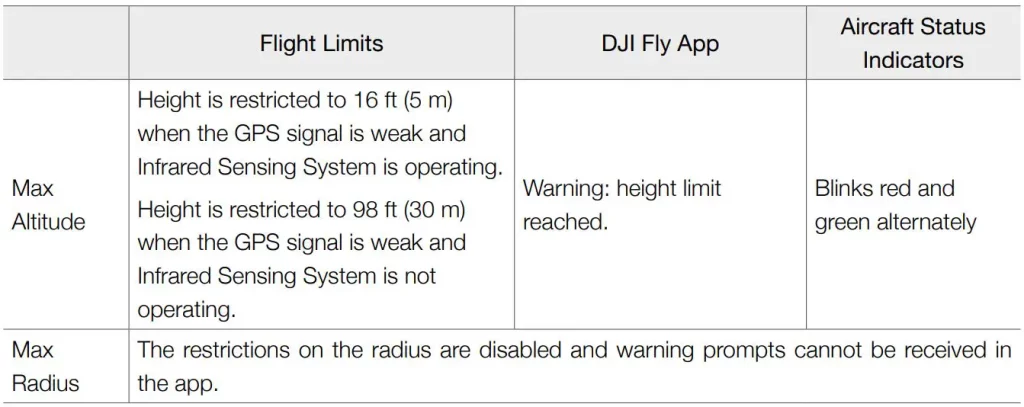
- There will be no altitude limit if the GPS signal becomes weak during flight as long as the GPS signal was stronger than weak (white or yellow signal bars) when the aircraft was powered on.
- If the aircraft is in a GEO zone and there is a weak or no GPS signal, the aircraft status indicator will glow red for five seconds every twelve seconds.
- If the aircraft reaches an altitude or radius limit, you can still control the aircraft, but you cannot fly it any further. If the aircraft flies out of the max radius, it will automatically fly back within range when the GPS signal is strong.
- For safety reasons, do not fly close to airports, highways, railway stations, railway lines, city centres, or other sensitive areas. Fly the aircraft only within your line of sight.
GEO Zones
All GEO zones are listed on the DJI official website at http://www.dji.com/flysafe. GEO zones are divided into different categories and include locations such as airports, airfields where manned aircraft operate at low altitudes, national borders, and sensitive locations such as power plants.
You will receive a prompt in DJI Fly if your aircraft is approaching a GEO zone and the aircraft will be restricted from flying in the area.
Pre-Flight Checklist
- Make sure the remote controller, mobile device, and Intelligent Flight Battery are fully charged.
- Make sure the Intelligent Flight Battery and the propellers are mounted securely and the propellers are spread.
- Make sure the aircraft arms are unfolded.
- Make sure the gimbal and camera are functioning normally.
- Make sure that there is nothing obstructing the motors and that they are functioning normally.
- Make sure that DJI Fly is successfully connected to the aircraft.
- Make sure that the camera lens and Downward Vision System sensors are clean.
- Use only genuine DJI parts or parts certified by DJI. Unauthorized parts or parts from non-DJI certified manufacturers may cause system malfunctions and compromise safety.
Auto Takeoff/Landing
Auto Takeoff
Use auto takeoff when the aircraft status indicator blinks green.
- Launch DJI Fly and enter the camera view.
- Complete all steps in the pre-flight checklist.
- Tap
 . If conditions are safe for takeoff, press and hold the button to confirm.
 - The aircraft will take off and hover approx. 3.9 ft (1.2 m) above the ground.
- The aircraft status indicator blinks green twice repeatedly to indicate that the aircraft is reliant on the Downward Vision System to fly and can only fly stable at altitudes below 30 m. It is recommended to wait until the aircraft status indicator is slowly blinking green before using auto takeoff.
- DO NOT take off from a moving surface such as a moving boat or vehicle.
Auto Landing
Use auto landing when the aircraft status indicator blinks green.
- Tap
 . If conditions are safe to land, press and hold the button to confirm.
 - Auto landing can be cancelled by tapping .
- If the Downward Vision System is working normally, Landing Protection will be enabled.
- Motors stop after landing.
- Choose the proper place for landing.
Starting/Stopping the Motors
Starting the Motors
A Combination Stick Command (CSC) is used to start the motors. Push both sticks to the bottom inner or outer corners to start the motors. Once the motors start spinning, release both sticks simultaneously.
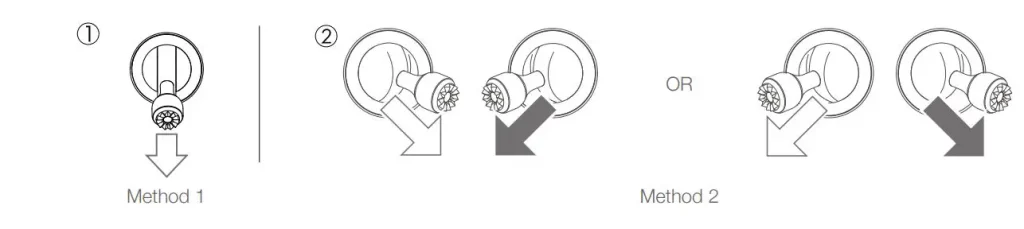
Stopping the Motors
There are two methods to stop the motors.
Method 1: when the aircraft has landed, push and hold the throttle stick down. The motors will stop after three seconds.
Method 2: when the aircraft has landed, push the throttle stick down, and perform the same CSC that was used to start the motors. Release both sticks once the motors have stopped.
Stopping the Motors Mid-Flight
The motors should only be stopped mid-flight in an emergency situation such as if a collision has occurred or if the aircraft is out of control and is ascending or descending very quickly, rolling in the air, or if a motor has stalled. To stop the motors mid-flight, use the same CSC that was used to start the motors. The default setting can be changed in DJI Fly.
- Stopping motors mid-flight will cause the aircraft to crash.
Flight Test
Takeoff/Landing Procedures
- Place the aircraft in an open, flat area with the aircraft status indicator facing towards you.
- Power on the remote controller and the aircraft.
- Launch DJI Fly, connect the mobile device to the aircraft, and enter the camera view.
- Wait until the aircraft status indicator blinks green slowly to indicate that the Home Point has been recorded and it is now safe to fly.
- Gently push the throttle stick to take off or use auto-takeoff.
- Pull the throttle stick or use auto-landing to land the aircraft.
- After landing, push the throttle down and hold. The motors stop after three seconds.
- Power off the aircraft and remote controller.
Video Suggestions and Tips
- The pre-flight checklist is designed to help you fly safely and to ensure that you can shoot video during flight. Go through the full pre-flight checklist before each flight.
- Select the desired gimbal operation mode in DJI Fly.
- It is recommended to take photos or record videos when flying in Normal or Cine mode.
- DO NOT fly in bad weather conditions such as when it is raining or windy.
- Choose the camera settings that best suit your needs.
- Perform flight tests to establish flight routes and to preview scenes.
- Push the control sticks gently to keep the aircraft movement smooth and stable.
It is important to understand the basic flight guidelines for the safety of both you and those around you.
DO NOT forget to read the disclaimer and safety guidelines.
Appendix
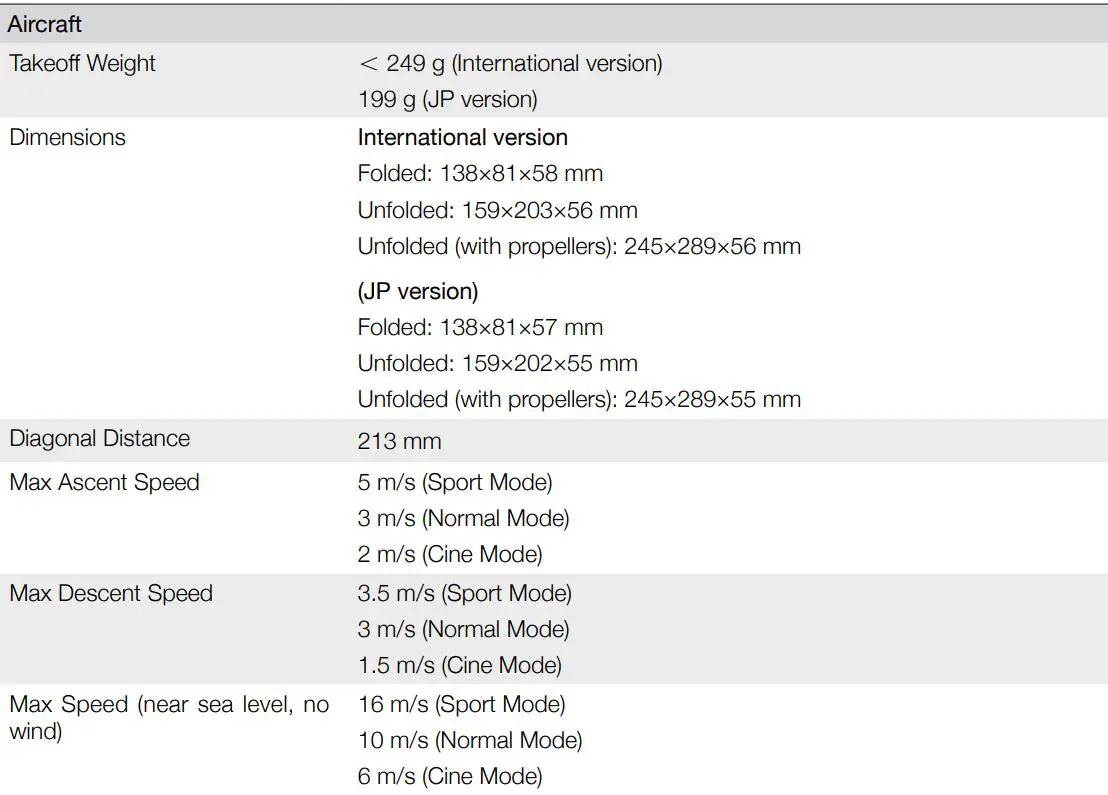
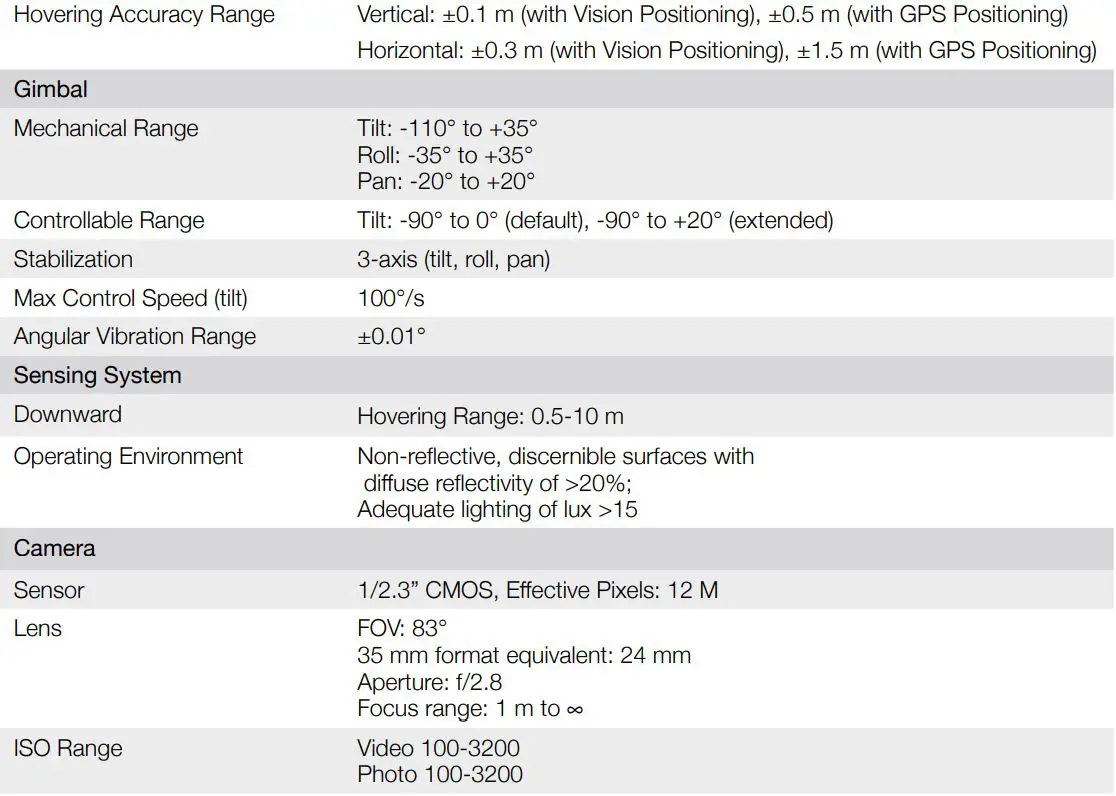
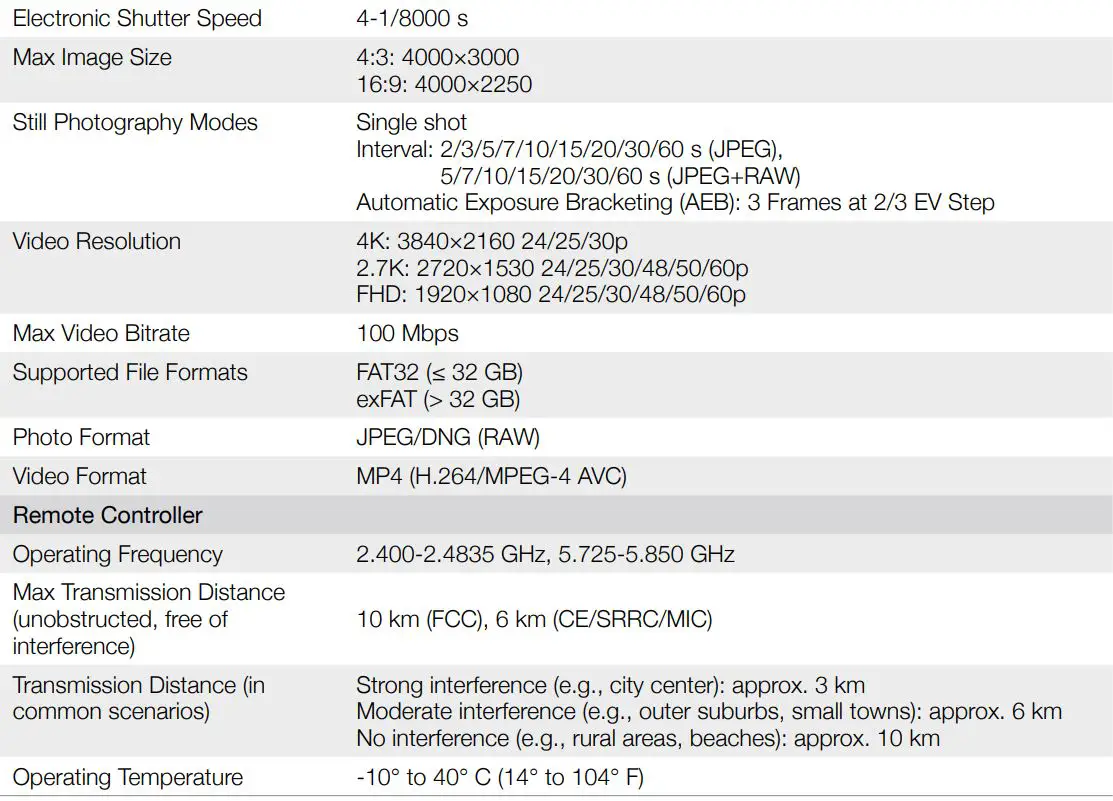
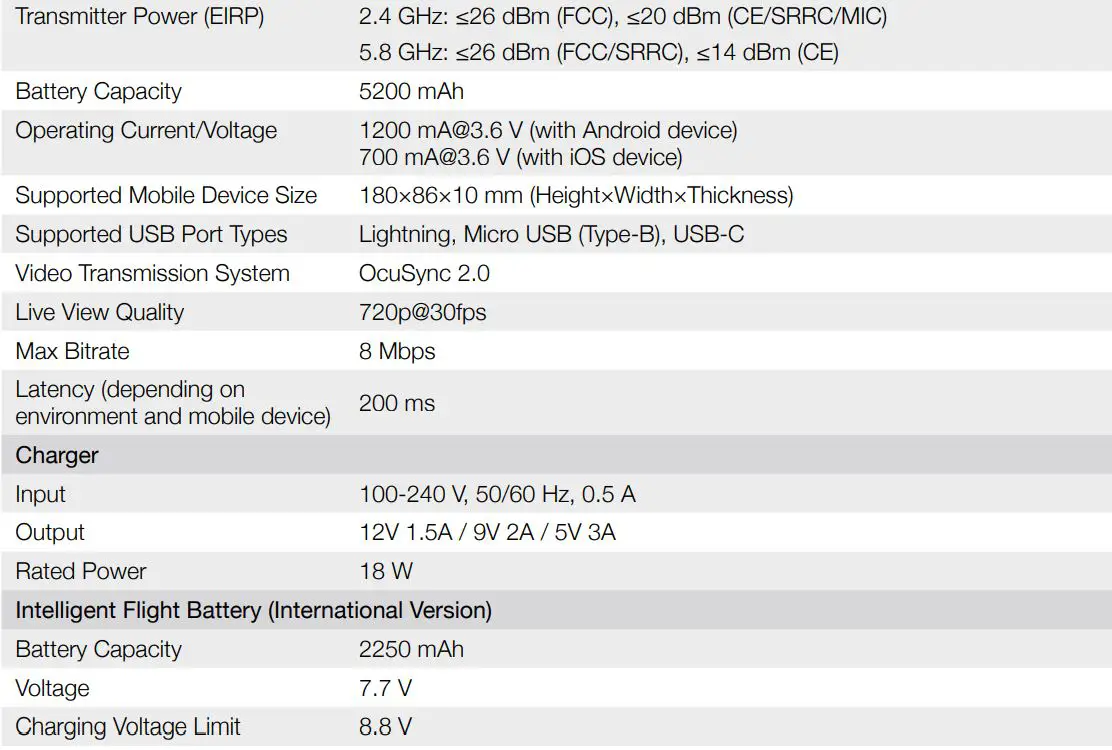
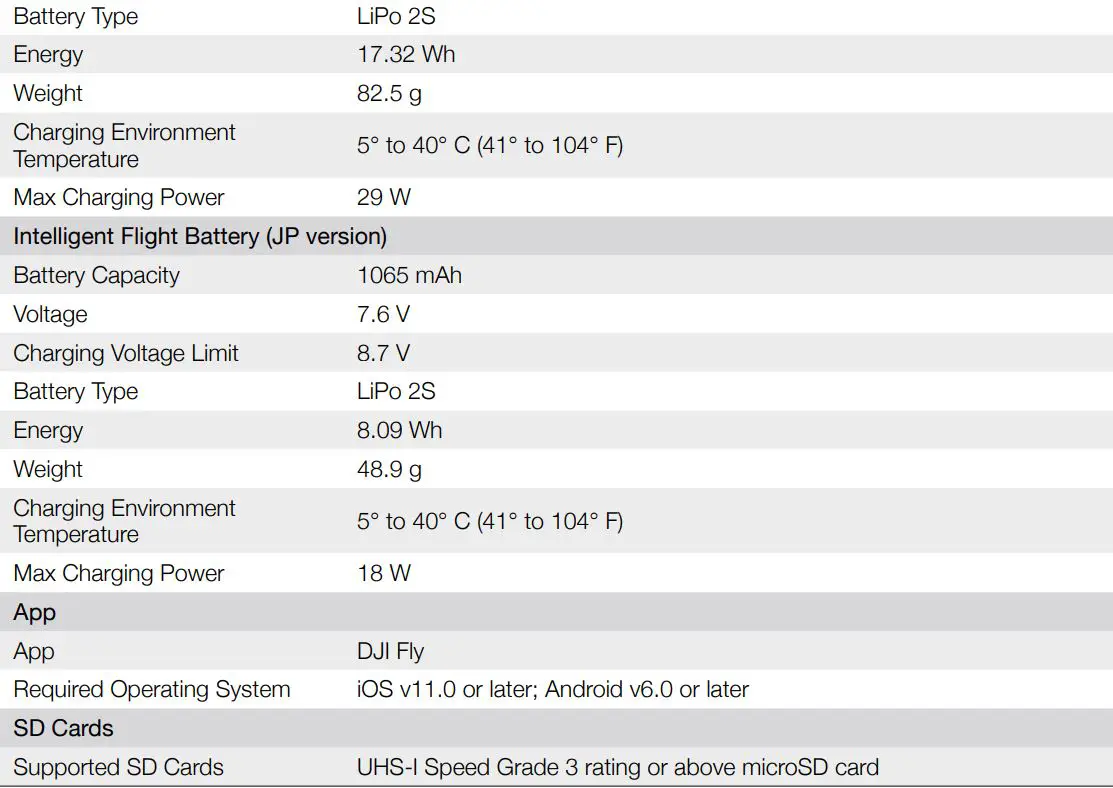
Specifications


Calibrating the Compass
It is recommended to calibrate the compass in the following situations when flying outdoors:
- Flying at a location further than 31 miles (50 km) away from the location the aircraft was last flown.
- The aircraft has not been flown for more than 30 days.
- A compass interference warning appears in DJI Fly and/or the aircraft status indicator blinks red and yellow alternatively.
- DO NOT calibrate the compass in locations where magnetic interference may occur such as close to magnetite deposits or large metallic structures such as parking structures, steel reinforced basements, bridges, cars, or scaffolding.
- DO NOT carry objects that contain ferromagnetic materials such as mobile phones near the aircraft during calibration.
- It is not necessary to calibrate the compass when flying indoors.
Calibration Procedure
Choose an open area to carry out the following procedure.
- Tap System Settings in DJI Fly, select Safety, then Calibrate, and follow the on-screen instructions. The aircraft status indicator is solid yellow, indicating calibration has started.
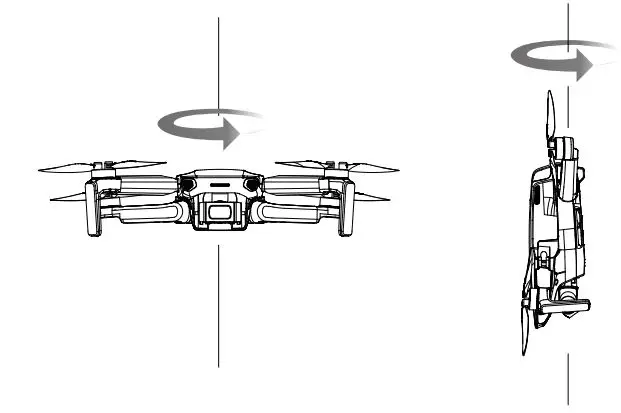
- Hold the aircraft horizontally and rotate it 360°. The aircraft status indicator will turn solid green.
- Hold the aircraft vertically and rotate it 360° around a vertical axis.
- If the aircraft status indicator blinks red, the calibration has failed. Change your location and try the calibration procedure again.
- If the aircraft status indicator blinks red and yellow alternatively after calibration is completed, this indicates that the current location is not suitable for flying the aircraft due to the level of magnetic interference. Choose a new location.
- A prompt will appear in DJI Fly if compass calibration is required before takeoff.
- The aircraft can take off immediately once calibration is complete. If you wait more than three minutes to take off after calibration, you may need to calibrate again.
Updating Firmware
When you connect the aircraft or remote controller to DJI Fly, you will be notified if a new firmware update is available. To update, connect the mobile device to the internet and follow the on-screen instructions. Note that the firmware cannot be updated if the remote controller is not linked to the aircraft.
- Make sure to follow all the steps to update firmware. Otherwise, the update may fail. The aircraft will power off automatically after the firmware update is complete.
- The firmware update will take approx. 10 minutes. It is normal for the gimbal to go limp, aircraft status indicators to blink, and the aircraft to reboot. Wait patiently until the update is complete.
- Before performing an update, make sure the Intelligent Flight Battery is at least 15% charged and the remote controller is at least 20% charged.
- The remote controller may become unlinked from the aircraft after updating. Relink the remote controller and aircraft. Note that the update may reset various main controller settings, such as the RTH altitude and the maximum flight distance, to default settings. Before updating, take note of your preferred DJI Fly settings and readjust them after the update.
After-Sales Information
Visit https://www.dji.com/support to learn more about after-sales service policies, repair services, and support.
DJI Support http://www.dji.com/support
This content is subject to change. Download the latest version from http://www.dji.com/mini-2
If you have any questions about this document, please contact DJI by sending a message to [email protected].
DJI is a trademark of DJI. Copyright © 2021 DJI All Rights Reserved.