
Dyson Ball Animal 2 pet vacuum cleaner
In the box
Some tools and accessories may not be included. You can buy additional tools and accessories at www.dyson.com.
Combination tool
Two tools in one -brush and nozzle, for versatile cleaning around your home.
Stair tool
For vacuuming narrow or difficult-to-reach carpeted areas, such as stairs and corners
Tangle-free
turbine tool Only Dyson uses counter-rotating heads to remove hair from carpets and upholstery with no tangles.
Soft dusting brush
Enclosed in a skirt of soft nylon bristlesfor gentle, vacuum-assisted dusting of delicate objects and surfaces.
Fabric and mattress tool
Removes dust, dirt and allergens from mattresses and upholstery.
Getting started
Assembling your machine
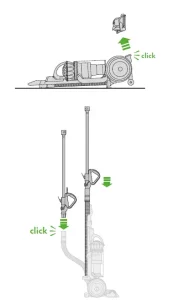
Fit the cleaner head Lie your machine on its back. Slide your Motorbar™ cleaner head into position on the front of the ball. Push upwards until the red button on the underside of your machine clicks securely in place. Stand your machine upriAght.
Fit the wand
Push the wand into the end of the hose until it clicks into position. Slide the handle onto the top of your machine. Slide the wand down into the hose.Close the wand end cap.
Fit the tool holder
Slide the tool holder into position on the side of your machine. Fit your combination tool onto the holder. Fit the Tangle-free turbine tool holder (optional) If your machine is supplied with a Tangle-free turbine tool holder, clip this to the front of the handle, just above the power button. Wrap the cable around the top and bottom cable hooks and secure with the cable clip.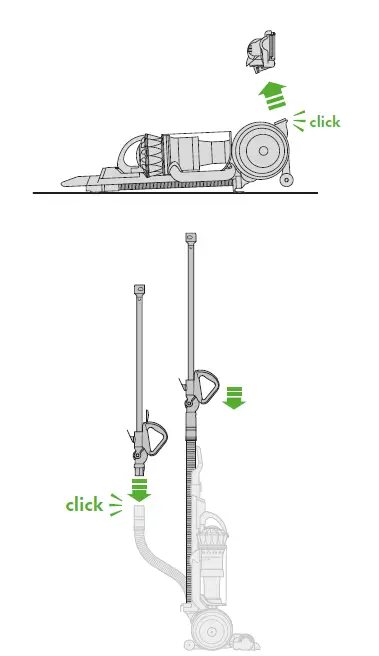
Caring for your floors
Check that the underside of the cleaner head or tool is clean and free from any objects that may cause damage. Before vacuuming your flooring, rugs, and carpets, check the manufacturer’s recommended cleaning instructions. The brush bar on your machine can damage certain flooring. Some rug materials may fuzz if a rotating brush bar is used when vacuuming. If this happens, we recommend vacuuming without the motorised floor tool and consulting with your flooring manufacturer.
Using your Motorbar™ cleaner head
Your cleaner head has a motor-driven bArush bar with suction control.Your cleaner head has a motor-driven bArush bar with suction control.Slide the suction control to suit your floor type. Select the right cleaning mode for the right task.Position the slider to the left for use on deep- to medium-pile carpets, delicate flooring and rugs.Position the slider in the center for low-pile carpets and large debris.Position the slider to the right for hard floors and ground in dirt.
Using your tools
Attach to the wand
Open the cap on the handle and slide the wand upwards until both the wand and hose release from the machine. Push the tool into the end of the wand. Remove the tool from the wand Remove the tool from the end of the wand. Slide the handle onto the top of your machine. Slide the wand down into the hose. Close the wand cap.
Attach to the hose
Open the cap on the handle and slide the wand upwards until both the wand and hose release from the machine. Press the button on the end of the hose to release the wand. Fit the tool into the end of the hose. Remove from the hose Remove the tool from the end of the hose.Push the wand into the end of the hose until it clicks into position. Slide the handle onto the top of your machine.Slide the wand down into the hose.Close the wand end cap.
Emptying your bin
Empty as soon as the dirt reaches the MAX level – don’t overfill. Using your machine when the dirt is above the MAX line may affect the performance and require more frequent filter washing.
Remove your bin
Turn off and unplug your machine.Press the button on the bin handle to detach the bin from your machine.
Release the dirt
Hold your bin, with the bin base pointing down, over your rubbish container.Firmly push the button on the bin handle, until the bin base opens.
Storing your machine
Carry your machine using the bin handle. Push your handle into the upright position.Push your handle firmly forward and listen for two clicks to lock in upright position. The stabiliser wheels will drop into position when the handle is locked in the upright position.
Clearing blockages
If any part of your machine becomes blocked, it may automatically cut out and the power will stop. Unplug and leave your machine to cool before checking for blockages.
Remove cleaner head
Lie your machine on its front. Push down the red button on the bottom of the ball and then slide your cleaner head down and off your machine.
Check the wand
Open the cap on the handle and slide the wand upwards until both the wand and hose release from the machine. Press the button on the end of the hose to release the wand. Look through the wand to check for blockages.
Check the hose
Open the cap on the handle and slide the wand upwards until both the wand and hose release from the machine. Press the button on the end of the hose and remove the wand. Press the button on the bin handle and remove the bin. Press the tab on the base of the hose to remove it from your machine. Check for blockages in the hose, be careful of any sharp objects.
Check airways for blockages
Recline your machine and remove the outer cover of the ball. Remove the cross-head screw and unhook the plastic access cover. Check the airway for any blockages. Replace the plastic cover by hooking it back into the slot and pushing it towards the filter. Fasten the cross-head screw and replace the outer cover on the ball.
Reassemble your machine
Follow the assembly instructions to reassemble your machine.
Clearing obstructions
Motorbar™ cleaner head Your Motorbar™ cleaner head doesn’t have a washable brush bar.To maintain optimum performance, check your brush bar regularly and clear any obstructions. Unplug and leave your machine to cool before checking for blockages.
Remove cleaner head
Lie your machine on its back. Push down the red button on the bottom of the ball and then slide your cleaner head down and off your machine.
Remove your brush bar
Press the button on the back of the Motorbar™ cleaner head and push upwards 90° to release the end cap. Pull the brush bar out of the cleaner head. Remove debris from around the brush bar. Be careful of any sharp objects when clearing blockages.
Replace your brush bar
Push the brush bar firmly back into the cleaner head. Make sure the brush bar is pushed fully into the cleaner head. Rotate the end cap until it clicks back into the locked position.
Fit the cleaner head
Slide your Motorbar™ cleaner head into position on the front of the ball. Push upwards until the red button on the underside of your machine clicks securely in place.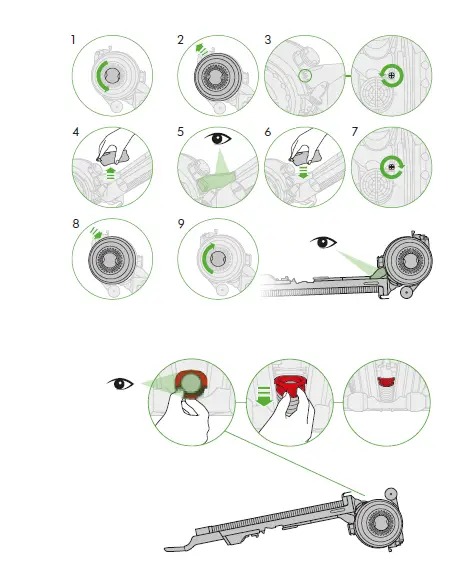
Washing filter A
Remove your filter
Press the button on the bin handle to detach the bin from your machine.
Wash your filter
Push up the catch on the front of the bin handle and lift out the filter. Only wash the filter with cold water. Hold the open end of the filter under a running tap, until the water runs clear. Turn the filter upside down and tap it to remove excess water. Run water over the outside of the filter until the water runs clear. Squeeze and twist with both hands to make sure the excess water is removed.
Dry your filter
Squeeze the excess water out of your filter. Leave your filter to dry for at least 24 hours in a well-ventilated, warm place. Don’t dry your filter in a tumble dryer, microwave or near a naked flame.
Important: your filter must be completely dry before you put it back into the machine. Your machine could be damaged if used with a damp filter.
Refit your filter
Drop your filter back into your machine. Close the handle and make sure it clips into place. Place the base of your bin onto your machine and then push the top into position until it clicks.
Washing filter B
Remove your filter
Lie your machine on its side with the side of the ball housing the filter facing upwards. Turn the lock in the centre of the ball until the filter cover is released.
Lift off the filter cover
Twist the filter counter-clockwise until it is released and lift it off your machine.
Wash your filter
Remove the inner part of the filter. Wash the outer filter in a rotating motion. Wash the inner foam part of the filter, taking care not to squeeze it. Repeat until the water runs clear. Tap the outer filter to remove excess water.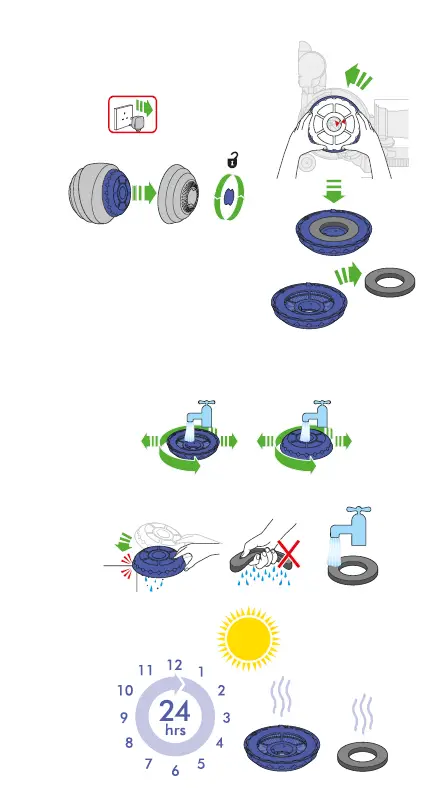
Looking after your machine
To always get the best performance from your machine, it’s important to clean it regularly and check for blockages.
Look after your machine
If your machine is dusty, wipe with a damp lint-free cloth. Check for blockages in the cleaner head, tools and main body of your machine.Wash your filter regularly and leave to dry completely. Don’t use detergents or polishes to clean your machine.
Your serial number
You can find your serial number on your machine, behind the bin. Use your serial number to register your machine.
