![]()
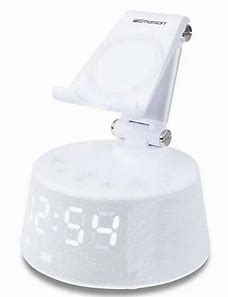
Bluetooth Speaker with Wireless Charger, Phone Rest that Extends and Rotates, USB Charger, FM Radio, Alarm Clock and 10 Watt Stereo
OWNER’S MANUAL
ER-X300

Visit our website at www.emersonradio.com
1 WARNING
- Read these instructions. Keep these instructions. Follow all instructions. Heed all warnings.
- – Do not use this apparatus near water.
– Never remove the casing of this product.
- Never lubricate any part of this product. - Clean only with dry cloth.
- Do not block any ventilation openings. Install in accordance with the manufacturer’s instructions.
- Do not install near any heat sources such as radiators, heat registers, stoves, or other apparatus (including amplifiers) that produce heat.
- Only use attachments / accessories specified by the manufacturer.
- Refer all servicing to qualified service personnel. Servicing is required when the apparatus has been damaged in any way, such as power-supply cord or plug is damaged, liquid has been spilled or objects have fallen into the apparatus, the apparatus has been exposed to rain or moisture, does not operate normally, or has been dropped.
- Use only with the cart, stand, tripod, bracket, or table specified by the manufacturer, or sold with the apparatus. When a cart is used, use caution when moving the cart/ apparatus combination to avoid injury from tip-over.

- The apparatus shall not be exposed to dripping or splashing and that no objects filled with liquids, such as vases, shall be placed on apparatus.
- Batteries (battery pack or batteries installed) shall not be exposed to excessive heat such as sunshine, fire or the like.
- Use of a speaker will impair your ability to hear other sounds, Use caution while using your speaker when you are engaging in any activity that requires your full attention.
- If you have a pacemaker or other electrical medical devices, you should consult your physician before using the product.
- This package contains small parts that may be hazardous to children and should be kept out of reach of children at all time. The product is not a toy never allow children to play with the product. The bags themselves or the many small parts they contain may cause choking if ingested.
- Never try to dismantle the product yourself, or push objects of any kind into the product, as this may cause short circuits which could result in a fire of electric shock.
- None of the components can be replaced or repaired by users. Only authorized dealers or service centers may open the product. If any parts of your product required replacement for any reason, including normal wear and tear or breakage, contact your dealer.
- Avoid exposing your product to rain, moisture or other liquids to protect against damage to the product or injury to you.
- If the product overheats, if the product has been dropped or damaged, or if the product had been dropped in a liquid, discontinue use.
- Never mount or store the product over any airbag deployment area, as serious injury may result when an airbag deploys.
- Do not use in areas where there are explosive hazards.
- Observe all signs and instructions that require an electrical device or RF radio product to be switched off in designated areas such as hospitals or aircrafts.
- Dispose of the product according to local standard and regulations.
CAUTION: Removal of the built-in battery voids the warranty and may destroy the product.
- Please observe the following if the product contains a battery.
- Your product is powered by a rechargeable battery. The full performance of a new battery is achieved only after two or three complete charge and discharge cycles.
- The battery can be charged and discharged hundreds of times, but it will eventually wear out.
- Unplug the charger from the electrical plug and the product when not in use. Do not leave a fully charged battery connected to a charger since overcharging may shorten its lifespan.
- If left unused, a fully charged battery will lose its charge over time.
- Leaving the product in hot or cold places, such as in a closed car in the summer and winter conditions, will reduce the capacity and lifespan of the battery.
- Always try to keep the battery between 0°C and 45°C (32°F and 113°F). A product with a hot or cold battery may not work temporarily, even when the battery is fully charged. Battery performance is particularly, limited in temperatures well below freezing.
- “Caution” The battery used in the product may present a risk of fire or chemical burn if mistreated.
- Unless otherwise specified in the user manual or quick start guide the battery in your product can not be removed or replaced by the user. Any attempt to do so is risky and may result in damage of the product. Use of other batteries may present a risk of fire or explosion and the warranty will be terminated.
- Only recharge your battery according to local regulations. Please recycle when possible.
- Do not dispose the battery as household waste or in a fire as it may explode.
- Batteries may explode if damaged.
- Do not attempt to charge your unit with anything other than the AC Adapter provided. The use of any other types may damage or destroy the unit and could be dangerous. Use of other chargers may invalidate any approval or warranty.
- Charge the product according to the instructions supplied with the product.
- When you disconnect the charger/adapter from AC mains, grasp and pull the plug, not the cord.
- Never use a charger that is damaged.
- Do not attempt to disassemble the charger as it may expose you to dangerous electric shock. Incorrect reassembly can cause electric shock or fire when the product is subsequently used.
- Avoid charging your speaker in extremely high or low temperatures and do not use the charger outdoors or in damp areas.
- This product may contain chemicals listed in Proposition 65 (https://oehha.ca.gov/proposition-65/proposition-65-list)
- WARNING: Cancer and Reproductive Harm www.P65Warnings.ca.gov
2
- Avoid installing this unit in places exposed to direct sunlight or close to heat radiating appliances such as electric heaters, on top of other stereo equipment that radiates heat, places lacking ventilation, dusty areas, places subject to constant vibration and / or humid or moist areas.
- Operation controls and switches as described in the manual.
FCC Information
This equipment has been tested and found to comply with the limits for a Class B digital device, pursuant to Part 15 of the FCC Rules. These limits are designed to provide reasonable protection against harmful interference in a residential installation. This equipment generates, uses, and can radiate radio frequency energy and, if not installed and used in accordance with the instructions, may cause harmful interference to radio communications. However, there is no guarantee that interference will not occur in a particular installation. If this equipment does cause harmful interference to radio or television reception, which can be determined by turning the equipment off and on, the user is encouraged to try to correct the interference by one or more the following measures:
- Reorient or relocate the receiving antenna.
- Increase the separation between the equipment and receiver.
- Connect the equipment into an outlet on a circuit different from that to which the receiver is connected.
- Consult the dealer or an experienced radio/TV technician for help. This device complies with Part 15 of the FCC Rules. Operation is subject to the following two conditions:
(1) This device may not cause harmful interference, and
(2) This device must accept any interference received, including interference that may cause undesired operation.
Changes or modifications to this unit not expressly approved by the party responsible for compliance could void the user’s authority to operate the equipment.
Thank you for purchasing this Emerson Strong Bass Portable Bluetooth Speaker ER-X300. If you encounter any problems with the set up or operation of this item, please call the Emerson Consumer Products Corp., Customer Service Hotline, toll free, at 1-800-898-9020.
3 Preparation for Use
Unpacking and Setup
- Remove the unit from the box and remove all packing material from the unit. Save the packing material, if possible, in case the unit ever needs to be serviced or transported. The original box and packing material is the only safe way to pack your unit to protect it from damage in transit.
- Remove any descriptive labels or stickers on the front or top of the cabinet. Do not remove any labels or stickers from the back or bottom of the cabinet.
- The serial number on the bottom of your unit and write this number in the space provided on the Warranty page of this manual.
- Place your unit on a level surface such as a table, desk or shelf, out of direct sunlight, and away from sources of excess heat, dirt, dust, moisture, humidity, or vibration.
Protect Your Furniture
This model is equipped with non-skid rubber ‘feet’ to prevent the product from moving when you operation the controls. These ‘feet’ are made from non-migrating rubber material specially formulated to avoid leaving any marks or stains on your furniture. However certain types of oil based furniture polishes, wood preservatives, or cleaning sprays may causes the rubber ‘feet’ to soften, and leave marks or a rubber residue on the furniture. To prevent any damage to your furniture we strongly recommend that you purchase small self-adhesive felt pads, available at hardware stores and home improvement centers everywhere, and apply these pads to the bottom of the rubber ‘feet’ before you place the product on fine wooden furniture.
Power Source
This product is designed to be powered by a built-in rechargeable lithium-ion battery and a DC5V/2.4A USB Adapter via a USB cable provided.
4 Package Contents

ER-X300 x 1 pc Owner’s Manual x 1 pc
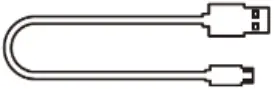
USB cable for charging x 1 pc DC5V/2.4A USB Adaptor x 1 pc
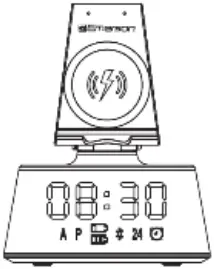
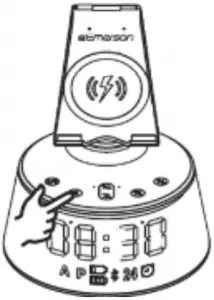
5 Location of Controls and Indicators
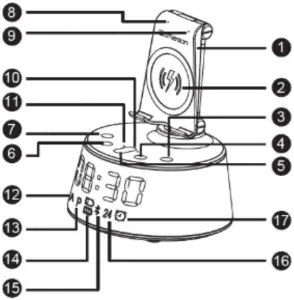
Control Panel Display Screen
- Phone Rest Adjustable Arm
- Wireless Charging Platform
-
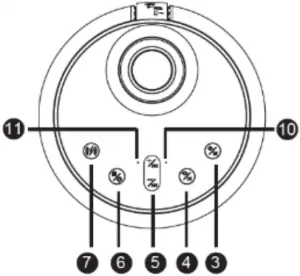
 Power On/Off button | Mode Select for Bluetooth/Radio/AUX
 -
 Answer Call | Play/Pause Key | FM Auto Search (AMS) | 12/24-Hour Format Select | Hour: Minutes Select button
 -
 Volume+/- | Tune Up / Tune Down button
 -
 Clock/Alarm Set | Dimmer button
 -
 Wireless Charging Power On/Off button
 - Wireless Charging Status Indicator (Blue LED)
- Wireless Charging Mode Indicator (Red LED)
- Power On Indicator | Bluetooth Pairing Indicator (Blue LED)
- Microphone for Handsfree
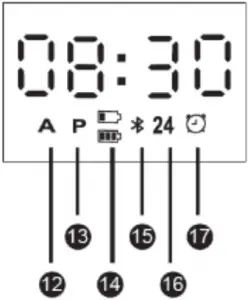
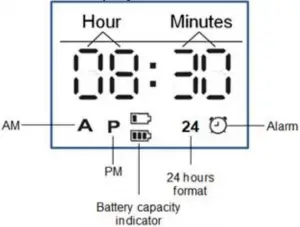
- A AM Indicator (12-Hour)
- P PM Indicator (12-Hour)

 Battery Capacity Indicator
 Bluetooth Mode Indicator
- 24 24-Hour Format Indicator
 ALARM Mode Indicator
6 Charging the Unit
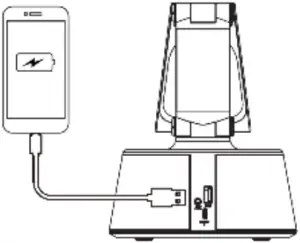
- Connect the USB cable with one end (micro USB) plugged into the micro USB connector at the back of the unit, and the other end (standard USB) plugged into the output port of the DC5V/2.4A USB Adaptor provided.
- For first time use, approximately 4 hours is required for a full charge.
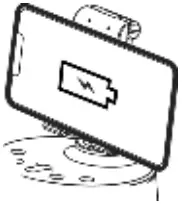
- A red indicator below the micro USB connector lights up while charging the unit and it changes to blue after fully charged.
Note: Battery will last up to 4 hours when connected wirelessly and up to 12 hours when connected through Line-In Audio Jack with audio output volume set at medium level.
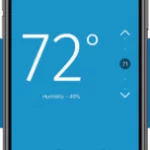
7 Setting the Time Manually
Display Indication
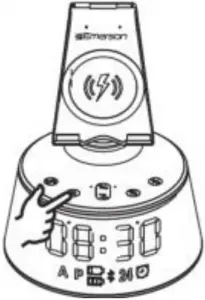
Press and hold the Power button until a harmonic sound chimes to denote the unit ON.
- Press and hold the button until the display “Flashes” Hour.
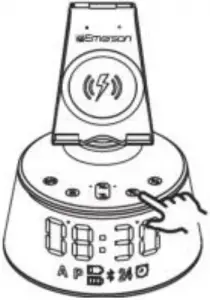
- Press the Tune Down
 or Tune Up
  button to move backward or forward the Hour.
 - Press the button once, the display “Flashes” Minutes.
- Press the Tune Down or Tune Up button to move backward or forward the Minutes.
- Press and hold the button to end and stop “Flashing” after time set.
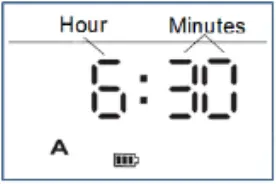
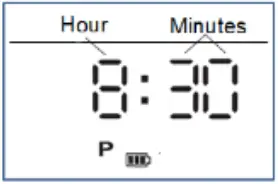
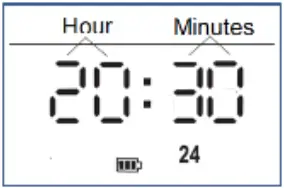
- While in clock mode, select 12/24-hour format by pressing and holding the button (default is 12-hour format).
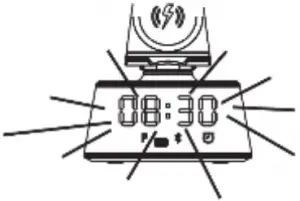
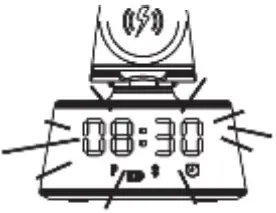
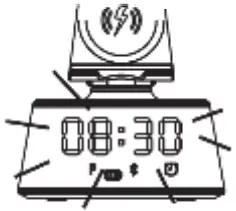
12-hour format (AM) 12-hour format (PM) 24-hour format
8 Setting the Alarm
Setting the Alarm
- Press and hold the button to have the display “Flashes” Hour (Clock Hour).
- Press the button to have the display “Flashes” Minutes (Clock Minutes).
- Press the button again to enter into “Alarm Time Set” mode to have the display “Flashes” Alarm Hour.
- Press the Tune Down or Tune Up button to move backward or forward to set Alarm Hour.
- Press the button again to have the display “Flashes” Alarm Minutes.
- Press the Tune Down or Tune Up button to move backward or forward to set Alarm Minutes.
- Press and hold the button after completed setting the alarm.
Turn On/ Off Alarm Function
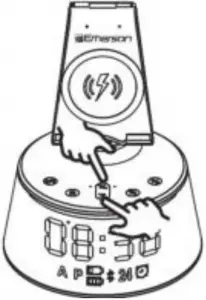
Press and hold the button until the display “Flashes” Hour, continuously press the button
four times. Then press the adjustment button at center of panel to turn “ON” or “OFF” the Alarm function.
Alarm icon is clearly visible at right bottom while turn on “Alarm” function.
![]()
9 Pairing Bluetooth
Press and hold the Power button to turn the unit ON, and then press the Power button once to enter into Bluetooth mode. A 2-beat sound is heard and “bLUE” is displayed, also, a Blue LED indicator on control panel as well as the Bluetooth Icon on front screen flashes for pairing.
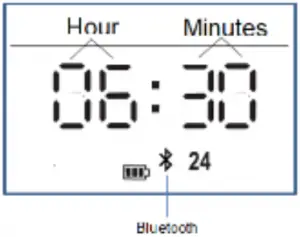
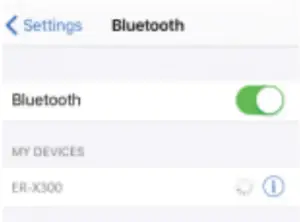
- Enable your Bluetooth device and select ER-X300 from its Available / Paired device list. If pairing successful, the unit will have quick 4-beat sound prompt out and indicator on front screen will then light up and become solid.
- Automatic connection with your Bluetooth devices is possible if they have been paired successfully with this unit before.
- After paired, you can play your music through this Bass Boosted Bluetooth Speaker.
- Press the Tune Down or Tune Up button to select the desired volume level, the volume level can also be adjusted on the paired audio device.
- Press and hold the Tune Down button to play last song or Tune Up button to skip forward to next song.
- Press the button for a play pause. To resume playback, press this button once again.
- When done listening, press the button to change to either Radio mode or AUX mode. Or press and hold the button to turn the unit Off.
Note: If pairing unsuccessful, all previously paired Bluetooth devices around should be disconnected or turned off first, in order to avoid making any auto reconnection between them. Then, set this unit to Bluetooth mode, and tap the Bluetooth switch on your phone / device off and back on again to refresh/ search any nearby “ER-X300” for pairing.
10 Listening to FM Radio
Press and hold the Power button to turn the unit ON. Then press the Power button twice to switch it to Radio mode. Radio frequency will display with its MHz unit and decimal point (one decimal place) discarded
- Ensure the USB cable is connected to the unit as it functions as the FM antenna for optimal FM signal reception (USB adapter is not required but only the cable).
- Auto Memory Saving (AMS) – Auto Searching / Scanning / Saving FM Stations *, press and hold the button for 1~2 seconds and then release for automatic searching and saving the captured radio stations into memory (program number from P01 to P50).
Note: Searching will only stop at a station with acceptable reception before saving into memory.
* Manual tuning not available - Recalling Favorite Stations from Memory
- Press and hold the Tune Down or Tune Up button to show the memory program number on screen, and select the stored program number to recall your favorite station stored.
Radio frequency (MHz) will be showing after the program number, having its decimal point discarded. - Press the Tune Down or Tune Up button to adjust volume.
- When done listening, press the button to switch to either Bluetooth mode or AUX function. Or press and hold the Power button to turn the unit Off.
Listening to FM Radio
Note:
- Keep the unit away from other electronic devices to avoid radio interference.
- For better FM reception, orient the USB cable and disconnect it from the charger.
- Wireless charging can interfere FM reception. Please use wired USB charging port while listening to radio.
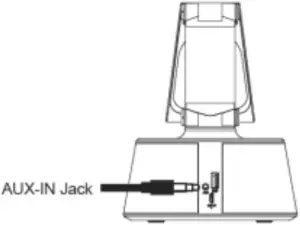
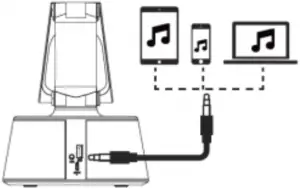
11 Enjoying Audio Source via AUX IN Jack
Press and hold the Power button to turn the unit ON. Then press the Power button three times to switch to AUX mode
Plug a ∅3.5mm audio cable (not provided) in the “AUX” interface located at the back of unit, connect the other end to the line-out/earphone out of your audio device, computer or music player. Unit will automatically enter into AUX mode for playing music from your audio source.
12 Wireless Charging Function
The 5W Wireless Charging Pad is built on Phone Rest Adjustable Arm on the unit for wireless power transfer to any wireless charging compatible mobile device over a vertical distance of not more than 0.2 inches (5 mm).
For wireless charging, the unit must be powered by the USB Adapter via the USB cable provided and the built-in rechargeable battery capacity must be kept high or fully charged to enable this function
- Press and hold the Power button to turn the unit ON.
- Press the button to start up the wireless charging function.
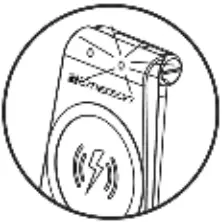
- Red LED indicator lights steadily at the top of wireless charging platform.
- Position your wireless charging compatible smartphone horizontally on the charging zone, marked with the logo
 . The center of your smartphone must be positioned properly right in the middle of this charging zone in order to maximize its charging efficiency.
 - The Blue LED indicator will light up indicating that it is wireless charging your smartphone. To ensure wireless charging performs properly, check the charging icon and/or charging message displays on your smartphone.
Enjoying Audio Source via AUX IN Jack Wireless Charging Function - When your smartphone is fully charged, the Blue LED will be Off and the Red LED will light up steadily.
Note:
- Work with Qi-compatible iPhone, Galaxy and all 5W Qi-enabled phones.
- While wireless charging error occurred (if metal sheet/ substance placed on charging zone), the Red LED indicator at top of wireless charging platform will be flashing to alert user to get the erroneous receiver removed.
- Wireless charging may not work properly if the protective case or accessory placed at the back of your smartphone is thicker than 0.2 inches (5 mm), remove the protective case or accessory before placing your smartphone (screen facing upward) on the wireless charging zone.
- Do not place any foreign objects, such as coins, keys, metallic objects, magnets, and magnetic stripe cards, between your smartphone and the wireless charger, to avoid interference or overheating.
13 USB for Charging
This unit has a USB port at the back, which can provide up to 5V 1A power to charge devices like smartphone or portable digital audio player etc. via another USB cable (not provided).
Note: Electrical power drawn from the USB port may vary due to different charging cable condition, battery characteristic or power management system of your device being charged.
14 4-Level Dimmer Control
Press the Dimmer button while in standby mode and select any of the four levels. It also can be adjusted when the Bluetooth, Radio, AUX and Wireless Charging On.

Dimmer 1 Dimmer 2 Dimmer 3 Dimmer 4 (Off)
15 Hands Free Function
Handsfree is functioning while Bluetooth successfully paired.
- While call in, press the button to answer call.
- Press the button again to end call.
- Double click the button to redial the last number.
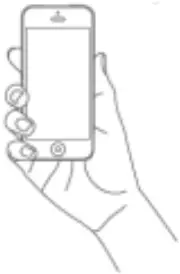
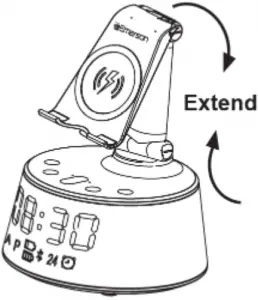
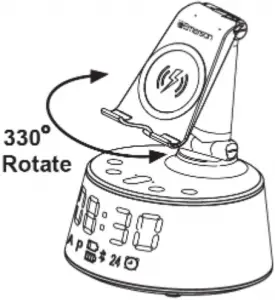
16 Phone Rest Adjustable Arm
Phone Rest Arm designed as an extendable and rotatable frame to enable adjustment for viewing angle.
17 Care and Maintenance
Care Of Cabinets
- If the cabinet becomes dusty, wipe it with a soft cloth.
- If the cabinet becomes smudged or dirty, clean it with a soft, slightly dampened cloth.
- Never allow water or any liquid to get inside the cabinet.
- Never use any abrasive cleaners or cleaning pads as these will damage the finish of your product.
18 Troubleshooting
- UNIT DOESN’T RESPOND (NO POWER)
Make sure unit is completely charged. Check that all connections are correct and properly plugged in. Make sure your device is properly paired with the ER-X300 - RESETTING THE UNIT
If the unit does not respond properly or appears to be “frozen”, unfold a paperclip and insert the end of the object into the AUX hole where the reset button resides. - LOW BATTERY
2-beat sound will be heard while the battery level is low to alert user to recharge the unit with the power adaptor and USB charging cable provided. - PHONE REST ARM LOOSING
If you find that after you have placed your device on the arm mount and it is “too loose”, the support screws may be adjusted / tightened manually with a screwdriver.
** Do not over tighten the screws**
19 LIMITED WARRANTY
Emerson Radio Corp. warrants this product to be free from manufacturing defects in original material, including original parts, and workmanship under normal home use and conditions (“manufacturing defect”) for a period of ninety (90) days from date of original purchase in, and if used in the United States. Should service be necessary under this warranty, Emerson will provide the following at our Return Repair Facility provided the manufacturing defect is verified along with the date of purchase:
* Repair service for ninety (90) days from date of original purchase at no charge for labor and parts.
To Receive Authorization to Return a Defective Item, please contact Emerson Customer Service at 1-800-898-9020 or at http://www.emersonradio.com/service/return-policy. Have your Model number, Serial Number and dated Proof of Purchase with you when you call.
In the event the product must be returned to Emerson:
* Pack the unit in a well-padded heavy corrugated box. Please insure the item is well padded to avoid damage while in transit back to our facility. If the item incurs damage, it will NOT be replaced and the consumer will be responsible for return freight costs to receive their same unit back.
* Enclose your check or money order payable to Emerson Radio in the amount of $10 to cover return shipping and handling costs.
* Enclose a note with your name, address, phone number, Return Authorization number and brief reason for returning the unit.
* Enclose a copy of your proof of purchase ().
* Ship the unit prepaid via UPS or parcel post (SHIP INSURED and obtain a tracking number).
NOTE This warranty does not cover:
(a) Damage to equipment not properly connected to the product.
(b) Cost incurred in the shipping of the product to and from Emerson’s Return Facility.
(c) Damage or improper operation of unit caused by customer abuse, misuse, negligence or failure to follow operating instructions (including cleaning instructions) provided with the product.
(d) Ordinary adjustments to the product which can be performed by customer as outlined in the owner’s manual.
(e) Signal reception problems caused by external antenna or cable systems.
(f) Products not purchased in the United States.
(g) Damage to product if used outside the United States.
THIS WARRANTY IS NON-TRANSFERABLE AND APPLIES ONLY TO THE ORIGINAL PURCHASER AND DOES NOT EXTEND TO SUBSEQUENT OWNERS OF THE PRODUCT. ANY APPLICABLE IMPLIED WARRANTIES, INCLUDING THE WARRANTY OF MERCHANTABILITY, ARE LIMITED IN DURATION TO A PERIOD OF THE EXPRESSED WARRANTY AS PROVIDED HEREIN BEGINNING WITH THE DATE OF ORIGINAL PURCHASE AT RETAIL AND NO WARRANTIES, WHETHER EXPRESSED OR IMPLIED, SHALL APPLY TO THE PRODUCT THEREAFTER. EMERSON MAKES NO WARRANTY AS TO THE FITNESS OF THE PRODUCT FOR ANY PARTICULAR PURPOSE OR USE.
THE EXTENT OF EMERSON RADIO CORP’S LIABILITY UNDER THIS LIMITED WARRANTY IS THE REPAIR OR REPLACEMENT PROVIDED ABOVE AND, IN NO EVENT, SHALL EMERSON RADIO CORP’S LIABILITY EXCEED THE PURCHASE PRICE PAID BY THE PURCHASER OF THE PRODUCT. UNDER NO CIRCUMSTANCES SHALL EMERSON RADIO CORP. BE LIABLE FOR ANY LOSS, DIRECT, INDIRECT, INCIDENTAL, SPECIAL, OR CONSEQUENTIAL DAMAGE ARISING OUT OF OR IN CONNECTION WITH THE USE OF THIS PRODUCT. THIS WARRANTY IS VALID ONLY IN THE UNITED STATES OF AMERICA.
THIS WARRANTY GIVES YOU SPECIFIC LEGAL RIGHTS. HOWEVER, YOU MAY HAVE OTHER RIGHTS WHICH MAY VARY FROM STATE TO STATE. SOME STATES DO NOT ALLOW LIMITATIONS LIMITED WARRANTY ON IMPLIED WARRANTIES OR EXCLUSION OF CONSEQUENTIAL DAMAGE, THEREFORE THESE RESTRICTIONS MAY NOT APPLY TO YOU.
10-90-1402A
The serial number can be found on the bottom cabinet. We suggest that you record the serial number of your unit in the space below for future reference.
Model Number: ER-X300
Serial Number: _______________________________
![]()
****** S E R V I C E ******
FOR ADDITIONAL SET-UP OR OPERATING ASSISTANCE
PLEASE CALL:
1-800-898-9020
______________________________________________________________
FOR CUSTOMER SERVICE, PLEASE E-MAIL TO:
[email protected]
OR WRITE TO:
Emerson Radio Corp.
Consumer Affairs Dept.
35 Waterview Blvd
Parsippany, NJ 07054
Emerson Part No.: ERX300-20190514-00 Printed in China