eureka Mignon Coffee Grinder Instruction Manual
SAFETY INSTRUCTIONS
The producer has reasonably considered every precaution possible, so to assure
user’s safety. Anyway, in installing and using the grinder, various conditions may create uncontrollable and unpredictable events; so, it’s always necessary to evaluate any risks and consider what follows:
- Before connecting the grinder, it’s necessary to verify that plate data match with electric net ones.
- Both installation and repair must respect safety instructions and the inforce rules of the country in which the grinder is installed.
- The grounding wire is necessary, like the installation. Both must respect the inforce rules of the country in which the grinder is installed.
- Adaptors, multiple outlets and extension cables are not suggested.
- Do not use this grinder if it is damaged on the cable. In case of malfunctioning, switch off the grinder and take it to the closest authorised service center.
- Do not immerse the grinder, the cable or the plug into water or other liquids. It’s necessary to avoid that internal parts enter in contact with other liquids.
- Do not use any water jets, unsuitable detergents or steam-cleaners to clean.
- During its use, install the grinder on a flat and stable surface being able to sustain the weight of the grinder.
- The grinder is intended to be used only to grind roasted coffee beans. A different use is considered unsuitable and dangerous. The producer cannot be considered responsible for possible damages related to misuse or erroneous and unreasonable actions.
- The grinder cannot be used in extreme enviromental conditions. In any case, use the grinder just between -5° C ÷ + 30° C degrees.
- This grinder has been conceived for commercial use, like restaurant kitchen, cantines, hospitals and shops, like bakeries and butchers. It is not suitable for continous food production.
- For home-use, it is necessary to switch off the grinder and to unplug it before changing any accessory or coming clode to any parts that is working.
- This grinder is conceived for home-useand similar domains, like kitchen equipments for the staff of shops, offices, agritourism, customers in hotels, motels or other locations, like residential areas or bed and breakfast.
- Do not allow children or untrained people to use the grinder.
- The grinder can be used by children being 8 years old or above and by people with reduced physical, sensory or mental capabilities ; by people without adequate experience just when monitored and if these have received user instruction on the grinder. Cleaning cannot be performed by unmonitored children.
IMPORTANT WARNINGS
- Do not pull the cable or the grinder itself to disconnect its power cable.
- Do not use the grinder with wet or damp hands.
- Do not use the grinder when you are barefoot.
- Before cleaning or servicing, unplug the grinder from the electric net.
- Do not leave the grinder switched on when not necessary. When it is not working, unplug the grinder.
- Do not obstruct the fan or heat elimination systems. Do not enter any water or liquids.
- While the grinder is working, do not enter spoons, forks or other utensils in the spout or the coffee container to perform anything.
- To solve any blockage in the spout, always switch off the grinder before.
- In case of failure of the motor, switch off the grinder and contact an authorised service center.
- Prevent the grinder to be used under any weather conditions (sun, rain, ecc.).
- Children must be monitored to prevent they play with the grinder.
- The owner is responsible for monitoring the installation of the grinder, so to assure it has been installed in enviromental conditions that will not create a safety or health danger for the users.
- If you decide not to use anymore this grinder, we suggest to make it inoperative. After having it unplugged, cut the cable. In case of failure, switch it off and do not tamper with.
CONSERVATION OF THE MANUAL
This manual must always be at any user disposal. The user must be informed on the
correct use of the grinder and on potential risks. It must be conserved in a dry, clean and heat-protected place. Use the manual so to avoid any damage to itself. Do not remove, rip or write on any manual parts. In case you cannot find the manual, take contact with the re-seller or the producer for further information.
UNPACKING THE GRINDER
- It’s necessary to check out that there is not any damage on the grinder, looking at the external packacing
- After having removed the packing, check out there are no damages on the grinder.
- Check out the entirety of all components. In case of defects or damages, inform
immediately the authorised reseller. - The packing (box, cellophane, metallic parts, styrofoam, etc.) can cut, wound or be dangerous if mismanaged. Prevent children or non-responsible people entering in contact with the packing.
- This symbol on the grinder or on the packing informs that the grinder cannot be considered like a usual home waste ; it must be delivered to a suitable waste collection facility that recycle electric and electronic devices. If this grinder is correctly disposed of, you will prevent potential damages to both environment and health; these damages may occur in case the grinder is not correctly disposed of. Waste recycling protects natural sources. For further information on the recycling of this product, you can contact your local authority, local recycling center or the reseller you purchased the grinder from.
IMPORTANCE OF THE MANUAL
This manual is adressed to the user of the grinder and it is considered part of this
product. It shares information on its correct use and maintanance, including information on user’s safety. This manual must be held during all the grinder’s lifespan and must be transmitted to any user or future owner. All information in this manual do not replace safety rules and techicnal data on the installation and functioning of the grinder and its packing. This manual reflects the nowadays state of the art and it cannot be considered inadaquate just because revised on the base of new techologies. The producer may modify the manual without revising previous editions, except in special cases. A misuse of the grinder, or a different use than the one described on the manual, will invalidate any warranty or responsability of the producer. The grinder can be used just by a responsible adult. It’s necessary to preserve the manual, as the producer cannot be held responsible for any damage on people or things, or any damage on the grinder in case it is misused or in case safety and maintenance rules are not respected.
GENERAL INFORMATION
- MANUFACTURER:
CONTI VALERIO – Via Luigi Longo, 39/41 – 50019 Sesto Fiorentino (FI) – ITALIE - MODEL:
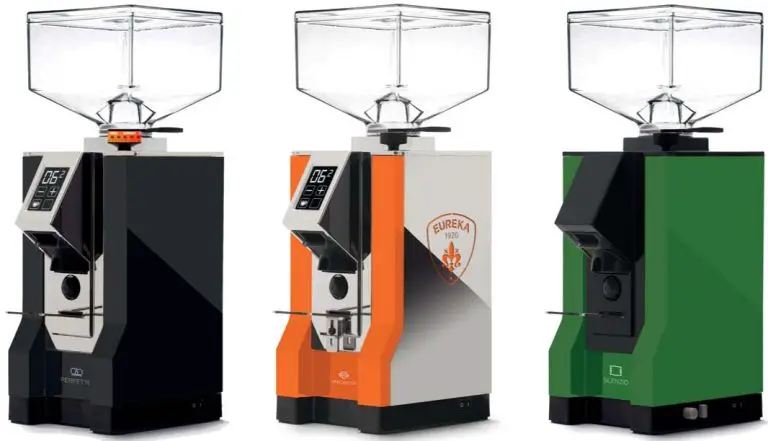
MEB – MEE – MEA – MEM – MPE – MPA – MPM – MPT
TECHNICAL DATA
| DESCRIPTION | MODEL | ||
| MEB – MEE – MEA – MEM – MPE – MPA – MPM – MPT | |||
| SILENT | EVOLUTION | FILTER | |
| Volts (V) | 220 V / 60 Hz 220-240 V /50-60 Hz |
||
| Power consumption (W) | 310 | ||
| RPM | 1350 (50Hz) 1630 (60Hz) |
||
| Production rate (g/s) | 50
1,2 – 1,6 (Espresso) |
1,1 – 1,5 (Espresso) 1,5 – 2,1 (Brew) |
50 |
| 1,1 – 1,5 (Espresso) 1,5 – 2,1 (Brew) |
|||
| 55
1,4 – 1,8 (Espresso) |
55 | ||
| 1,9 – 2,5 (Brew) | |||
| Empty weight (kg) | 5,6 | ||
| Hopper capacity (g) | standard 300 / optional 500 | ||
| Ground coffee basket capacity (g) | 160 | ||
| Height (mm) | 350 330 (Mignon Design) | ||
| Width (mm) | 120 | ||
| Depth (mm) | 180 | ||
- T ON: 60 s
- T OFF: 120 s or 600 s
PRODUCT DESCRIPTION

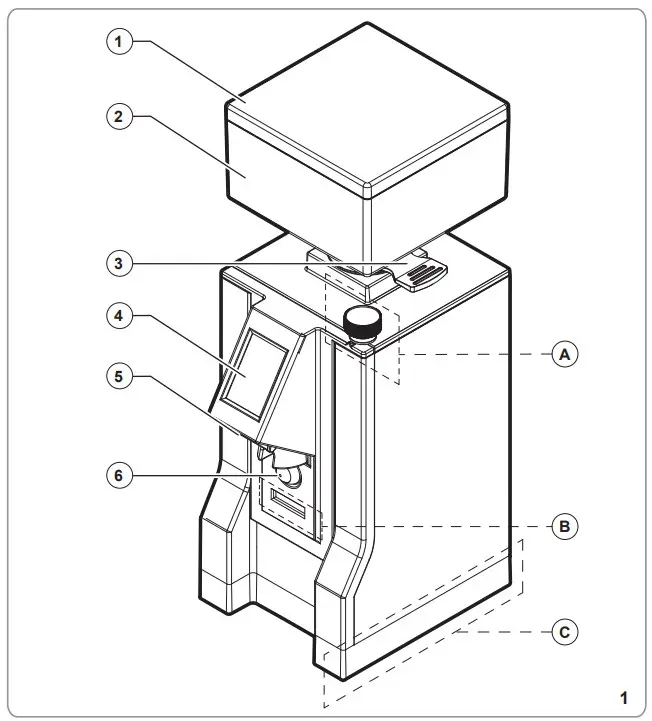

- Container lid
- Coffee beans container
- Coffee beans container opening/closing tab
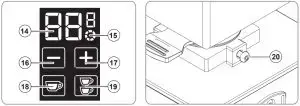
- Touch-screen display
- Spout
- Activation button for grinding
- Setting knob for grinding
- EASY SETTING regulation knob
- Setting knob FILTER grinding
- Adjustable filter holder knob
- Fixed fork
- Plastic fork
- Ground coffee basket
- Display dispensing time/dose counter
- Continuous mode on
- Decreasing key
- Increasing key
- 1 cup button
- 2 cups button
- Fixing screw of the coffee beans container
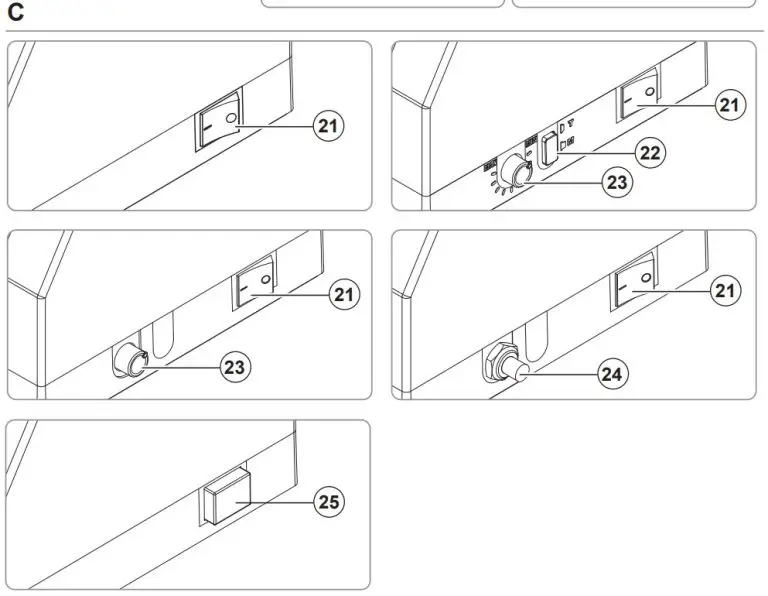
- Switch on button
- Manual/Timer mode button
- Potentiometer timer button
- Side button triggering grinding
- Side button triggering grinding
LOCKING THE CONTAINER
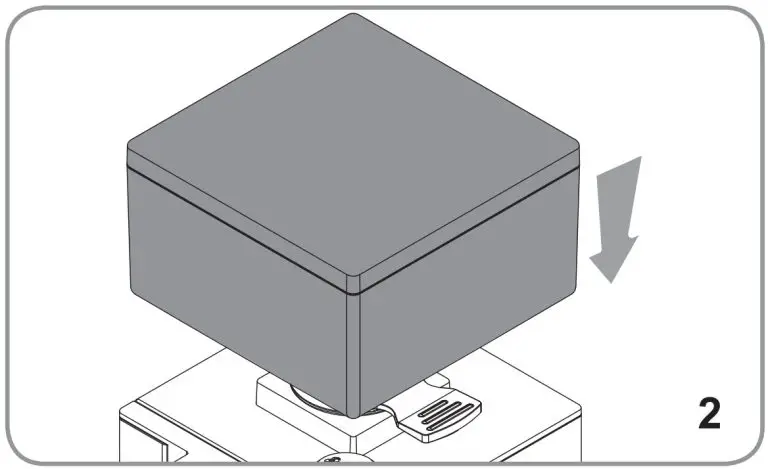
Before operating the appliance, it is necessary to fit the coffee bean container (2).
- Insert the container (2) into its seat (Fig. 2), positioning it so that the hole lines up with the screw on the back part of the appliance.
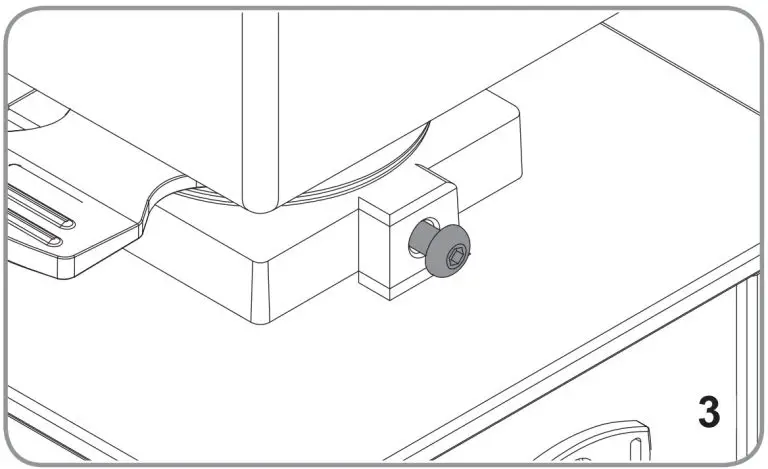
- Tighten the lock screw (12) (Fig. 3).
SETTING AND USE
PREPARATORY OPERATIONS
Looking at the type of coffee (more or less roasted) and grinding, it’s necessary to set up the grinder before working with it.
- Evaluate the type of coffee (more or less roasted).
- Evaluate the grinding level.
- If equipped with adjustable fork (10), set it in height (Fig. 6).
- Insert the container (2) in its position (Fig. 2).

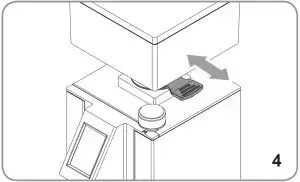
- After having set the electric connection, pull the tab (3) on the bottom of the coffee bean container (2) to close it (Fig. 4). Then, set up dose programming.
- Remove the cover (1) of the container (2) and fill it with coffee beans.
- Put the cover back (1) and push the lid (9) so to let the beans go all the way down.
MANUAL MODE FUNCTION
- Lay the filter holder on the fork (10/11/12) (Fig. 9) or position the ground coffee basket (13) under the outlet chute (5)(Fig.10).


- Push the filter holder, or position the ground coffee basket (13) under the outlet chute, until in contact with the micro-switch button (6), or keep pressed the side activation button (24/25), so to dispense the ground coffee from the spout (5).
- The dispensing stops moving away the filter holder or the basket from the microswitch (6) or releasing the side button (24/25).
TIMER MODE FUNCTION
- Lay the filter holder on the fork (10/11/12) (Fig. 9) or position the ground coffee basket (13) under the outlet chute (5)(Fig.10).
- Push the filter holder, or the basket, until in contact with the micro-switch button (6), so to dispense the ground coffee from the spout (5).
- Dispensing time is set regulating the potentiometer (23), turning it to increase or
decrease coffee ground quantity. - Dispensing stops at the end of the set time. To stop automatic dispensing before the time is over, push again the micro-switch button (6).
If equipped with, it’s possible to use the select button (22) to switch from manual to timer mode (and vice-versa). To activate the manual mode, push the « M » positioned button ; to activate timer mode, press the « T » positioned button.
DISPLAY FUNCTIONING
TURNING THE MACHINE ON
When starting the machine for the first time, the appliance has the factory default settings. In the subsequent starts, it keeps the settings preceding the last turning off.
When starting, the display loads the firmware and gets ready for dispensing.
DOSE DISPENSING AND ADJUSTMENT (DISPLAY)
- By pressing the button of one dose(18)
 or double dose (19)
  , the dose to be dispensed is selected (the buttons goes on).
 - With a single pressure (quick) of the grinding start button (6),the coffee dispensing and the countdown to zero are activated.
- When the dispensing is complete, the grinding time goes back to the value set. The counter of single or double doses is increased by 1.
- Select the single (18) or double dose (19) and press the buttons (16)
 and (17) to increase or reduce the dispensing time of the selected dose (the time is shown in seconds on the display).
 - If the button (16) or (17) , is kept pressed for some seconds, the time is increased or reduced according to the pressure time.
To pause the automatic dispensing before the grinding time has elapsed, press the grinding start button (5) with the filter holder:
- Press the button (5) again to restart the dispensing for the remaining time.
- Keep pressed the button of the selected dose (blinking) to stop dispensing.
The grinding time goes back to the value set.
CONTINUOUS DISPENSING
- Press the single dose (18) and double dose (19) . buttons at the same time to access this mode.
- The symbol (15)
 appears on the display.
 - The continuous dispensing lasts up to max 60 seconds.
- To exit the continuous dispensing mode, keep pressed the single dose (18) or the double dose(19) button for some seconds.
LOCKING THE TIME
- Press the buttons(16) and (17) . at the same time. When releasing them, the dose dispensing time adjustment stops. Furthermore, on the display the buttons (16) and (17) disappears.
- Press both buttons (16) and (17) again to unlock the functions.
DOSE COUNTS
When starting the machine, keep pressed for 5 seconds the grinding start button (6) and then select one of the counts:
- Single dose button (18) : access to the count of the dispensed single doses;
- Double dose button (19) : access to the count of the dispensed double doses;
- Single dose button (18) and double dose button (19) : access to the count of the dispensed continuous doses;
On the display, only the selected buttons remain on and the numbers of doses are shown in pairs progressively.
For instance, if the dose total is 142536, the display shows the digits 14, 25, and 36
(each one for two seconds).
After the last digit pair, it stops for 4 seconds and then the sequence restarts.
To exit the count, press the grinding start button (6).
DISPLAY CONTRAST ADJUSTMENT
When starting the machine, keep pressed the grinding start button (6) and then press the button (16) ![]() or (17) to access the contrast adjustment. On the display, only the buttons (16)
or (17) to access the contrast adjustment. On the display, only the buttons (16) ![]() and (17) To exit the contrast adjustment, press the grinding start button (6).
and (17) To exit the contrast adjustment, press the grinding start button (6).
GRINDING SETTING (FIG. A)
Turn the adjustment knob (7-8-9) clockwise for more finely ground coffee and counterclockwise for a coarser grind. The adjustment is to be made gradually, by grinding a little coffee every max 2 notches.
If the knob is turned of a turn with the motor in standstill, the machine could stop.
The adjustment system EASY SETTING (8), if fitted, makes this procedure easier and allows to adjust grinding in a quick and intuitive manner according to the required final product.
POSITIONING THE FIXED FORK
- Insert the filter holder fork (11) (Fig. 7) into its seat.

WARNING
- Do not use the fork (12) (fig. 8) without having fixed it with the apposite screw

FILTER HOLDER FORK ADJUSTMENT (FIG.6)
- Insert the filter holder fork (10) (Fig. 7) into its seat.
- With a screwdriver, loosen the fixing screw of the filter holder fork (6). Do not loosen the screw completely.
- Lift or lower the fork to adjust it according to the filter holder dimensions.
- Once having found the correct position, tighten the fork fixing screw (10).
- The fork is suitable for any kind of filter holder available on the market.
CLEANING AND MAINTENANCE
 ATTENTION
Unplug the grinder from the electrical net before performing any cleaning and maintenance. Do not pull the feeding cable or the grinder itself to unplug.
ATTENTION
Maintenance and cleaning operations must be performed by trained technicians, authorised by the producer.
ATTENTION
Do not perform any approximate maintenance and always use original spare parts.
CLEANING
Cleaning is fundamental for the correct use of the grinder. A neglected grinder can negatively impact on the coffee dispensing and on the precision of the dose and the grind. Before cleaning, check if the grinder is unplugged.
HOPPER CELANING
After having removed the hopper, clean the internal parts of it with water and neutral
soap, taking off any oil left by the coffee beans. Rinse and dry it carefully. Perform the same on the cover. Do not use the dish-washer.
GRINDING SYSTEM CLEANING
After having removed the lid, open the upper burr holder. Then, clean the blades and the other internal parts with a brush or a dry cloth. If necessary, use a vacuum cleaner or an air compressed jet. After having installed back the upper burr holder and the lid, install the hopper. For a complete cleaning, use detergent pills.
ATTENTION
Any cleaning operation must be performed with food use approved products.
MAINTENANCE
- To ensure correct operation of the appliance, avoid grinding more than 160g of coffee per activation.
- Check and possibly replace the blades every 250 kg of coffee. For burrs maintenance, unplug the grinder from the electric net and remove the coffee beans container.
- Then, unscrew the screw being on the lid and the screws fixing the upper burr holder.
- To clean the blades, use a brush or a dry cloth. If necessary, use a vacuum cleaner or air compressed jet.
ATTENTION
Maintenance must be performed only by trained technicians, authorised by the producer.
ATTENTION
Do not perform any approximate maintenance and always use original spare parts.
TROUBLESHOOTING
- Contact specialist personnel.