Fender MUSTANG Micro
Fender MUSTANG Micro
INTRODUCTION
This manual is a guide to the features and functions of Mustang Micro–a plug-and-play headphone amplifier and interface that connects directly to your guitar and bass to deliver amp models, effects models, Bluetooth capability and more. With fantastic Fender Mustang amplifier sound and yet no larger than a deck of cards, Mustang Micro is easily portable and provides up to six hours of battery-operated playing time.
Mustang Micro is simple and intuitive. Connect it to any popular instrument model using the 1/4″ rotating input plug. Choose an amp. Choose an effect and effect parameter setting. Set volume and tone controls. Turn Bluetooth on and stream music to play along with, or practice to online instruction with synced audio and video. Mustang Micro delivers it all straight to your earbuds, headphones or digital recording software.

FEATURES
- A. ROTATING INPUT PLUG: Standard 1/4″ plug rotates up to 270 degrees for easy compatibility with all popular guitar models.
- B. MASTER VOLUME: Thumbwheel control adjusts instrument and overall output level to headphones/earbuds or recording software (page 6).
- C. AMP BUTTONS/LED: Buttons (-/+) select amplifier from 12 models (page 4). LED color indicates amp model in use.
- D. EQ BUTTONS/LED: Buttons (-/+) adjust tone (page 6); selections include flat setting, two progressively darker settings and two progressively brighter settings. EQ control is post-amplifier. LED color indicates EQ setting in use.
- E. EFFECTS BUTTONS/LED: Buttons (-/+) select effect (or effects combination) from 12 different options (page 5). LED color indicates effect model in use.
- F. MODIFY EFFECTS BUTTONS/LED: Buttons (-/+) control one particular parameter of the selected effect (page 6). LED color indicates parameter setting in use.
- G. POWER/BLUETOOTH SWITCH/LED: Three-position slider switch turns Mustang Micro on and off and activates Bluetooth (pages 3, 7). LED indicates power/Bluetooth/charging status.
- H. HEADPHONE OUTPUT: Stereo headphone jack
- I. USB-C JACK: For charging, recording output and firmware updates (pages 7-8).
CONNECTING TO A GUITAR AND POWERING UP
Connecting Mustang Micro™ to your guitar couldn’t be easier–simply rotate the 1/4″ INPUT PLUG (A) out from the unit and plug it into the guitar’s input jack (see image at right).
Slide the POWER SWITCH (G) to the center “on” position (see image at lower right). POWER LED will illuminate green for 10 seconds and then extinguish, indicating that Mustang Micro is on and charged (different LED colors indicate different charging status; see “Charging”, page 7). You’re now ready to choose an amp, choose an effect and effect parameter setting, adjust volume and EQ, engage Bluetooth if so desired, and start playing.
If power is on but no instrument input is detected for 15 minutes, Mustang Micro will automatically switch to a low-power “sleep mode”. Press any button to wake up from sleep mode.
WARNING: Connecting Mustang Micro to your instrument, disconnecting it or touching the end of the device’s plug may cause a loud noise. To avoid hearing damage when wearing headphones/ear buds, follow these steps to ensure safe operation of your device:
- When connecting/disconnecting Mustang Micro, remove headphones/earbuds, ensure that the device is turned off, or ensure that the device’s VOLUME control is set to zero.
- Turn the device ON with VOLUME set to zero, then gradually adjust VOLUME to reach a comfortable listening level. When wearing headphones/earbuds, connecting/disconnecting Mustang Micro or touching its exposed plug
while unit is on and MASTER VOLUME is up is similar to plugging an instrument cable into a live amplifier with volume up or to touching the exposed end of a live instrument cable.
SELECTING AN AMPLIFIER MODEL
Mustang Micro has 12 different amplifier models to choose among, encompassing “clean,” “crunch”, “high-gain” and “direct” types. To choose an amp model, press the AMP -/+ buttons (C) on the side of the unit. AMP LED color indicates amp model in use; LED will illuminate for 10 seconds and then extinguish until any button is pressed.
Amplifier types, models and LED colors are:
All non-FMIC product names and trademarks appearing in this manual are the property of their respective owners and are used solely to identify the products whose tones and sounds were studied during sound model development for this product. The use of these products and trademarks does not imply any affiliation, connection, sponsorship, or approval between FMIC and with or by any third party.
SELECTING AN EFFECTS MODEL
Mustang Micro has 12 different effects models to choose among (including combined effects). To choose an effect, use the EFFECTS -/+ buttons (E) on the side of the unit. EFFECTS LED color indicates effect model in use; LED will illuminate for 10 seconds and then extinguish until any button is pressed.
Effects models and LED colors are:
All non-FMIC product names and trademarks appearing in this manual are the property of their respective owners and are used solely to identify the products whose tones and sounds were studied during sound model development for this product. The use of these products and trademarks does not imply any affiliation, connection, sponsorship, or approval between FMIC and with or by any third party.
MODIFY EFFECTS SETTINGS
For each Mustang Micro effects model, six different settings of one particular effect parameter can be chosen using the MODIFY -/+ buttons (F) on the side of the unit. Five of these consist of a middle default setting, two progressively weaker settings (- and –) and two progressively stronger settings (+ and ++). MODIFY LED color indicates effect parameter setting in use; LED will illuminate for 10 seconds and then extinguish until any button is pressed.
To achieve an amp-only sound with no effect present, a MODIFY effect-bypass setting is available (—).
Effects models and the parameters affected for each effect model are in the below left table. MODIFY button effect parameter settings and their LED colors are in the below right table:
SETTING MASTER VOLUME AND EQ CONTROLS
Once amplifier and effects models are chosen, overall volume and EQ are easily adjusted. For overall volume level, simply turn the MASTER VOLUME wheel (B) to preference (image at right). Note that MASTER VOLUME controls instrument and overall volume only; the mix between an instrument and a Bluetooth audio source is determined using the volume control on the external Bluetooth device.
To adjust overall (EQ), five different settings can be chosen using the -/+ EQ buttons (D) on the side of the unit (image below). These consist of a flat middle default setting, two progressively darker settings (- and –) and two progressively brighter settings (+ and ++). EQ control affects signal after an amplifier and effect are chosen. EQ LED color indicates EQ setting in use (table below); LED will illuminate for 10 seconds and then extinguish until any button is pressed.
BLUETOOTH
Mustang Micro easily streams Bluetooth audio, so you can play along in your headphones or earbuds. The device is discoverable as “Mustang Micro” on smart phones and other Bluetooth devices.
To activate Bluetooth pairing mode, push the POWER SWITCH (G) to the left, where the Bluetooth symbol is, and hold it there for two seconds. The POWER SWITCH Bluetooth position is spring-loaded for momentary contact only, and will return to the center “ON” position when button is released. In pairing mode, the POWER SWITCH LED will flash blue for two minutes or until a connection is established.
On successful connection, the LED will turn solid blue for 10 seconds and then extinguish.
To disconnect a Bluetooth device from Mustang Micro, hold the POWER SWITCH in the Bluetooth position for two seconds and then release it (as when pairing). This will end the Bluetooth connection and return Mustang Micro to pairing mode with a flashing blue LED; pairing mode will expire within two minutes if no other Bluetooth connection is made, and the blue LED will extinguish. Alternately, disconnect using the external device.
Mustang Micro automatically pairs with the last connected Bluetooth device if that device is available. Note that MASTER VOLUME (B) controls instrument and overall volume only; the mix between an instrument and a Bluetooth audio source is determined using the volume control on the external Bluetooth device.
CHARGING
Mustang Micro provides up to six hours of battery-powered operation. Recharge Mustang Micro using the USB-C jack (H) on the bottom of the unit and the included USB cable.
POWER SWITCH (G) LED color indicates charging status:
RECORDING
Mustang Micro can be used as an input device for digital recording software by using a USB cable to connect the USB-C jack (H) on the bottom of the unit to the USB port on the user’s Mac or PC.
Note that Mustang Micro can only be used as a source for USB audio (which cannot be routed back to Mustang Micro for monitoring).
No external driver is needed to connect to an Apple computer. For assistance with configuring and using USB recording, visit the “Connected Amps” section at https://support.fender.com.
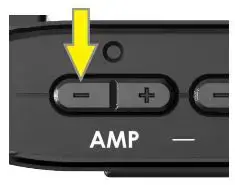
FIRMWARE UPDATE
To perform a Mustang Micro firmware update, follow these three steps:
- With Mustang Micro off, connect a USB cable to its USB-C jack and connect the other end to a Mac or PC.
- Press and hold the AMP “-” button (C).
- Turn Mustang Micro on while continuing to hold the AMP “-” button for three seconds.
Successful initiation of firmware update mode is then indicated by a solid white POWER SWITCH LED (G) for 10 seconds; the white LED will then begin flashing to indicate an update in process.
When a firmware update is complete, the POWER SWITCH LED will illuminate solid green to indicate a successful update; the LED will illuminate solid red to indicate a failed update. Mustang Micro is automatically powered up during the firmware update process; when an update is completed successfully, disconnect the USB cable from Mustang Micro and restart the unit.
FACTORY RESET
A Mustang Micro factory reset can be performed that resets all buttons (AMP, EQ, EFFECTS, MODIFY) to their original factory values and clears the Bluetooth paired device list.
Initiate factory reset mode by turning Mustang Micro on while simultaneously holding the EQ “+” (D) and EFFECTS “-” (E) buttons for three seconds. The LEDs above the EQ and EFFECTS buttons will illuminate white after factory reset (as will the LEDs above the AMP and MODIFY buttons not shown below).
SPECIFICATIONS
PART NUMBERS
Mustang Micro 2311300000 US, CAN, EU, AU, JP
2311314000 MEX, CN
A PRODUCT OF
FENDER MUSICAL INSTRUMENTS CORP.
311 CESSNA CIRCLE
CORONA, CALIF. 92880 U.S.A.
AMPLIFICADOR DE AUDIO
IMPORTADO POR: Fender Ventas de México, S. de R.L. de C.V.
Calle Huerta #279, Int. A. Col. El Naranjo. C.P. 22785. Ensenada, Baja California, México.
RFC: FVM-140508-CI0
Service al Client: 01(800) 7887395, 01(800) 7887396, 01(800) 7889433
Fender® and Mustang™ are trademarks of FMIC. Other trademarks are property of their respective owners.
Copyright © 2021 FMIC. All rights reserved.
FAQ’S
What is the difference between Mustang Micro and the original Fender Mustang?
The original Fender Mustang was designed to be a guitar amplifier. It has a speaker, an input jack and an output jack. It also has knobs for volume, tone and gain. Mustang Micro is designed to be a headphone amplifier. It has no speaker and no output jack. Instead of a speaker, it has an input jack for connecting your instrument directly to the amp models. Instead of an output jack, it has a master volume control that adjusts the overall volume of your headphones/earbuds or recording software. Mustang Micro also features Bluetooth capability so you can stream music to play along with or practice to online instruction with synced audio and video.
Mustang Micro also includes a built-in tuner, which is not included in the original Fender Mustang.
How do I connect my guitar or bass to Mustang Micro?
Use the 1/4″ rotating input plug on the back panel (see diagram below). Plug your instrument cable into the rotating plug, then rotate the plug until it fits snugly into your instrument’s output jack (if applicable).
How do I turn on Mustang Micro?
Press and hold both Amp buttons for about two seconds until LED lights up green. You should hear a tone when you plug in your instrument cable into the rotating input plug on the back panel (see diagram below). If you don’t hear anything, check that your instrument cable is plugged into both ends securely and that you have selected an amp model by pressing one of the Amp buttons (-/+). If you still don’t hear anything, make sure that your instrument cable is plugged into your guitar or bass securely and that you have selected an amp model by pressing one of the Amp buttons (-/+). If you still don’t hear anything, try another guitar cable or contact Customer Support at [email protected] .
How do I turn off Mustang Micro?
Press and hold both Amp buttons for about two seconds until LED lights up red. When LED lights up red, Mustang Micro will power down in about ten seconds.
Are there any other ways to turn off Mustang Micro?
Yes–press both EQ buttons simultaneously for two seconds until LED lights up red. When LED lights up red, Mustang Micro will power down in about ten seconds. If LED does not light up red when you press both EQ buttons simultaneously for two seconds, try pressing both Amp buttons simultaneously for two seconds instead–this will also turn off Mustang Micro in about ten seconds if it is not already powered down from pressing either one of the Amp buttons alone for two seconds (see above).
What does each button on Mustang Micro do?
There are three buttons on each side of Mustang Micro–one button controls whether or not Bluetooth is turned on or off; one button controls whether or not Bluetooth audio streaming.
Can you plug the Fender Mustang Micro into an amplifier?
You can plug it directly into your electric guitar jack, connect stereo headphones to its 1/8-inch jack, choose various amp and effect settings, and play for hours.
Do you need headphones for Fender Mustang Micro?
Mustang Micro is a complete personal guitar amplifier featuring a wide selection of tones from the wildly popular Mustang series amps. Plug Mustang Micro directly into your guitar, connect your favorite wired headphones, and choose your perfect amp and effect settings.
How do I setup my Mustang Micro?
Bluetooth connections
You have the ability to jam along with your favorite songs and videos by pairing the Mustang Micro with any device that has Bluetooth capability. All you need to do is hold the BLUETOOTH button in the ON position for a few seconds. The blue LED will flash until a connection has been made
Can you use AirPods with Mustang Micro?
The Fender Mustang Micro has built in Bluetooth connectivity, so you can pair it with wireless headphones like Apple’s AirPods. You can also pair it to your phone as well which is handy if you like jamming along with drum tracks via YouTube.
How do I reset my Fender Mustang amp?
Press and hold the EXIT button while turning the amplifier ON. Continue holding the EXIT button until it is no longer illuminated. The FACTORY RESTORE function will erase all user modified presets.
How do you know when the Fender Mustang Micro is fully charged?
POWER LED will illuminate green for 10 seconds and then extinguish, indicating that Mustang Micro is on and charged (different LED colors indicate different charging status.
VIDEO
Fender MUSTANG Micro
www://fender.com/en-US/guitar-amplifiers/headphone-amplifiers/mustang-micro/2311300000.html