fender Passport Event Series 2
Owner's Manual

PASSPORT® EVENT SERIES 2
Congratulations on purchasing a Fender® Passport Event Series 2 audio system–a self-contained portable audio system designed for great sound anywhere. Carry Passport like a suitcase, and simply flip open the cabinet-release latches to access two full-range speaker cabinets, a powered mixer, and power and speaker cables.
Use Passport as a public address system or to amplify musical instruments and vocals. Connect mobile devices for easy accompaniment, including Bluetooth pairing. Passport’s quick and easy setup, its ability to cover large audiences and its simple operation are the hallmarks of this innovative product. Its control panel features mono mic/line channels and stereo line channels with a variety of input jacks to provide superb flexibility.
Register your Passport Event Series 2 online at start.fender.com.
SYSTEM SETUP
1. OPEN: Flip open cabinet latches on top of Passport and detach speaker cabinets from powered mixer section: 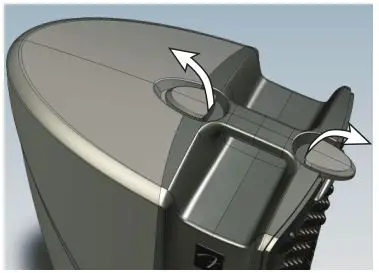
2. PLACEMENT: For optimal results, elevate speaker cabinets on Passport speaker stands or sturdy tables. Place the speakers far apart to maximize stereo separation. Position mixer close by for easy access to control panel: 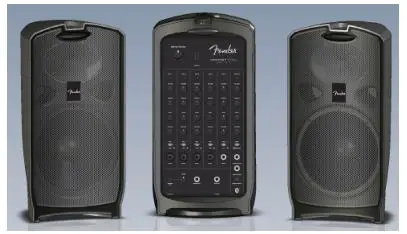
3. SPEAKER CABLE/POWER CORD STORAGE: Open storage compartment on rear of mixer and remove power cord and speaker cables: 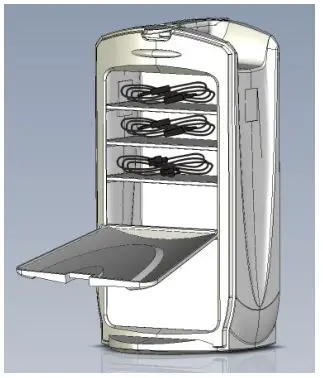
4. POWER CORD/SPEAKER CABLE CONNECTION: Plug speaker cables into left and right speaker jacks on back of the mixer (upper right arrow), then connect corresponding left and right speakers. Make sure power switch is off before connecting power cord (included) into power inlet on back of mixer (lower left arrow); plug other end into a grounded AC power outlet: 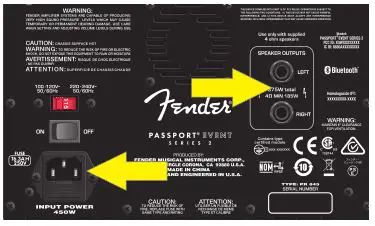
5. INPUTS: Connect microphones to channels 1 through 4; connect other mono sound sources such as instruments to any channel (large arrows). Use channel 6/7 inputs (smaller arrows) for stereo/mono sound sources such as keyboards, other line-level audio sources, and mobile devices: 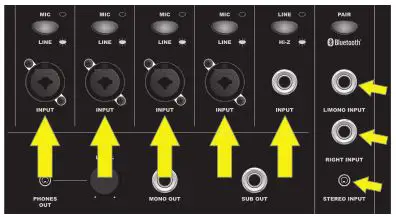
6. INITIAL VOLUME/REVERB: Turn MASTER VOLUME knob, all channel VOLUME knobs and all REVERB knobs fully counterclockwise to start: 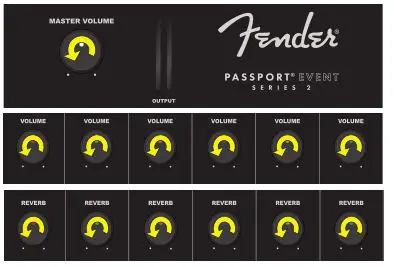
7. POWER UP: Turn on all external equipment connected to Passport first, then turn Passport on. Power LED will illuminate green: 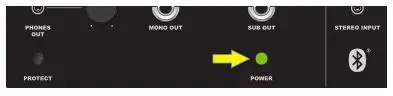
8. SETTING MASTER VOLUME: Turn MASTER VOLUME up to 1/4 volume: 
9. SETTING LEVELS: Connect a microphone or other sound source and slowly turn up that channel’s VOLUME control (curved yellow arrow). LED above VOLUME control will illuminate green when signal is present. LED will illuminate yellow when signal is approaching clipping level; will illuminate red when clipping (distortion) occurs. For best performance, set channel VOLUME and TONE controls (curved green arrows) so that LED is green and occasionally yellow. If LED turns red, reduce VOLUME or TONE control settings. If LED is still turning red after adjusting VOLUME and TONE controls, press MIC/LINE button in (straight arrow): 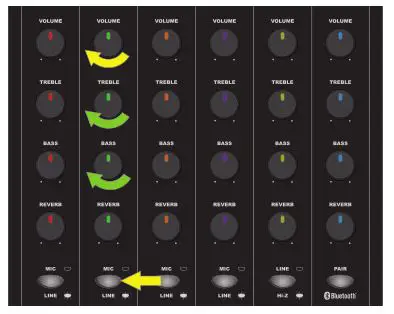
10. SETTING TONE/REVERB: Starting with each TONE control (TREBLE, BASS) in the center-detented position (flat equalization), set each TONE control to preference for best clear and consistent sound coverage throughout the area. REVERB controls (green arrows) are not center detented; set these to preference: 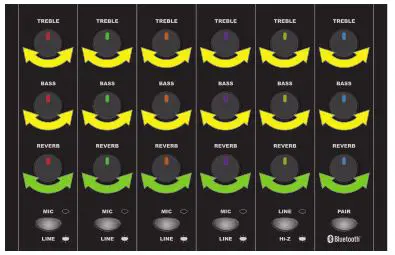
Adjust each channel the same way. Use channel VOLUME knobs to set relative loudness of each channel for overall balance, then adjust MASTER VOLUME knob for overall mix loudness. MASTER VOLUME has a SIGNAL LEVEL METER just to the right; if meter illuminates red, decrease MASTER VOLUME accordingly.
FRONT PANEL
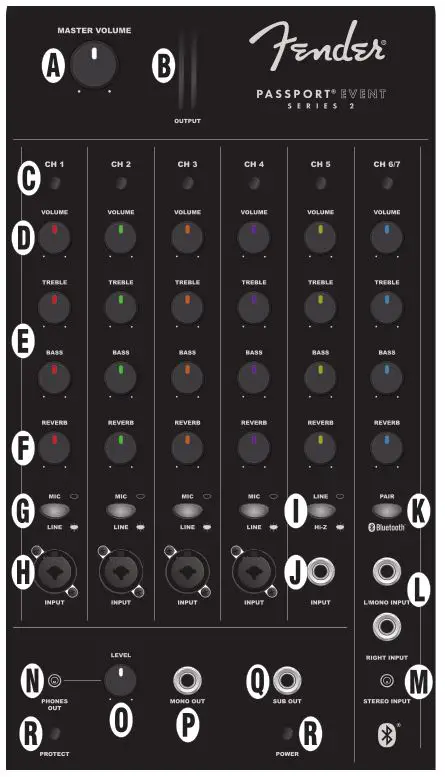
A. MASTER VOLUME: Adjusts overall loudness. No sound is produced at full counterclockwise position.
B. SIGNAL LEVEL METERS: Indicate left/right power amp output signal level. If meters illuminate red, reduce MASTER VOLUME (A) to prevent distortion and avoid amp overload/shutdown (see item R, POWER/PROTECT LED, to reset unit after protect-mode shutdown).
C. SIGNAL/CLIP LED: Illuminates green when signal is present; yellow when signal level is -10dB away from clipping. Illuminates red during clipping (see step 9 under SYSTEM SETUP).
D. CHANNEL VOLUME: Adjusts individual channel loudness.
E. TREBLE/BASS: Adjusts individual channel treble and bass tone, with “flat” response at center-detented position.
F. REVERB: Adjusts individual channel reverb effect.
G. MIC/LINE SWITCH: If signal source level is too high (see step 9 under SYSTEM SETUP), press in to reduce input sensitivity by 24dB.
H. MONO CHANNEL INPUT: XLR and 1/4″ input for microphones, instruments and other mono line-level sources for channels 1 through 4.
I. LINE/INSTRUMENT SWITCH: For channel 5 only, switch activates high-impedance (“Hi-Z”) preamp for passive instruments such as electric guitars and basses. For linelevel input or if clipping (distortion) occurs, disengage switch.
J. 1/4″-ONLY MONO CHANNEL INPUT: Same as MONO CHANNEL INPUT (H) above, but 1/4″ only (no XLR).
K. PAIR BLUETOOTH: Press for Bluetooth pairing with external devices. When button is flashing blue, select “PASSPORT EVENT” in external device Bluetooth menu. Button will stop flashing and illuminate blue continuously when connection is successful. Press and hold button to disconnect Bluetooth. For best sound quality, set volume control on external device (i.e., smart phone) to 75-100 percent of its maximum level.
L. 1/4″ LEFT (MONO)/RIGHT INPUT: Inputs for line-level stereo audio sources requiring separate 1/4″ jacks for each channel. Using stereo L/MONO jack by itself functions as mono channel; mono output will be heard from both speakers.
M. 1/8″ STEREO INPUT: Input for mobile devices, computers and other line-level stereo audio sources with 1/8″ connection.
N. HEADPHONE OUTPUT: Connect headphones and recording equipment here. Individual channel controls affect this output; MASTER VOLUME (A) does not.
O. LEVEL CONTROL: Adjusts HEADPHONE OUTPUT (N) and MONO OUTPUT (P) signal levels.
P. MONO OUTPUT: For connection to a powered monitor. Signal level is pre-MASTER VOLUME (A); can be adjusted using LEVEL CONTROL (O).
Q. SUB OUTPUT: For connection to a powered subwoofer. Set subwoofer crossover frequency control to 120Hz. Use subwoofer’s volume or level control to set bass level to preference. External subwoofer use automatically removes signals below 120Hz from main Passport amp and speakers.
R. POWER/PROTECT LEDS: POWER LED illuminates green when system is on. Passport features internal protection measures that will shut down audio output in the event of electrical or thermal problems; PROTECT LED will illuminate red when this happens. Passport will automatically reset itself on resolution of such problems. If Passport does not reset automatically, check fuse in power cord socket on rear panel (O). If PROTECT LED remains illuminated after unit has had sufficient cooling time and other power outlets have been tried, consult an authorized Fender Service Center.
REAR PANEL
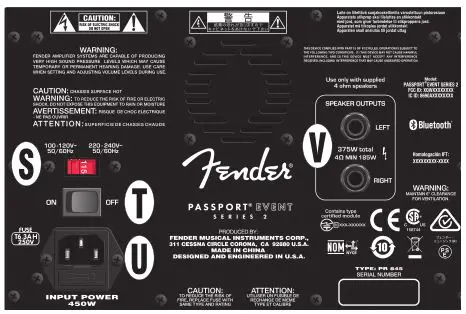
S. VOLTAGE SELECTOR: Change the setting of this 100V/120V220V/240V switch only when using Passport in a country that requires a different voltage setting.
T. POWER: Turns Passport on and off.
U. POWER CORD SOCKET/FUSE: Connect power cord (included) to this socket; plug other end into a grounded AC outlet in accordance with correct VOLTAGE SELECTOR (S) setting. To check/replace fuse, unplug power cord and pry fuse holder from POWER CORD SOCKET; replace fuse only with another of the same type and rating.
V. SPEAKER OUTPUTS: Connect Passport speaker cables (included) here.
SPECIFICATIONS
- TYPE : PR 845
- POWER REQUIREMENT : 450W
- POWER OUTPUT : 375W
- FUSE : T6.3A H, 250V
- AMPLIFIER TYPE : Class D
- SPEAKERS : Two 8″ woofers, two 1.2″ HF drivers
- DIMENSIONS AND WEIGHT :
Width: 29″ (73.66 cm)
Height: 23″ (58.42 cm)
Depth: 11″ (27.94 cm)
Weight: 44 lbs. (19.96 kg)
Product specifications subject to change without notice.