![]() User Manual
User Manual
Version 3.5

Get started
Get a deeper understanding of your body, your health, and your progress with Fitbit Charge 3. Take a moment to review our complete safety information at fitbit.com/safety.
What’s in the box
Your Charge 3 box includes: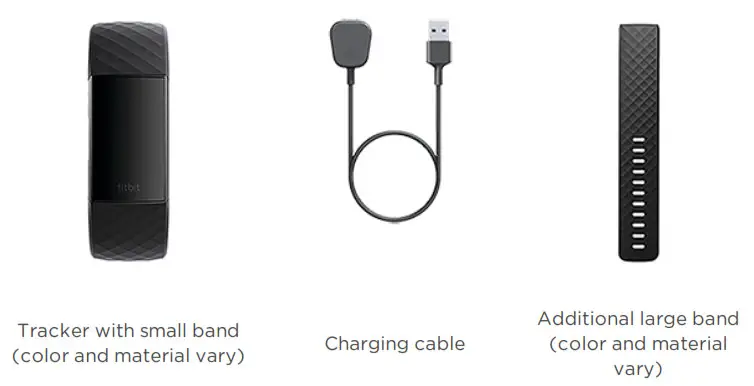
The detachable bands on Charge 3 come in a variety of colors and materials, sold separately.
Set up Charge 3
For the best experience, use the Fitbit app for iPhones and iPads or Android phones. You can also set up Charge 3 on Windows 10 devices. If you don’t have a compatible phone or tablet, use a Bluetooth-enabled Windows 10 PC. Keep in mind that a phone is required for call, text, calendar, and smartphone app notifications.
To create a Fitbit account, you’re prompted to enter your birthdate, height, weight, and sex to calculate your stride length and to estimate distance, basal metabolic rate, and calorie burn. After you set up your account, your first name, last initial, and profile picture are visible to all other Fitbit users. You have the option to share other information, but most of the information you provide to create an account is private by default.
Charge your tracker
A fully-charged Charge 3 has a battery life of up to 7 days. Battery life and charge cycles vary with use and other factors; actual results will vary.
To charge Charge 3:
- Plug the charging cable into the USB port on your computer, a UL-certified USB wall charger, or another low-energy charging device.
- Clip the other end of the charging cable to the port on the back of Charge.
- The pins on the charging clip must lock securely with the gold contacts on the back of the tracker. Charge 3 vibrates, and a battery icon appears on the screen.
Charging fully takes about 1-2 hours. While the tracker charges, you can press the button to check the battery level. A fully-charged tracker shows a solid battery icon with a smile.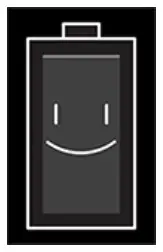
Set up with your phone or tablet
Set up Charge 3 with the Fitbit app. The Fitbit app is compatible with most popular phones and tablets. For more information, see fitbit.com/devices.
To get started:
- Download the Fitbit app:
• Apple App Store for iPhones and iPads
• Google Play Store for Android phones
• Microsoft Store for Windows 10 devices - Install the app, and open it.
• If you already have a Fitbit account, log in to your account > tap the Today tab > your profile picture > Set Up a Device.
• If you don’t have a Fitbit account, tap Join Fitbit to be guided through a series of questions to create a Fitbit account. - Continue to follow the on-screen instructions to connect Charge 3 to your account.
When you’re done with the setup, read through the guide to learn more about your new tracker and then explore the Fitbit app.
For more information, see help.fitbit.com.
Set up with your Windows 10 PC
If you don’t have a compatible phone, you can set up and sync Charge 3 with a Bluetooth-enabled Windows 10 PC and the Fitbit app.
To get the Fitbit app for your computer:
- Click the Start button on your PC and open the Microsoft Store.
- Search for “Fitbit app”. After you find it, click Free to download the app to your computer.
- Click Microsoft account to sign in with your existing Microsoft account. If you don’t already have an account with Microsoft, follow the on-screen instructions to create a new account.
- Open the app.
• If you already have a Fitbit account, log in to your account, and tap the account icon > Set Up a Device.
• If you don’t have a Fitbit account, tap Join Fitbit to be guided through a series of questions to create a Fitbit account. - Continue to follow the on-screen instructions to connect Charge 3 to your account.
When you’re done with the setup, read through the guide to learn more about your new tracker and then explore the Fitbit app.
See your data in the Fitbit app
Sync Charge 3 to transfer your data to the Fitbit app, where you can view your activity and sleep data, log food and water, participate in challenges, and more. Each time you open the Fitbit app, Charge 3 syncs automatically when it’s nearby. You can also use the Sync Now option in the app at any time.
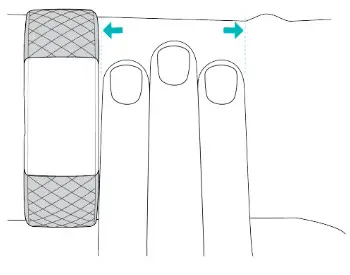
Wear Charge 3
Place Charge 3 around your wrist. If you need to attach a different size band, or if you purchased another band, see the instructions in “Change the band” on page 13.
Placement for all-day wear vs. exercise
When you’re not exercising, wear Charge 3 a finger’s width above your wrist bone.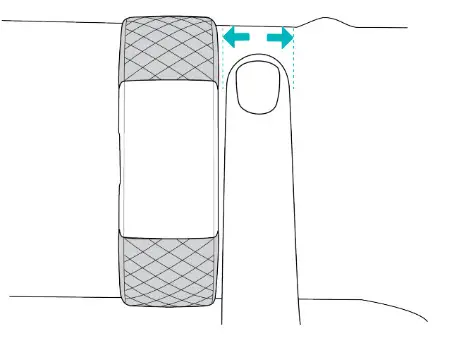
For optimized heart-rate tracking while exercising:
- During a workout, experiment with wearing your tracker a bit higher on your wrist for an improved fit. Many exercises, such as bike riding or weight lifting, cause you to bend your wrist frequently, which could interfere with the heart rate signal if the tracker is lower on your wrist.
- Wear your tracker on top of your wrist, and make sure the back of the device is in contact with your skin.
- Consider tightening your band before a workout and loosening it when you’re done. The band should be snug but not constricting (a tight band restricts blood flow, potentially affecting the heart-rate signal).
Handedness
For greater accuracy, you must specify whether you wear Charge 3 on your dominant or non-dominant hand. Your dominant hand is the one you use for writing and eating. To start, the Wrist setting is set to non-dominant. If you wear Charge 3 on your dominant hand, change the Wrist setting in the Fitbit app:
From the Today tab in the Fitbit app, tap your profile picture > Charge 3 tile > Wrist > Dominant.
Change the band
Charge 3 comes with a small band attached and an additional large, bottom band in the box. Both the top and bottom bands can be swapped with accessory bands, sold separately on fitbit.com. For band measurements, see “Band size” on page 48.
Remove a band
- Turn over Charge 3 and find the band latches.
- To release the latch, press down on the flat button on the band.
- Gently pull the band away from the tracker to release it.

- Repeat on the other side.
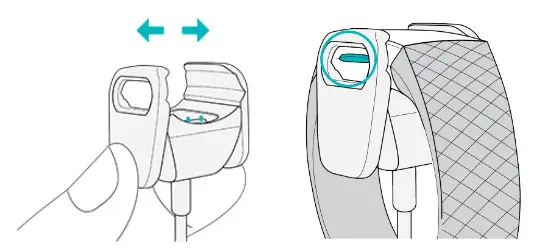
Attach a new band
To attach a new band, press it into the end of the tracker until you feel it snap into place.
If you have trouble attaching the band or if it feels loose, gently move the band back and forth to make sure it’s attached to the tracker.
Basics
Learn how best to navigate, check the battery level, and care for your tracker.
Navigate Charge 3
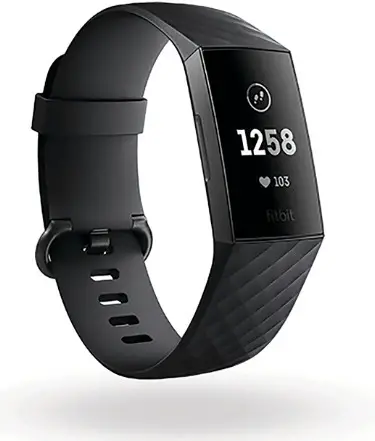
Charge 3 has an OLED touchscreen display and 1 button.
Navigate Charge 3 by tapping the screen, swiping side to side and up and down, or pressing the button. To preserve the battery, the tracker’s screen turns off when not in use.
Basic navigation
The home screen is the clock.
- Swipe down to see notifications.
- Swipe up to see your daily stats.
- Swipe left to see the apps on your tracker.
- Press the button to go back to a previous screen or return to the clock face.

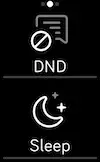
Quick settings
Press and hold the button and swipe left on Charge 3 for a faster way to access certain settings. Tap a setting to turn it on or off. When you turn off the setting, the icon appears dim with a line through it.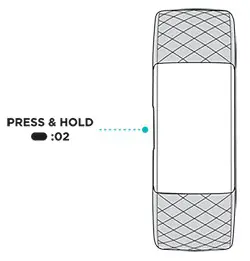
On the quick settings screen:
DND (Do not disturb) |
When they do not disturb setting is on, notifications, goal celebrations, and reminders to move don’t cause the tracker to vibrate or the screen to turn on. You can’t turn on do not disturb and sleep mode at the same time. |
Sleep Mode |
When the sleep mode setting is on:
Sleep mode doesn’t automatically turn off unless you set a sleep mode schedule. To schedule sleep mode to automatically turn on during certain hours:
Sleep mode automatically turns off at the time you schedule, even if you manually turn it on. |
Screen Wake |
When the screen wake setting is on, turn your wrist toward you to turn on the screen. |
Adjust settings
Manage basic settings in the Settings app
| Brightness | Change the screen’s brightness. |
| Vibrations | Adjust your tracker’s vibration strength. |
| Screen Timeout | Choose how long the screen stays on after you stop interacting with your tracker. |
| Heart Rate | Turn heart-rate tracking on or off. |
| Do Not Disturb | Turn off all notifications. Choose to receive alerts about your workout in the Exercise app – even if Do Not Disturb is on. even if Do Not Disturb is on. |
| Sleep Mode | Adjust sleep mode settings, including setting a schedule for the mode to automatically turn on and off. |
Check battery level
On the clock face, swipe up. The battery level icon is at the top of the screen.
Care for Charge 3
It’s important to clean and dry Charge 3 regularly. For more information, see fitbit.com/productcare.
Change the clock face
- From the Today tab in the Fitbit app, tap your profile picture > Charge 3 tile.
- Tap Clock Faces > All Clocks.
- Browse the available clock faces. Tap a clock face to see a detailed view.
- Tap Select to add the clock face to Charge 3.
Notifications
Charge 3 can show call, text, calendar, and app notifications from your phone to keep you informed. Keep your tracker within 30 feet of your phone to receive notifications.
Set up notifications
Check that Bluetooth on your phone is on and that your phone can receive notifications (often under Settings > Notifications). Then set up notifications:
- From the Today tab in the Fitbit app, tap your profile picture > Charge 3 tile.
- Tap Notifications.
- Follow the on-screen instructions to pair your tracker if you haven’t already. Call, text, and calendar notifications are turned on automatically.
- To turn on notifications from apps installed on your phone, including Fitbit and WhatsApp, tap App Notifications and turn on the notifications you want to see.
Note that if you have an iPhone or iPad, Charge 3 shows notifications from all calendars synced to the Calendar app. If you have an Android phone, Charge 3 shows calendar notifications from the calendar app you choose during setup.
For more information, see help.fitbit.com.
See incoming notifications
A notification causes your tracker to vibrate. If you don’t read the notification when it arrives, you can check it later by swiping it down from the top of the screen.
Manage notifications
Charge 3 stores up to 10 notifications, after which the oldest are replaced as you receive new ones.
To manage notifications:
- Swipe down from the top of the screen to see your notifications and tap any notification to expand it.
- To delete a notification, tap to expand it, then swipe to the bottom and tap Clear.
- To delete all notifications at once, swipe to the top of your notifications and tap Clear All.
Turn off notifications
Turn off certain notifications in the Fitbit app, or turn off all notifications in the quick settings on Charge 3. When you turn off all notifications, your tracker won’t vibrate and the screen won’t turn on when your phone receives a notification.
To turn off certain notifications:
- From the Today tab in the Fitbit app on your phone, tap your profile picture > Charge 3 tile > Notifications.
- Turn off the notifications you no longer want to receive on your tracker.
- Sync your tracker to save your changes.
To turn off all notifications:
- Press and hold the button on your tracker and swipe left to reach the quick settings screen (on Fitbit Pay-enabled trackers).
- Tap DND to turn on do not disturb. The DND icon dims to indicate that all notifications, including goal celebrations and reminders to move, are turned off.
Note that if you use the do not disturb setting on your phone, you don’t receive notifications on your tracker until you turn off this setting.
Answer or reject phone calls
If paired to an iPhone or Android (8.0+) phone, Charge 3 lets you accept or reject incoming phone calls. If your phone is running an older version of the Android OS, you can reject, but not accept, calls on your tracker.
To accept a call, tap the checkmark  on your tracker’s screen. Note that you can’t speak into the tracker—accepting a phone call answers the call on your nearby phone. To reject a call, tap the
  icon on your tracker’s screen.
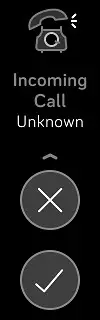
Respond to messages
If paired to an Android (8.0+) phone, Charge 3 lets you respond directly to text messages and notifications from certain apps on your tracker with preset quick replies.
To respond to a message:
- Tap the notification on your tracker. To see recent messages, swipe down from the clock face.
- Tap Reply. If you don’t see an option to reply to the message, replies aren’t available for the app that sent the notification.
- Choose a text reply from the list of quick replies or tap the emoji icon to
 choose an emoji.
For more information, including how to customize quick replies, see help.fitbit.com.
Timekeeping
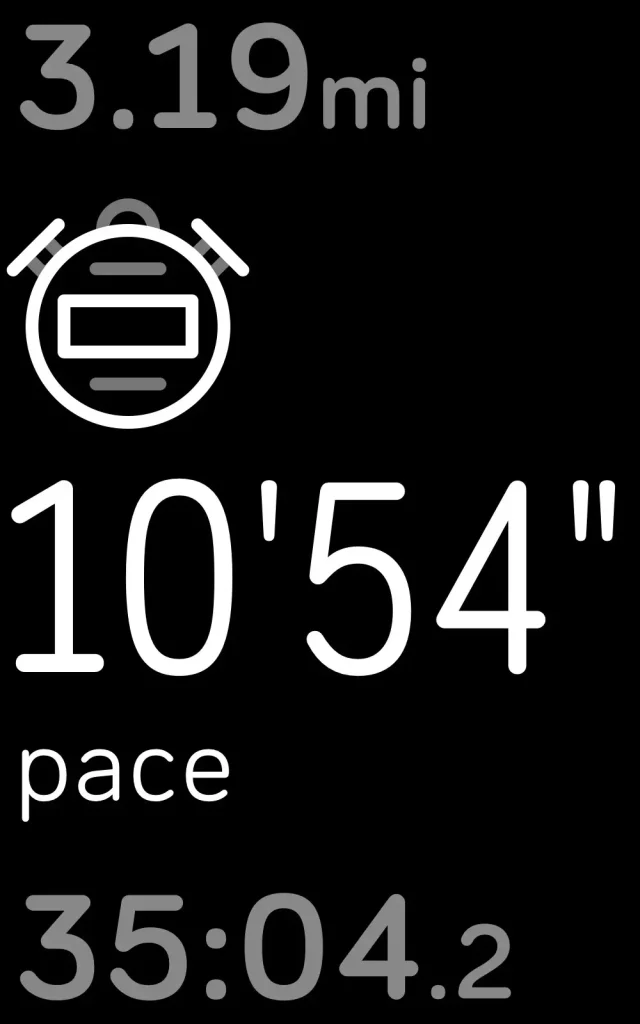
Alarms vibrate to wake or alert you at a time you set. Set up to 8 alarms to occur once or on multiple days of the week. You can also time events with the stopwatch or set a countdown timer.
Use the Alarms app
Set one-time or recurring alarms with the Alarms app . When an alarm goes off, your tracker vibrates.
When setting an alarm, turn on Smart Wake to allow your tracker to find the best time to wake you starting 30 minutes before the alarm time you set. It avoids waking you during deep sleep so you’re more likely to wake up feeling refreshed. If Smart Wake can’t find the best time to wake you, your alarm alerts you at the set time.
For more information, see help.fitbit.com.
Use the Timers app
Time events with the stopwatch or set a countdown timer with the Timers app  on your tracker. You can run the stopwatch and countdown timer at the same time.
For more information, see help.fitbit.com.
Activity and Sleep
Charge 3 continuously tracks a variety of stats whenever you wear it. Data automatically syncs when in range of the Fitbit app throughout the day.
See your stats
Swipe up from the clock face on your tracker to see your daily stats, including:
| Core stats | Steps taken today, distance covered, floors climbed, calories burned, and active minutes |
| Hourly steps | Steps were taken this hour, and the number of hours you met your hourly activity goal |
| Heart rate | Current heart rate and heart-rate zone, and resting heart rate |
| Exercise | Number of days you met your exercise goal this week |
| Cycle track | Information on the current stage of your menstrual cycle, if applicable |
| Sleep | Duration and quality of your sleep |
Find your complete history and other information detected by your tracker, such as sleep data, in the Fitbit app.
Track a daily activity goal
Charge 3 tracks your progress toward a daily activity goal of your choice. When you reach your goal, your tracker vibrates and shows a celebration.
Choose a goal
Set a goal to help you get started on your health and fitness journey. To begin, your goal is to take 10,000 steps per day. Choose to change the number of steps, or pick a different activity goal depending on your device.
For more information, see help.fitbit.com.
Track progress toward your goal on Charge 3. For more information, see “See your stats” on the previous page.
Track your hourly activity
Charge 3 helps you stay active throughout the day by keeping track of when you’re stationary and reminding you to move. Reminders nudge you to walk at least 250 steps each hour. You feel a vibration and see a reminder on your screen at 10 minutes before the hour if you haven’t walked 250 steps. When you meet the 250-step goal after receiving the reminder, you feel a second vibration and see a congratulatory message.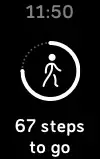
For more information, see help.fitbit.com.
Track your sleep
Wear Charge 3 to bed to automatically track basic stats about your sleep, including your time asleep, sleep stages (time spent in REM, light sleep, and deep sleep), and sleep score (the quality of your sleep). Charge 3 also tracks your estimated oxygen variation throughout the night to help you uncover potential breathing disturbances. To see your sleep stats, sync your tracker when you wake up and check the Fitbit app, or swipe up from the clock face on your tracker to check the Sleep tile in Fitbit Today.
For more information, see help.fitbit.com.
Set a sleep goal
To start, you have a sleep goal of 8 hours of sleep per night. Customize this goal to meet your needs.
For more information, see help.fitbit.com.
Learn about your sleep habits
With a Fitbit Premium subscription, see more details about your sleep score and how you compare to your peers, which can help you build a better sleep routine and wake up feeling refreshed.
For more information, see help.fitbit.com.
See your heart rate
Charge 3 tracks your heart rate throughout the day. Swipe up from the lock screen to see your real-time heart rate and heart-rate zone. For more information, see “See your stats” on page 26.
During a workout, Charge 3 shows your heart-rate zone to help you target the training intensity of your choice.
For more information, see “Check your heart rate” on page 33.
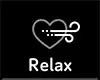
Practice guided breathing
The Relax app  on Charge 3 provides personalized guided breathing sessions to help you find moments of calm throughout the day. You can choose between 2minute and 5-minute sessions.
- On Charge 3, open the Relax app
- The 2-minute session is the first option. Swipe left to choose the 5-minute session.
- Tap the play icon
 to start the session and follow the on-screen instructions.
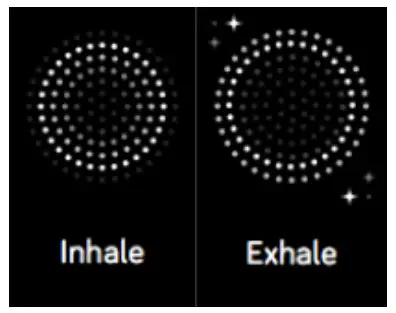
After the exercise, a summary appears that shows your alignment (how closely you followed the breathing prompt), your heart rate at the start and end of the session, and how many days you completed a guided breathing session this week.
All notifications are automatically disabled during the session.
For more information, see help.fitbit.com.
Fitness and Exercise
Choose to automatically track exercise, or to track activity with the Exercise app and see real-time stats and a post-workout summary. Sync Charge 3 with the Fitbit app and share your activity with friends and family, see how your overall fitness level compares to your peers, and more.
Track your exercise automatically
Charge 3 automatically recognizes and records many high-movement activities which are at least 15 minutes long. Sync your device to see basic stats about your activity in the Exercise tile in the Fitbit app.
For more information, including how to change the minimum duration before an activity is tracked, see help.fitbit.com.
Track and analyze exercise with the Exercise app
Track-specific exercises with the Exercise app on Charge 3 to see real-time stats, including heart-rate data, calories burned, elapsed time, and a post-workout summary on your wrist. For complete workout stats, and a workout intensity map if you used GPS, tap the Exercise tile in the Fitbit app.
Note: Charge 3 uses the GPS sensors on your nearby phone to capture GPS data.
GPS requirements
- Turn on Bluetooth and GPS on your phone.
- Make sure Charge 3 is paired to your phone.
- Make sure the Fitbit app has permission to use GPS or location services.
- Check that GPS is turned on for the exercise.
a. Open the Exercise app andswipe to find the exercise you want to track.
b. Swipe up and make sure GPS is set to On. - Keep your phone with you while you exercise.
Track an exercise
- On Charge 3, open the Exercise app and swipe to find an exercise.
- Tap the exercise to choose it.
- Tap Start
 or Set Goal
 . If you set an exercise goal, press the button to go back and tap Start.
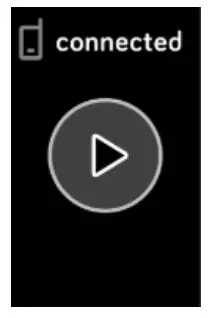
 - Tap the play icon to begin. If the exercise uses GPS, you can wait for the signal to connect, or start the exercise and GPS will connect when a signal is available. Note that GPS can take a few minutes to connect.
- Tap the middle of the screen to scroll through your real-time stats.
- When you’re done with your workout or want to pause, press the button.
- To end the workout, press the button again and tap Finish. Swipe up to see your workout summary. Tap the checkmark to close the summary screen.
- To see your GPS data, sync your tracker and tap the Exercise tile in the Fitbit app.
Notes:
- If you set an exercise goal, your tracker vibrates and flashes when you’re halfway to your goal and when you reach the goal.
- If the exercise uses GPS, an icon appears in the top left as your tracker connects to your phone’s GPS sensors. When the screen says “connected” and Charge 3 vibrates, GPS is connected.
Customize your exercise settings and shortcuts
Customize settings for various exercise types and change or reorder exercise shortcuts in the Fitbit app. For example, turn connected GPS and cues on or off or add a yoga shortcut to Charge 3.
To customize an exercise setting:
- From the Today tab in the Fitbit app, tap your profile picture> Charge 3 tile > Exercise Shortcuts.
- Tap an exercise.
- Choose the settings you want to customize, and then sync your device.
For more information, see help.fitbit.com.
Check your workout summary
After you complete a workout, Charge 3 shows a summary of your stats.
Sync your tracker, and tap the Exercise tile in the Fitbit app to see additional stats and a workout intensity map if you used GPS.
Check your heart rate
Heart-rate zones help you target the training intensity of your choice. See your current zone and progress toward your maximum heart rate on your device next to your heart-rate reading. In the Fitbit app, you can see your time spent in zones during a particular day or exercise. Three zones based on American Heart Association recommendations are available, or you can create a custom zone if you have a specific heart rate you’re targeting.
Default heart-rate zones
Default heart-rate zones are calculated using your estimated maximum heart rate.
Fitbit calculates your maximum heart rate with the common formula of 220 minus your age.
| Icon | Zone | Calculation | a Description |
| Below Zones |
Below 50% of your maximum heart rate | Below the fat burn zone, your heart beats at a slower pace. You’re likely at rest or doing light activities such as taking a stroll. | |
| Fat Burn Zone | Between 50% and 69% of your maximum heart rate |
In the fat burn zone, you’re likely in a moderate activity such as a brisk walk. Your heart rate and breathing might be elevated, but you can still carry on a conversation. | |
| Cardio Zone | Between 70% and 84% of your maximum heart rate |
In the cardio zone, you’re likely doing a vigorous activity such as running or spinning. | |
| Peak Zone |
Greater than 85% of your maximum heart rate |
In the peak zone, you’re likely doing a short, intense activity that improves performance and speed, such as sprinting or high-intensity interval training. |
Custom heart-rate zones
Instead of using these 3 heart-rate zones, you can create a custom zone to target a specific heart-rate range in the Fitbit app.
For more information, see help.fitbit.com.
Share your activity
After you complete a workout, sync your tracker with the Fitbit app to share your stats with friends and family.
For more information, see help.fitbit.com.
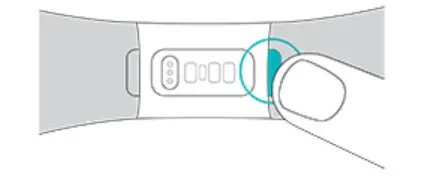
Fitbit Pay
Some editions of Charge 3 include a built-in NFC chip, which lets you use your credit and debit cards on your tracker. To check if your Charge 3 supports Fitbit Pay, remove the bottom band and look for “Fitbit Pay” printed on the end of the tracker.
Use credit and debit cards
Set up Fitbit Pay in the Wallet section of the Fitbit app, and use your tracker to make purchases in stores that accept contactless payments.
We’re always adding new locations and card issuers to our list of partners. To see if your payment card works with Fitbit Pay, see fitbit.com/fitbit-pay/banks.
Set up Fitbit Pay
To use Fitbit Pay, add at least 1 credit or debit card from a participating bank to the Wallet section of the Fitbit app. The Wallet is where you add and remove payment cards, set a default card for your tracker, edit a payment method, and review recent purchases.
- From the Today tab in the Fitbit app, tap your profile picture > Charge 3 tile.
- Tap the Wallet tile.
- Follow the on-screen instructions to add a payment card. In some cases, your bank might require additional verification. If you’re adding a card for the first time, you might be prompted to set a 4-digit PIN code for your tracker. Note that you also need passcode protection enabled for your phone.
- After you add a card, follow the on-screen instructions to turn on notifications for your phone (if you haven’t already done so) to complete the setup.
You can add up to 5 payment cards to the Wallet and choose which card to set as the default payment option on your tracker.
Make purchases
Make purchases using Fitbit Pay at any store that accepts contactless payments. To determine if the store accepts Fitbit Pay, look for the symbol below on the payment terminal: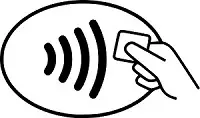
All customers except those in Australia:
- If prompted, enter your 4-digit tracker PIN code. Your default card appears on the screen.

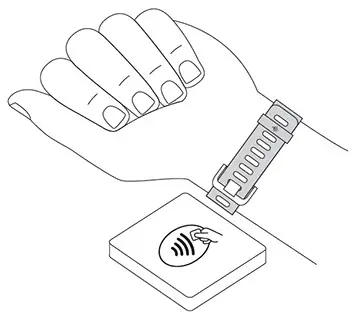
- To pay with your default card, hold your wrist near the payment terminal. To pay with a different card, tap to find the card you want to use, and hold your wrist near the payment terminal.
Customers in Australia:
- If you have a credit or debit card from an Australian bank, hold your tracker near the payment terminal to pay. If your card is from a bank outside of Australia, or if you wish to pay with a card that is not your default card, complete steps 1-3 in the section above.
- If prompted, enter your 4-digit tracker PIN code.
- If the purchase amount exceeds $100 AU, follow the instructions on the payment terminal. If prompted for a PIN code, enter the PIN code for your card (not your tracker).
When the payment succeeds, your tracker vibrates and you see a confirmation on the screen.
If the payment terminal doesn’t recognize Fitbit Pay, make sure the tracker’s face is near the reader and that the cashier knows you’re using contactless payment.
For added security, you must wear Charge 3 on your wrist to use Fitbit Pay.
For more information, see help.fitbit.com.
Change your default card
- From the Today tab in the Fitbit app, tap your profile picture > Charge 3 tile.
- Tap the Wallet tile.
- Find the card you want to set as the default option.
- Tap Set as Default on Charge 3.
Pay for transit
Use Fitbit Pay to tap on and off at transit readers that accept contactless credit or debit card payments. To pay with your tracker, follow the steps listed in “Use credit and debit cards” on page 36.
Pay with the same card on your Fitbit tracker when you tap the transit reader at the start and end of your trip. Make sure your device is charged before beginning your trip.
Weather
See the weather in your current location, as well as 2 additional locations you choose in the Weather app  on your tracker.
Check the weather
Open the Weather app to see conditions in your current location. Swipe left to view the weather in other locations you added.
If the weather for your current location doesn’t appear, check that you turned on-location services for the Fitbit app. If you change locations or don’t see updated data for your current location, sync your tracker to see your new location and the latest data in the Weather app.
Choose your unit of temperature in the Fitbit app. For more information, see help.fitbit.com.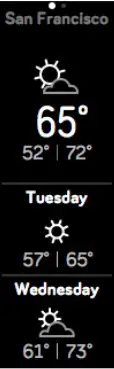
Add or remove a city
- From the Today tab in the Fitbit app, tap your profile picture > Charge 3 tile.
- Tap Apps.
- Tap the gear icon
 next to Weather. You may need to swipe up to find the app.
 - Tap Add city to add up to 2 additional locations or tap Edit > the X icon to delete a location. Note that you can’t delete your current location.
- Sync your tracker with the Fitbit app to see the updated locations on your tracker.
Agenda
Connect your phone’s calendar in the Fitbit app to see upcoming calendar events for today and tomorrow in the Agenda app
For more information, see help.fitbit.com.
Update, Restart, and Erase
Learn how to update, restart, and erase Charge 3.
Restart Charge 3
If you can’t sync Charge 3 or you have trouble with connected GPS or tracking your stats, restart your tracker from your wrist:
Open the Settings app and tap About > Reboot Device.
If Charge 3 is unresponsive:
- Connect Charge 3 to the charging cable. For instructions, see “Charge your tracker ” on page 7.
- Press and hold the button on your tracker for 8 seconds. Release the button. When you see a smiley face and Charge 3 vibrates, the tracker restarted.
Restarting your tracker reboots the device but doesn’t delete any data.
Charge 3 has a small hole (altimeter sensor) on the back of the device. Don’t attempt to restart your device by inserting any items, such as paper clips, into this hole as you can damage your tracker.
Erase Charge 3
If you want to give Charge 3 to another person or wish to return it, first clear your personal data:
On Charge 3, open the Settings app > About > Clear User Data.
Update Charge 3
Update your tracker to get the latest feature enhancements and product updates. When an update is available, a notification appears in the Fitbit app. After you start the update, a progress bar appears on Charge 3 and in the Fitbit app until the update is complete. Keep your tracker and phone close to each other during the
update.
Note: Updating Charge 3 takes several minutes and maybe demand on the battery. We recommend plugging your tracker into the charger before starting the update.
For more information, see help.fitbit.com.
Troubleshooting
If Charge 3 isn’t working properly, see our troubleshooting steps below. Visit help.fitbit.com for more information.
Heart-rate signal missing
Charge 3 continuously tracks your heart rate while you’re exercising and throughout the day. If the heart-rate sensor on your tracker has difficulty detecting a signal, dashed lines appear.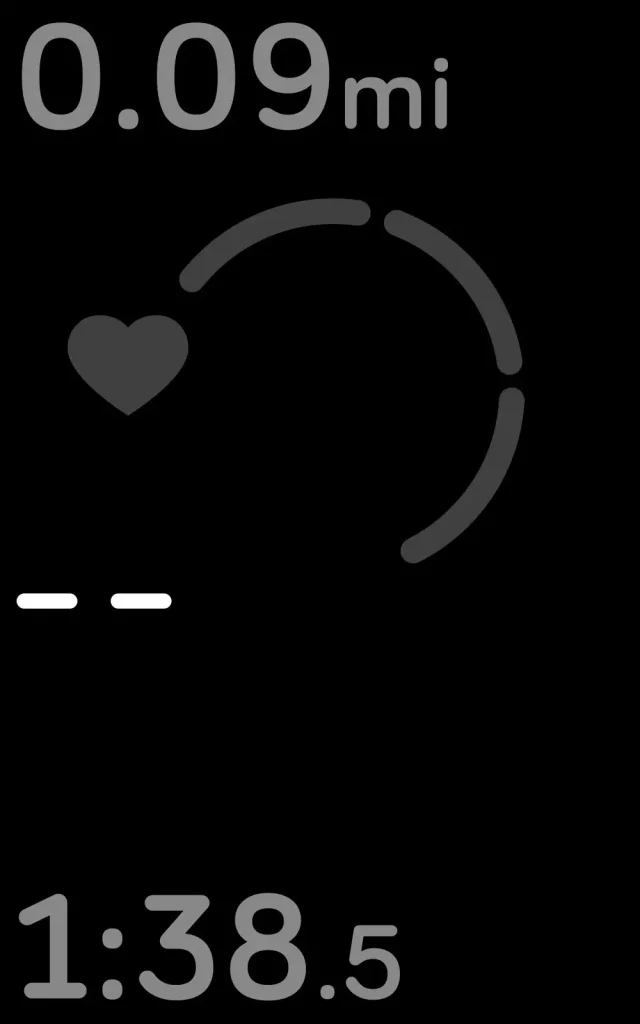
If your tracker doesn’t detect a heart-rate signal, first make sure heart-rate tracking is turned on in the Settings app on your tracker. Next, make sure you’re wearing your tracker correctly, either by moving it higher or lower on your wrist or by tightening or loosening the band. Charge 3 should be in contact with your skin.
After holding your arm still and straight for a short time, you should see your heart rate again.
For more information, see help.fitbit.com.
GPS signal missing
Environmental factors, including tall buildings, dense forest, steep hills, and thick cloud cover, can interfere with your phone’s ability to connect to GPS satellites. If your phone is searching for a GPS signal during an exercise, “connecting” appears at the top of the screen.
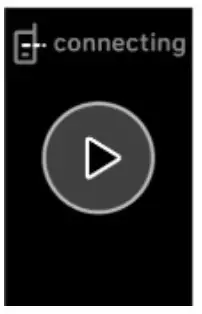 For best results, wait for your phone to find the signal before you start your workout.
Other issues
If you experience any of the following issues, restart your tracker:
- Won’t sync
- Won’t respond to taps, swipes, or button press
- Won’t track steps or other data
For instructions, see “Restart Charge 3” on page 43.
For more information or to contact Customer Support, see help.fitbit.com.
General Info and Specifications
Sensors
Fitbit Charge 3 contains the following sensors and motors:
- A MEMS 3-axis accelerometer, which tracks motion patterns
- An altimeter, which tracks altitude changes
- An optical heart-rate tracker
- A vibration motor
Materials
The housing and buckle on Charge 3 are made of anodized aluminum. While anodized aluminum can contain traces of nickel, which can cause an allergic reaction in someone with nickel sensitivity, the amount of nickel in all Fitbit products meets the European Union’s stringent Nickel Directive.
The Charge 3 classic band is made of a flexible, durable elastomer material similar to that used in many sports watches.
Wireless technology
Charge 3 contains a Bluetooth 4.0 radio transceiver, and Fitbit-Pay enabled devices to contain an NFC chip.
Haptic feedback
Charge 3 contains a vibration motor for alarms, goals, notifications, and reminders.
Battery
Charge 3 contains a rechargeable lithium-polymer battery.
Memory
Charge 3 stores your data, including daily stats, sleep information, and exercise history, for 7 days. Sync your tracker with the Fitbit app to access your historical data.
Display
Charge 3 has an OLED display.
Band size
Band sizes are shown below. Note that accessory bands sold separately may vary slightly.
| Small band Large band | Fits a wrist between 5.5 – 7.1 inches (140 mm – 180 mm) in circumference |
| Small band Large band | Fits a wrist between 7.1 – 8.7 inches (180 mm – 220 mm) in circumference |
Environmental conditions
| Operating temperature | 14° to 113° F (-10° to 45° C) |
| Non-operating temperature | -4° to 14° F (-20° to -10° C) 113° to 140°F (45° to 60° C) |
| Maximum operating altitude | 30,000 feet (9,144 m) |
Learn more
To learn more about your tracker, how to track your progress in the Fitbit app, and how to build healthy habits with Fitbit Premium, visit help.fitbit.com.
Return policy and warranty
Find warranty information and the fitbit.com return policy on our website.
Regulatory and Safety Notices
Notice to the User: Regulatory content for certain regions can also be viewed on
your device. To view the content:
Settings > About > Regulatory Info
USA: Federal Communications Commission (FCC) statement
Model FB409:
FCC ID: XRAFB409
Model FB410
FCC ID: XRAFB410
Notice to the User: The FCC ID can also be viewed on your device. To view the content: Settings > About > Regulatory Info
This device complies with Part 15 of the FCC Rules.
Operation is subject to the following two conditions:
- This device may not cause harmful interference and
- This device must accept any interference, including interference that may cause undesired operation of the device.
FCC Warning
Changes or modifications not expressly approved by the party responsible for compliance could void the user’s authority to operate the equipment.
Note: This equipment has been tested and found to comply with the limits for a Class B digital device, pursuant to part 15 of the FCC Rules. These limits are designed to provide reasonable protection against harmful interference in a residential installation. This equipment generates, uses and can radiate radio frequency energy and, if not installed and used in accordance with the instructions, may cause harmful interference to radio communications. However, there is no guarantee that interference will not occur in a particular installation. If this equipment does cause harmful interference to radio or television reception, which can be determined by turning the equipment off and on, the user is encouraged to try to correct the interference by one or more of the following measures:
- Reorient or relocate the receiving antenna.
- Increase the separation between the equipment and receiver.
- Connect the equipment into an outlet on a circuit different from that to which the receiver is connected.
- Consult the dealer or an experienced radio/TV technician for help.
This device meets the FCC and IC requirements for RF exposure in public or uncontrolled environments.
Canada: Industry Canada (IC) statement
ModelFB409
IC: 8542A-FB409
Model/Modèle FB410
IC: 8542A-FB410
Notice to the User: The IC ID can also be viewed on your device. To view the content:
Settings > About > Regulatory Info
This device meets the IC requirements for RF exposure in public or uncontrolled environments.
IC Notice to Users English/French in accordance with the current issue of RSS GEN:
This device complies with Industry Canada license-exempt RSS standard(s).
Operation is subject to the following two conditions:
- his device may not cause interference, and
- this device must accept any interference, including interference that may cause undesired operation of the device.
European Union (EU)
Models FB409 and FB410
Simplified EU Declaration of Conformity
Hereby, Fitbit, Inc. declares that the radio equipment type Model FB410 is in compliance with Directive 2014/53/EU. The full text of the EU declaration of conformity is available at the following internet address: www.fitbit.com/safety

Customs Union
Model FB409 and FB410

Argentina
Model FB409:
Australia and New Zealand
Model FB409 and FB410

Belarus
Model FB409 and FB410

China
Model FB410
Notice to the User: Regulatory content can also be viewed on your device.
Instructions to view content from your menu:
Settings > About > Regulatory Info
CMIIT ID: 2018DJ3954
China RoHS
| Part Name | Toxic and Hazardous Substances or Elements | |||||
| Model FB410 | (Pb) | (Hg) | (Cd) | (Cr(VI)) | (PBB) | (PBDE) |
| (Strap and Buckle) | 0 | 0 | 0 | 0 | 0 | 0 |
| (Electronics) | 0 | 0 | 0 | 0 | 0 | 0 |
| (Battery) | 0 | 0 | 0 | 0 | 0 | 0 |
| (Charging Cable) | 0 | 0 | 0 | 0 | 0 | 0 |
O = (indicates that the content of the toxic and hazardous substance in all the Homogeneous Materials of the part is below the concentration limit requirement as described in GB/T 26572).
X = (indicates that the content of the toxic and hazardous substance in at least one Homogeneous Material of the part exceeds the concentration limit requirement as described in GB/T 26572).

India
Model FB410
Notice to the User: Regulatory content for this region can also be viewed on your device. To view the content:
Settings > About > Regulatory Info
Indonesia
Model FB410
56621/SDPPI/2018
3788
Japan
Model FB410
Notice to the User: Regulatory content for this region can also be viewed on your
device. To view the content:
Settings > About > Regulatory Info
Mexico

Model FB409 and FB410
Nigeria
Model FB409 and FB410
Connection and use of this communications equipment is permitted by the Nigerian Communications Commission.
Oman
Model Name FB409
OMAN-TRA/TA-R/5771/18
D100428
Model FB410
OMAN-TRA/TA-R/5773/18
D100428
Pakistan
Model No.: FB410
TAC No.: 9.6090/2018

Model: FB410
Serial No: Refer to the retail box
Year of Manufacture: 2018
Philippines
Model FB410

Serbia
Model FB409 and FB410

South Korea
Model FB410
Taiwan
Model FB410
Translation:
Low power warning:
According to the management method of low power radio wave radiating motor.
Article 12
Without permission, any company, firm or user shall not alter the frequency, increase the power, or change the characteristics and functions of the original design of the certified lower power frequency electric machinery.
Article 14
The application of low power frequency electric machinery shall not affect the navigation safety nor interfere a legal communication, if an interference is found, the service will be suspended until improvement is made and the interference no longer exists. The foregoing legal communication refers to the wireless telecommunication operated according to the telecommunications laws and regulations. The low power frequency electric machinery should be able to tolerate the interference of the electric wave radiation electric machinery and equipment for legal communications or industrial and scientific applications.
Translation:
“Excessive use may cause damage to vision”
Rest for 10 minutes after every 30 minutes.
Children under 2 years old should stay away from this product. Children 2 years old or more should not see the screen for more than 1 hour.
Translation:
Battery warning:
This device uses a lithium-ion battery.
If the following guidelines are not followed, the life of the lithium-ion battery in the device may be shortened or there is a risk of damage to the device, fire, chemical burn, electrolyte leakage and/or injury.
- Do not disassemble, puncture or damage the device or battery.
- Do not remove or try to remove the battery that the user cannot replace.
- Do not expose the battery to flames, explosions or other hazards.
- Do not use sharp objects to remove the battery.
United Arab Emirates
Model FB410
Model FB409
TRA Registered No.: ER63685/18
Dealer No.: DA35294/14
TRA Registered No.: ER63686/18
Dealer No.: DA35294/14
Vietnam
Model FB410

Zambia
Model Name FB409
ZMB/ZICTA/TA/2018/9/27
Model FB410

ZMB/ZICTA/TA/2018/9/28
Safety Statement
This equipment has been tested to comply with safety certification in accordance with the specifications of EN Standard: EN60950-1:2006 + A11:2009 + A1:2010 + A12:2011 + A2:2013 & EN62368-1:2014 + A11:2017.
©2020 Fitbit, Inc. All rights reserved. Fitbit and the Fitbit logo are trademarks or registered trademarks of Fitbit in the US and other countries. A more complete list of Fitbit trademarks can be found at http://www.fitbit.com/legal/trademark-list. Third-party trademarks mentioned are the property of their respective owners.