GARDENA® 1892 Water Control Master Owner’s Manual
![]()
![]()
Translation of the original instructions.
 For safety reasons, children and young people under 16 as well as anyone who is not familiar with these operating instructions should not use the product. Persons with reduced physical or mental abilities may use the product only if they are supervised or instructed by a responsible person. Children must be supervised to ensure that they do not play with the product. Never operate the product when you are tired, ill or under the influence of alcohol, drugs or medicine.
Intended use:
The GARDENA Water Control is intended for private use in domestic and hobby gardens, exclusively for outdoor use, to control sprinklers and watering systems. The Water Control can be used for automatic watering during holidays.
DANGER! The GARDENA Water Control must not be used for industrial purposes or in conjunction with chemicals, foodstuffs, easily flammable and explosive materials.
SAFETY
Important!
Read the operator’s manual carefully before use and keep for future reference.
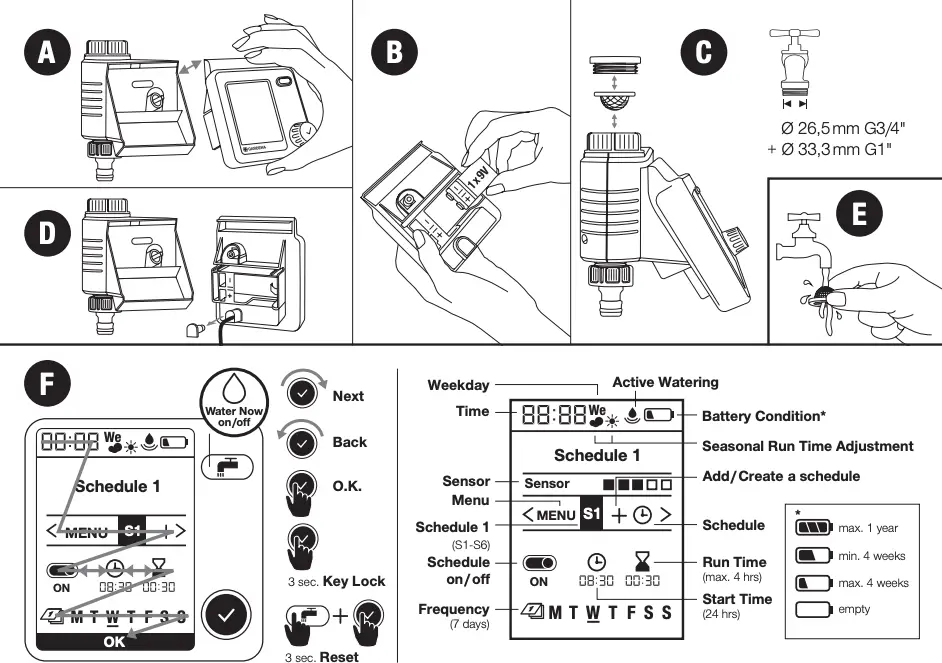
Battery:
To ensure the Water Control runs safely, only a 9V alkaline manganese battery (alkaline) type IEC 6LR61 must be used! In order to stop the Water Control from failing because of a weak battery if you are away for a long time, the battery must be replaced when the battery symbol flashes.
Setting up:
The Water Control may only be set up vertically with the sleeve nut to the top to prevent water penetrating into the battery compartment. The minimum water output to ensure that the Water Control functions correctly is 20 – 30 l/h. For example, at least 10 x 2-litre Drip Heads are required to control the Micro-Drip-System.
At high temperatures (over 70 °C at the display) the LCD display may extinguish. This does not affect the program in any way. When the computer cools down the LCD display illuminates again.
The max. temperature for the water flow is 40 °C.
Avoid tensile strain.
- Do not pull the hose connected to the Water Control.
 CAUTION! If the control section is removed when the valve is open, the valve remains open until the control section is reattached.
DANGER! Cardiac arrest!
This product makes an electromagnetic field while it operates. This field may under some conditions interfere with active or passive medical implants. To decrease the risk of conditions that can possibly injure or kill, we recommend persons with medical implants to speak with their physician and the medical implant manufacturer before you operate the product.
DANGER! Risk of suffocation! Small parts can be easily swallowed. There is also a risk that the polybag can suffocate toddlers. Keep toddlers away when you assemble the product.
INITIAL OPERATION
 A video of the setting processes is available here:
FUNCTION
The Master Water Control offers two options for watering your garden automatically on a timer:
- Water 1 area of a garden with a water line e.g. using a sprinkler, the GARDENA Micro-DripSystem or the GARDENA Sprinklersystem
– or – - Operate 2 ‒ 6 water lines one after another using the GARDENA Automatic Water Distributor, Art. 1197, see Fig. O (optionally available). Each line can be activated up to once a day.
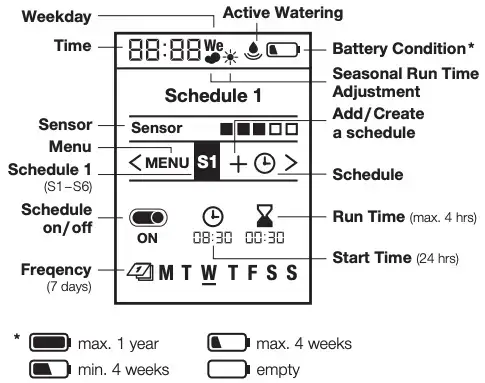
You can change the settings or move to the next setting by turning the knob. You can confirm the respective input by pressing the rotary knob. Pressing the knob for longer than 3 seconds locks or unlocks the display. If no more changes are made to the settings, the LCD display switches off after 5 minutes to save energy. To reactivate the display, actuate the rotary knob. The default display appears.

SETTINGS
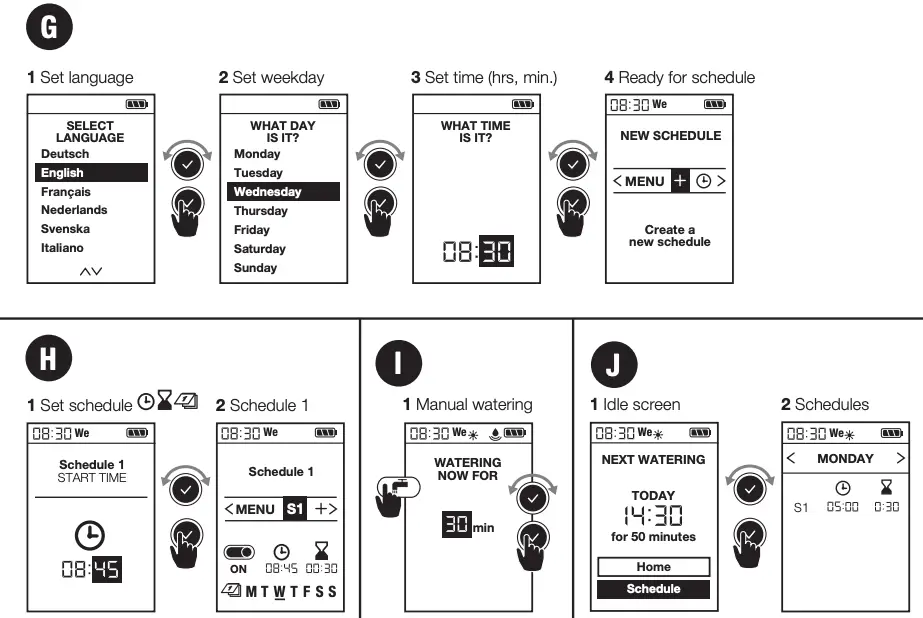
Initial settings → (Fig. G):
1 Set language | 2 Set weekday | 3 Set time (hrs, min.) | 4 Ready for schedule
Active (manual) watering → (Fig. I):
1 Manual watering
Setting schedules → (Fig. H):
1 Set schedule | 2 Schedule 1
Configure and save up to 6 different watering schedules by setting the start time, duration and weekdays for each one. Schedules can be activated or deactivated by pressing on/off (see fig. H).
Default display → (Fig. J):
1 Idle screen | 2 Programs
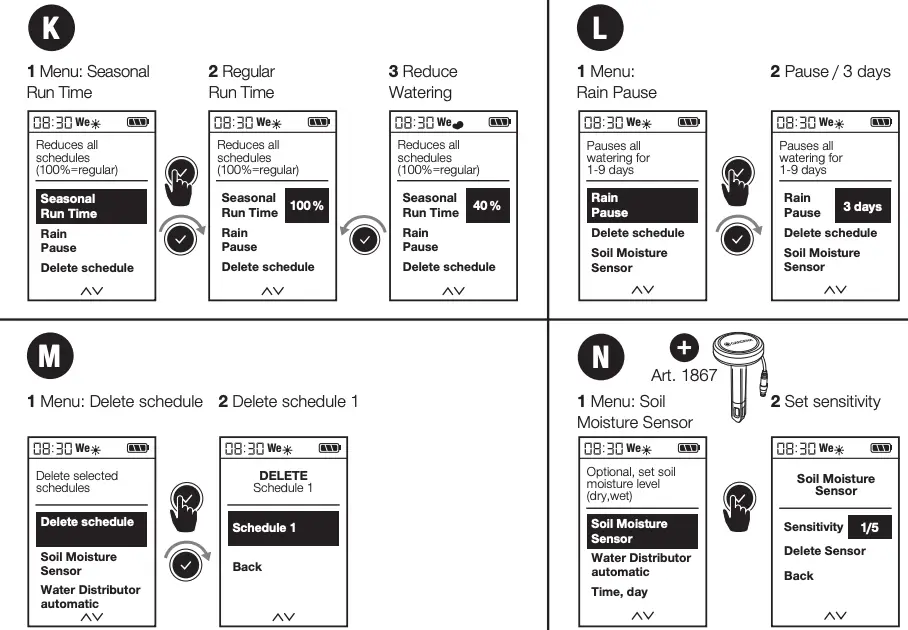
Seasonal watering duration → (Fig. K):
1 Menu: Seasonal Run Time | 2 Regular Run Time | 3 Reduce Watering
You can reduce the durations set for all schedules at once in 10% increments, from 100% down to 10%. This saves you having to change each of the 6 schedules individually.
Tip: Less watering is required in the spring and autumn than in the height of summer. Simply set the maximum watering duration for high summer as the default. Then reduce the watering duration for all schedules at once in convenient 10% increments when there is less need for watering. Note: When you change the percentage, the duration is adjusted within the schedules and the “cloud” symbol appears. If the duration is not altered (= 100%), the “sun” symbol is displayed.
Rain pause → (Fig. L):
1 Menu: Rain pause | 2 Pause / 3 days
Pauses all watering operations without changing the set schedules. You can select any number of days between 1 and 9. At the end of the pause, all schedules are reactivated.
Deleting a schedule → (Fig. M):
1 Menu: Delete schedule | 2 Delete schedule 1
Soil Moisture Sensor → (Fig. D and N):
1 Menu: Soil Moisture Sensor
Once the soil is sufficiently moist, a watering operation is interrupted or a schedule is disabled so that it cannot be activated. This does not affect active (manual) watering.

Soil Moisture Sensor, Art. 1867
(optionally available)
1 Connect soil moisture sensor
Once a soil moisture sensor has been connected, the next step is to specify the future switching point in the “Soil moisture sensor” menu. This is the soil moisture level at or above which watering is not to be carried out (see GARDENA Soil Moisture Sensor Operating Instructions).
There are 5 levels to choose from.
- During normal operation, the currently measured level is displayed constantly.
- The switching point as of which the sensor signals that the soil is moist – thereby preventing watering – is selected via the number of levels.
- 0 dots for loamy soil
- Sensor response when soil is quite dry.
- 5 dots for sandy soil
- Sensor response when soil is very moist.

Soil Moisture Sensor, Art. 1188
(optionally available, Models up to 2020)
→ (Fig. D and N):
1 Connect soil moisture sensor
After a soil moisture sensor is connected, the “sensor activated/deactivated” display will appear – this can take up to 1 minute. Select an option to activate/deactivate the sensor response. Use the switching point controller on the soil moisture sensor to set the level of soil moisture that must be achieved before the sensor responds (see Operator’s Manual for GARDENA Soil moisture sensor).
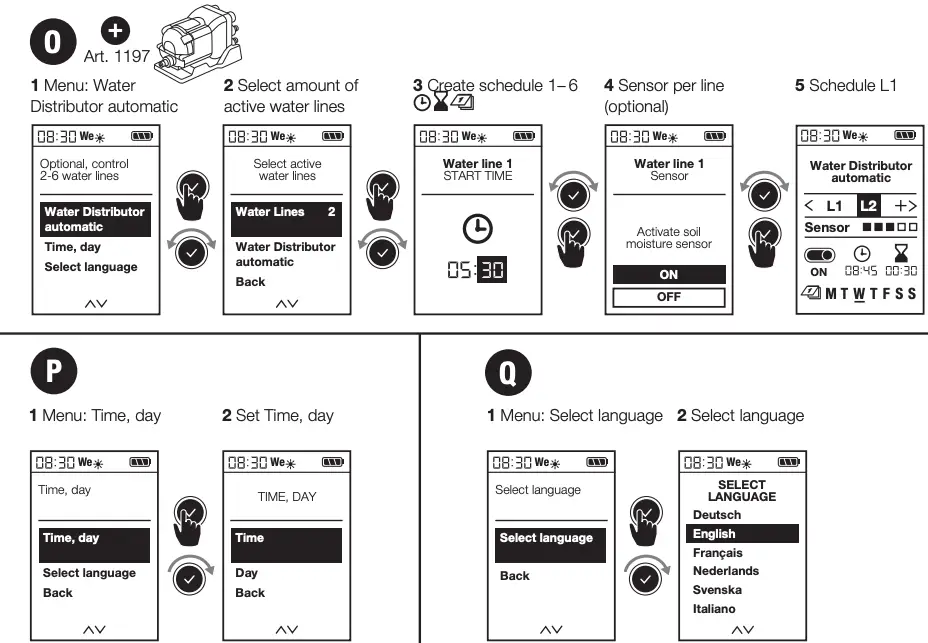
 GARDENA Automatic Water Distributor, Art. 1197 (optionally available)
→ (Fig. O): 1 Menu: Water Distributor automatic This menu allows you to control up to 6 water lines with the Automatic Water Distributor. This includes a necessary minimum pause of 5 minutes between the outlets and a minimum watering duration of 30 seconds (display: 1 min). This time ensures reliable switch-over to the next outlet and makes sure that the schedules and outlets are correctly linked (for details of the commissioning process, see the Operating Instructions for the Water Distributor).
2 Select amount of active water lines
You can select any number between 2 and 6. Seal any outlets on the Water Distributor that you do not need with end caps and move the setting lever to the “OFF” position.
3 Create schedules 1 ‒ 6
When prompted to do so, enter watering schedules L1 – L6 on the display. For this, use the standard method for entering schedules based on the start time, duration and frequency.
Note: Schedules are not allowed to overlap. If you enter a schedule that overlaps with the next one, the start time of the next watering operation will be postponed and a pause of 5 minutes will be inserted between the operations. Changes to the schedules can be made in the “Water Distributor” menu.
- Start times: Define the start times for the water lines in chronological order. This makes it easier to calculate and suggest the next possible start time.
- Duration: The total watering duration for all outlets – including the necessary pauses – must not exceed 24 hours.
- Frequency: Different weekdays can be selected. Note: To ensure correct switch-over and correct linking of the schedules and outlets, any outlets that are not scheduled to operate on a particular day will still be activated for a period of 30 seconds on the day concerned.
- Reduction in the number of outlets: If the number of outlets is reduced, the superfluous channels will be deleted. For example, if the number of outlets is reduced from 5 to 3, the settings for no. 4 and no. 5 will be deleted. The “Delete schedules” menu is not active.
- Manual watering and rain pause:
To activate a watering operation manually, press . Please note that a minimum duration of 30 seconds and a pause of at least 5 minutes must be observed. It is important to ensure that the water distributor outlets and the water control schedules are correctly linked. If this is not the case, the correct water distributor outlet will need to be set on the device.
4 Sensor per line (optional)
- If a soil moisture sensor is connected, you have the option of activating/deactivating it for each individual outlet. If the sensor is deactivated for a particular schedule, watering will always take place based on the schedule.
- If the sensor signals that the level of moisture is sufficient, any pending watering operation will be reduced to a duration of 30 seconds (display: 1 min).
5 Schedule L1
Time → (Fig. P):
1 Menu: Time, day | 2 Set time, day
Language → (Fig. Q):
1 Menu: Language preference | 2 Select language
MAINTENANCE
→ (Fig. E)
STORAGE

To put into storage:
- The product must be stored away from children.
- To preserve the battery, it should be removed (fig. B).
- Store the controller and the valve unit in a dry, enclosed and frost-free place.
 Disposal: (in accordance with RL2012/19/EC) The product must not be disposed of to normal household waste. It must be disposed of in line with local environmental regulations.
IMPORTANT!
Dispose of the product through or via your municipal recycling collection centre.
Disposal of the battery:
- Please return a flat battery to a GARDENA dealer or dispose of it properly at your nearest recycling centre.
Dispose of the battery only when discharged.
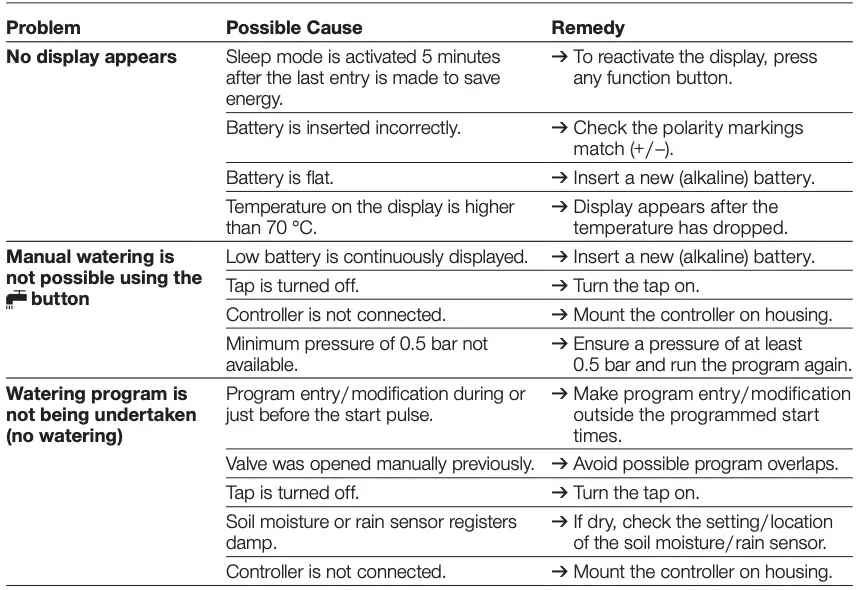
TROUBLESHOOTING
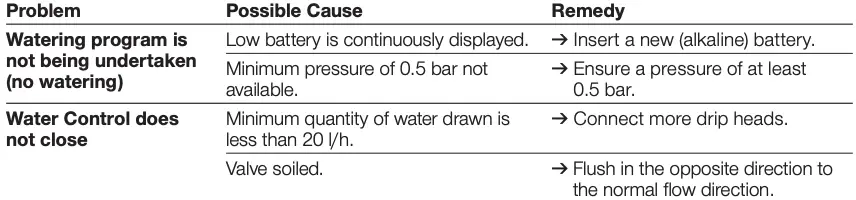

NOTE: For any other malfunctions please contact the GARDENA service department. Repairs must only be done by GARDENA service departments or specialist dealers approved by GARDENA.
TECHNICAL DATA

ACCESSORIES
Product liability
In accordance with the German Product Liability Act, we hereby expressly declare that we accept no liability for damage incurred from our products where said products have not been properly repaired by a GARDENA-approved service partner or where original GARDENA parts or parts authorised by GARDENA were not used.
EC Declaration of Conformity
The undersigned hereby certifies as the authorized representative of the manufacturer, GARDENA Germany AB, PO Box 7454, S-103 92, Stockholm, Sweden, that, when leaving our factory, the unit(s) indicated below is /are in accordance with the harmonised EU guidelines, EU standards of safety and product specific standards. This certificate becomes void if the unit(s) is /are modified without our approval.
Description of the product: Water Control
Product type: Master
Article number: 1892
EC-Directives:
2014/30/EU
2011/65/EC
Deposited Documentation:
GARDENA
Technical Documentation,
M. Kugler, 89079 Ulm
Year of CE marking: 2018
Ulm, 02.03.2020
Authorised representative
Reinhard Pompe
Vice President


1892-28.960.04/1220
© GARDENA Manufacturing GmbH; D-89079 Ulm; http://www.gardena.com