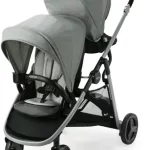
GRACO 1893776 DuetSoothe Swing and Rocker
Prevent serious injury or death: Failure to follow these warnings and the assembly instructions could result in serious injury or death.
INSTRUCTIONS
- THIS PRODUCT REQUIRES ADULT ASSEMBLY. Follow assembly instructions carefully. If you experience any difficulties, please contact the Customer Service Department. FALL and STRANGULATION HAZARDS: Infants have suffered head injuries falling from swings and have strangled in straps.
- ALWAYS use restraints. Adjust to fit snugly.
- STOP using product when infant attempts to climb out (approximately 9 months) or reaches 30 lb (13.6 kg).
- Stay near and watch infant during use. This product is not safe for unsupervised use or unattended sleep.
- Never carry swing with infant in it.
SUFFOCATION HAZARDS: Young infants have limited head and neck control. If the seat is too upright, infant’s head can drop forward and compress the airway.
- ALWAYS keep swing seat fully reclined until infant is at least 4 months old AND can hold up head without help.
STRANGULATION HAZARD:
- DO NOT suspend strings over the product or attach strings to toys.
- DO NOT place product in any location where there are cords, such as window blind cords, drapes, phone cords, etc.
- Strings can cause strangulation. DO NOT place items with a string around your child’s neck, such as hood strings or pacifier cords.
- DO NOT USE THIS PRODUCT if it is damaged or broken.
- NEVER USE as a car seat.
- DO NOT place product near water and moisture. Do not use the product near possible wet areas, such as a bathtub, shower, wash basin, sink, laundry tub, swimming pool, wet basement, etc.
- DO NOT use the AC adapter if it has been exposed to liquids, has been dropped, or is damaged.
- Protect the power cord. Place it so it is not walked on or pinched by furniture or other items.
- DO NOT use with an extension cord.
- Use only power cord provided.
- ROCKER MODE:
FALL HAZARD: Children have suffered head injuries falling from product. - ALWAYS use restraints. Adjust to fit snugly.
- NEVER use this product to carry or transport a child.
- Child’s movement can slide product. Use only on floor. Never place product near edges of counter tops, tables, or other elevated sur-faces.
- STOP using product when baby starts trying to sit up or has reached 18 lb (8.2kg), whichever comes first.
- NEVER use this product as a means to transport an infant in a motor vehicle.
- Maximum recommended height is 27 in. (68.2 cm) and weight is 18 lb (8.2 kg).
SUFFOCATION HAZARD: Babies have suffocated when seats tipped over on soft surfaces.
- NEVER use on a bed, sofa, cushion, or other soft surface.
- Stay near and watch child during use. This product is not safe for unsupervised use or unattended sleep.
FOR SAFE BATTERY USE
Keep the batteries out of children’s reach. Any battery may leak battery acid if mixed with a different battery type, if inserted incorrectly (put in backwards) or if all batteries are not replaced or recharged at the same time. Do not mix old and new batteries. Do not mix alkaline, standard (carbon-zinc) or rechargeable (nickel-cadmium) batteries. Any battery may leak battery acid or explode if disposed of in fire or an attempt is made to charge a battery not intended to be recharged. Never recharge a cell of one type in a recharger made for a cell of another type. Discard leaky batteries immediately. Leaky batteries can cause skin burns or other personal injury. When discarding batteries, be sure to dispose of them in the proper manner, according to your state and local regulations. To prevent battery leaks, which can burn skin and eyes,
- Remove batteries before putting product into storage for a prolonged period of time.
- Dispose of used batteries immediately.
- Old and new batteries should not be mixed. Always replace the entire set of batteries at one time.
- Never mix old and new batteries, or batteries of different brands or types. Alkaline, standard carbon-zinc, and rechargeable nickel-cadmium batteries should not be mixed.
FCC
Recommended type batteries—alkaline disposables, size D (LR20-1.5V). NEVER mix battery types. Change batteries when product ceases to operate satisfactorily. Changes or modifications to this unit not expressly approved by the party responsible for compliance could void the user authority to operate the equipment.
NOTE: This equipment has been tested and found to comply with the limits for a Class B digital device, pursuant to Part 15 of the FCC Rules. This Class A/B digital apparatus meets all requirements of the Canadian Interference-Causing Equipment Regulations. These limits are designed to provide reasonable protection against harmful interference in a residential installation. This equipment generates, uses and can radiate radio frequency energy and, if not installed and used in accordance with the instructions, may cause harmful interference to radio communications. However, there is no guarantee that interference will not occur in a particular installation. If this equipment does cause harmful interference to radio or television reception, which can be determined by turning the equipment off and on, the user is encouraged to try to correct the interference by one or more of the following measures:
- Reorient or relocate the receiving antenna.
- Increase the separation between the equipment and receiver.
- Connect the equipment into an outlet on a circuit different from that to which the receiver is needed.
- Consult the dealer or an experienced radio/TV technician for help.
This Class B digital apparatus meets all requirements of the Canadian Interference-Causing Equipment Regulations. CAN ICES-3 (B) /NMB-3 (B).
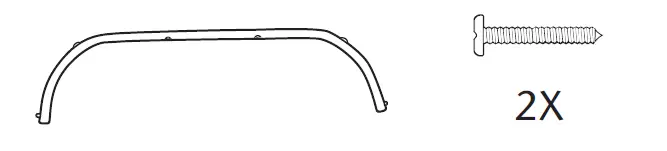
Parts list
This model may not include some features shown below. Check that you have all the parts for this model BEFORE assembling your product. If any parts are missing, call Customer Service.
Tools required: Phillips Screwdriver
ALL MODELS 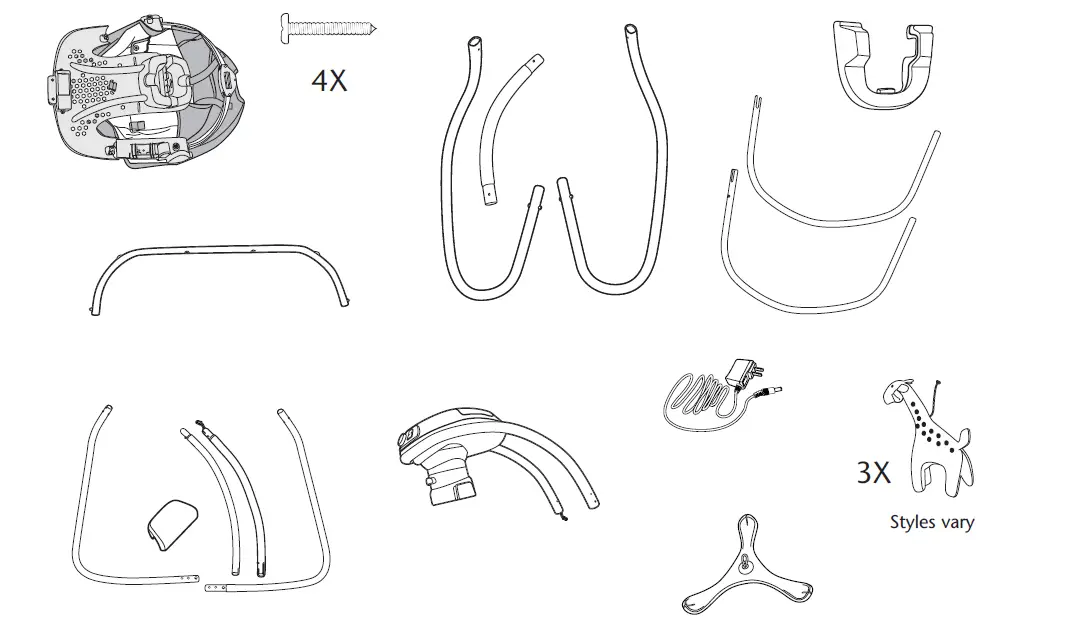
FEATURES ON CERTAIN MODELS
Assembly
- Wrap seat pad over tubes on seat.
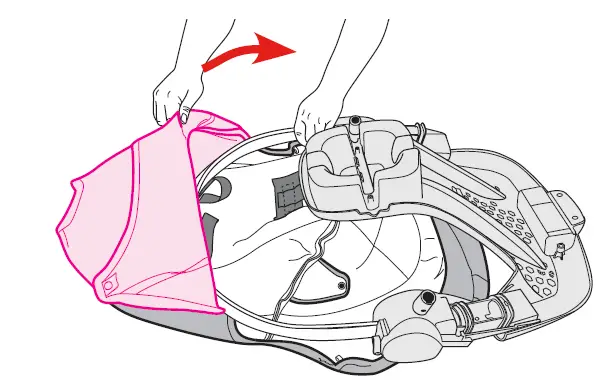
- Attach seat pieces together as shown.
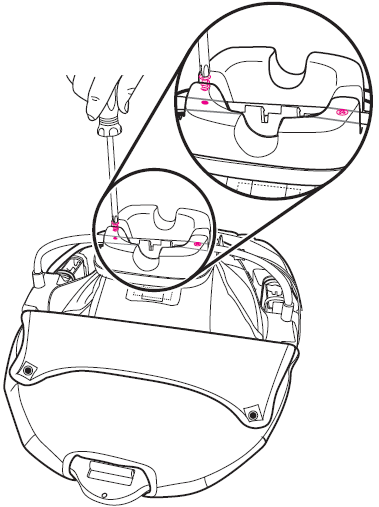
- Fasten screw on each side of seat as shown.
- Wrap seat pad around vibration unit and bottom of seat frame.
- Attach elastic straps to hooks on both sides of seat.
- Pull seat pad webbing through bottom of frame as shown.
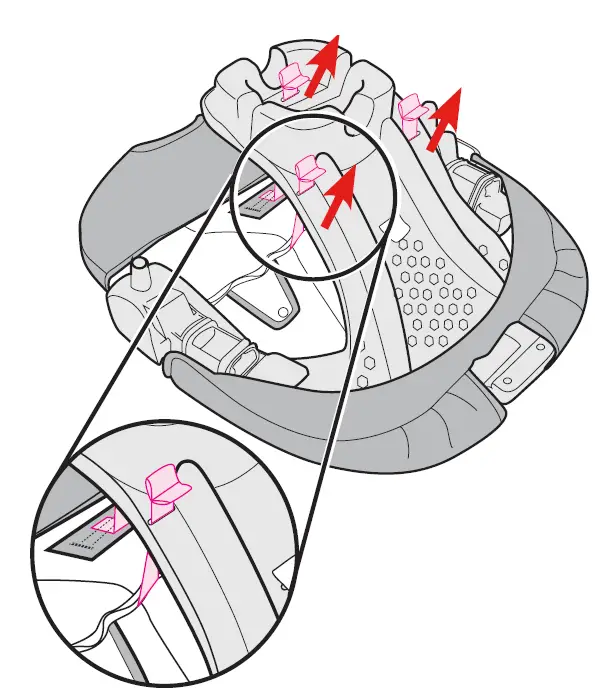
- Insert seat tube into brackets on rear of seat with snaps facing away from the recline handle as shown.
- Fasten seat tube with two screws. CHECK to make sure seat tube is attached by pulling on it.

Attaching Seat Pad
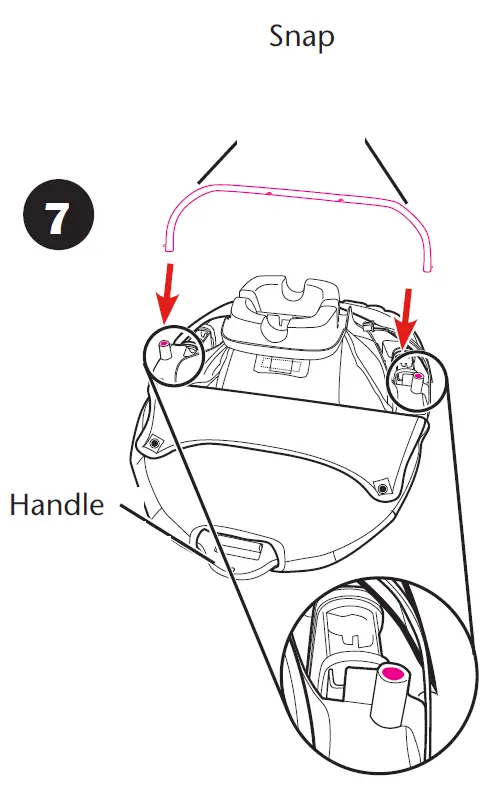
- Attach flaps on bottom of seat pad to snaps on seat tube as shown.
- Attach seat pad to snaps on tube as shown.

Assembling Legs
- Assemble legs as shown.
- Lay seat face down and insert leg tubes into holes in leg bracket until they snap into place. CHECK to make sure leg tubes are attached by pulling on them.
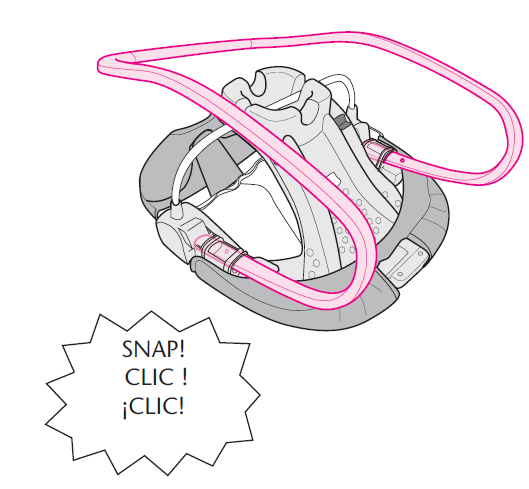


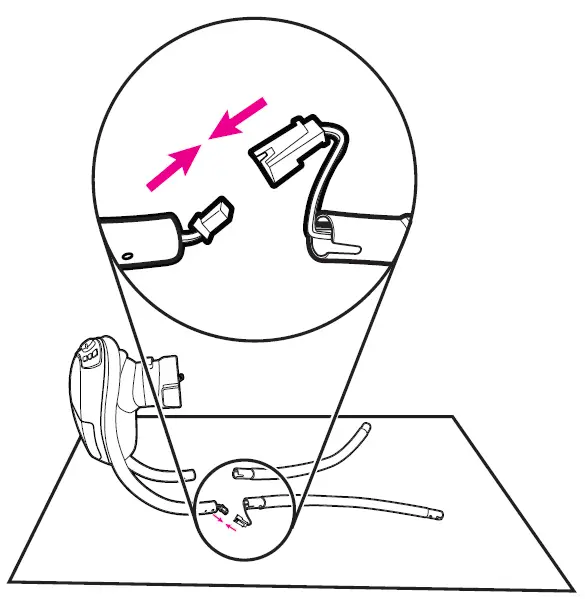
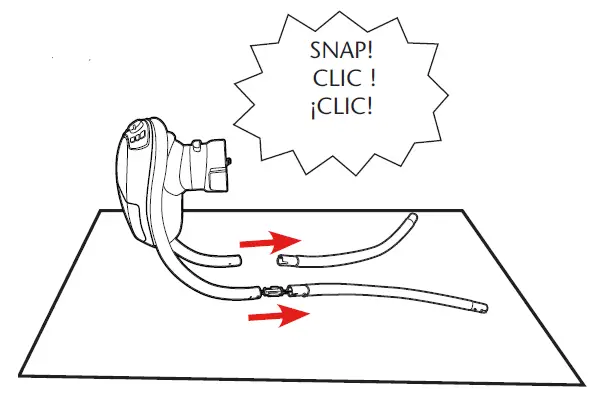
Assembling Swing Frame
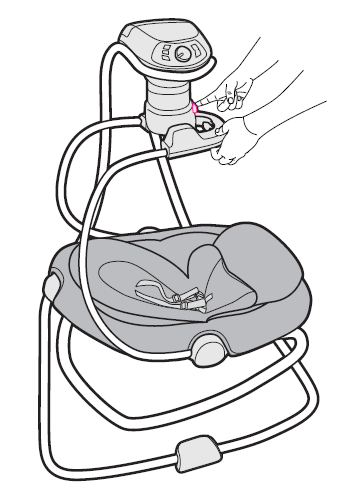
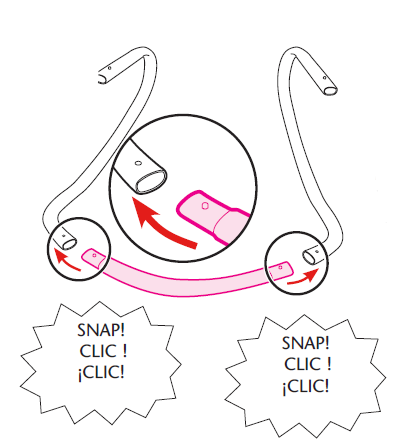
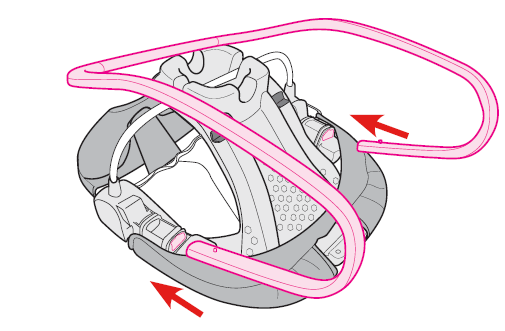
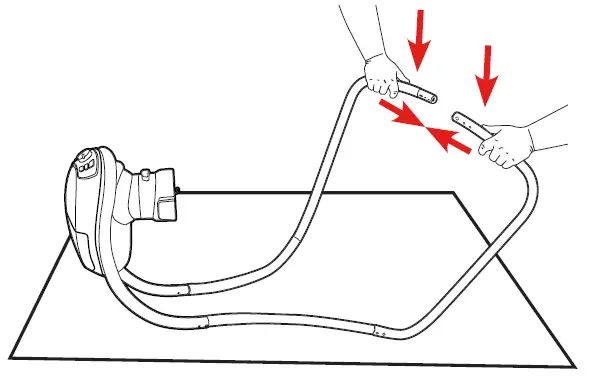
- Place carton on ground. Lay unit down as shown. Plug wires together as shown and insert wires inside tube.
- Insert motor housing tubes to leg tubes as shown.
- Insert vertical tubes into base tubes as shown.
- Grab base tubes and push down while inserting tubes together.
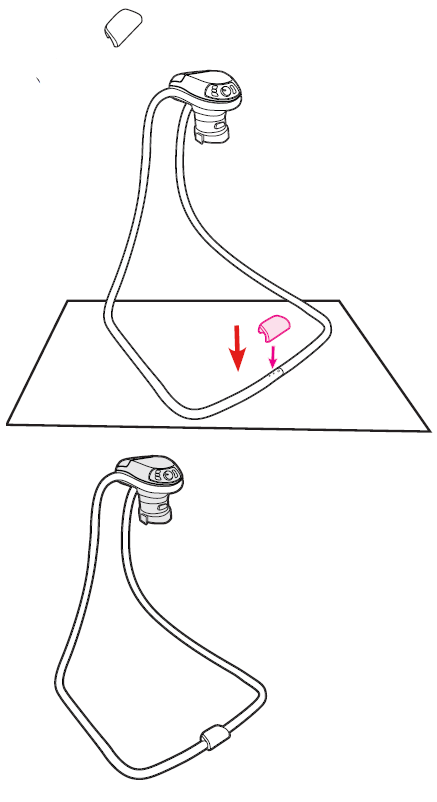
- Place the cover on tubes as shown.


Attaching Rocker Seat
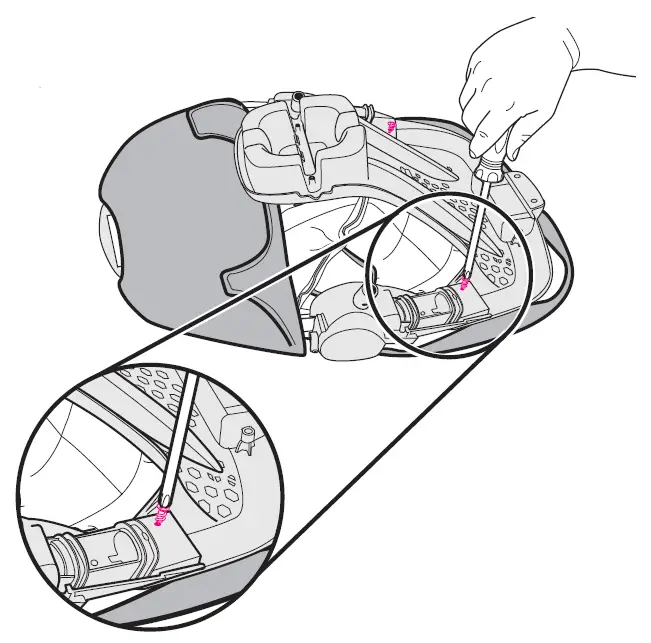
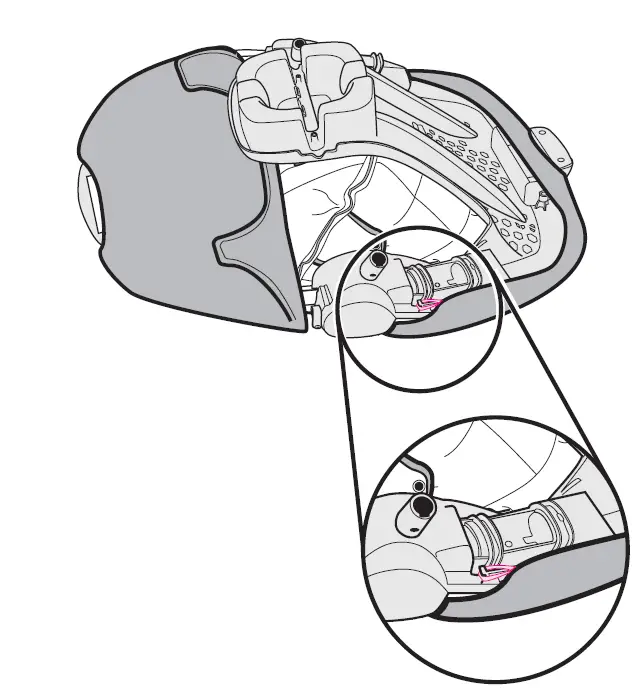
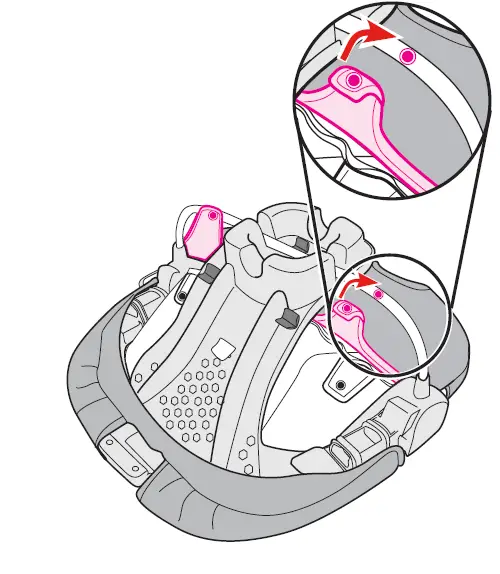
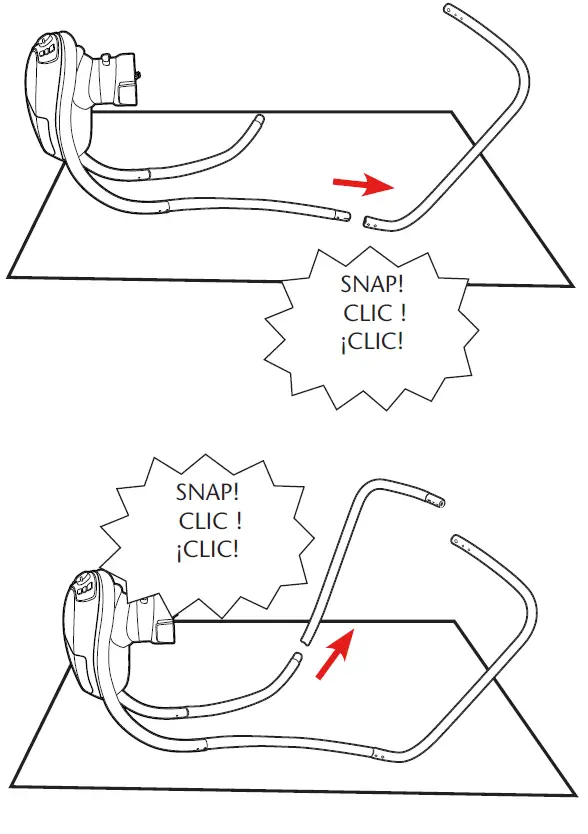
- Insert rocker arm tubes into handle until they snap into place as shown. CHECK to make sure rocker arm tubes are attached by pulling on them.

- Insert assembled rocker arms into sides of rocker seat as shown. CHECK to make sure rocker arm tubes are attached by pulling on them.
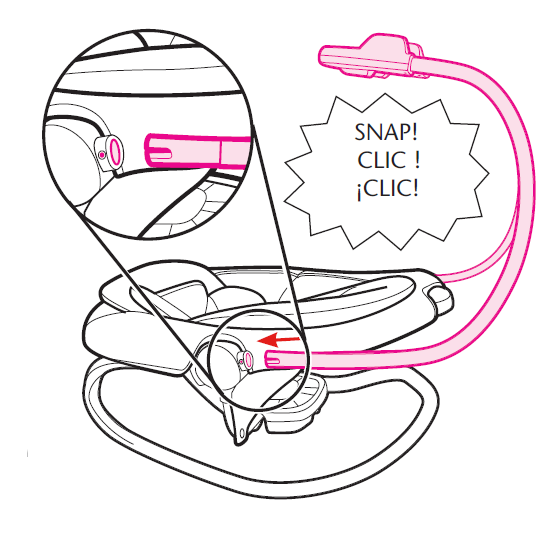
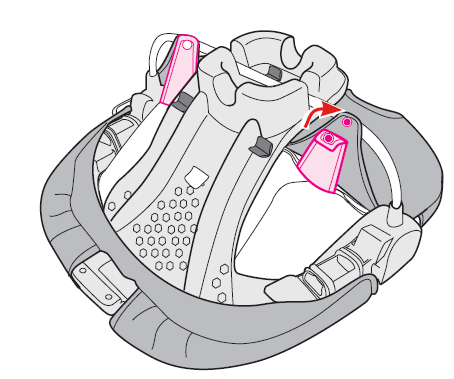
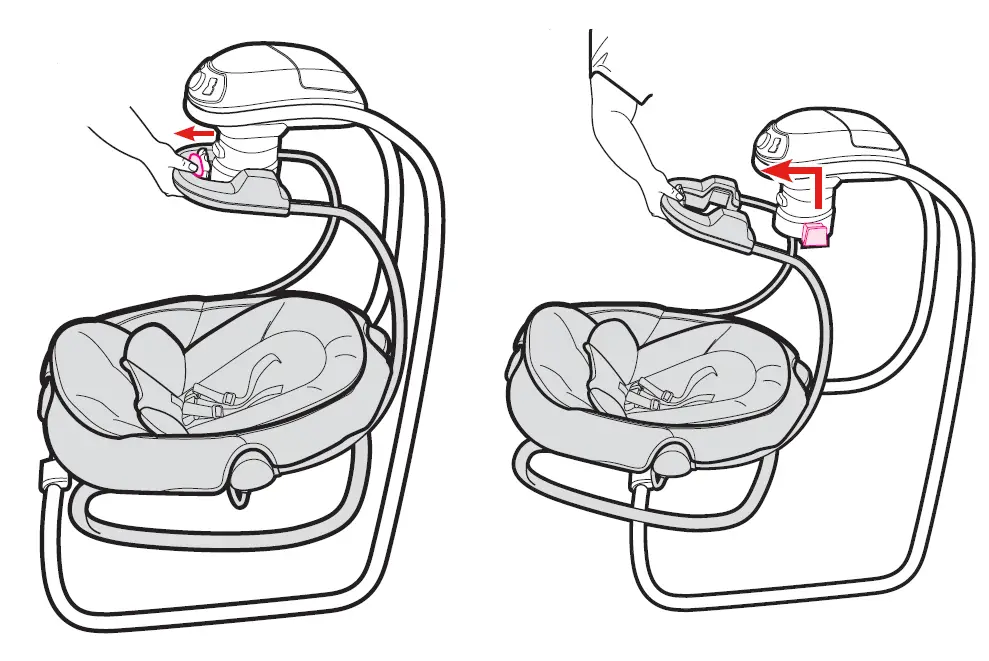
- Place rocker onto swing mounts as shown until it clicks into place. Mounts are on both sides of motor housing.
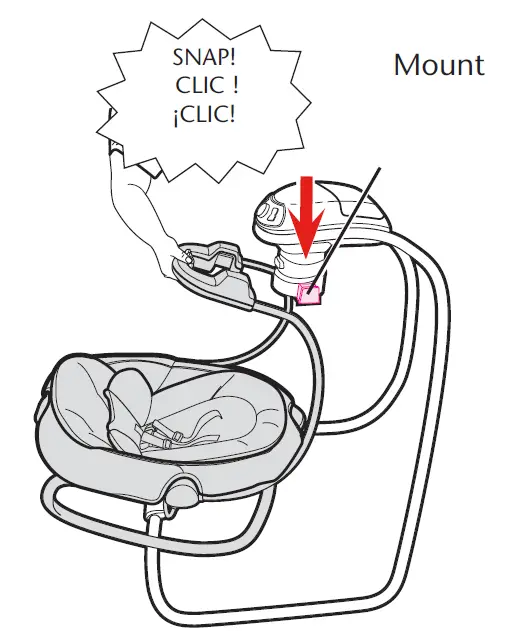
- CHECK to make sure it is attached by pulling up on it.

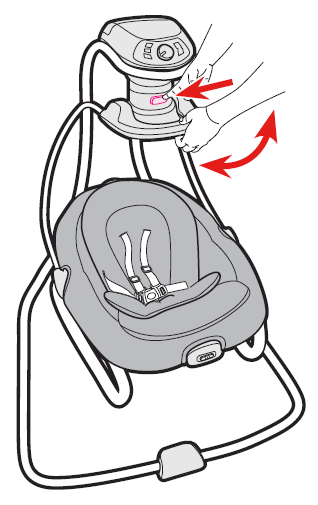
To Adjust Seat Positions
- To adjust seat position, push button in on motor housing and rotate into one of three positions.
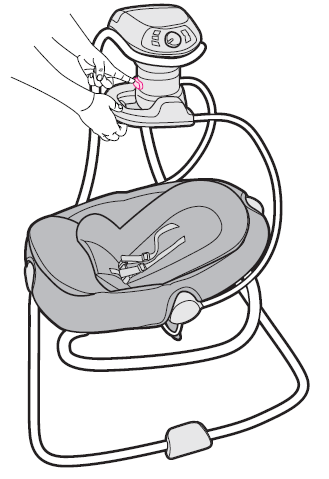


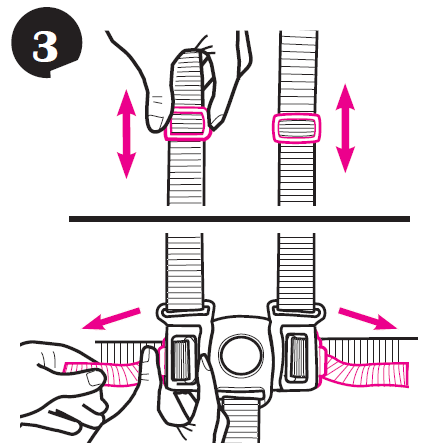
To Adjust Recline (2 positions)
Use the most reclined position for newborn and young babies. Use the more upright position for older, more active infants.
- Squeeze button on handle at top of seat and rotate up or down.
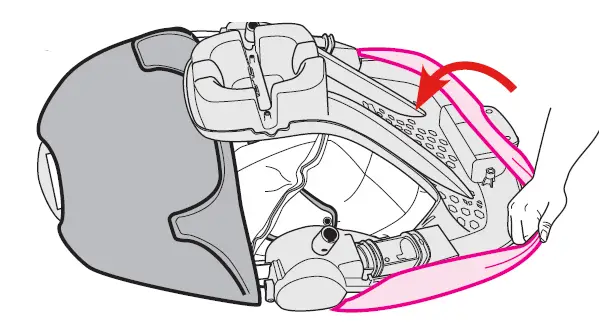
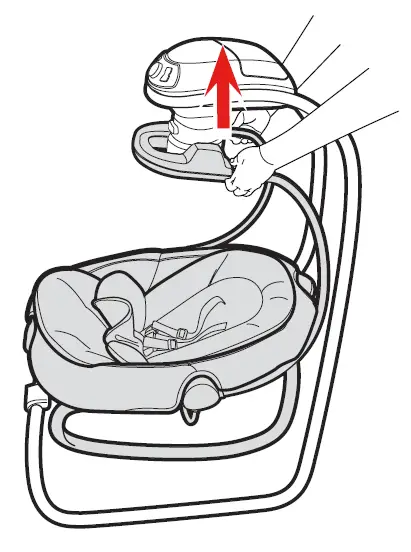
To Remove Rocker Seat
- To use as rocker, squeeze release button on inside of handle. Pull rocker up and off of the mounts.
To Secure Infant
- Use slide adjuster at shoulder and waist for tighter adjustment. To change shoulder harness slots,
- When changing harness strap slots, MAKE SURE harness straps are going through same slots in seat pad.
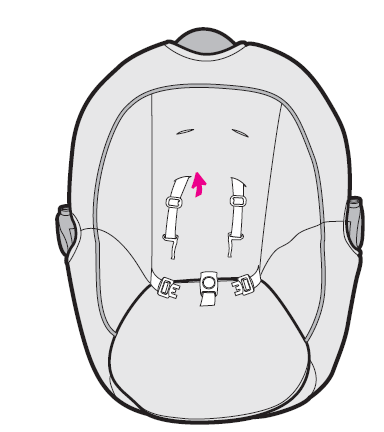
- The harness straps must go into the slot that is even with or slightly above the shoulders. Avoid twisting straps.


Installing Batteries
WARNING To avoid injury: Remove child from swing before changing batteries.
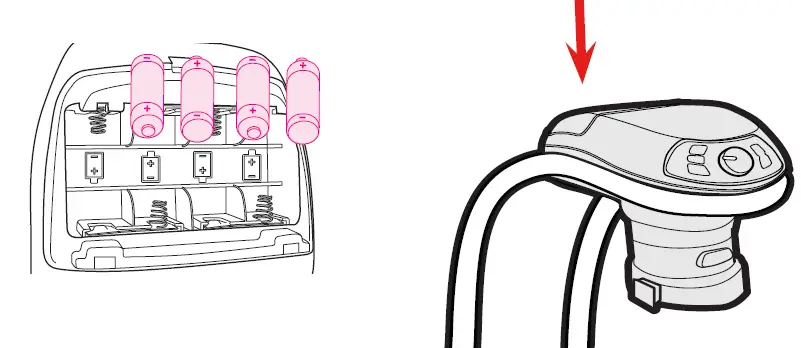 With baby out of swing, open the battery compartment lid by inserting a screwdriver into the coin slot. Insert four D (LR20-1.5V) cell batteries.
CHECK that the batteries are put in correctly. Your swing will not run if the batteries are put in backwards.
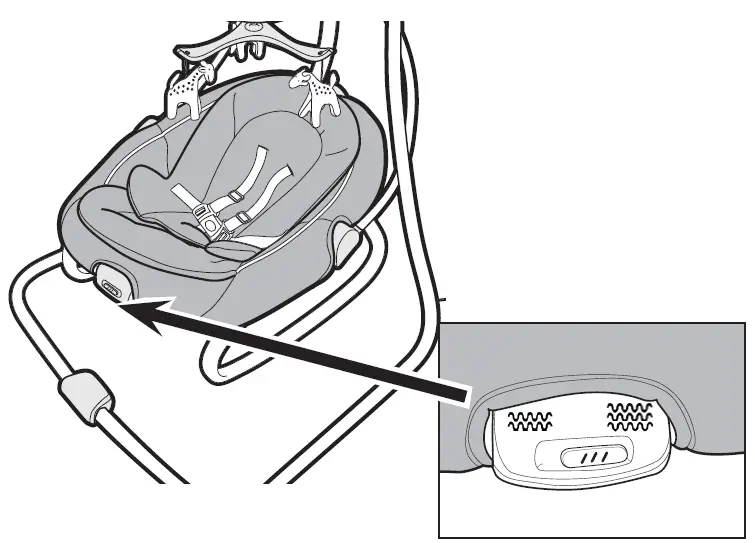
To Use Wall Plug
- WARNING Product does not recharge batteries. When AC adapter is in use, batteries will automatically shut off.
- DO NOT place product near water and moisture. Do not use the product near possible wet areas, such as a bathtub, shower, wash basin, sink, laundry tub, swimming pool, wet basement, etc.
- DO NOT use the AC adaptor if it has been exposed to liquids, has been dropped, or is damaged. Protect the power cord. Place it so it is not walked on or pinched by furniture or other items.
- WARNING Strangulation Hazard: Keep this cord out of the reach of children. DO NOT use with an extension cord. Use only power cord provided.
Starting Swing (6 Speed)
WARNING avoid serious injury from falling or sliding out. Always use seat belt. After fastening buckles, adjust belts to get a snug fit around your infant.
TO TURN SWING ON:
Rotate the speed dial clockwise, and lightly push the swing to get it started. Observe the swinging motion for a minute. It takes time for the swing to adjust to a setting. Change setting if needed by moving the dial clockwise for faster speeds or counter-clockwise for slower.
TO TURN SWING OFF:
Turn dial counter-clockwise until it “CLICKS” into the “OFF” position. Your seat may be stopped at any time the motor is running without damaging the motor.


Features on Certain Models
This model may not include some features.
Body support
- Styles vary
- Only use this body support on this swing. Never use this body support on any other product.

Assembling Mobile
Styles vary

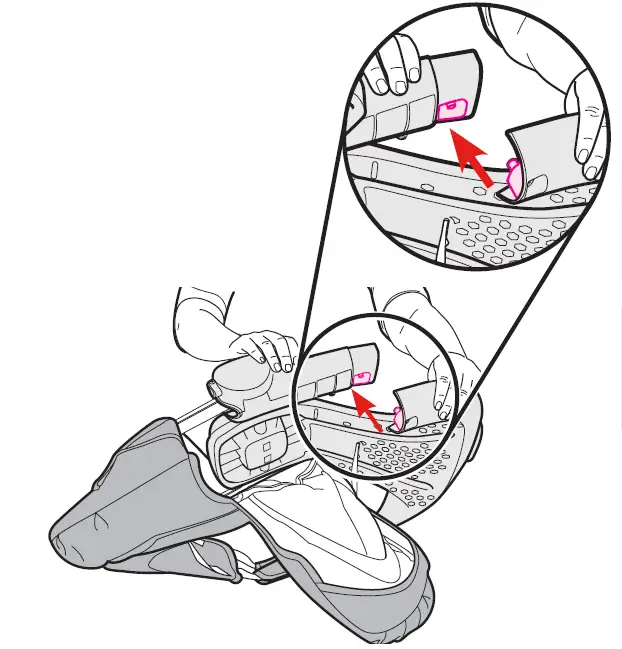
To Use Vibration
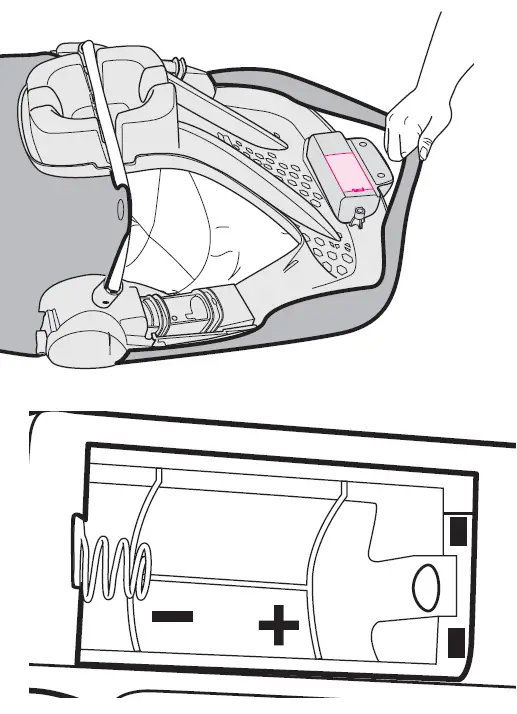
- Remove battery lid, found under seat, with a key and insert 1-D (LR20-1.5V) battery in module. Replace lid.
- Vibration: Turn to one of two settings.
Problem Solving
SWING WON’T OPERATE:
- No batteries in swing.
- Batteries dead.
- Speed setting too low.
- Batteries in backwards — check “+” and “-”.
- Corrosion on battery terminals. Rotate batteries in place against terminals, or clean with sandpaper or steel wool if corrosion is severe.
- Baby grabbing swing legs. (Discontinue use.)
- Push swing to start.
SEAT DOESN’T SWING VERY HIGH:
- Control setting too low.
- Blanket hanging down, causing increased wind resistance.
- Batteries too weak.
- Baby too heavy or too active. (Discontinue use.)
- Soft carpet (swings higher on hard floors).
Care and Maintenance
- FROM TIME TO TIME CHECK YOUR SWING for loose screws, worn parts, torn material or stitching. Replace or repair the parts as needed. Use only Graco replacement parts.
- TO CLEAN SEAT COVER, Refer to your care tag on your seat pad for washing instructions. NO BLEACH.
- TO CLEAN FRAME, use only household soap and warm water. NO BLEACH OR DETERGENT.
- EXCESSIVE EXPOSURE TO SUN OR HEAT could cause fading or warping of parts.
Warranty Information (USA)
Replacement Parts
To purchase parts or accessories or for warranty information in the United States, please contact us at the following: www.gracobaby.com
or/o 1-800-345-4109
To purchase parts or accessories or for warranty information in Canada, please contact us at the following : Pour commander des pièces ou pour service sous garantie au Canada, communiquer avec nous : www.gracobaby.ca
or/ou 1-800-345-4109
Product Registration
(USA)
To register your Graco product from within the U.S.A. visit us online at www.gracobaby.com/productregistration or return the registration card provided with your product. We currently do not accept product registrations from those living outside the United States of America.