graco SnugEssentials™ INFANT CAR SEAT andamp; BASE

Parts List Fitting Guide
- Carry Handle
- Canopy
- Body Pillow
- Harness Covers
- Buckle
- Buckle Cover
- Harness Straps
- Harness Release Lever
- Harness Adjustment Strap
- Handle Adjustment Buttons
- Rear-Facing Lap Belt Path (when used without the base)
- Instruction Manual Storage
- Base release lever
- Head Support Height Adjustment
- Rear-Facing Lap Belt Path (when used without the base)
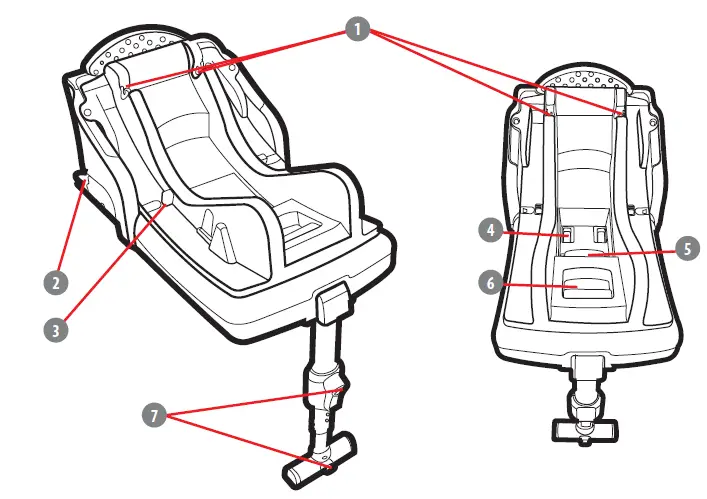
- Car Seat Base Lock
- ISOFIX Attachments
- Car Seat Attachment Indicator ISOFIX Extender Buttons ISOFIX Release Lever
- Recline Handle
- Support Leg Adjustment Buttons
WARNINGS!
- Do not make any alterations or additions to this child restraint without the approval of the Type Approval Authority, it is dangerous to do so.
- It is dangerous not to follow closely the manufacturer installation instructions provided with this child restraint, FAILURE TO USE THIS CHILD RESTRAINT PROPERLY INCREASES THE RISK OF SERIOUS INJURY OR DEATH IN A SHARP TURN, SUDDEN STOP OR CRASH!
- It is dangerous to use the car seat on an elevated surface, e.g. a table.
- Always use the restraint system.
- This car seat is not intended for prolonged periods of sleeping.
- This car seat does not replace a cot or a bed. Should your child need to sleep, then it should be placed in a suitable cot or bed.
- Do not use accessories or replacement parts other than those approved by the manufacturer.
Important safety advice
- When this Infant Carrier is used in recline positions 5, 6, and 7
- This child restraint is suitable for use by children within the following size range 40 cm – 87 cm.
- This child restraint is suitable for use by children with a maximum weight of 13 kg.
- Please also check the “i-Size Child Restraint System” instructions in the vehicle manufacturer’s handbook.
- It is very important to ensure that any lap strap is worn low
- The rigid items and plastic parts of a child restraint shall be so located and installed that they are not liable, during everyday use of the vehicle, to become trapped by a movable seat or in a door of the vehicle.
- Do not use this child restraint in seating positions where there is an active frontal airbag installed.
- Any straps restraining the child should not be twisted.
- Any straps holding the restraint to the vehicle should be tight.
- Any straps restraining the child should be adjusted to the child’s body.
- This Child Restraint should be replaced when it has been subject to violent stresses in an accident.
- Do not leave a child in this child restraint unattended.
- Any luggage or other objects liable to cause injuries in the event of a collision must be properly secured.
- This Child Restraint System must not be used without the cover.
- The Child Restraint System cover must not be replaced with any other than the one recommended by the manufacturer, because the cover constitutes an integral part of the restraint performance.
your own, it is very important to READ, UNDERSTAND AND FOLLOW THE OWNER’S MANUAL. - If you need help, please contact our Customer Service Department with any questions you may have concerning parts, use, or maintenance. When you contact us, please have your product’s model number and manufactured
- numbers can be found on a sticker on the back of your child restraint.
Your child’s safety depends on:- Choose the proper head support position based on your child’s size.
- Properly secure your child in the child restraint.
- Select a suitable location for the child restraint in your vehicle.
- Properly routing and securing the vehicle seat belt.
! THE CHILD RESTRAINT CAN BECOME VERY HOT IF LEFT IN THE SUN. Contact with these parts can burn your child’s skin. Always touch the surface of any metal or plastic parts before putting your child in the child restraint.
! NEVER USE A SECOND-HAND CHILD RESTRAINT or a child restraint whose history you do not know.
INSTRUCTIONS
- Rotate Support Leg Out
- Place base on the vehicle seat. The support leg has two buttons to allow the length to be adjusted. Press the buttons to adjust the leg length. The
oor. Make sure the load leg is secure by pressing down on the base. - Extend the ISOFIX connectors.
Squeeze the ISOFIX extender buttons and pull the ISOFIX connectors out. - Press the ISOFIX connectors onto the vehicle anchors until a click is heard. When the ISOFIX connectors are locked the connection indicators will be green. If the base is not locked in the indicators will be red.
- Squeeze the ISOFIX extender buttons. Push down firmly on the base towards the back of the vehicle seat to ensure a tight fit on the seat.
- To release the base from the vehicle seat pull the ISOFIX release lever and remove base.
- Recline Car Seat
To recline the car seat pull recline handle and slide into correct position for your child.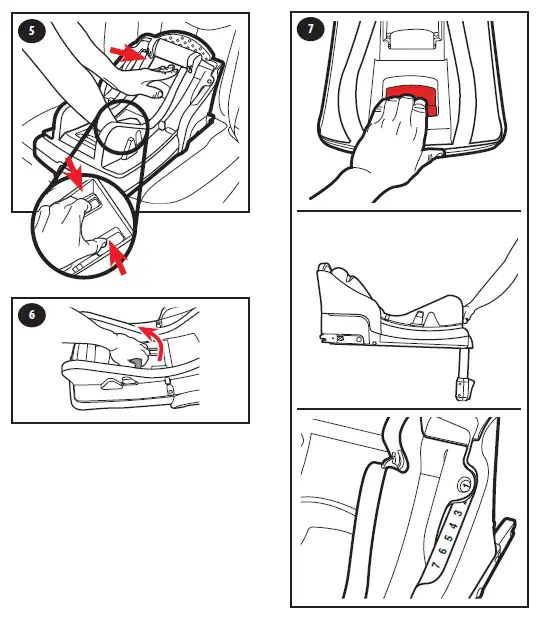
- Attaching the car seat to the base
To attach seat to base, position front of seat in base then push down on the back until it locks into place. (See Illustration).Pull up on car seat to be sure it is securely fixed onto base. - To remove, squeeze the release handle at back of the car seat to release the attachment catch. Lift car seat from base as shown. Always place the handle in the down position when removing your baby from the seat and if you place the car seat onto the seat
Car Seat Installation Without Base - Place Car Seat Rear-Facing in the Vehicle Place the car seat on the vehicle seat. Push it back until the front of the car seat touches the vehicle seatback.
- Put lap section of the belt over car seat and under the two belt hooks marked with blue labels. Buckle the vehicle belt.
- Place the shoulder belt around the back of the car seat exactly as shown, making sure to run it through the center guides on the back of the seat and below the notch opposite the shoulder belt
and not be twisted. Make sure the buckle and seat belt are in line with each other. Contact Graco if in doubt about this point.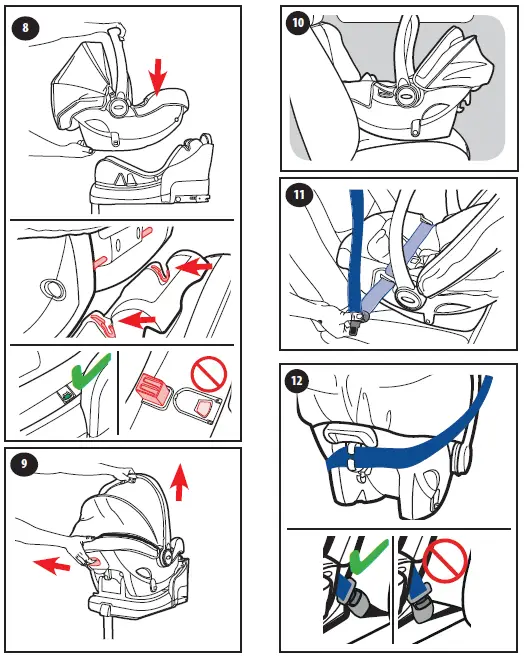
- Tighten Vehicle Seat Belt
Lay your forearm across the car seat at the belt path and push down. Pull-on the shoulder belt to tighten while feeding the slack back into the retractor. - Adjusting the handle
Squeeze latches on both sides at bottom of the handle to release it. Rotate the handle until it clicks into any of the 4 positions:
Position A (up): MUST be used when carrying by a handle,
Position B: Vehicle Travel Position
Position C: Convenience Position
Position D (down): is the sitting position.
Always place the handle in the B position when using it in a vehicle. - Canopy Mesh Opening To open the mesh canopy opening, unzip as shown. Securing Child Loosen Harness Straps Push down on the harness release lever while pulling out on the harness straps.
- Press the red button on the harness to unfasten
- Place Your Child in the Seat back.
- Place Harness Straps Over Child’s Shoulders
- Be Sure the Harness Straps are at the Proper Height Harness straps must be at or just below the child’s shoulders.
- To change harness location, from the back of the seat, squeeze the headrest adjustment buttons and move it up or down to the correct harness position.
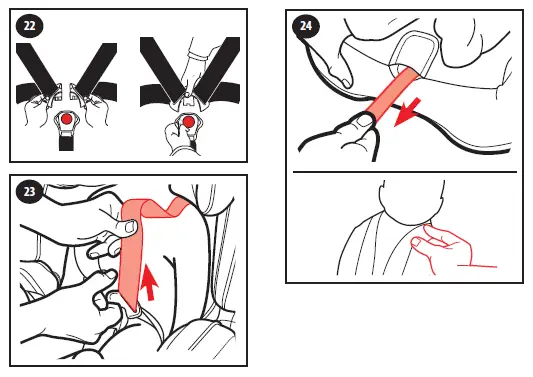
- Buckle Harness Straps Fit the two buckle tongues together and push them into the buckle. You will hear a “click” when buckle tongues are securely attached. Pull up on the buckle tongue to make sure it is securely attached.
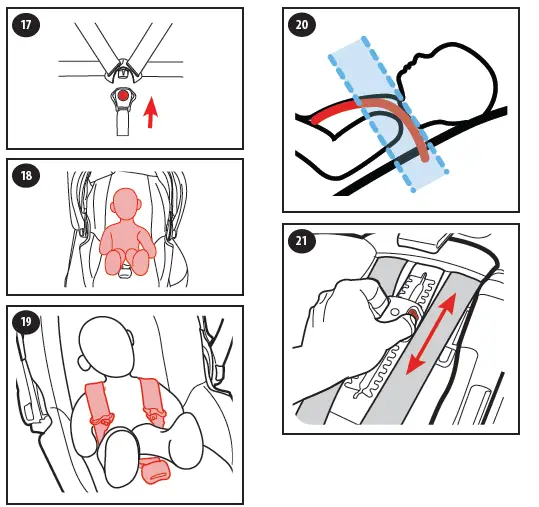
- Pull All the Slack Out From around the Waist Pull up on the harness strap while pushing the buckle tongue down. Do this on both sides.
- Tighten the Harness by Pulling the Harness Adjustment Strap
When you are not able to pinch any of the harness webbings at your child’s shoulder, the harness is tight enough.
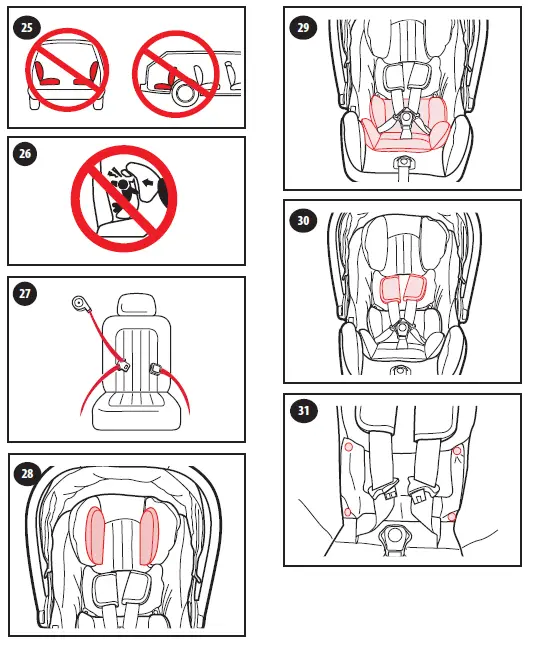
Unsafe Vehicle Seat Locations
Never install this car seat in any of the following vehicle seating locations: - rear-facing or side-facing vehicle seats
- rear-facing with an active frontal airbag
- Identify Your Seat Belt Type
There is only one type of vehicle seat belts that can be used with this car seat: Combined Lap & Shoulder Seat-belt
3 connections points.ACCESSORIES
- HEAD PILLOW
Use only with infants up to 60 cm. To remove, slide out from behind the headrest pad. - BODY PILLOW
Use only with the lowest two sets of harness slots. To remove, unbuckle the buckle and remove the pillow. - Harness Covers
To remove, undo the fastening strips and remove.
Cleaning Seat Cover - Unsnap the four buttons on the seat cover.
- Pull out the plastic flaps from the side of the seat
- Pull out the plastic flaps from the side of the seat
- Pull the cover off the shell.
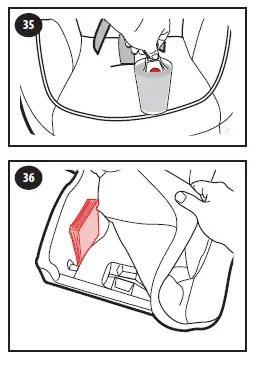
- To remove the canopy from the canopy hoop, first press the release tab and remove it from the mounting remove canopy.
Machine wash cover and canopy in cold water on delicate cycle and drip dry. DO NOT USE BLEACH. Reverse the steps to reattach the cover to the shell. Make sure the harness straps are not twisted.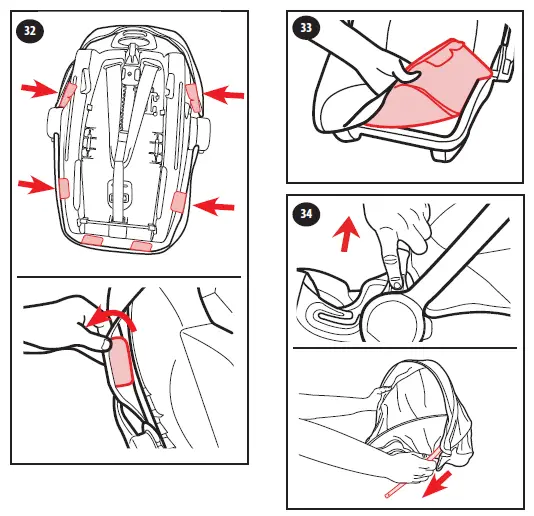
Cleaning Crotch Buckle
WARNING! Inspect and clean the buckle from time to time to remove any objects or debris that could prevent latching. - To clean the buckle, place in a cup of warm water and gently agitate the buckle. Press the red button several times while in the water. DO NOT SUBMERGE THE BUCKLE STRAP. DO NOT USE SOAPS, HOUSEHOLD DETERGENTS or LUBRICANTS. Shake out excess water and allow to air dry. Repeat steps as needed until it fastens with a click.
Cleaning Harness
Surface wash only with mild soap and damp cloth. DO NOT IMMERSE THE HARNESS STRAPS IN WATER Doing so may weaken the straps.
If harness straps are frayed or heavily soiled, contact Customer Service at
www.gracobaby.eu
www.graco.co.uk
www.gracobaby.pl - Store instruction manual in the slot with the instruction book icon as shown.
Replacement Parts
To purchase parts or accessories, please contact us at the following:
www.gracobaby.eu
www.graco.co.uk
www.gracobaby.pl
Product of:
Wonder Brands Limited
FLAT/RM 1501, 15/F, Capital Centre, 151 Gloucester Road,
Wan Chai, Hong Kong
Customer Service
gracobaby.eu
www.gracobaby.pl
For UK and ROI
[email protected]
+44 0800 952 0063