![]()
OPERATOR MANUAL
PRESSURE WASHER
DESCRIPTION
1.1 PURPOSE
The machine is used to clean vehicles, boats, buildings, porches, decks, patios, and driveways.
For domestic use only, not for professional use, and for operation at a temperature above 32°F (0°C).
1.2 OVERVIEW
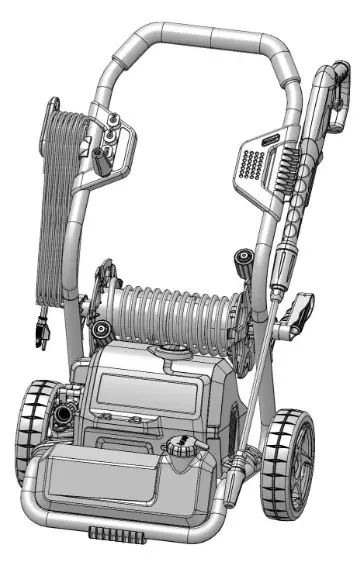
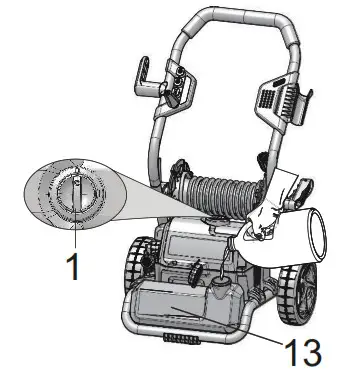
| 1 Power switch 2 Spray wand 3 Gun 4 High-pressure hose 5 Water inlet 6 Water outlet 7 Wheel 8 Power cord 9 Cord retainer 10 Tip storage 11 Gun holder 12 Handle lock button 13 Detergent tank |
14 Garden hose 15 Inlet coupler 16 Washer 17 Pin 18 Garden hose 19 Gun trigger 20 Nozzle 21 Cleaning tool 22 Upper handle 23 Lower handle 24 Axle 25 Trigger safety button |
GENERAL POWER TOOL SAFETY WARNINGS
WARNING
When using this product basic precautions should always be followed, including the following:
Save all warnings and instructions for future reference.
The term “power tool” in the warnings refers to your mains-operated (corded) power tool.
2.1 GENERAL POWER TOOL SAFETY WARNINGS
- The machine is not intended for use by persons (including children) with reduced physical, sensory or mental capabilities, or lack of experience and knowledge unless they have been given supervision or instruction concerning the use of the appliance by a person responsible for their safety. Children should be supervised to ensure that they do not play with the appliance.
- Learn the machine’s applications and limitations as well as the specified potential hazards related to this tool by studying this manual.
- Never operate the machine with any guard or cover removed or damaged.
- Do not operate the product while under the influence of drugs, alcohol, or any medication.
- Do not wear loose clothing, gloves, neckties, or jewelry. They can get caught and draw you into moving parts.
- Rubber gloves and non-skid footwear are recommended when working outdoors. Also wear protective hair covering to contain long hair. Wear footwear that will
protect your feet and improve your grip on slippery surfaces. - Don’t overreach or stand on unstable support. Keep proper footing and balance at all times.
- Check the work area before each use. Remove all objects such as rocks, broken glass, nails, wire, or string which can be thrown or become entangled in the machine.
- Avoid dangerous environments. Don’t expose yourself to rain. Keep work area well lit.
- Before starting any cleaning operation, close doors and windows. Clear the area to be cleaned of debris, toys, outdoor furniture, or other objects that could create a hazard.
- Don’t use the appliance within range of persons unless they wear protective clothing.
2.2 ELECTRICAL SAFETY WARNINGS
- Disconnect from the electrical power supply before carrying out user maintenance.
- Use only extension cords that have watertight connections and are intended for outdoor use. Use only extension cords having an electrical rating not less than the rating of the product. Examine the extension cord before using it and replace it if damaged. Do not abuse the extension cord and do not pull on any cord to disconnect. Keep the cord away from heat and sharp edges. Always disconnect the extension cord from the receptacle before disconnecting the product from the extension cord.
- Do not use the appliance if a supply cord or important parts of the appliance are damaged, e.g. safety devices, high-pressure hoses, trigger guns.
- Inadequate extension cords can be dangerous.
- To reduce the risk of electrocution, keep all connections dry and off the ground. Do not touch the plug with wet hands.
- Do not abuse the cord. Never use the cord to carry the product or to disconnect the plug from an outlet. Keep cord away from heat, oil, sharp edges, or moving parts.
Replace damaged cords immediately. Damaged cords increase the risk of electric shock. - Inspect extension cords periodically and replace them if damaged. Keep handles dry, clean, and free from oil or grease.
2.3 PRESSURE WASHER SAFETY WARNINGS
- Read all the instructions before using the product.
- To reduce the risk of injury, close supervision is necessary when a product is used near children.
- Know how to stop the product and bleed unit pressure quickly. Be thoroughly familiar with the controls.
- Stay alert – Watch what you are doing.
- Do not operate the product when fatigued or under the influence of alcohol or drugs.
- Keep the operating area clear of all persons.
- Do not overreach or stand on unstable support. Keep good footing and balance at all times.
- Follow the maintenance instructions specified in the manual.
- This product is provided with a ground fault circuit interrupter built into the power cord plug. if replacement of the plug or cord is needed, use only identical replacement parts.
- Risk of injection or injury– Do not direct discharge stream at persons.
- Keep the motor away from flammables and other hazardous materials.
- Keep the product dry, clean, and free from oil and grease.
Always use a clean cloth when cleaning. Never use brake fluids, gasoline, petroleum-based products, or any solvents to clean products.
![]() WARNING
WARNING
To reduce the risk of electrocution, keep all connections dry and off the ground. Do not touch the plug with wet hands.
2.4 EXTENSION CORDS
- Use only extension cords that are intended for outdoor use. These extension cords are identified by a marking “Acceptable for use with outdoor appliances; store indoors while not in use.” Use only extension cords having an electrical rating not less than the rating of the product. Do not use damaged extension cords. Examine the extension cord before using and replace if damaged. Do not abuse the extension cord and do not yank on any cord to disconnect. Keep the cord away from heat and sharp edges. Always disconnect the extension cord from the receptacle before disconnecting the product from the extension cord.
2.5 CHILD SAFETY
Tragic accidents can occur if the operator is not aware of the presence of children.
- Keep children out of the working area and under the watchful care of a responsible adult.
- Do not allow children under the age of 14 to operate this machine. Children who are 14 years of age and older must read and understand the operating instructions and
safety rules in this manual and must be trained and supervised by a parent. - Stay alert, and turn the machine off if a child or any other person enters the working area.
- Use extreme care when approaching blind corners, doorways, shrubs, trees, or other objects that may obscure your view of a child who may run into the path of the machine.
2.6 SYMBOLS ON THE PRODUCT
Some of the following symbols may be used on this tool.
Please study them and learn their meaning. Proper interpretation of these symbols will allow you to operate the tool better and safer.
| Symbol | Explanation |
| To reduce the risk of injury, users must read and understand the operator’s manual before using this product. | |
 |
Do not expose the product to rain or moist conditions. |
 |
Always wear safety goggles or safety glasses with side shields and, as necessary, a full face shield when operating this product. |
| To reduce the risk of injection or in- jury, never direct a water stream towards people or pets or place any body part in the stream. Leaking hoses and fittings are also capable of causing injection injury. Do not hold hoses or fittings. | |
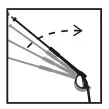 |
To reduce the risk of injury from kickback, hold the spray lance securely with both hands when the machine is on. |
 |
Failure to use in dry conditions and to observe safe practices can result in electric shock. |
 |
Fuel and its vapors are explosive and can cause severe burns or death. |
| Symbol | Explanation |
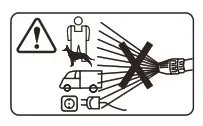 |
Warning! Never point the gun at humans, animals, the machine body, power supply, or any electric appliances. |
 |
The appliance is not suitable for connection to the drinking water mains without a backflow preventer. |
 |
Only use cleaning deck on flat, horizontal surfaces. Never lift the cleaning deck from the cleaning surface while operating the pressure washer. |
 |
Keep hands and feet away from the cleaning deck while the pressure washer is running. |
2.7 RISK LEVELS
The following signal words and meanings are intended to explain the levels of risk associated with this product.
| SYM- BOL | SIGNAL | MEANING |
| DANGER | Indicates an imminently hazardous situation, which, if not avoided, will result in death or serious injury. | |
| WARNING | Indicates a potentially hazardous situation, which, if not avoided, could result in death or serious injury. | |
| CAUTION | Indicates a potentially hazardous situation, which, if not avoided, may result in minor or moderate injury. | |
| CAUTION | (Without Safety Alert Symbol) Indicates a situation that may result in property damage. |
2.8 PROPOSITION 65
![]() WARNING
WARNING
This product contains a chemical known to the state of California to cause cancer, birth defects, or other reproductive harm. Some dust created by power sanding, sawing, grinding, drilling, and other construction activities contain chemicals known to cause cancer, birth defects, or other reproductive harm. Some examples of these chemicals are:
- Lead from lead-based paints;
- Crystalline silica from bricks and cement and other masonry products;
- Arsenic and chromium from chemically treated lumber.
Your risk of exposure to these chemicals varies depending on how often you do this type of work. To reduce your exposure to these chemicals, work in a well-ventilated area,
and work with approved safety equipment, such as dust masks that are specially designed to filter out microscopic particles.
Save these instructions.
INSTALLATION
3.1 ELECTRICAL CONNECTION
This machine has a precisely built electrical motor. It should be connected to a power supply that is 120V, 60 Hz, AC only (household). Do not operate this machine on direct current (DC). A considerable voltage drop will cause a loss of power and the motor will be overheated.
3.2 UNPACK THE MACHINE
![]() WARNING
WARNING
Make sure that you correctly assemble the machine before use.
![]() WARNING
WARNING
- If the parts are damaged, do not use the machine.
- If you do not have all the parts, do not operate the machine.
- If the parts are damaged or missing, speak to the service center.
- Open the package.
- Read the documentation in the box.
- Remove all the unassembled parts from the box.
- Remove the machine from the box.
- Discard the box and package in compliance with local regulations.
3.3 INSTALL THE GUN HOLDER
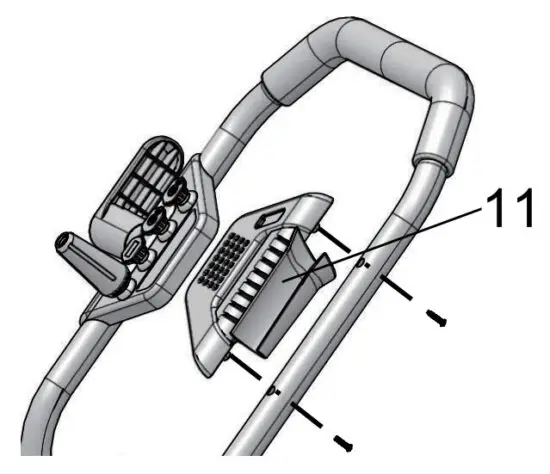
- Aligh the screw sleeves of the gun holder (11) with the screw holes on the upper handle.
- Push the screws through the screw sleeves and tighten them.
3.4 INSTALL THE UPPER HANDLE
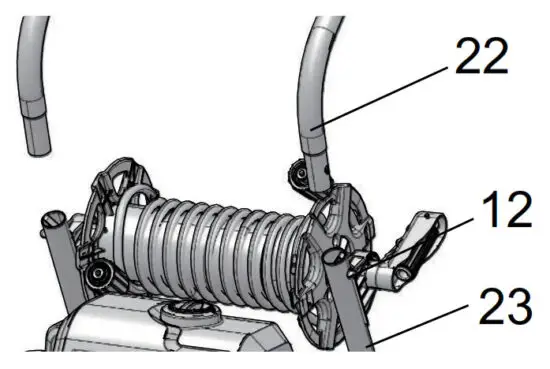
- Push and hold the handle lock button (12) on the upper handle (22).
- Move the upper handle (22) into the lower handle (23) until the handle lock button (12) clicks through the slot.
3.5 INSTALL THE WHEELS

- Put an axle (24) through the wheel and handle frame.
- Attach a washer (16) to the axle (24).
- Put a cotter pin (17) through the hole of the axle (24).
3.6 INSTALL THE SPRAY WAND
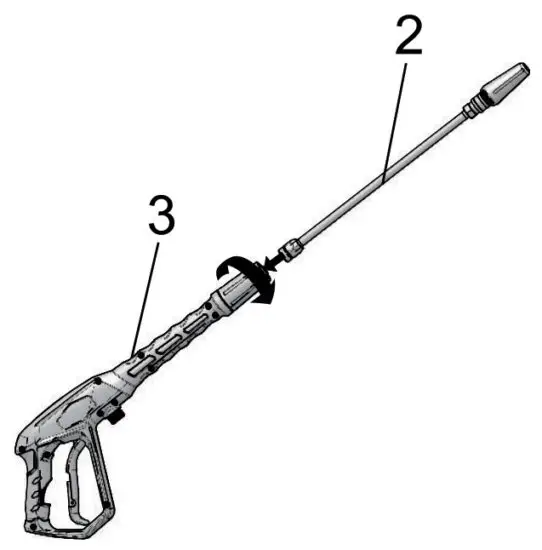
- Push the end of the spray wand (2) into the gun (3).
- Turn the spray wand (2) clockwise until the tabs lock into position.
![]() WARNING
WARNING
Make sure that the connection has no leakage.
3.7 INSTALL THE HIGH-PRESSURE HOSE
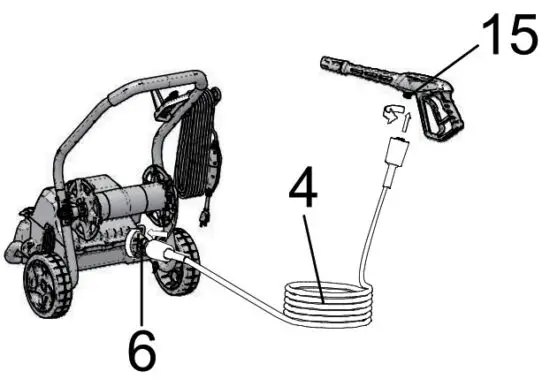
- Turn the crank handle to release the high-pressure hose (4).
- Push and turn clockwise one end of the high-pressure hose (4) into the inlet coupler (15).
- Install and tighten the other end of the high-pressure hose (4) onto the water outlet (6).
OPERATION
WARNING
Make sure that all the connections are tight and have no leakage before operation.
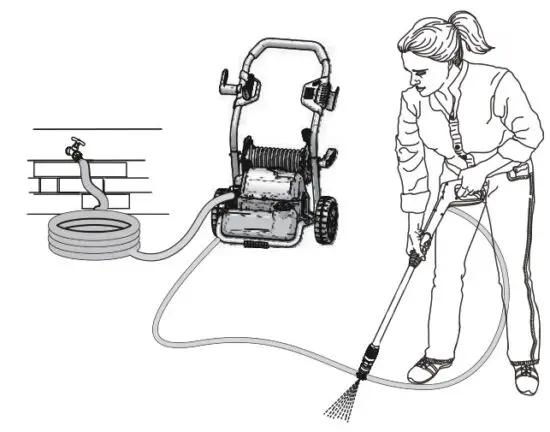
4.1 CONNECT THE WATER SUPPLY TO THE MACHINE
For easy operation, please use a self-coiling garden hose (not provided).
![]() WARNING
WARNING
When you operate the self-coiling hose, make sure that the hose has no blockage.
![]() WARNING
WARNING
• The water supply must come from the water main
• Do not use hot water
• Do not use water from ponds or lakes
![]() WARNING
WARNING
Do the local regulations when you connect the garden hose to the water supply. Direct connection through a receiver tank or backflow preventer is usually permitted.
![]() CAUTION
CAUTION
Inspect the filter in the water inlet connector before you connect the garden hose
• If the filter is damaged, do not use the machine until the filter is replaced.
• If the filter is dirty, clean the filter.
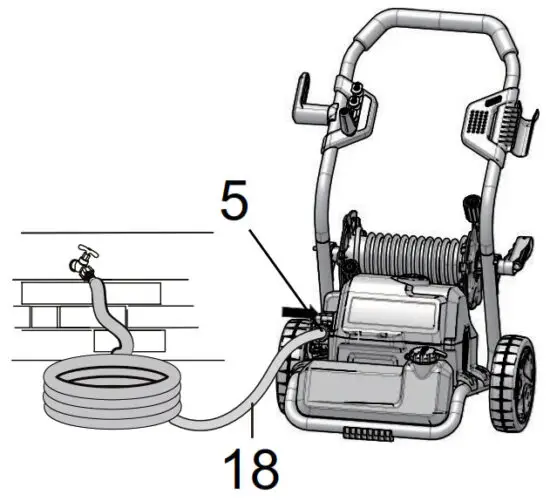
- Uncoil the garden hose (18).
- Let the water flow through the garden hose (18) for 30 seconds.
- Turn the water supply off.
- Install and tighten the end of the garden hose (18) to the water inlet connector (5).
![]() CAUTION
CAUTION
There must be a minimum of 3 m of free hose between the water inlet and the water supply.
4.2 USE THE GUN
![]() WARNING
WARNING
For safe control, keep your hands on the gun at all times.
• Pull and hold the gun trigger (19) to start the machine.
• Release the gun trigger (19) to stop water flow through the nozzle.
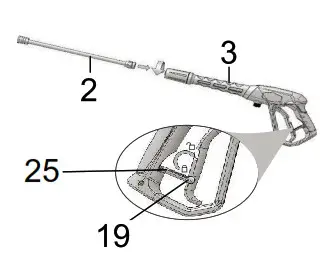
4.2.1 UNLOCK THE GUN TRIGGER
• Push backward the trigger safety button (25).
4.2.2 LOCK THE GUN TRIGGER
• Push forward the trigger safety button.
4.3 CHANGE THE NOZZLE
![]() WARNING
WARNING
Before you change the nozzle:
- Pull the gun trigger to release water pressure.
- Lock the trigger safety button on the gun.
- Stop the machine.
![]() WARNING
WARNING
Do not point the spray wand at your face or others’.
4.3.1 NOZZLE TYPE
| SPRAY TIP | APPLICATION |
 |
Green – Narrow fan tip (25° )
• The green pressure washer tip pro- vides high versatility with its 25 de- gree angle tip. Referred to as the washing tip, because it provides adequate pressure to remove dirt from surfaces, but is designed to not damage many surfaces. This pressure washer tip is designed for “sweeping” foliage or debris given its wide-angle. This tip is versatile due to its wide area of cleaning and strong pressure application. |
 |
White – Wide fan tip (40° )
• The white 40-degree tip, referred to as the “fan” tip creates the widest area of cleaning with relatively low pressure. This pressure washer tip is best used for light or delicate cleaning applications. It is recommended for light cleaning on wood decks and other soft or delicate surfaces. |
 |
Black – Soap spray tip
• The black soap spray tip, is used for soap application. Soap is applied un- der low-pressure high volume for optimum performance. Soap cannot be applied under high pressure with this machine. |
 |
Turbo Nozzle Tip
• The nozzle rotates in a zero to 15 de- gree spray pattern in a circular motion to break down tough dirt and grime. The spray pattern can cover an area of 4 to 8 inches wide, depending on the distance between the tip and the surface being cleaned. |
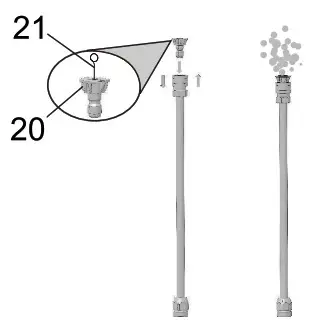
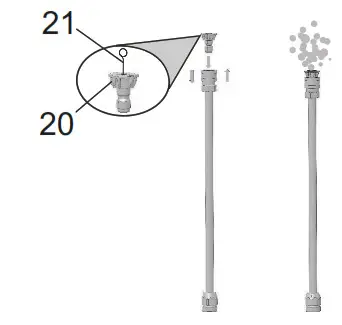
4.3.2 INSTALL THE NOZZLE
- Pull back the quick-connect collar on the spray wand (2).
- Install the nozzle (20) onto the spray wand (2).
- Release the quick-connect collar to attach the nozzle (20).
4.4 ADD DETERGENT
WARNING
Do not use household detergents, acids, alkalines, bleaches, solvents, flammable material, or industrial-grade solutions, which can do damage to the pump.
WARNING
Do the instructions on the solution bottle to prepare detergent.
NOTE
If it is necessary, use a funnel to prevent the spill of detergent. Clean and dry the spilled detergent when you fill it.
NOTE
Soap/detergent can only be applied with this machine when the black nozzle(75 degrees) is installed.
- Put the machine vertically on a flat surface..
- Open the cap on the detergent tank (13).
- Put the detergent into the detergent tank (13).
- Close the cap.
NOTE
Do not let detergent dry on the surface to prevent streaks.
4.5 START THE MACHINE
![]() CAUTION
CAUTION
Do not operate without the water supply connected.
![]() CAUTION
CAUTION
Before you start the machine:
- Turn the water supply on.
- Pull the gun trigger to release air pressure.
- If a stable stream of water comes into view, release the gun trigger.
- Connect the machine to the power supply.
- Set the power switch to the “ON” ( | ) position.
- Turn the water supply on.
- Pull the gun trigger.
4.6 STOP THE MACHINE
- Release the spray gun trigger.
- Press down on the ON/OFF switch, once again, to set the power switch to the “OFF” (O) position.
![]() WARNING
WARNING
If you do not use the machine:
- Stop the machine.
- Turn the water supply off.
- Disconnect the power cord from the outlet.
- Pull the spray gun trigger to release the remaining pressure from the machine.
- Engage the trigger safety lock-out on the spray gun.
MAINTENANCE
![]() WARNING
WARNING
Before maintenance, make sure that you
- Stop the machine.
- Wait until all the moving parts stop.
- Disconnect the plug from the power source.
![]() WARNING
WARNING
Do not use strong solvents or detergents on the plastic housing or components.
![]() WARNING
WARNING
Do not let brake fluids, gasoline, or petroleum-based materials touch the plastic parts. Chemicals can cause damage to the plastic, and make the plastic unserviceable.
![]() WARNING
WARNING
Replace the power cord with an approved service center.
5.1 NOZZLE MAINTENANCE
If there is too much pump pressure, the nozzle can become clogged, you can feel a pulsing sensation while you pull the gun trigger.
5.1.1 REMOVE THE NOZZLE
- Pull back the quick-connect collar on the gun wand (2).
- Remove the nozzle (20) from the gun wand (2).
5.1.2 CLEAN THE NOZZLE
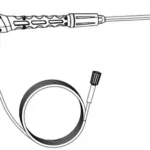
- Use a straight paper clip or cleaning tool (21) to clean the spray tip (20).
- Flush and clean the unwanted materials out of the nozzle (20) with the garden hose (14).
- Install the clean nozzle (20) to the spray wand (2).
TRANSPORTATION AND STORAGE
![]() WARNING
WARNING
Disconnect the power cord and water supply hose before transportation and storage.
6.1 MOVE THE MACHINE
- Point the spray wand in a safe direction.
- Only hold the machine with the handgrip.
6.2 STORE THE MACHINE
![]() WARNING
WARNING
Make sure that the spray gun, the high-pressure hose, and the pump are dry.
![]() WARNING
WARNING
Make sure the machine is out of the reach of children.
NOTE
Use a recommended pump protector to prevent cold weather damage during storage in winter.
- Disconnect the garden hose from the machine.
- Wind the power cord and the high-pressure hose.
- Clean housing and the plastic components with a moist and soft cloth.
- Make sure that the machine does not have loose or damaged parts. If it is necessary, follow these steps/ instructions:
- Replace the damaged parts.
- Tighten the bolts.
- If needed, call the customer service phone number (enter number here) for servicing instructions.
- Store the machine in a dry, isolated, and frost-free area.
TROUBLESHOOTING
| PROBLEM | POSSIBLE CAUSE | SOLUTION |
| The motor does not start. | The power button is in the “OFF” (O) position. | Set the power switch to the “ON” ( | ) posi- tion. |
| The power cord is not plugged in. | Connect the power cord to the power supply. | |
| The electrical outlet does not supply sufficient power. | Try another elec- trical outlet. | |
| The circuit breaker is tripped. | Let it cool, and start the machine again. | |
| The power switch is on, but you do not pull the spray gun trigger. | Pull the spray gun trigger. |
| PROBLEM | POSSIBLE CAUSE | SOLUTION |
| The machine does not reach high pressure. | The diameter of garden hose is too small. | Replace with a 1” (25 mm) or 5/8” (16 mm) garden hose. |
| Water supply is re- stricted. | Check garden hose for kinks, leaks, and blockage. | |
| The water supply is not sufficient. | Open the water supply fully. | |
| Spray tip has not be installed onto the spray wand properly. | Install desired spray tip to end of wand. | |
| The water intake filter is clogged. | Remove filter and rinse in warm wa- ter. | |
| The water supply is not sufficient. | Open water supply fully. Check gar- den hose for kinks, leaks, or blockage. | |
| The pump is draw- ing in air. | 1. Make sure that the hoses and fitting are air- tight. | |
| 2. Turn “OFF” machine. | ||
| The output pres- sure varies high and low. | 3. Purge pump by squeezing trigger gun un- til a stead flow of water comes out the spray tip. | |
| The water intake filter is clogged. | Remove the filter and Rinse in warm water. | |
| The supply volt- age is low. | Make sure that on- ly the pressure washer is running on the circuit. | |
| The gun, hose or nozzle are calci- fied. | Run distilled vine- gar through deter- gent tank. |
| PROBLEM | POSSIBLE CAUSE | SOLUTION |
| The motor buzzes, but the machine does not start. | The supply volt- age is low. | Make sure that on- ly the pressure washer is running on the circuit. |
| The pump system has residual pres- sure. | 1. Turn “OFF” the machine. 2. Pull the spray gun trigger on spray wand to release pres- sure. 3. Turn the ma- chine “ON”. |
|
| Voltage loss due to use of an improper extension cord. | Disconnect the ex- tension cord, and connect the ma- chine directly into the outlet. | |
| Pressure washer not used for long periods. | Call customer service. | |
| Residual friction among compo- nents. Unit might emit a humming noise. | 1. Disconnect the water supply. 2. Power “ON” the machine for 2 to 3 sec- onds. 3. Repeat the above step a couple of times or until the motor starts. |
|
| There is no water. | The water supply is off. | Turn the water supply on. |
| The garden hose is kinked.. | Remove kink in garden hose. |
TECHNICAL DATA
| Universal Motor | 120V~ 60 Hz, 13 Amps |
| Max. Pounds Per Square Inch Pressure | 2000 PSI |
| Max Gallon Per Minute | 1.2 GPM |
| Maximum Inlet Water Temperature | 104 °F (40 °C) |
| Cleaning Units | 2400 C.U. |
| Weight | 40.39 lbs. (18.3 kg) |
LIMITED WARRANTY
3 YEAR ANS ANOS LIMITED WARRANTY
Greenworks hereby warranties this product, to the original purchaser with proof of purchase, for a period of three (3) years against defects in materials, parts, or workmanship. Greenworks, at its own discretion, will repair or replace any and all parts found to be defective, through normal use, free of charge to the customer. This warranty is valid only for units that have been used for personal use that have not been hired or rented for industrial/commercial use, and that has been maintained in accordance with the instructions in the owners’ manual supplied with the product from the new.
ITEMS NOT COVERED BY WARRANTY:
- Any part that has become inoperative due to misuse, commercial use, abuse, neglect, accident, improper maintenance, or alteration; or
- The unit, if it has not been operated and/or maintained in accordance with the owner’s manual; or
- Normal wear, except as noted below;
- Routine maintenance items such as lubricants, blade sharpening;
- Normal deterioration of the exterior finish due to use or exposure.
HELPLINE:
Warranty service is available by calling our toll-free helpline, at 1-888-909-6757.
TRANSPORTATION CHARGES:
Transportation charges for the movement of any power equipment unit or attachment are the responsibility of the purchaser. It is the purchaser’s responsibility to pay transportation charges for any part submitted for replacement under this warranty unless such return is requested in writing by Greenworks.
| USA address: | Canadian address: |
| Greenworks Tools | Greenworks Tools Canada Inc. |
| P.O. Box 1238 | 1110 Stellar Drive Unit 102 |
| Mooresville, NC 28115 | Newmarket, ON, L3Y 7B7 |
EXPLODED VIEW
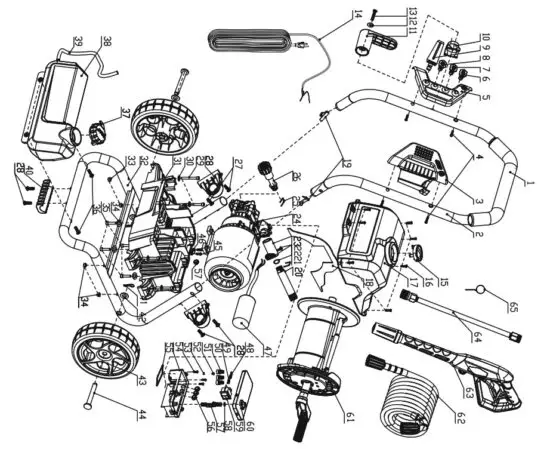
| ITEM NO. | PART NO. | DESCRIPTION | QTY |
| 1 | 349011635 | Foam grip | 1 |
| 2 | 331011635 | Upper handle | 1 |
| 3 | 311201635 | Gun holder assy | 1 |
| 4 | 322011628 | Screw ST5.5*22-F | 4 |
| 5 | 311211635 | Spray tip panel assy | 1 |
| 6 | 34139319 | 25-degree nozzle | 1 |
| 7 | 31225363 | 40-degree nozzle | 1 |
| 8 | 31240363 | Soap nozzle | 1 |
| 9 | 31208363 | Turbo Nozzle | 1 |
| 10 | 341111635 | Cord arm basement | 1 |
| 11 | 341101635 | Cord arm | 1 |
| 12 | 32913847 | Washer | 1 |
| 13 | 322021635 | Screw M6*35 | 1 |
| 14 | 364992516 | Power cord assy | 1 |
| 15 | 341091639B | Switch knob | 1 |
| ITEM NO. | PART NO. | DESCRIPTION | QTY |
| 16 | 322031635 | Screw ST4.2*16-F | 8 |
| 17 | 341011635AB | Upper housing | 1 |
| 18 | 341171635 | Heat isolation board | 1 |
| 19 | 33306847 | Spring button | 2 |
| 20 | 332021635 | Water outlet connector | 1 |
| 21 | 34202368 | O-ring | 1 |
| 22 | 32202368 | Screw ST4.2*16-F | 2 |
| 23 | 341201635AB | Water outlet connector press plate | 1 |
| 24 | 31101363A | Motor pump assy | 1 |
| 25 | 33302365 | U pin | 2 |
| 26 | 311221635 | Water inlet connector assy | 1 |
| 27 | 322011635 | Bolt M6*20 | 10 |
| 28 | 341371635 | Hose reel bracket | 2 |
| 29 | 322011023 | Bolt M6*50 | 4 |
| 30 | 329011635 | Washer | 4 |
| 31 | 341021635AB | Lower housing | 1 |
| 32 | 331021635 | Mainframe | 1 |
| 33 | 32222301A | Bolt M6 nut | 4 |
| 34 | 32233301A | Washer | 4 |
| 35 | 32212131 | Bolt M6*25 | 4 |
| 36 | 3220398 | Screw M6*25 | 2 |
| 37 | 342011635 | Soap tank cap | 1 |
| 38 | 341031635B | Soap tank | 1 |
| 39 | 34900365 | Suction hose | 35 |
| 40 | 341161635 | Foot pad | 1 |
| 41 | 32229301A | Hitch pin | 2 |
| 42 | 32908301A | Washer | 4 |
| 43 | 341083613 | 8″ wheel | 2 |
| 44 | 33210301A | Wheel axle | 2 |
| 45 | 3320303 | Screw ST3.5*16-F | 2 |
| 46 | 34119316A | Power cord clamp | 1 |
| 47 | 36401661 | Capacitor | 1 |
| 48 | 36503301A | Terminal sleeve | 1 |
| 49 | 36501301 | Female terminal | 1 |
| 50 | 36511154 | Wire cup | 3 |
| 51 | 32204301A | Bolt M4*6 | 1 |
| 52 | 32912301A | Washer | 1 |
| 53 | 32202316A | Bolt M4*12 | 3 |
| ITEM NO. | PART NO. | DESCRIPTION | QTY |
| 54 | 341141635 | Switch box | 1 |
| 55 | 34226316A | Motor seal | 1 |
| 56 | 34201301A | Wire seal | 4 |
| 57 | 341151635 | Switch lever | 1 |
| 58 | 34216301A | O-ring | 1 |
| 59 | 363021628 | Power switch | 1 |
| 60 | 341131635 | Switch box cover | 1 |
| 61 | 311301635 | Hose reel assy | 1 |
| 62 | 31160363 | High-pressure hose assy | 1 |
| 63 | 31140363-1 | GW gun handle assy | 1 |
| 64 | 31145363 | GW gun wand assy | 1 |
| 65 | 33201671 | Spray cleaning tool | 1 |