![]()
USE AND CARE GUIDE
WIRELESS PLUG-IN DOORBELL KIT

Illustrations may vary from the actual unit.
THANK YOU
We appreciate the trust and confidence you have placed in Hampton Bay through the purchase of this wireless doorbell kit. We strive to continually create quality products designed to enhance your home. Visit us online to see our full line of products available for your home improvement needs. Thank you for choosing Hampton Bay!
Safety Information
PRECAUTIONS
- Please read and understand this entire manual before attempting to assemble, install, or operate this doorbell.
- All electrical work must be in accordance with national and local electrical codes. If in doubt, consult a qualified electrician.

![]() NOTE: The push-button and doorbell come synced from the factory. The range of the wireless doorbell can vary with location, temperature, and battery condition.
NOTE: The push-button and doorbell come synced from the factory. The range of the wireless doorbell can vary with location, temperature, and battery condition.
This device complies with Part 15 of the FCC Rules. Operation is subject to the following two conditions: (1) this device may not cause harmful interference, and (2) this device must accept any interference received, including interference that may cause undesired operation.
Warning: Changes or modifications to this unit not expressly approved by the party responsible for compliance could void the user’s authority to operate the equipment.
Note: This equipment has been tested and found to comply with the limits for a Class B digital device, pursuant to part 15 of the FCC Rules. These limits are designed to provide reasonable protection against harmful interference in a residential installation. This equipment generates, uses, and can radiate radio frequency energy and, if not installed and used in accordance with the instructions, may cause harmful interference to radio communications. However, there is no guarantee that interference will not occur in a particular installation. If this equipment does cause harmful interference to radio or television reception, which can be determined by turning the equipment off and on, the user is encouraged to try to correct the interference by one or more of the following measures:
- Reorient or relocate the receiving antenna.
- Increase the separation between the equipment and receiver.
- Connect the equipment into an outlet on a circuit different from that to which the receiver is connected.
- Consult the dealer or an experienced radio/TV technician for help.
This device contains license-exempt transmitter(s)/receiver(s) that comply with Innovation, Science, and Economic Development Canada’s license-exempt RSS(s). Operation is subject to the following two conditions:
- This device may not cause interference.
- This device must accept any interference, including interference that may cause undesired operation of the device.
FCC Responsible Party Name: HeathCo LLC
Address: 2445 Nashville Road, Bowling Green, KY 42101 U.S.A.
Telephone Number: 800-858-8501
Warranty
3-YEAR LIMITED WARRANTY
WHAT IS COVERED
This product is guaranteed to be free of factory defective parts and workmanship for a period of 3 years from the date of purchase. A purchase receipt is required for all warranty claims.
WHAT IS NOT COVERED
This warranty does not include expendable items (such as light bulbs, batteries, etc.), repair service, adjustment, and calibration due to misuse, abuse, or negligence. Unauthorized service or modification of the product or of any furnished component will void this warranty in its entirety. This warranty does not include reimbursement for inconvenience, installation, setup time, loss of use, unauthorized service, or return shipping charges. This warranty is not extended to other equipment and components that a customer uses in conjunction with this product. The manufacturer reserves the right to discontinue products and to change specifications at any time without incurring any obligation to incorporate new features in products previously sold.
Contact the Customer Service Team at 1-844-760-3644 or visit www.hamptonbay.com.
Pre-Installation
PLANNING INSTALLATION
Before installing the wireless doorbell kit, ensure that all parts are present. Compare parts with the Hardware Included and Package Contents sections. If any part is missing or damaged, do not attempt to assemble, install, or operate this wireless doorbell kit.
Estimated installation time: 30 minutes
SPECIFICATIONS
| Doorbell | Push-button | |
| Power requirements | 120 VAC, 60 Hz | Type A23 12V battery (included) |
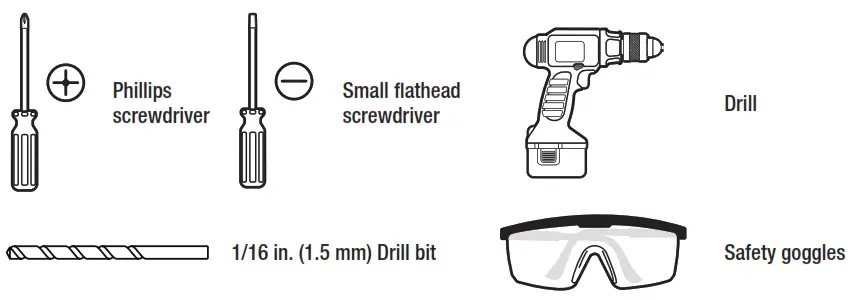
TOOLS REQUIRED
HARDWARE INCLUDED
![]() NOTE: Hardware shown to actual size.
NOTE: Hardware shown to actual size.
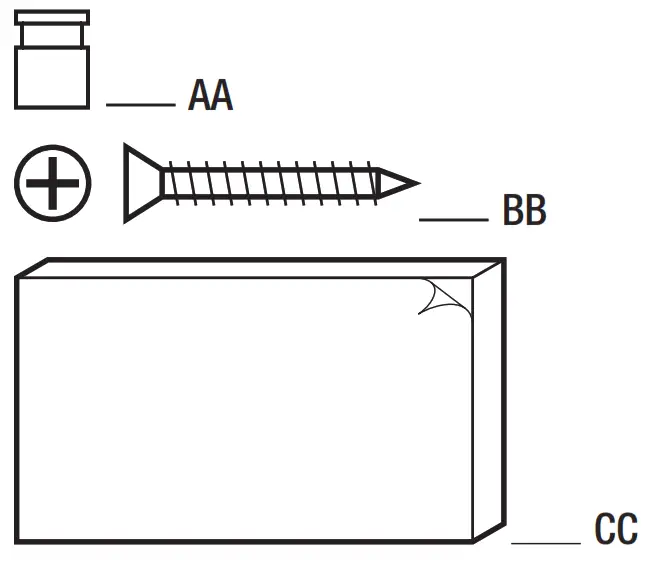
| Part | Description | Quantity |
| AA | Juniper | 1 |
| BB | Screw | 2 |
| CC | Double-sided tape | 1 |
PACKAGE CONTENTS
| Part | Description | Quantity |
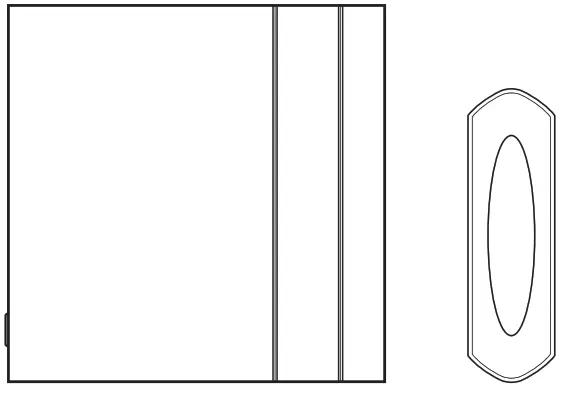
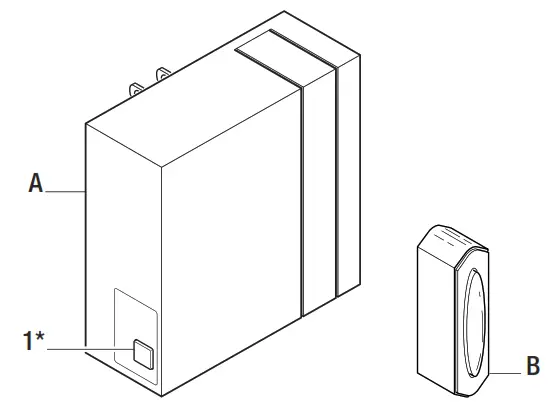
| A | Doorbell | 1 |
| B | Push-button | 1 |
Tune/Sync/Reset button. See Operation, step 2 – Selecting a tune or Troubleshooting for additional information.
Installation
- Installing the doorbell
□ Plug in the doorbell (A) at the desired location.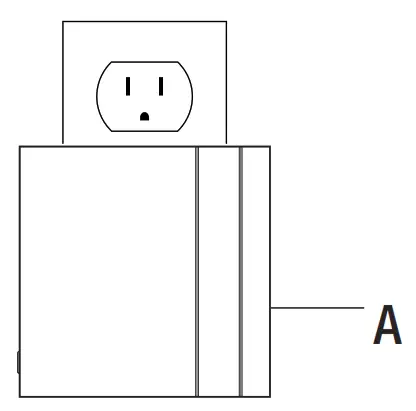
- Removing the battery tab
□ Remove the back of the push button (B) by pushing in the tab on the bottom with a small screwdriver (not included).
□ Remove the orange battery tab from the push button (B).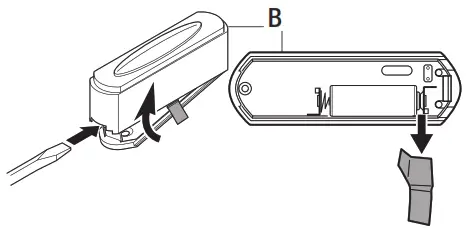
- Testing the push button and doorbell
□ Temporarily position the push button (B) where it will be mounted.
□ Press the push button (B) to verify the doorbell (A) and push button (B) work properly.
□ If the doorbell (A) does not sound, move the doorbell (A) closer to the push button (B) and test again.
 NOTE: Do not permanently mount the push button until the push button and doorbell are working properly.
NOTE: The push-button and doorbell come synced from the factory. The range of the wireless doorbell can vary with location, temperature, and battery condition.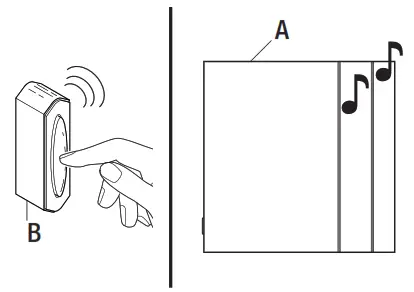
- Mounting the push button
Use either screw (BB) or double-sided tape (CC) to □ To mount with screws (BB), remove the back □ When attaching the push button (B) withNOTE:
Operation
- Setting the wireless push button
The wireless push button (B) has two options for tune selection: Play the selected “FRONT” door musical tune or play the “REAR” door designated tune (Ding).
□ The push button (B) comes from the factory with no jumper (AA) installed on the pins. This setting will play the “FRONT” door musical tune.
□ To set the push button (B) to play the “REAR” door tune (Ding), add the jumper (AA) to the pins inside the push button (B).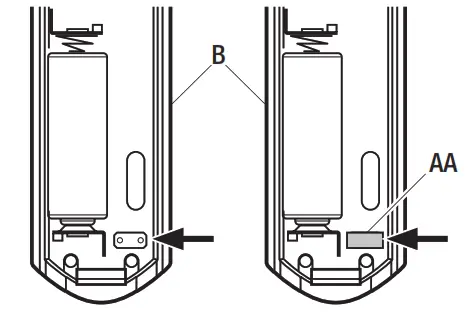
Push-button (B) set as “FRONT” door – no
jumper (AA) on the pins (Factory Default)Push-button (B) set as “REAR” door – jumper (AA) is on the pins - Selecting a tune
The doorbell (A) has different selectable tunes. The push button (B) set as the “REAR” push button (B) will only play Ding (one note tune). The push button (B) set as the “FRONT” push button (B) will play either DingDong (two-note tune) or Westminster (eight-note tune).
□ Press and release the “TUNE” button (1) on the doorbell (A) until the desired “FRONT” tune is heard.
NOTE: All doorbell models are designed to work with up to 5 wireless push buttons (sold separately).
NOTE: All doorbells are designed to play only two different tunes no matter how many push buttons are used.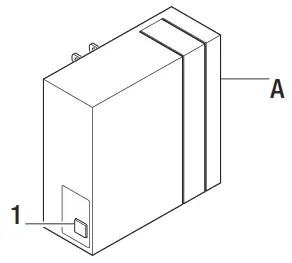
Care and Cleaning
- Use a dry cloth to clean the doorbell and push the button.
- Do not use cleaners or polishes.
- Do not use any fluids on the doorbell or push the button.
Troubleshooting
| Problem | Possible Cause | Solution |
| The doorbell does not sound. |
|
|
| The batteries seem okay, but the doorbell does not work after installation. |
|
|
| Doorbell sounds when not intended (false triggers). |
|
|
![]()
Questions, problems, missing parts?
Before returning to the store, call Hampton Bay Customer Service
8 a.m. – 5 p.m., CST, Monday – Friday
1-844-760-3644
HAMPTONBAY.COM
Retain this manual for future use.