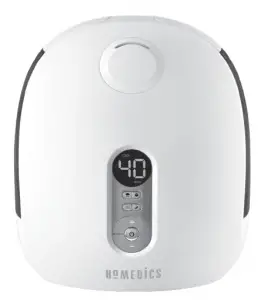
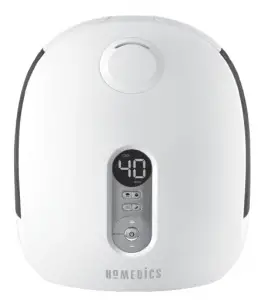
Homedics UHE-WM250 Warm & Cool Mist Ultrasonic Humidifier Instruction Manual and Warranty Information
IMPORTANT SAFETY INSTRUCTIONS:
WHEN USING ELECTRICAL PRODUCTS, ESPECIALLY WHEN CHILDREN ARE PRESENT,BASIC SAFETY PRECAUTIONS SHOULD ALWAYS BE FOLLOWED, INCLUDING
THE FOLLOWING:
READ ALL INSTRUCTIONS BEFORE USING
DANGER – TO REDUCE THE RISK OF ELECTRIC SHOCK:
- Always place humidifier on a firm, flat surface. A waterproof mat or pad is recommended for use under the humidifier. Never place it on a rug or carpet, or on a finished floor that may be damaged by exposure to water or moisture.
- Always unplug the unit from the electrical outlet immediately after using and before cleaning
- DO NOT reach for a unit that has fallen into water. Unplug it immediately.
- DO NOT use while bathing or in the shower.
- DO NOT place or store the unit where it can fall or be pulled into a tub or sink.
- DO NOT place or drop into water or other liquids.
- DO NOT use water above 86° Fahrenheit.
WARNING – TO REDUCE THE RISK OF BURNS, ELECTRIC SHOCK, FIRE
OR INJURY TO PERSONS:
- A unit should never be left unattended while plugged in.
- Close supervision is necessary when this unit is used by or near children, invalids, or disabled persons.
- Use this unit only for its intended use as described in this manual. Do not use attachments not recommended by HoMedics; specifically any attachments not provided with this unit.
- NEVER drop or insert any object into any opening.
- DO NOT operate where aerosol (spray) products are being used, or where oxygen is being administered.
- Electrical supply shall be disconnected prior to beginning any such cleaning operation.
- Always hold the water tank firmly with both hands when carrying a full tank of water.
- NEVER use the humidifier in an environment where explosive gases are present.
- DO NOT place the humidifier near heat sources, such as a stove, and do not expose the humidifier to direct sunlight.
- DO NOT carry this unit by the power cord or use the power cord as a handle.
- To disconnect, turn all controls to the “off” position, then remove the plug from the outlet.
- DO NOT use outdoors. For indoor use only.
SAVE THESE INSTRUCTIONS
CAUTION – PLEASE READ ALL INSTRUCTIONS CAREFULLY BEFORE
OPERATION.
- Never cover the unit while it is operating.
- Always keep the cord away from high temperature and fire.
- If the cord or tank(s) sustains damage, you must stop using this product immediately and contact HoMedics consumer relations (see Warranty section for consumer relations contact information).
- Perform regular maintenance on the ultrasonic membrane.
- Never use detergent to clean the ultrasonic membrane.
- Never clean the ultrasonic membrane by scraping with a hard object.
- Do not attempt to adjust or repair the unit. Servicing must be performed by professional or qualified personnel.
- Stop using this unit if there is an unusual noise or smell.
- Unplug this unit when not in use for a long period of time.
- Do not touch the water or any parts of the unit that are covered by water while the unit is on or plugged in.
- Never operate without water in the tank.
- Only use water in the tank.
- Never use any additive to the water.
- Do not wash, adjust, or move this unit without first unplugging it from the electrical outlet.
- Keep this unit out of reach of children. Do not allow children to use this unit without supervision.
- This appliance is intended for household use only.
Attention California Residents:
WARNING: This product contains chemicals known to the State of California to cause cancer, birth defects and other reproductive harm.
Unique Features and Specifications
Ultrasonic Tech nology
This humidifier uses ultrasonic high frequency tech nology to convert the water into 1–5 million super particles that are dispersed into the air evenly.
LED Digital Readout
Displays current room humidity, programmed humidity setting, timer setting, warm or cool mist selection and mist output level.
Programmable Humidistat
Customize the level of humidity between 35% – 65% in 5% increments.
Built-In Timer
Programmable timer, up to 12 hours.
Night Light / Display Lights
A useful light feature is included for your convenience.
Auto Shut-Off Protection
When the tanks are empty the unit will shut off automatically.
Capacity
2.0 gallon – 7.57 liters
Dual Water Tanks
Refill one tank while the other is running.
Run Time: 120 hours
Run time is calculated based on using cool mist and setting the mist level to low setting. Based on the natural humidity level in your home, the temperature of water you use, and the mist level setting you choose, you may experience longer or shorter run times.
Control Panel
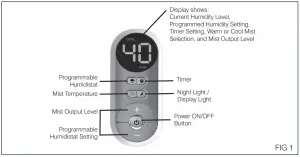
Figure 1
How To Use
Power ON/OFF Button
Plug unit in to a 120 volt AC electrical outlet. Press the POWER button to turn unit on. Press the POWER button again to turn unit off. ATTENTION: When the water in the tank is almost empty, the unit will shut off to indicate to the user to refill water.
Mist Output Level
Mist adjusts from the lowest output 1 to the highest output 5. To increase the mist output, press the + Button. The corresponding Mist Level will be lit on the display. To decrease mist output, press the – Button.
Mist Temperature Setting
When the humidifier is powered ON, it will be operating on the last setting used.
To change the mist temperature from Cool to Warm Mist, press the Mist Temperature Button. WARM will be illuminated on the display. To change the mist temperature from Warm to Cool Mist, press the Mist Temperature Button again. COOL will be illuminated on the display.
NOTE: Once Warm Mist is selected, it will take 20 minutes to heat up before the mist becomes warm.
Programmable Humidistat
The Programmable Humidistat can be set in 5% increments from 35% – 65% humidity.
To program the humidity level, press the Humidistat Button. Then press the + / – Button. The humidity level will increase / decrease by 5% every time the + / – Button is pressed and will show on the display screen. Keep pressing the + / – Button until the desired programmable humidity setting is reached. The display will show the set humidity level for 3 seconds, then default back to display the current room humidity.
NOTE: To eliminate any programmed Humidistat setting, press the Humidistat Button. Then press the + Button until you reach “CO” (continuous on) one level above 65%.
NOTE: When the set humidity level is reached, the humidifier will cycle off until the humidity in the room drops 5% below the set humidity level, then will cycle on until the set humidity level is reached again.
Night Light / Display Light
Press the Night Light / Display Light Button once to turn on the night light. The light at the bottom of the water tanks will turn on, illuminating the tanks. Press a second time to leave the night light on, but turn off the display light. Press a third time to turn off the night light and display light so no lights are illuminating. Press a fourth time to turn the display light on.
Timer
Press the Timer Button. Keep pressing the Timer Button until the desired timer setting is lit on the display. The Timer Button will cycle through the following settings 0 hours, 2 hours, 4 hours, 8 hours, 12 hours, 0 hours. To turn the Timer off, press the Timer Button until 0 hours is shown on the display.
NOTE: Always be sure the humidifier has a full tank of water prior to using the timer setting.
How to Fill
CAUTION: Before filling unit with water, turn the power off and unplug the unit from the outlet.
NOTE: Always use two hands to carry the water tank.
- Grasp tank handle and lift up from humidifier base. (Fig. 2)
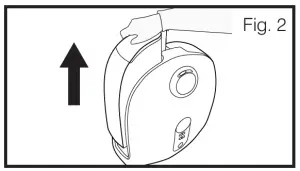
Figure 2
- Turn the tank upside down—remove the tank cap by turning it counter-clockwise. (Fig. 3)
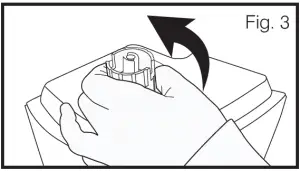
Figure 3
- Fill the water tank with clean, cool (not cold) water. We recommend using distilled water if you live in a hard water area. (Fig. 4)
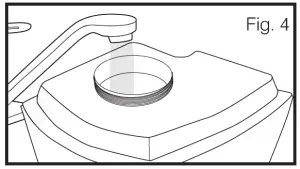
Figure 4
NOTE: Not for use with essential oils. Even a few drops can ruin the humidifier. - Replace the tank cap by turning clockwise until tight. (Fig. 5)
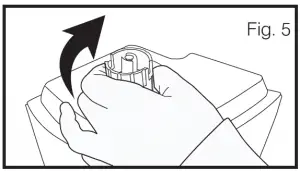
Figure 5
- Install the tank back on the base of the unit. Make sure the tank is firmly seated. (Fig. 6)
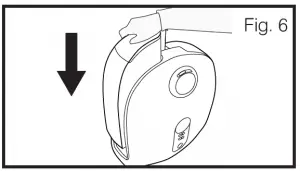
Figure 6
- Repeat the process for the 2nd tank.
NOTE: It is normal to have a small amount of water
in the base during and after use.
About White Dust:
Use of high mineral content hard water may cause a white mineral residue to accumulate on surfaces in the room near the humidifier. The mineral residue is commonly called “white dust.” The higher the mineral content (or, the harder your water is), the greater the potential for white dust. The white dust is not caused by a defect in the humidifier. It is caused only by minerals suspended in the water.
How and Why To Use Demineralization Cartridges:
The HoMedics demineralization cartridge will help reduce the potential for white dust, a deposit of minerals left behind from using hard water in your humidifier. The cartridge should be replaced every 30 – 40 fillings. The cartridge may need to be replaced more often if you are using very hard water. Replace the cartridge when you notice an increase in white dust build-up. If white dust still forms around the humidifier after a new cartridge has been installed, consider using distilled water. To purchase new demineralization cartridges, model # UHE-HDC4, go back to the retailer (where you purchased your humidifier), or visit www.homedics.com
If you live in an area with hard water, or use a water softener, we recommend using distilled water for better results from your humidifier. Never use water softening additives in your humidifier
Installation Instructions
- Remove demineralization cartridges from packaging and let them soak in water for 10 minutes.
- Remove the tanks from humidifier base and turn it over.
- Unscrew the tank cap by turning the cap counter-clockwise.
- Fill the tank with water as shown in the How to Fill section of the instructions included with your humidifier.
- Add a soaked demineralization cartridge into each tank.
- Replace the tank cap by turning clockwise.
- Place the tanks back on the base.

Cleaning and Care
CAUTION: Before cleaning the unit, turn power off and unplug unit from the outlet.
To Clean the Tank
Remove the water tanks from the humidifier base by lifting them from the main unit. Unscrew the tank cap and rinse inside the tank with clean water. (Fig. 7) To remove any scale or build up, use a 50/50 mixture of vinegar and lukewarm water to clean the inside of the tank. Suggestion: Clean the water tanks once every two to three weeks, depending on your water conditions.
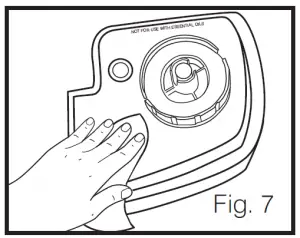
Figure 7
To Clean the Ultrasonic Membrane
Remove transducer plate cover. (Fig. 8) Pour a 50/50 mixture of vinegar and water on the surface of the ultrasonic membrane, then soak for five minutes. Brush clean with a soft-bristle brush (not included) and rinse. (Fig. 9) Replace transducer plate cover.

Figure 8
NEVER touch the ultrasonic membrane with your fingers as the natural oils in skin can damage the membrane.
Suggestion: Clean the membrane once every two to three weeks, depending on your water conditions.
NOTE: Never submerge the base in water or any liquid

Figure 9
To Clean the Surface
Clean the surface of the unit with a clean damp soft cloth as often as needed. (Fig. 10)

Figure 10
Troubleshooting
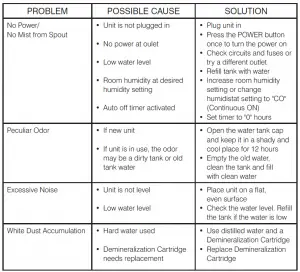
FCC DISCLAIMER
NOTE: This product has been tested and complies with the requirements for Federal Communication Commission, Part 18. Although this product is tested and complies with FCC, it may interfere with other devices. If this product is found to interfere with another device, separate the other device and this product. Conduct only the user maintenance found in this instruction manual. Other maintenance and servicing may cause harmful interference and can void the required FCC compliance.
LIMITED ONE YEAR WARRANTY
HoMedics sells its products with the intent that they are free of defects in manufacture and workmanship for a period of one year from the date of original purchase, except as noted below. HoMedics warrants that its products will be free of defects in material and workmanship under normal use and service. This warranty extends only to consumers and does not extend to Retailers.
To obtain warranty service on your HoMedics product, contact a consumer relations representative for assistance. Please make sure to have the model number of the product available.
HoMedics does not authorize anyone, including, but not limited to, Retailers, the subsequent consumer purchaser of the product from a Retailer or remote purchasers, to obligate HoMedics in any way beyond the terms set forth herein. This warranty does not cover damage caused by misuse or abuse; accident; the attachment of any unauthorized accessory; alteration to the product; improper installation; unauthorized repairs or modifications; improper use of electrical/power supply; loss of power; dropped product; malfunction or damage of an operating part from failure to provide manufacturer’s recommended maintenance; transportation damage; theft; neglect; vandalism; or environmental conditions; loss of use during the period the product is at a repair facility or otherwise awaiting parts or repair; or any other conditions whatsoever that are beyond the control of HoMedics.
This warranty is effective only if the product is purchased and operated in the country in which the product is purchased. A product that requires modifications or adoption to enable it to operate in any other country than the country for which it was designed, manufactured, approved and/or authorized, or repair of products damaged by these modifications is not covered under this warranty.
THE WARRANTY PROVIDED HEREIN SHALL BE THE SOLE AND EXCLUSIVE WARRANTY. THERE SHALL BE NO OTHER WARRANTIES EXPRESS OR IMPLIED INCLUDING ANY IMPLIED WARRANTY OF MERCHANTABILITY OR FITNESS OR ANY OTHER OBLIGATION ON THE PART OF THE COMPANY WITH RESPECT TO PRODUCTS COVERED BY THIS WARRANTY. HOMEDICS SHALL HAVE NO LIABILITY FOR ANY INCIDENTAL, CONSEQUENTIAL OR SPECIAL DAMAGES. IN NO EVENT SHALL THIS WARRANTY REQUIRE MORE THAN THE REPAIR OR REPLACEMENT OF ANY PART OR PARTS WHICH ARE FOUND TO BE DEFECTIVE WITHIN THE EFFECTIVE PERIOD OF THE WARRANTY. NO REFUNDS WILL BE GIVEN. IF REPLACEMENT PARTS FOR DEFECTIVE MATERIALS ARE NOT AVAILABLE, HOMEDICS RESERVES THE RIGHT TO MAKE PRODUCT SUBSTITUTIONS IN LIEU OF REPAIR OR REPLACEMENT.
This warranty does not extend to the purchase of opened, used, repaired, repackaged and/or resealed products, including but not limited to sale of such products on Internet auction sites and/or sales of such products by surplus or bulk resellers. Any and all warranties or guarantees shall immediately cease and terminate as to any products or parts thereof which are repaired, replaced, altered, or modified, without the prior express and written consent of HoMedics.
This warranty provides you with specific legal rights. You may have additional rights which may vary from country to country. Because of individual country regulations, some of the above limitations and exclusions may not apply to you.
For more information regarding our product line in the USA, please visit: www.homedics.com. For Canada, please visit: www.homedics.ca.
