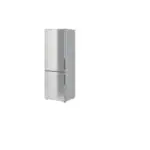
IKEA KÖLDGRADER 750 Integrated Fridge/Freezer
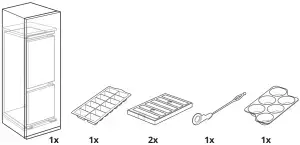
Package Content

Product description
 Fan-cooling with LED lamp
![]() Control panel
Control panel
![]() Door balconies
Door balconies
![]() Bottle balcony
Bottle balcony
![]() Vegetable drawer
Vegetable drawer
 Freezer drawers
 Freezing drawer
![]() Sliding shelf with containers
Sliding shelf with containers
 Rating plate
 Extra Zone
 Extendable half-shelf
 Glass shelves
 Least cold zone
 Intermediate temperature zone
 Coldest zone
Cleaning the interior
Before using the appliance for the first time, the interior and all internal accessories should be washed with lukewarm water and some neutral soap to remove the typical smell of a brand-new product, then dried thoroughly.
![]() Caution! Do not use detergents, abrasive powders, chlorine or oilbased cleaners as they will damage the finish.
Caution! Do not use detergents, abrasive powders, chlorine or oilbased cleaners as they will damage the finish.
![]() Caution! The accessories and parts of the appliance are not suitable for washing in a dishwasher.
Caution! The accessories and parts of the appliance are not suitable for washing in a dishwasher.
Installation
![]() Warning! Refer to Safety chapters.
Warning! Refer to Safety chapters.
![]() Warning! Refer to installation instruction document to install your appliance.
Warning! Refer to installation instruction document to install your appliance.
![]() Warning! Fix the appliance in accordance with installation instruction document to avoid a risk of instability of the appliance.
Warning! Fix the appliance in accordance with installation instruction document to avoid a risk of instability of the appliance.
Location
This appliance should be installed in a dry, well ventilated indoor position. Do not install the appliance in the nearby of the heat source (oven, stoves, radiators, cookers or hobs) or in a place with direct sunlight.
This appliance is intended to be used at ambient temperature ranging from 10°C to 43°C.
 The correct operation of the appliance can only be guaranteed within the specified temperature range.
If you have any doubts regarding where to install the appliance, please turn to the vendor, to our customer service or to the nearest Authorised Service Centre.
It must be possible to disconnect the appliance from the mains power supply. The plug must therefore be easily accessible after installation.
Inspection checklist
Please follow the inspection checklist before using your appliance. If any answer is “NO”, follow the relevant action. Remember to write down the product serial number and article number as required and attach your receipt to this page.
Product serial number (Ser. No.): ……………………………….
Product article number (Art. No.): ……………………………….
Purchasing date: ……………………………….

| To check | If the answer is NO |
| Check if the tube is inside the evapora‐ tive tray. | Put the tube inside the evaporative tray. |
| Make sure gasket seals all around the door when the door is closed. | Refer to the assem‐ bly instruction – door alignment. |
| Check if there is no collision between parts/furniture while opening and closing the door. | Refer to the assem‐ bly instruction – door alignment. |
| Install the appliance in the built-in structure. | Follow the assembly instruction for the proper installation. |
| Make sure that at first installation or after reversing the door the appliance stands in vertical po‐ sition for at least 4 hours before it is connected to the power supply. | Wait 4 hours before connecting the ap‐ pliance to the power supply. |
Control panel

Display
![]() Freezer temperature warmer button
Freezer temperature warmer button
![]() Freezer temperature colder button
Freezer temperature colder button
![]() OK button
OK button
![]() Function button
Function button
Fridge temperature warmer button
![]() Fridge temperature colder button
Fridge temperature colder button
ON/OFF button
It is possible to change predefined sound of buttons by pressing together Function and temperature colder button for a few seconds. Change is reversible.
Display
A. Fridge compartment indicator
B. Fridge temperature indicator and timer indicator
C. Fridge 0ff indicator
D. Shopping Function indicator
E. Vacation Function indicator
F. Fast Freezing Function indicator
G. Freezer temperature indicator
H. Freezer compartment indicator
I. Alarm indicator
J. Child Lock Function indicator
K. Bottle Chill Function indicator
L. Fan-cooling Function indicator
Switching on
- Connect the mains plug to the power socket.
- Press the
 ON/OFF button if the display is off.
The temperature indicators show the set default temperature.
Switching off
Press ![]() ON/OFF button for 3 seconds. The display switches off.
ON/OFF button for 3 seconds. The display switches off.
To disconnect the appliance from the power, disconnect the mains plug from the power socket.
Switching on and Pԑ the fridge compartment
To switch on the fridge compartment press one of the fridge temperature buttons.
To switch off only the fridge compartment maintaining the freezer on:
- Press the
 Function button until the fridge compartment icon appears.
The fridge 0ff indicator and the fridge compartment indicator flash.
The fridge temperature indicator shows dashes. - Press the
 OK button to confirm.
The fridge 0ff indicator is shown and the fridge compartment is switched off.
Temperature regulation
Set the temperature by pressing the temperature regulators. The temperature indicators show the set temperature.
Recommended set temperature is:
- +4°C for the fridge
- -18°C for the freezer
The set temperature will be reached within 24 hours. After a power failure the set temperature remains stored.
Shopping Function
- Press Function button until the Shopping icon appears.
The Shopping indicator flashes. - Press OK button to confirm.
The Shopping indicator is shown. The fan activates automatically for the function duration.
This function stops automatically after approximately 6 hours. You can also deactivate the function by repeating the procedure or by selecting a different fridge set temperature.
Vacation Function
- Press Function button until the Vacation icon appears.
The Vacation indicator flashes. The fridge temperature indicator shows the set temperature. - Press OK button to confirm. The Vacation indicator is shown. The function switches off after selecting a different fridge temperature.
Fast Freezing Function
To freeze fresh food activate the Fast Freezing Function at least 24 hours before placing the food in the appliance.
- Press the Function button until the Fast Freezing icon appears.
The Fast Freezing indicator flashes. - Press OK button to confirm.
The Fast Freezing indicator is shown.
The Fast Freezing Function stops automatically after 52 hours. You can also deactivate the function by repeating the procedure until the Fast Freezing indicator turns off or by selecting a different set temperature.
Child Lock Function
- Press Function button until the Child Lock icon appears.
The Child Lock indicator flashes. - Press OK button to confirm.
The Child Lock indicator is shown.
To deactivate the Child Lock Function, repeat the procedure until the Child Lock indicator disappears.
Bottle Chill Function
- Press Function button until the Bottle Chill icon appears.
The Bottle Chill indicator flashes.
The Timer shows the set value (30 minutes) for a few seconds. - Press the
 ,
,  temperature buttons to change the Timer set value from 1 to 90 minutes.
 - Press OK button to confirm. The Bottle Chill indicator is shown. The Timer starts to flash (min). At the end of the countdown the “0 min” indicator flashes and an audible alarm sounds. At that time, remove the products that were put into the appliance to cool down, and press the OK button to switch off the sound and terminate the function.
To switch off the function at any time during the countdown, repeat the procedure until the Bottle Chill indicator disappears.
Fan-cooling Function
- Press Function button until the Fancooling indicator appears.
The Fan-cooling indicator flashes. - Press OK button to confirm. The Fan-cooling indicator is shown. To switch off this function repeat the procedure until the Fan-cooling indicator disappears.
The activation of the Fan-cooling Function increase the energy consumption.
Freezing and storage of frozen food
When activating an appliance for the first time or after a period out of use, before putting the products in the compartment let the appliance run at least 3 hours with the Fast Freezing function switched on.
To freeze fresh food activate the Fast Freezing function at least 24 hours before placing the food to be frozen in the freezer compartment.
Store the fresh food evenly distributed in the first compartment or drawer from the top.
The maximum amount of food that can be frozen without adding other fresh food during 24 hours is specified on the rating plate (a label located inside the appliance).
If large quantities of food are to be stored, remove all drawers and place the food on shelves.
Keep the food no closer than 15 mm from the door.
![]() Caution! In the event of accidental defrosting, for example due to a power failure, if the power has been off for longer than the value shown on rating plate under “rising time”, the defrosted food must be consumed quickly or cooked immediately then cooled and then re-frozen.
Caution! In the event of accidental defrosting, for example due to a power failure, if the power has been off for longer than the value shown on rating plate under “rising time”, the defrosted food must be consumed quickly or cooked immediately then cooled and then re-frozen.
Hints and tips
- Freezer compartment is the one marked with
 .
. - Good temperature setting that ensures preservation of frozen food products is a temperature less than or equal to -18°C.
Higher temperature setting inside the appliance may lead to shorter shelf life. - The whole freezer compartment is suitable for storage of frozen food products.
- Fresh food compartment is the one marked (on the rating plate) with
 .
. - In order to accelerate cooling down of the goods, it is advisable to turn on the fan. Refer to “Fan-cooling Function”. The activation of Fan-cooling allows greater homogenization of internal temperatures.
Troubleshooting
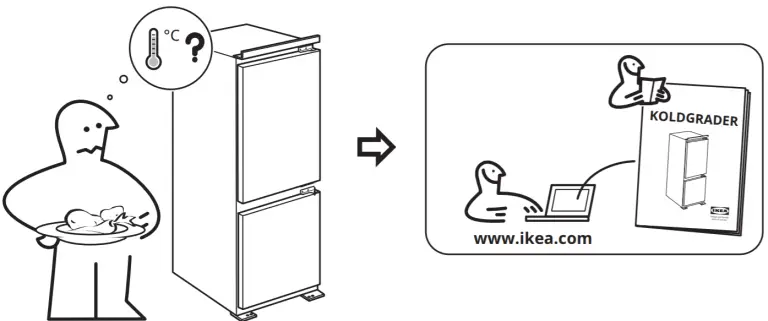
Be sure to check “Inspection checklist” before using your appliance. If you encounter an issue with your appliance, check “Troubleshooting” chapter in the full version of the User Manual available on: www.ikea.com.
Technical data
The QR code on the energy label supplied with the appliance provides a web link to the information related to the performance of the appliance in the EU EPREL database. Keep the energy label for reference together with the user manual and all other documents provided with this appliance.
It is also possible to find the same information in EPREL using the link https://eprel.ec.europa.eu and the model name and product number that you find on the rating plate of the appliance.
See the link www.theenergylabel.eu for detailed information about the energy label.
Information for test institutes
Installation and preparation of the appliance for any EcoDesign verification shall be compliant with EN 62552. Ventilation requirements, recess dimensions and minimum rear clearances shall be as stated in this User Manual in Installation chapter. Please contact the manufacturer for any other further information, including loading plans.