ILIFE A4s Robot Vacuum Cleaner

Thank you for choosing ILIFE A4s robotic vacuum cleaner! You’ve joined millions of people to get cleaning done robotically. This user manual helps you to keep your robot performing at its best. Please take a few moments to read through it. You are entitled to the exclusive benefits once you register your robot at www.iliferobot.com/register:
- – Access to ILIFE 24-hour online customer support;
- Get first-hand updates, including new model launch and exclusive discounts.
As a registered user, you could also share your robotic cleaning experience with us. ILIFE listens and makes product improvements based on your valuable feedbacks. If you have any questions, please contact our customer service for assistance or visit www.iliferobot.com for more information. Enjoy automated home cleaning performed by ILIFE A4s!
ILIFE Customer Service
Customer Service Number
1-800-631-9676 (Toll free for USA & Canada)
Mon-Fri: 9:00 a.m. – 18:00 p.m.
Email: [email protected]
For more details, please visit www.iliferobot.com
Important notes
A4s contains electronic parts. Do NOT put it in water or spay it with water. Clean the robot with a dry cloth only.
Where to start
- Place the charging dock against a wall in an open area. Do not put it near a door or steps.
- Before cleaning begins, clear up excessive objects on the floor (e.g. cables, bar stools, etc.).
- Choose MAX mode to clean areas with accumulated dust.
For best performance
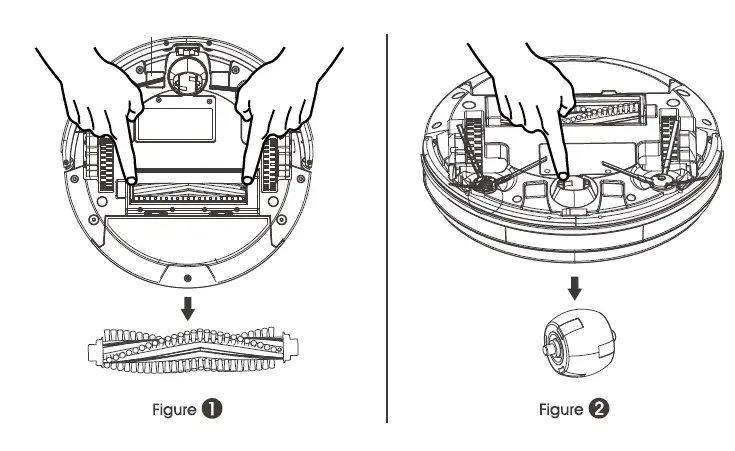
- Remove the main brush. Clean the bristle ends and the roller twice a week. (Figure 1)
- Remove the front wheel with a screwdriver. Remove hair in the wheel cavity and axle twice a week. (Figure 2)
- Empty the dustbin and clean filter and bristle brush after each use. Replace filter every month.
Safety Instructions
Before using the robot, please read and follow the below safety instructions and precautions.
- Read through this user manual carefully before using the robot.
- Retain this user manual.
- Any operation that is not described in this user manual may injure the users or cause product damage.
WARNING
- Only certified technicians may disassemble the robot. Users must not disassemble or repair the robot.
- Use factory authorized adapter only. Using nonspecific adapter may cause electric shock, fire or robot damage.
- Do not touch the power cord, plug or adapter with wet hands.
- Do not allow clothes or any part of your body to be drawn into the robot’s wheels.
- Do not place the robot near cigarette, lighter, matches or other flammables.
- Clean the robot after charging finishes.
- Do not over-bend the power cord or pressure the power cord with heavy or sharp objects.
- Do not use the robot outdoor.
- Do not sit on the robot or attach any object on it.
- Do not use the robot on wet floors.
- Before using the robot, remove all fragile objects (textile, glass, lighting, etc) and other objects that could be caught in the brushes or suction opening (cords, clothing, papers, drapes, blinds, etc).
- Do not place the robot where it could easily fall off (tables, chairs, etc).
- Turn off the power switch during transportation or when the robot will not be used for a long time.
- To avoid battery damage, check if the adapter and outlet are properly connected before using the robot.
- To avoid tripping, make sure everyone in the house knows the robot is working.
- Do not use the robot when the dustbin is full.
- Use the robot in environment between -I0°C and 50°C.
- Do not place the robot in high-temperature environment.
- Battery must be removed from the robot before the battery is scrapped.
- Disconnect electricity supply before removing the battery.
- The battery is to be disposed of safety according to local regulations.
NOTE: This product should not be used by children, mentally challenged people or people who lack related experience and knowledge (unless they are under proper supervision).
Product Parts
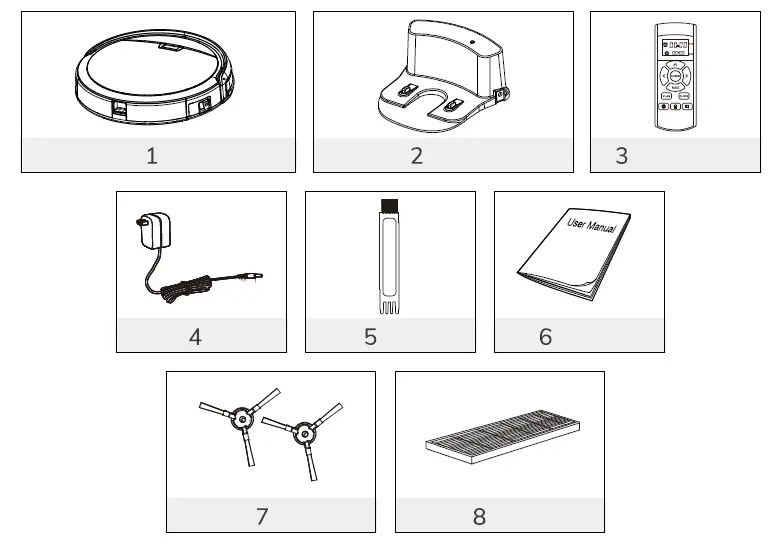
Main body and accessories
| NO. | Description | Qty |
| 1 | Main Body | 1 |
| 2 | Charging Dock | 1 |
| 3 | Remote Control ( battery not included ) | 1 |
| 4 | Adapter | 1 |
| 5 | Cleaning Tool | 1 |
| 6 | User Manual | 1 |
| 7 | Extra Side Brushes | 2 |
| 8 | High Performance Filter | 1 |
Robot anatomy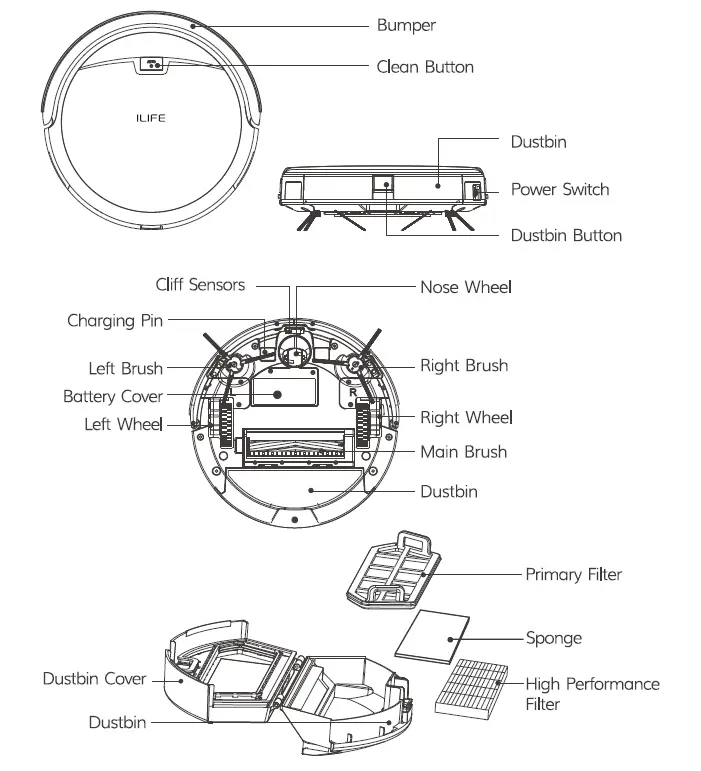
Charging dock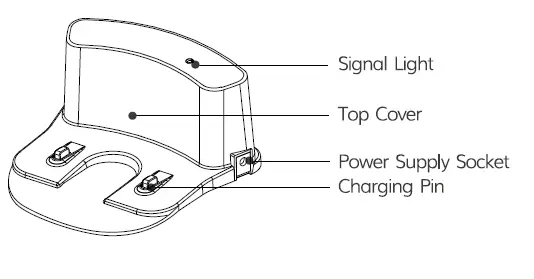
CLEAN button status signals
| Robot status | Light signals |
| Charging | Orange light flashes |
| Charging finished | All lights off |
| In selected mode | Green light flashes |
| Malfunctioning | Red light turns solid |
| Low battery | Orange light turns solid |
| In cleaning mode | Green light turns solid |
Remote control
Clean
- To start cleaning in selected mode.
- To stop current cleaning cycle.
- To change from sleep mode to selected mode.
Direction Buttons
Upward Button:
- To increase minute and hour setting in schedule or clock mode.
- To move robot forward in selected mode
- To stop the robot when it hits against objects.
MAX Button:
- To decrease minute and hour setting in schedule or clock mode.
- To maximize vacuuming power.
Down Button:
- To change from minute to hour in schedule or clock mode.
- To turn the robot left.
Right Button:
- To change from minute to hour in schedule or clock mode.
- To turn the robot right.
Plan
- To enter schedule mode when robot is in selected mode.
- To confirm cleaning schedule.
Clock
- To enter clock mode when robot is in selected mode.
- To confirm time setting.
HOME
- To return robot to charging dock.
Edge
- To clean along the edge of the walls.
Spot
- To clean specific areas.
00:00
- To display scheduled time.
00:00
- To display clock.
Note:
- Place two AAA batteries into the remote control.
- Remove batteries if the remote control will not be used for a long time.
How to Use
Getting started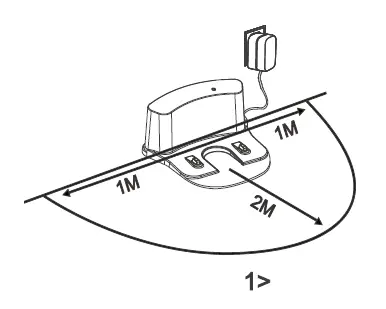
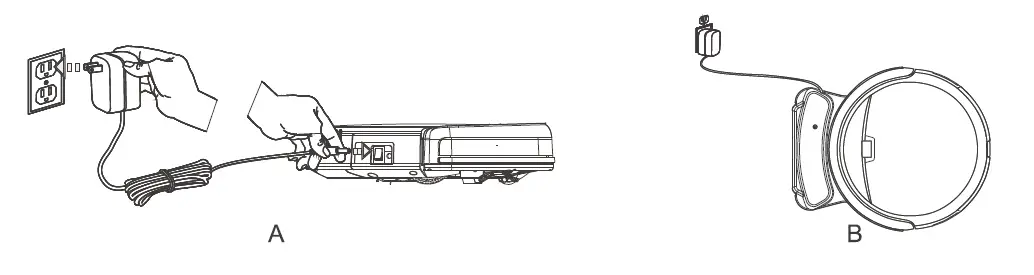
Place charging dock on the floor and plug in adapter. Signal light on charging dock will turn solid.
Note: Put charging dock against a wall and remove obstacles about 1 meter on both sides and about 2 meters in front.
Display panel will flash after the power switch (near the power socket) is turned on. (If no command is received, the robot will switch to sleep mode after 45 seconds)
Note:
- Always keep the power switch on, otherwise the robot will not work.
- If power switch is turned off, all scheduled cleaning will be lost.
Caution: Before charging the robot, make sure the power switch is turned on, otherwise the robot will not be charged.
Robot can be recharged by:
- Plugging into an electrical outlet;
- Pressing ( 1§)-) button on remote control – the robot will return to charging dock for auto recharge.
Extending battery life:
- Before first use, charge the robot overnight. When charging finishes, light at AUTO button will turn off.
- Always place the robot on the charging dock that is connected to power.
- If the robot will not be used for a long time, fully recharge it and turn off the power switch before storing it in a cool, dry place.
Auto charging
Robot will automatically return to the charging dock when battery runs low.
Start/Pause/Sleep
- Sleep mode: the robot is not working, the light at the AUTO button is off and the power switch is on.
- Selected mode: the robot is not working, the green light at AUTO button flashes. Cleaning mode: the robot is working, the green light at AUTO button turns solid.
Starting up
- Make sure the power switch is on.
- Press the button on robot or 8 button on remote control to start cleaning.
Note: If robot is in sleep mode, press button to recover it from sleep mode. Press button again to start the cleaning cycle.
Pause
Press button on robot or 8 button on remote control to change from Clean mode to selected mode.
Note: When robot is paused, press I “”.’° I button to resume the cleaning cycle.
Sleep
Change from selected mode to sleep mode:
- Press and hold I “”.’° I button on robot for 3 seconds.
- Robot automatically enters sleep mode if no command is received after 45 seconds
Schedule
- Point the remote control at robot and press CLEAN button to recover robot from sleep mode. You will hear a beep.
- Adjust the “clock” on remote control to display local time.
- Press CLOCK and set time with direction buttons.
- Press CLOCK again to save the setting.
- Note: When scheduling a cleaning cycle, keep the remote control close to robot for better signal reception.
- Point the remote control at robot, and set PLAN time to start cleaning.
- After setting the time, press PLAN button on remote control to save the schedule. Successful scheduling will be confirmed by a “beep” sound.
- Note:
- Do not place charging dock on carpet.
- Make sure the robot is turned on after scheduled cleaning is set.
- How to cancel the schedule?
- To cancel a schedule, turn off the power switch off on the robot.
- Restart the robot
Successful time and schedule settings are confirmed by a beep sound. If there is no sound confirmation, it means the settings are not saved.
Cleaning mode
Auto cleaning
In Auto cleaning mode, robot automatically cleans the areas that it can reach.
Note: Press button on robot or 8 button on remote control to start Auto cleaning.
Spot cleaning
- Press Spot button on remote control while robot is working. Robot will clean around a circular route and return to Auto Clean mode after Spot cleaning is finished.
- Press Spot button on remote control while robot is in selected mode. Robot will clean around a circular route and return to selected mode after Spot cleaning is finished.
Edge cleaning
To start edge cleaning, put robot near the edge of a wall and press EDGE on remote control.
Note: Edge cleaning will automatically stop when robot cannot detect any edges. To stop edge cleaning manually, press CLEAN button.
Mini-Room mode
Press CLEAN button twice on robot or remote control to switch from Sleep mode to MINI-room mode, which is designed for small space or single room cleaning.
Maintenance
Side brushes
Clean the side brushes when they get dirty. Replace them if they are damaged.
Note: When replacing the side brushes, make sure they are installed according to the “L” and “R” marks on both sides of the brush and the base of the robot.
Dustbin and filter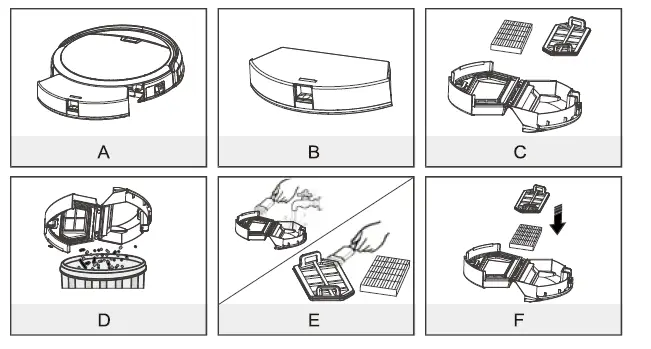
Follow the steps below to empty and clean the dustbin after each use.
- Take out the dustbin and clean dust or debris in the suction opening.
- Clean filter after 15-30 days of use. Replace it no more than 6 months of use.
- Do not reinstall the filter and primary filter when they are still wet.
- Replace dustbin and filters (including filter and primary filter) if needed.
Cliff sensors and auto charging pins.
Gently clean the sensor lens and charging pins with a soft dry cloth.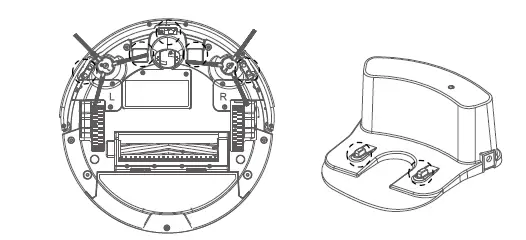
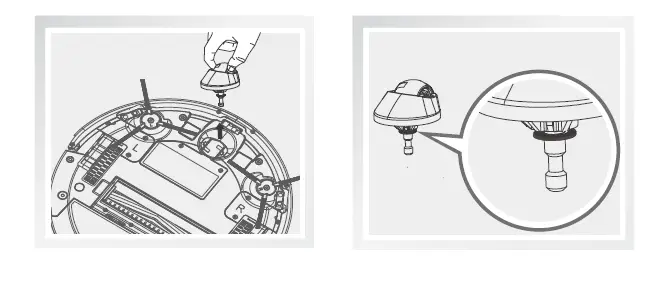
Front-wheel
Make sure the front wheel is clean and can rotate freely to avoid lowered cleaning performance:
- Pull the wheel up and out vertically and clean it. Also check if the gasket is worn.
- Make sure the gasket is properly installed after cleaning the front wheel.
Product Specifications
Remark: The storage temperature of this product is between -20°C and 60°C. The clock or schedule setting is confirmed with a beep sound. The setting is unsuccessful if there is no sound confirmation.
Troubleshooting
| Movement | Possible cause | What to do |
|
Noise level increased |
Bristle brush and roller are jammed by hair |
• Remove main brush. • Clean bristle brush and roller and reinstall them . |
|
Stop and beep suddenly |
Bristle brush and roller are jammed by hair | • Remove main brush.
• Clean bristle brush and roller and reinstall them. |
|
Pick up less debris and spit out debris |
Dustbin is full and filter is dirty |
• Replace filter once every three months. • Take out dustbin and Clean the dustbin • Remove filter and Clean the filter. |
|
Side wheels don’t work properly |
Side wheels are jammed by hair |
• Clean hair and debris on the wheels.
• Push them in and out to make sure they can rotate freely. |
|
Side brushes don’t rotate freely |
Side brushes are stuck |
• Remove dust and hair from side brushes
• Make sure they can rotate freely. |
|
Working time shortened |
Charging time too short or battery problems |
• Make sure robot is fully charged in 5 hours. • Replace battery. |