![]()
Flash Cube
Quickstart Guide
Introduction
1. Make sure all items listed in the Box Contents section are included in the box.
2. READ SAFETY INSTRUCTION BOOKLET BEFORE USING THE PRODUCT.
Box Contents
Flash Cube
Remote Control
1/8” Stereo Aux Cable
Quickstart Guide
Safety & Warranty Information Booklet
Support
For the latest information about this product (system requirements, compatibility information, etc.) and product registration, visit ionaudio.com.
Quick Setup
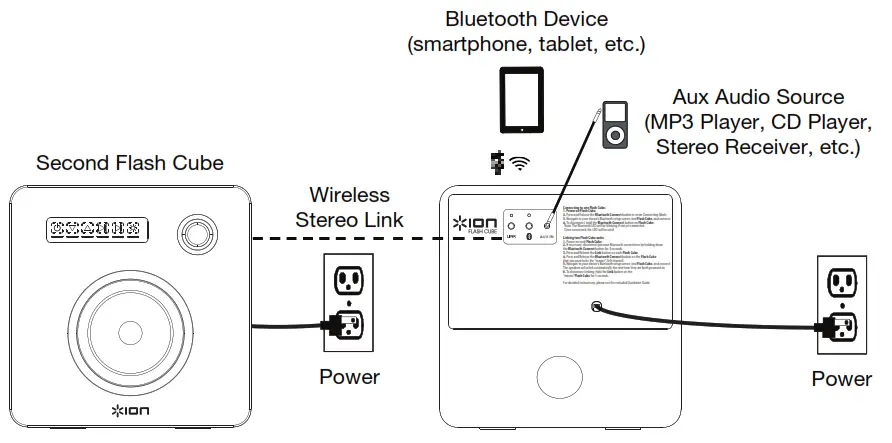
Connection Diagram
Items not listed in the Box Contents section are sold separately.
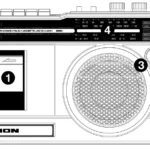
Remote Control
1. LEDs On/Off
2. LED Mode Select
3. LED Color Select
4. Bluetooth® Connecting
5. Power On/Off
6. Play/Pause
7. Previous Track *
8. Next Track *
9. Volume Up
10. Volume Down
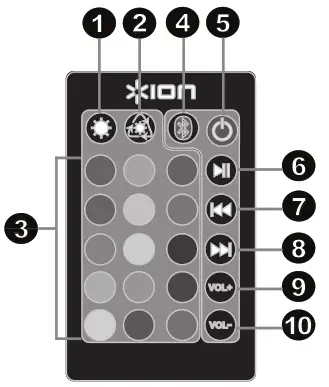
* Note: With some apps, pressing the Previous Track button or Next Track button may go to another playlist or music genre.
Bluetooth Connecting with Flash Cube
1. Press and hold the power button for two seconds to power on Flash Cube.
2. Press and release the Bluetooth Connecting button to enter Connecting Mode. Flash Cube’s Bluetooth LED will blink during the connection process.
3. Navigate to your device’s Bluetooth setup screen, find Flash Cube, and connect. Flash Cube’s Bluetooth LED will light up solid when it is connected.
Note: If you experience trouble in connecting, select Forget this Device on your Bluetooth device and try to connect again.
4. To disconnect, hold the Bluetooth Connecting button on Flash Cube for 3 seconds.
Speaker Linking
To link two Flash Cubes together:
1. Power on each Flash Cube.
2. If necessary, disconnect previous Bluetooth connections by holding down the Bluetooth Connecting button for 3 seconds.
3. Press and release the Link button on each Flash Cube. Flash Cube’s Link LED will blink and a beeping tone will sound on each Flash Cube during the linking process. Linking may take up to a minute. Once the two Flash Cubes are fully linked, the Link LEDs on both Flash Cubes will be lit solid.
4. Press and release the Bluetooth Connecting button on the Flash Cube that you want to be the master (left channel).
5. Navigate to your device’s Bluetooth setup screen, find Flash Cube, and connect. The speakers will re-link automatically the next time they are both powered on.
6. To disconnect linking, hold the Link button on the master Flash Cube for 5 seconds.
Note: When using the remote, there will be a response delay of a few seconds with the play and pause commands.
Features
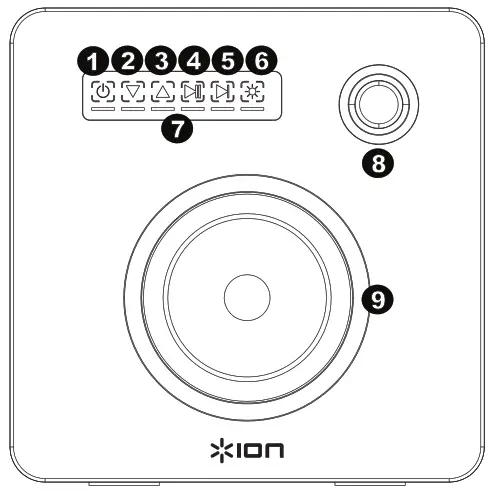
Front Panel
1. Power: Press and hold this capacitive touch button for 2 seconds to power Flash Cube on or off.
Note: Flash Cube will power off after 1 hour if no audio is playing and there is no Bluetooth connection.
2. Volume Down: Press and release this capacitive touch button to decrease the speaker volume.
3. Volume Up: Press and release this capacitive touch button to increase the speaker volume.
4. Play/Pause: Press and release this capacitive touch button to play or pause the sound source.
5. Next Track: Press and release this capacitive touch button to skip to the next track.
Note: With some apps, pressing the Next Track button may go to another playlist or music genre.
6. Light Mode: Press and release this capacitive touch Light Mode button to toggle through these different options:
• Color Cycle: The lights slowly glow and cycle through colors. This is the default mode when Flash Cube is first powered on. Once the speaker is powered on, the lights will turn on before any music starts.
• Beat Sync: The lights react to the beat of the music.
• OFF: The lights are turned off.
7. Volume LEDs: These LED segments light up as the volume control is adjusted.
8. Tweeter: Outputs the high frequencies of the sound source.
9. Woofer: Outputs the low frequencies of the sound source.
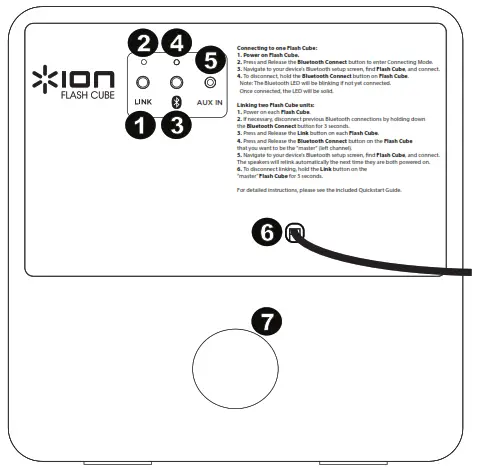
Rear Panel
1. Link: Press this button on both speakers to link two Flash Cubes together. Refer to Quick Setup > Speaker Linking for more details.
2. Link LED: When linking two Flash Cubes, this LED will blink on both Flash Cubes during the linking process. Once fully linked with another Flash Cube, this LED will remain solid on both Flash Cubes.
3. Bluetooth Connecting: Press this button to pair to your Bluetooth device. For more details, refer to Quick Setup > Bluetooth Connecting with Flash Cube.
4. Bluetooth LED: This LED blinks when pairing with a Bluetooth device. Once fully paired, the LED will remain solid.
5. Aux Input: Connect a media player, smartphone, or another audio source to this stereo 1/8” input.
6. Power Cable: This power cable is hard-wired into Flash Cube.
7. Bass Port: Adds increased bass to the sound.
Appendix
Technical Specifications
| Output Power | 50 W (peak) |
| Supported Bluetooth Profile | A2DP |
| Bluetooth Range | Up to 100’ / 30.5 m * |
| Linked Range | Up to 50’ / 15.2 m * |
| Power | Input voltage: 100-120V AC, 60 Hz; 220-240V AC, 50 Hz |
| Dimensions (width x depth x height) | 10.6″ x 10.02″ x 10.6″ 26.9 cm x 25.4 cm x 26.9 cm |
| Weight | 9.6 lbs. 4.37 kg |
Specifications are subject to change without notice.
* Bluetooth range is affected by walls, obstructions, and movement. Best performance is achieved in a wide-open area.
** Battery life may vary based on temperature, age, and volume usage of the product.
Trademarks and Licenses
ION Audio is a trademark of ION Audio, LLC, registered in the U.S. and other countries.
iPod is a trademark of Apple Inc., registered in the U.S. and other countries.
The Bluetooth word mark and logos are owned by the Bluetooth SIG, Inc. and any use of such marks by ION Audio is under license.
All other product or company names are trademarks or registered trademarks of their respective owners.