![]()
Insta Sound™
Quickstart Guide
Introduction
Thank you for purchasing the Insta Sound. At ION, your entertainment is as important to us as it is to you. That’s why we design our products with one thing in mind—to make your life more fun and more convenient.
Box Contents
(2) Insta Sound Speakers
(2) Wall Mounts
(2) Charging Adapters
(8) Screws
Quickstart Guide
Safety & Warranty Manual
Support
For the latest information about this product (documentation, technical specifications, system requirements, compatibility information, etc.) and product registration, visit ionaudio.com. For additional product support, visit ionaudio.com/support.
Setup
Items not listed under Introduction > Box Contents are sold separately.
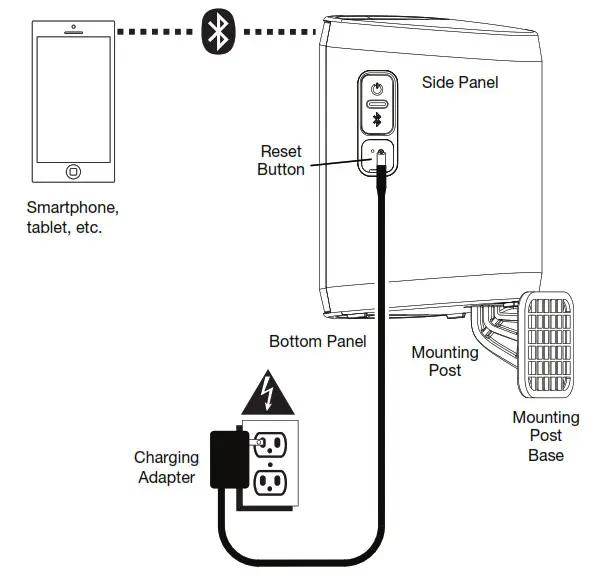
Installation
Insta Sound may be used freestanding or mounted. When used freestanding, the feet on the bottom of the speaker allow Insta Sound to sit comfortably on any flat surface. To mount Insta Sound using the included wall mount, follow the instructions below.
To use Insta Sound with the included wall mount, first, inspect the area where you would like to install the speakers. Confirm that the surface you are mounting Insta Sound on can safely hold the weight of the speaker. If you are unsure whether you can safely install Insta Sound in your desired location, please consult a professional contractor.
To install the wall mount:
Note: It is recommended to install the mount so that the post is pointing straight up. Since the speaker is designed to easily slide off/on the post, do not install with the post at an extreme angle, parallel with the ground, or pointing towards the ground as the speaker will slide off of the post and cause damage.
- Insert screws into the 4 holes on the wall mount base. Fully tighten all screws so the wall-mount base is flush with the surface before placing the speaker on the mount. Do not use the included screws to mount Insta Sound on surfaces such as concrete or drywall, as these may require special tools and/or hardware.
- Slide Insta Sound onto the mount so that the mounting post is fully inserted into the mounting hole on the bottom of the speaker. Make sure it is unobstructed on all sides for optimal performance.
Note: The posts have notches that match up with the grooves at the base of the hole on the speaker to help pivot/rotate the speaker to a fixed position/angle.
Outdoor Use and Care
Though Insta Sound is water-resistant and able to tolerate splashing water, please review the tips below to get the best performance from Insta Sound:
- Insta Sound must only be used outdoors with power outlets or extension cords that are rated for outdoor use.
- Bring Insta Sound indoors during extreme weather.
- Please do not place Insta Sound in standing water.
- Please do not connect the charging adapter to Insta Sound in a wet environment. Make sure the charging adapter input, charging adapter, and power outlet are all completely dry before making any connections.
- Make sure the connection between the prongs of the charging adapter and the power outlet is secure and sealed according to your power outlet’s specifications.
- WARNING: Keep any non-water-resistant devices (phones, music players, etc.) in a dry place where they will not be affected by water and cause a risk of electric shock.
Stereo-Link™ and Bluetooth Connecting to Insta Sound
- Power on each Insta Sound by pressing and releasing their power buttons. You will hear “Powering On” for confirmation. *
- The 2 speakers will automatically initiate the wireless stereo linking process. The speakers will search for each other indicated by their blinking yellow LEDs. Once the stereo pair is successfully linked, you will hear “Connected”, the yellow LEDs will be solid, and the “master” speaker’s blue LED will blink to indicate it is in Bluetooth pairing mode.
This process may take up to 2 minutes the first time two speakers are linked. Speakers that were previously linked will relink automatically in seconds if powered on in a range of one another.
Note: Insta Sound speakers should be within 30 ft. (9 m) of each other to Link properly. - When the stereo link is confirmed by the solid yellow LED, the blue LED on the “master” speaker will begin to blink to indicate that it is ready to pair with your Bluetooth device.
Note: The Left channel will be the “master” speaker and the unit from which the Bluetooth range will be determined. - On your Bluetooth device, navigate to your Bluetooth settings menu, find Insta Sound, and connect. Once the Bluetooth connection is made, the blue LED will be lit solid. You will hear “Paired” for confirmation.
Note: If you experience trouble in connecting, select “Forget this Device” for Insta Sound on your Bluetooth device and try to connect again.
If your Bluetooth device is not able to connect to Insta Sound, while powered on, press and hold the Bluetooth button for 2 seconds to break previous Bluetooth connections. Press and hold the Reset button for 5 seconds to reset the device. This will clear the memory of existing paired Bluetooth devices.
Single Speaker Mode
If you want to use only 1 Insta Sound speaker, you can enter Single Speaker mode. While the unit is powered off, press and hold the Power button on the speaker. After the Insta Sound powers on, while still holding the Power button, press and hold the Bluetooth button for 2seconds. The yellow LED will be unlit, and the Blue LED will blink to confirm the speaker is now in Single Speaker mode. Proceed to connect to Insta Sound in your Bluetooth device’s
Bluetooth menu. To revert back to Stereo mode, power the speaker off then back on.
Features
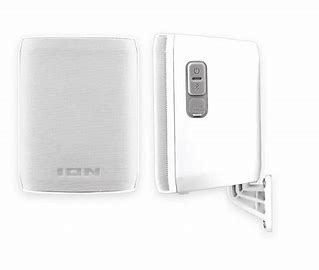
Speaker (Side View)
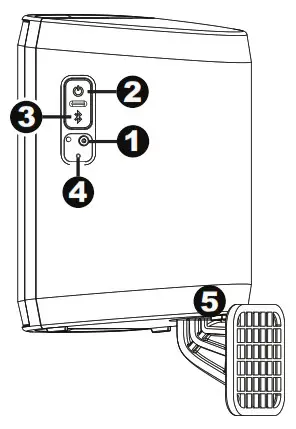
- Charging Adapter Input: Insert the included charging adapter here to charge the Insta Sound battery.
Important: Insta Sound should be fully charged prior to first use for maximum battery life. - Power: Press and release this button to power on Insta Sound. Press and hold this button for 1 second to power off Insta Sound.
- Bluetooth: Press and hold this button to disconnect current Bluetooth connections.
Note: Insta Sound will automatically power off after 30 minutes if no audio is playing. - Reset: If Insta Sound is working abnormally, shut down the unit by pressing and holding the Reset button for 5 seconds. This will power the speaker off, and clear all previous Bluetooth connections.
- Mount: Insert the wall mount post here.
LED Activity
Blinking Blue LED = Bluetooth pairing mode
Solid Blue LED = Connected to a Bluetooth device
Blinking Yellow LED = Stereo-Linking mode
Solid Yellow LED = Both speakers are Stereo-Linked
Blinking Red LED = Battery is low and needs to be recharged
Solid Red LED = The Battery Charging LED will be lit while the unit is charging and the red
LED will turn off when charging has been completed
Enabling/Disabling Voice Prompts
If you would like to disable or enable the voice prompts, while the speaker(s) is on, press The power button and the Bluetooth button simultaneously. With the voice prompts disabled, LED feedback is still present.