User Manual
ITEM #2735850/ 2737923
RENAELC REWOP DLEHDNAH SSELDROC V04
MODEL #KPC 2040-06/ KPC 7040-06
KOBALT and K & Design are trademarks
or registered trademarks of LF, LLC. All rights reserved.
ATTACH YOUR RECEIPT HERE
Serial Number……..
Purchase Date………
Questions, problems, missing parts? Before returning to your retailer, call our customer service department at 1-888-3KOBALT (1-888-356-2258), 8 a.m. – 8 p.m., EST, Monday – Sunday. You could also contact us at [email protected] or visit www.lowespartsplus.com.
SM20336
PRODUCT SPECIFICATIONS
| SPECIFICATIONS | |
| Voltage | 40 V |
| Max. Pounds Per Square Inch Pressure | 600 PSI |
| Max. Gallons Per Minute | 0.8 GPM |
| Maximum Inlet Water Temperature | 104°F (40°C) |
| Cleaning Units | 360 C.U. |
| Net Weight | 2.76 kg (6.08 lb) |
THE RECOMMENDED AMBIENT TEMPERATURE RANGE
| Power Cleaner storage temperature range | 32 ˚F (0 ˚C) ~ 113 ˚F (45 ˚C) |
| Power Cleaner operation temperature range | 32 ˚F (0 ˚C) ~ 113 ˚F (45 ˚C) |
| Battery charging temperature range | 39 ˚F (4 °C) ~ 104 ˚F (40 ˚C) |
| Charger operation temperature range | 39 ˚F (4 °C) ~ 104 ˚F (40 ˚C) |
| Battery discharging temperature range | 32 °F (0 °C) ~ 113 ˚F (45 ˚C) |
| Battery storage temperature range | 32 °F (0 °C) ~ 113 °F (45 °C) |
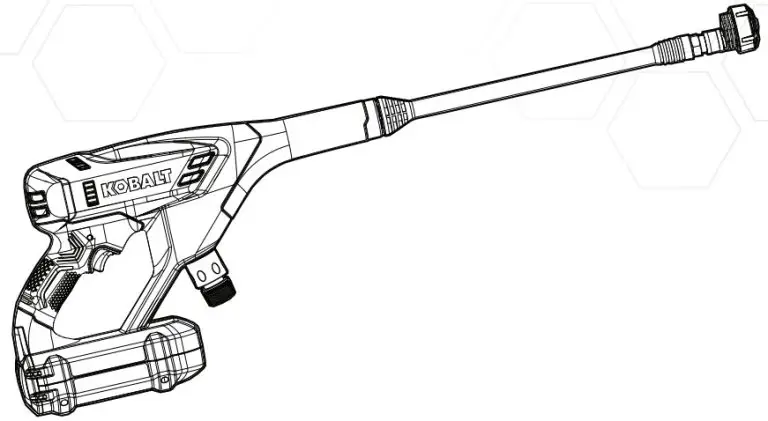
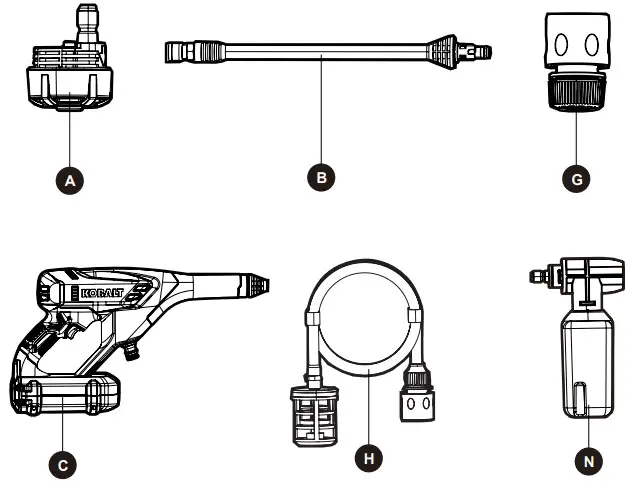
PACKAGE CONTENTS

| PART | DESCRIPTION | QUANTITY |
| A | 5 in 1 Spray nozzle | 1 |
| B | Spray wand | 1 |
| C | Front handle | 1 |
| D | Water inlet | 1 |
| E | Battery compartment | 1 |
| F | Trigger | 1 |
SAFETY INFORMATION
General Use
 WARNING
- Read all the instructions before using the product.
- To reduce the risk of injury, close supervision is necessary when a product is used near children.
- Know how to stop the product and bleed pressure quickly. Be thoroughly familiar with the controls.
- Stay alert – Watch what you are doing.
- Do not operate the product when fatigued or under the influence of alcohol or drugs.
- Keep operating area clear of all persons.
- Do not overreach or stand on unstable support. Keep good footing and balance at all times.
- Follow the maintenance instructions specified in the manual.
- Risk of Injection or Injury– DO NOT DIRECT DISCHARGE STREAM AT PERSONS.
- Read all safety warnings and instructions. Failure to follow the warnings and instructions may result in electric shock, fire, and/or serious injury.
- Prevent unintentional starting. Ensure the switch is in the off-position before connecting to the battery pack, picking up or carrying the appliance. Carrying the appliance with your finger on the switch or energizing an appliance that has the switch on invites accidents.
- Disconnect the battery pack from the appliance before making any adjustments, changing accessories, or storing the appliance. Such preventive safety measures reduce the risk of starting the appliance accidentally.
- For use only with KB 240C-06 battery.
- For use only with KRC 40-06 charger.
- When the battery pack is not in use, keep it away from other metal objects, like paper clips, coins, keys, nails, screws or other small metal objects, that can make a connection from one terminal to another. Shorting the battery terminals together may cause burns or a fire.
- Do not use a battery pack or appliance that is damaged or modified. Damaged or modified batteries may exhibit unpredictable behavior resulting in fire, explosion or risk of injury.
- Do not expose a battery pack or appliance to fire or excessive temperature. Exposure to fire or temperature above 265°F may cause an explosion.
- Follow all charging instructions and do not charge the battery pack or appliance outside of the temperature range specified in the instructions. Charging improperly or at temperatures outside of the specified range may damage the battery and increase the risk of fire.
- Have servicing performed by a qualified repair person using only identical replacement parts . This will ensure that the safety of the product is maintained.
- Do not modify or attempt to repair the appliance or the battery pack (as applicable) except as indicated in the instructions for use and care.
WARNING PROPOSITION 65
Some dust is created by power sanding, sawing, grinding, drilling, and other construction activities that contain chemicals known to cause cancer, birth defects, or other reproductive harm. Some examples of these chemicals are:
- Lead from lead-based paints
- Crystalline silica from bricks and cement and other masonry products
- Arsenic and chromium from chemically treated lumber
Your risk from these exposures varies, depending on how often you do this type of work.
To reduce your exposure to these chemicals: work in a well-ventilated area, and work with approved safety equipment, such as those dust masks that are specially designed to filter out microscopic particles.
PREPARATION
Before beginning the installation of the product, make sure all parts are present. Compare parts with package contents list and hardware contents list. If any part is missing or damaged, do not attempt to assemble, install or operate the product.
Estimated Assembly Time: 1-2 minutes.
ASSEMBLY INSTRUCTIONS
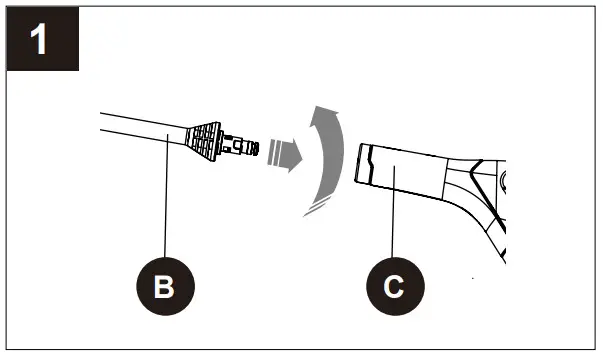
1. INSTALL THE SPRAY WAND
- Push the end of the spray wand (B) into the gun handle (C).
- Turn the spray wand (B) clockwise until the tabs lock into position.

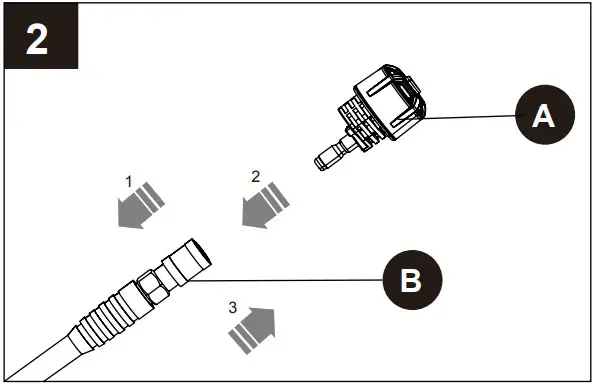
2. INSTALL THE SPRAY NOZZLE
- Pull back the quick-connect collar on the spray wand (B).
- Insert the spray tip (A) onto the spray wand (B).
- Release the quick-connect collar to attach the spray tip (A).
- Pull-on spray tip (A) to ensure it is properly installed and does not pull out.
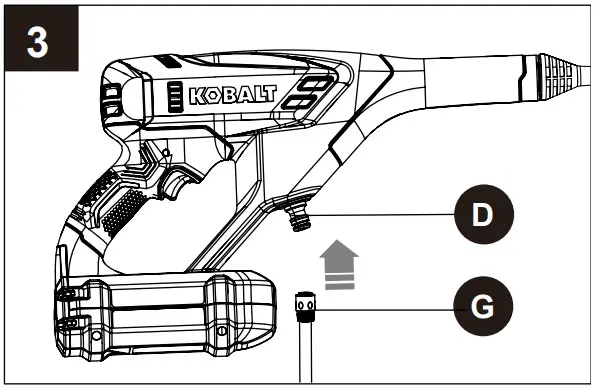
3. INSTALL THE SELF-SIPHON HOSE
- Insert one end of the self-siphon hose (G) into the water intake (D).
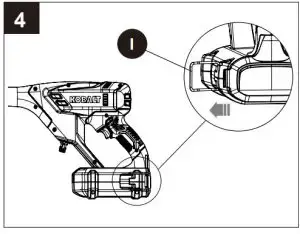
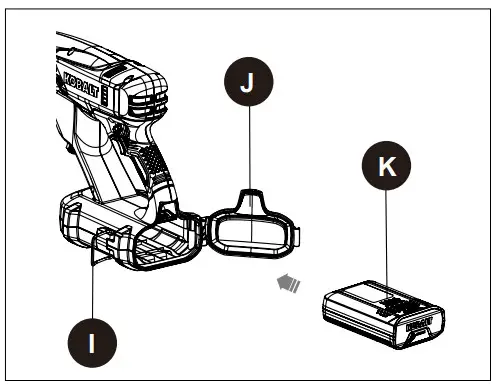
4. INSTALL THE BATTERY PACK
- Pull back on the hinge lock lever (I).
- Unhook the hinge (I) from the battery door (J).
- Open the battery door (J).
- Align the lift ribs on the battery pack (K) with the grooves in the battery compartment.
- Push the battery pack (K) into the battery compartment until the battery pack (K) locks into place.
- When you hear a click, the battery pack is installed.
- Close the battery door (J) and lock the hinge (I).
5. REMOVE THE BATTERY PACK
- Pull back on the hinge lock lever (I).
- Unhook the hinge (I) from the battery door (J).
- Open the battery door (J).
- Push and hold the battery release button (L).
- Remove the battery pack (K) from the machine.
OPERATING INSTRUCTIONS
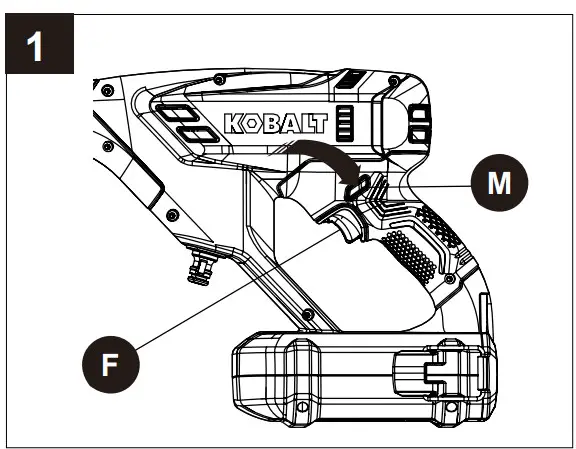
1. USE THE SPRAY GUN
WARNING
For safe control, keep your hands on the gun at all times.
- Keep pressing the lock-out button (M), pull and hold the spray gun trigger (F) to start the machine.
- Release the lock-out button (M) and spray gun trigger (F) to stop water flow through the spray tip.
2. ADJUST THE SPRAY NOZZLE
WARNING
Before you adjust the spray nozzle:
- Pull the spray gun trigger to release water pressure.
- Stop the machine.
WARNING
Do not point the spray wand at your face or others’.
1. Rotate the spray nozzle to adjust the spray setting (A).
NOZZLE TYPE
| SPRAY SETTING | APPLICATION |
 |
The 0-degree tip provides a straight line of spray. It provides the highest amount of pressure. It is best used for removing hard, stuck-on grime or dirt. |
 |
The tip provides high versatility with its 15-degree angle tip. Referred to as the washing tip, because it provides adequate pressure to remove dirt from surfaces, but is designed to not damage many surfaces. This pressure washer tip is designed for “sweeping” foliage or debris given its wide-angle. This tip is versatile due to its wide area of cleaning and strong pressure application. |
 |
The tip provides high versatility with its 25-degree angle tip. Referred to as the washing tip, because it provides adequate pressure to remove dirt from surfaces, but is designed to not damage many surfaces. This pressure washer tip is designed for “sweeping” foliage or debris given its wide-angle. This tip is versatile due to its wide area of cleaning and strong pressure application. |
 |
The 40-degree tip, referred to as the “fan” tip creates the widest area of cleaning with relatively low pressure. This pressure washer tip is best used for light or delicate cleaning applications. It is recommended for light cleaning on wood decks and other soft or delicate surfaces. |
 |
The shower spray tip is used for shower application. The shower is applied under low-pressure high volume for optimum performance. The shower cannot be applied under high pressure with this machine. |
APPLICATIONS
You may use this product for the purposes listed below:
- Cleaning boats, cars, trucks, motorcycles, outdoor furniture, grills, house siding, driveways, patios, and decks.
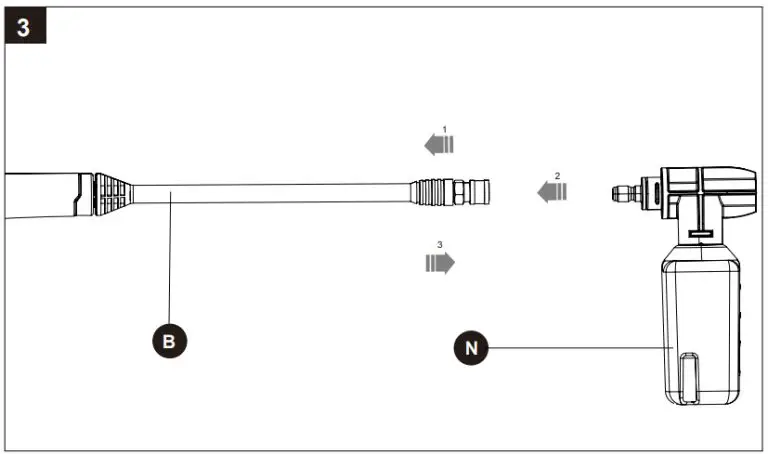
3. DETERGENT ADDING AND USE
Use only detergents designed for pressure washers; household detergents, acids, alkaline, bleaches, solvents, flammable material, or industrial grade solution can damage spray nozzle. Many detergents may require mixing prior to use. Prepare cleaning solution as instructed on the solution bottle.
SOAP APPLICATION
Soap is applied under low-pressure high volume for optimum performance.
TO ADD DETERGENT:
- Pour detergent in the detergent tank (N).
- Install the soap tank (N) to the spray wand (B).
- Start the pressure washer and spray the detergent on a dry surface using long, even, overlapping To prevent streaking, do not allow detergent to dry on the surface.

CAUTION
Use only approved pressure washer cleaners. Do not use bleach, chlorine, or any cleaners containing acids.
NOTE: Use a funnel, if needed, to prevent accidental spilling of the detergent outside the tank. If any detergent is spilled during the filling process, make sure the unit is cleaned and dried before proceeding.
CARE AND MAINTENANCE
To promote longer life of the power cleaner:
- Do not run over the hose with vehicles or drag over sharp surfaces, as this could damage the hose and cause leaks.
- Run clean, freshwater through the kit, then turn off the pressure washer and water supply.
- Depressurize by squeezing the gun trigger until all the water has been drained out of the Unit.
- The unit can now be disconnected safely for storage in a cool dark area, or to remove debris from individual parts.
WARNING
Keep hose away from hot surfaces (like a muffler). If the hose develops a leak, do not try to repair it.
REPLACE THE ENTIRE HOSE. The hose is for cold water pressure washers only. DO NOT use hot water or steam service.
TROUBLESHOOTING
| PROBLEM | POSSIBLE CAUSE | CORRECTIVE ACTION |
| Gun and/or hose leaks. | 1. Loose connection. 2. 0-ring is missing or damaged. |
1. Tighten the connections. 2. Turn off and depressurize the unit. Disconnect, remove and replace old o-ring. |
| Unit won’t spray. | 1. Power or water supply is not on. 2. hose, gun, wand, or nozzle is clogged. |
1. Turn power or water supply on. 2. Consult the troubleshooting list below for these specific parts and instructions. |
| Wand/Nozzle | Wand/nozzle is clogged or the spraying pattern is uneven. | Turn off and depressurize unit. Remove wand/nozzle from gun outlet. Look through the opening in wand; you should see light through the nozzle end. If not, then reverse flush with air or water to dislodge debris. |
| Gun | Gun is clogged. | Turn off and depressurize unit. Remove wand from gun and gun from hose. Reverse flush the gun with air or water to dislodge debris. |
| Hose | Hose is clogged. | Turn off and depressurize unit. Remove gun from hose and hose from unit. Flush the hose with air or water to dislodge debris. |
| The machine does not start. | The battery is not charged. | Charge the battery by following the procedures in the battery and charger manual. |
| The battery is too cold. | Remove the battery from the unit. Place the battery on the charger and allow it to charge for 10 minutes or until the charging light turns green. Remove from the charger and install in a unit for use. |
WARRANTY
5-YEAR REPAIR WARRANTY
This Kobalt 600 PSI power cleaner is warranted to the original purchaser from the original purchase date for five (5) years subject to the warranty coverage described herein.
This Kobalt 600 PSI power cleaner is warranted for the original user to be free from defects in material and workmanship.
If you believe that Kobalt 600 PSI power cleaner is defective at any time during the specified warranty period, simply call our warranty service (1-888-356-2258) along with proof of purchase.
This warranty is void if: defects in materials or workmanship or damages resulting from repairs or alterations which have been made or attempted by others or the unauthorized use of nonconforming parts; the damage is due to normal wear, the damage is due to abuse (including overloading of the tool beyond capacity), improper maintenance, neglect or accident; or the damage is due to the use of the tool after partial failure or use with improper accessories or unauthorized repair or alteration.
This warranty gives you specific legal rights, and you may also have other rights that vary from state to state.
REPLACEMENT PARTS LIST
For replacement parts, call our customer service department at 1-888-356-2258, 8 a.m. – 8 p.m., EST, Monday – Sunday. You could also contact us at [email protected] or visit www.lowespartsplus.com.

| PART | DESCRIPTION | PART # |
| A | Spray tip | C1104655-00 |
| B | Gun Wand | C4102326-00 |
| C | Trigger handle | C1105936-00 |
| G | Connector | C1100521-00 |
| H | Self-siphon hose | C1104825-00 |
| N | Detergent tank | C1104657-00 |