Thank you for purchasing our products. This manual addresses the safety guidelines, warranty, and operating instructions. Please review this manual thoroughly before operating your device.
Getting Started
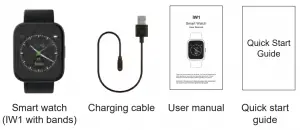
What’s in the box
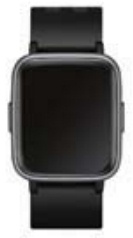
Smart watch (ID205 with bands)
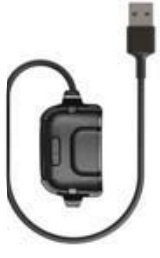
Charging cable
User manual
What’s in this document
This manual gets you started quickly with setting up your watch. Setup ensures that your watch can synchronize its data with the VeryFitPro app, where you can get detailed information on your stats, view historical trends, log sleep, and more. As soon as setup is complete, you’re ready to start moving. The remainder of the manual walks you through every function on your ID205.
Setting up Your Watch
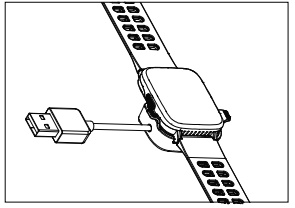
Charging your watch
Please fully charge your watch before initial use.
- Plug the charging cable into the USB port on your computer or a UL-certified USB wall charger.
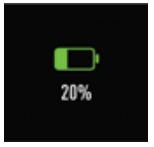
- Place the watch in the charging cradle and push it in until you hear a click. The pins on the charging cradle must align with the gold contacts on the back of the watch. The percent charged appears on the screen.
When the watch shows that the battery is low, connect the watch to a USB charging adaptor or a port with 5V-500mA. If the watch is installed correctly, it will vibrate.
While the watch charges, press the left/right button to check the battery level.
Remove the watch from the power supply once fully charged.
- USB charger requirement: DC USB port (5V-500mA)
- Charging time: 2-3 hours
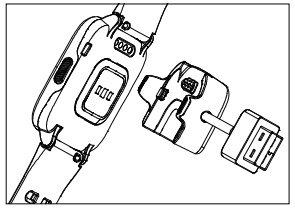
Disassembling / Assembling Your Watch
Disassembly
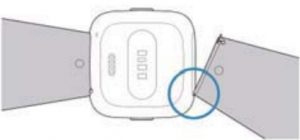
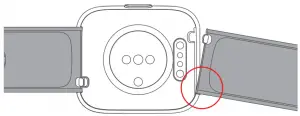
- Turn over the watch and find the quick-release lever.
- While pressing the quick-release lever inward, gently pull the wristband away from the watch to release it.
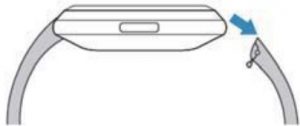
- Repeat on the other side.
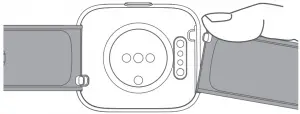
Assembly
- Slide the pin (the side opposite the quick-release lever) into the notch on the watch. Attach the wristband with the clasp to the top of the watch.
- While pressing the quick-release lever inward, slide the other end of the wristband into place.
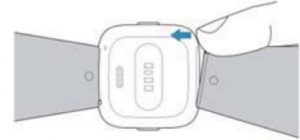
- When both ends of the pin are inserted, release the quick-release lever.
Wearing Your Watch
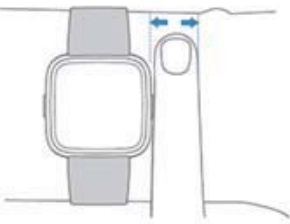
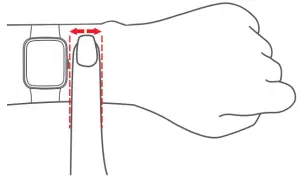
All-day wear and exercise
For all-day wear when you’re not exercising, wear the device on your wrist horizontally, a finger’s width below your wrist bone and lying flat, the same way you would put on a watch.
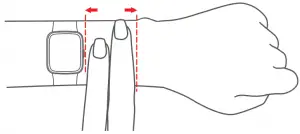
For optimized heart rate tracking, keep these tips in mind:
- Experiment with wearing the watch higher on your wrist during exercise. Because the blood flow in your arm increases the farther up you go, moving the watch up a couple of inches can improve the heart rate signal. Also, many exercises such as bike riding or weight lifting require you to bend your wrist frequently, which is more likely to interfere with the heart rate signal if the watch is lower on your wrist.
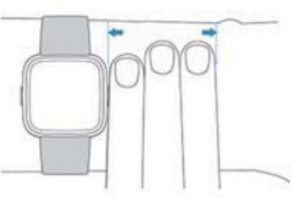
- Do not wear your watch too tight. A tight band restricts blood flow, potentially affecting the heart rate signal. This being said, the watch should also be slightly tighter (snug but not constricting) during exercise than during all-day wear.
Using Your Watch
Use the watch with our customized VeryFitPro app.
You can download VeryFitPro from Apple Store/Google Play or scan the QR codes below to download.
iOS

Android


Notes:
- The VeryFitPro app is only compatible with smartphones, not tablets or PCs.
- Smartphone operating system should be iOS 8.0 / Android 4.4 or higher; Bluetooth version should be 4.0 or higher.
Smart Phone System Requirements
- iOS 8.0 & higher
- Android 4.4 & higher
- Bluetooth 4.0 & higher
Mainpage
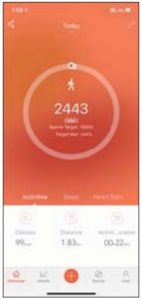
(Swipe down the page to sync data from the watch to your phone)
Details
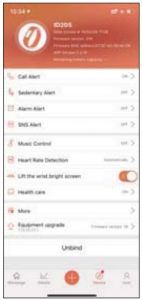
Device
User
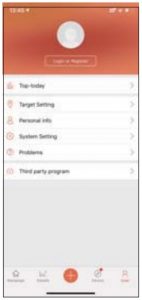
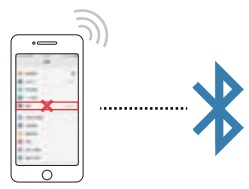
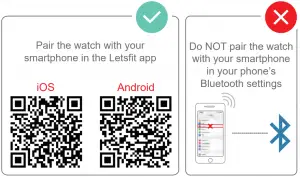
Please pair the watch with your phone in the VeryFitPro app, NOT in the Bluetooth settings of your phone.
Pair the watch with your smartphone in the VeryFitPro app
iOS
Android
Do NOT pair the watch with your smartphone in your phone’s Bluetooth settings
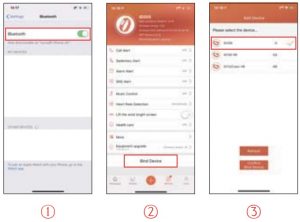
- Enable the Bluetooth of your smartphone.
- Open the VeryFitPro app on your smartphone and go to the “Device” page, tap “Bind Device”, then your smartphone starts searching devices.
- In the list of found devices that appear on your smartphone, tap on “ID205” to connect the watch to your smartphone. (If your phone failed to find ID205, please search the watch on your smartphone again.)
Notes:
- Once the watch is connected to your app, the watch will automatically search and reconnect itself if the connection is lost or when Bluetooth is restarted after manual disconnection.
- If the watch is unbound from the app, the information on the watch will be reset, and the information on the app will be cleared. Please do not unbind the connection unless there is an issue that will require a reset.
- The watch can only pair with one smartphone at a time.
When pairing, please ensure the watch and your smartphone is within 0.5 meters distance.
Getting to Know Your Watch
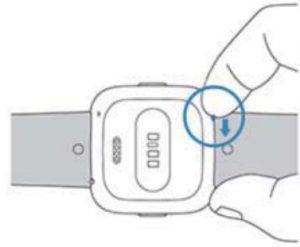
Press and hold the left button to enter the sports mode. (you can define a specific sports mode in the function list of the watch → “Setting” → “Long press”.)
- Press the right button to return to the previous interface
- Press and hold the right button to turn on the watch.
This is a touch screen; swipe the screen to go to different interfaces, and tap to enter the function.
The home screen is the clock. On the clock:
- Swipe down to see notifications.
- Swipe up to see your daily stats
- Swipe left to see the function list.
- Swipe right to see the status bar.
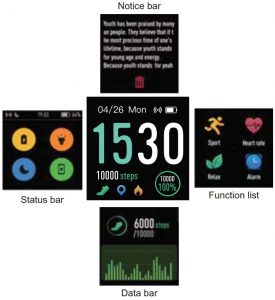
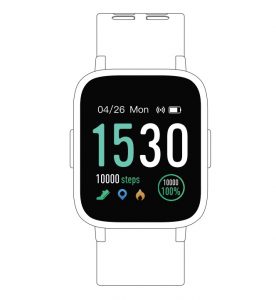
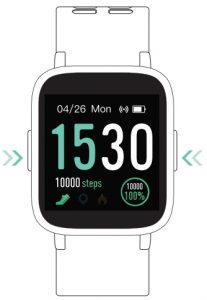
fig. 1
After the watch is bound to the app, the home screen will display the time and date as shown in fig. 1.
You can customize the home screen by following the steps below:
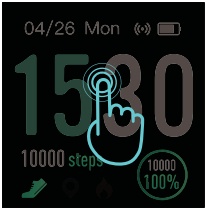
- Tap and hold the home screen.
- Swipe down to choose one and tap to confirm.
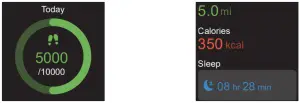
Tap the screen to switch between steps, distance, and calories. Contents displayed may be different according to the home screen you choose.
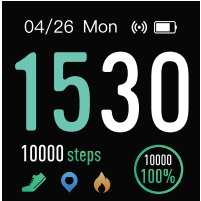
Steps
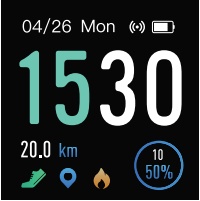
Distance
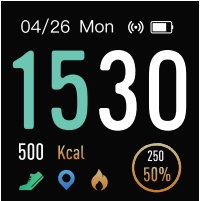
Calories
To conserve power, the watch has a standby mode in which the screen turns off. To wake the screen, turn your wrist towards you or press the left/right button.
Function Introduction
 Tracks your exercise data in up to 14 sports modes. Choose the modes that you want to display on the watch in the app.
  Tracks your real-time heart rate automatically and continuously.
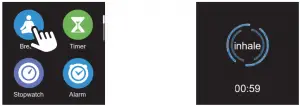
 Guides your breathing for a relaxation.
  Set alarms in the app to have the watch vibrates to wake you up, take pills, and more.
Control the music playing of your smartphone.
Timing and countdown.
Some basic settings of the watch.

Your recent sports record.
The watch tracks your exercise data in up to 14 sports
modes.
You can set up to 8 different sports modes from among
14 sports modes in the app to display on the watch screen (“Device” page → “More”→ “Activity display”).
Start a sport
Tap “Sport” → Swipe the screen to view sport modes →
Tap the sport you choose to start.
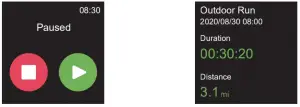
During sports
- Swipe the screen left/right to flip through exercise data.
- Press the right key to pause/resume the sport.
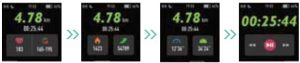
End the sport
Press and hold the right button to end the sport → Tap “” to confirm.
Exercise data is displayed after the exercise has ended.
Swipe down the screen to flip through exercise data:
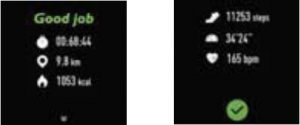
Data of exercises less than 1 minute will not be saved.
Notes:
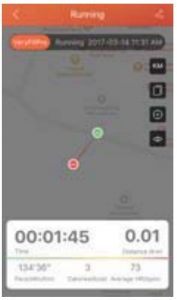
- You can also use your phone’s GPS to track your pace and distance during walks, hikes, runs or rides while mapping out your run or walk on your phone.
In the app, tap and
and  will pop up.
  Tap
Tap  to enter running mode directly or tap to choose another sports mode.
After entering running mode, the app will track and map your run distance (using your phone’s GPS). After the exercise, you can effortlessly check your exercise data in both the app and the watch.
- Sports mode is up to 6 hours.
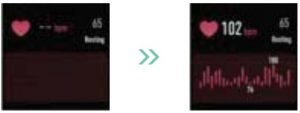
The watch tracks your real-time heart rate automatically and continuously. You can also view your detailed heart rate data on the watch screen or in the app.
Notes:
- To monitor heart rate more accurately, wear the watch on the upper position of your wrist and a bit tighter than usual when you exercise. In addition, complete your profile in the app.
- Automatic heart rate monitoring is ON by Default, monitoring heart rate all day automatically. You can disable/enable automatic heart rate monitoring in the app (“Device” page → “Heart Rate Detection”).
Tap  to start the relaxing → Press the right button to end the relaxing → Tap to confirm.
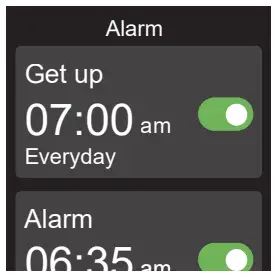
- Go to the “Device” page in the app and tap “Alarm Alert”.
- Tap “+” to add an alarm.
- Tap the alarm, then set the alarm type, repeat type and time.
- Tap to save your settings.
You can tap the alarm you set on the watch screen to enable/ disable the alarm.
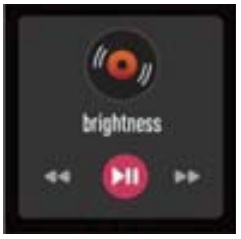
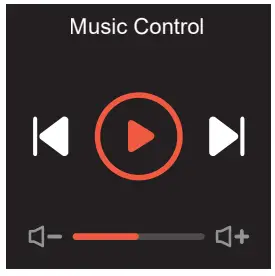
- Go to the “Device” page in the app and tap “Music Control”.
- Enable the function and tap to save you settings.
- Tap “Music Controller” on the watch screen to enter the function and control the music playing on your phone.
Note:
You can only control the music player that’s running on your smartphone.
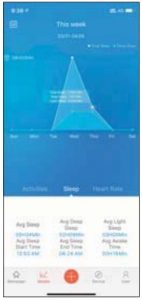
The watch automatically tracks your sleep duration (Deep Sleep, Light Sleep, and Wake-sleep) and consistency with a comprehensive analysis of sleep quality data so you can see your sleep trends and improve your routine.
You can check your detailed sleep data in the app.
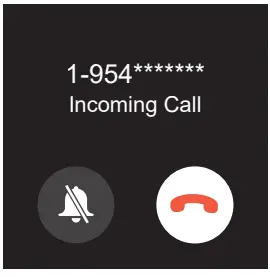
7.1 Call Notification

When there is an incoming call, the watch vibrates to alert you, and the screen displays the caller ID.
Tap  on the watch screen to reject the call.
Notes:
- Only when Call alert is enabled in the app (“Device” page → “Call Alert” ) will calls be notified.
(After enabling/disabling the Call Alert function, tap to save your settings.
When Do not disturb is enabled in the app (“Device” Page → More → Do not disturb), calls will not be notified on the watch during the do-not-disturb period.
7.2 Message Notification

When messages (SMS, Facebook, WhatsApp, Twitter, Instagram, Facebook Messenger, LinkedIn, Email, Mail, Calendar, and more) come in, the watch vibrates to alert you, and the screen displays the message content.
Notes:
- Only when SNS Alert is enabled in the app (Device page → SNS Alert → Allow notification), will messages be notified. After enabling/disabling the SNS Alert function, tap to save your settings.
- When the Do not disturb function is enabled in the app (Device page → More → Do not disturb) or on the watch (Status → “
 “) Massages will not be notified on the watch during the do-nor- disturb period.
7.3 Women’s Health Tracking
The watch reminds you of your important days like menstrual period and safe period at the time you set when you enable the function in the app (“Device” page → Health care)
7.4 Sedentary Reminder
The watch vibrates to remind you to get up and move around when you have been sitting too long (“Device” page → Sedentary Alert, enable the Sedentary Alert function and set the remind interval.)
Basic Specifications
Model No.: ID205
Sync: Bluetooth 4.0
Screen: 1.3″ TFT LCD
Battery Capacity: 210mAh
Working Voltage: 3.8V
Working Temperature: -10℃~ 40℃
Weight: 1.37oz (39g)
Waterproof Rating: 5ATM
Working Time: 10+ days
Electronic Information Products
Toxic and Hazardous Substances Statement

This product meets the EU ROHS standards
Refer to IEC 62321 and EU RoHS
Directive 2011/65 / EU and its revision instructions
FAQs
Failure to find the watch when pairing
- Make sure your smartphone’s Bluetooth is enabled and your smartphone’s system meets the requirements of Android 4.4 or higher, iOS 8.0 or higher, and Bluetooth 4.0 or higher.
- Make sure the distance between your smartphone and the watch does not exceed 0.5 meters and that Bluetooth communication is also within range (10 meters max).
- Make sure your watch has enough battery life. If there is still a problem after being fully charged, please contact us.
Occasional failure to connect with Bluetooth
Reboot your smartphone or restart your smartphone’s Bluetooth.
Failure to receive SMS/calls notifications
Calls/SMS notification function works when the watch connects to your smartphone via the app. Please kindly refer to the following tips:
- Go to your smartphone Settings, find VeryFitPro app and enable the Location and all Notifications.
- Enable your phone’s Bluetooth and go to the VeryFitPro app to bind the watch.
- Enable the Call/SNS Alert function, and tap to save your settings.
Failure to connect to smartphone
The watch will disconnect from your smartphone in the following cases:
- Smartphone Bluetooth is off or exceeds the Bluetooth connection range (the maximum Bluetooth connection range is 10 meters and can easily be reduced by walls, furniture, etc.)
- The VeryFitPro app is closed on the phone. (This can occur automatically under certain circumstances.)
To reconnect the watch to your smartphone, please kindly take the following steps:
- Go to your smartphone system Settings, find the VeryFitPro app and enable the Location and all Notifications.
- Clear all running/background processes on your smartphone. Go to the VeryFitPro app and swipe down “Mainpage”, then the watch will reconnect to your smartphone and update data. You can also restart your smartphone and Bluetooth, then rebind the watch in the app.
Warranty
We strive to build our products with the highest attention to detail and craftsmanship. However, sometimes there are occurrences of a defect, so we are happy to offer a ONE-year hassle-free warranty on all our devices as we continue to make amazing products. Please contact us if you have any questions about our devices.
Important Safety Instructions
The device contains electrical equipment that may cause injury if not used properly. For example, prolonged contact may contribute to skin allergies for some users. To reduce irritation, please read the safety guidelines on the following pages to ensure proper use and care.
- Do not expose your device to liquid, moisture, humidity or rain while charging; do not charge your device when it is wet, as this may result in electrical shock and injury.
- Keep your device clean and dry. Do not use abrasive cleaners to clean your device.
- Consult your doctor before use if you have any preexisting conditions that might be affected by using this device.
- Do not wear it too tight. If your device feels hot or warm, or if it causes any skin irritation or other discomforts, please discontinue using your device and consult your doctor.
- Do not expose your watch to extremely high or low temperatures.
- Do not leave your watch near open flames such as cooking stoves, candles, or fireplaces.
- This product is NOT a toy – never allow children or pets to play with this product. Always store the product out of the reach of children. The devices themselves or the many small parts they contain may cause choking if ingested.
- Never try to abuse, crush, open, repair or disassemble this device. Doing so will void the warranty and can result in a safety hazard.
- If any parts of your product require replacement for any reason, including normal wear and tear or breakage, please contact us.
- Do not use your device in a sauna or steam room.
- Dispose of this device, the device’s battery and itspackage in accordance with local regulations.
- Do not check any notifications, GPS, or any information on your device’s display while driving or in other situations where distractions could cause injury or hazard. Always be aware of your surroundings while exercising.
Battery Warnings
A lithium-ion battery is used in this device. If these guidelines are not followed, batteries may experience a shortened life span or may cause fire, chemical burn, electrolyte leakage, and/or injury.
- Do NOT disassemble, modify, remanufacturer, puncture or damage the device or batteries.
- Do NOT remove or attempt to remove the non-user-replaceable battery.
- Do NOT expose the device or batteries to fire, explosion, or other hazards.
Health Warnings
- If you have a pacemaker or other internal electronic device, consult your physician before using a heart rate monitor.
- The optical wrist heart rate monitor emits green light and flashes occasionally. Consult your physician if you have epilepsy or are sensitive to flashing lights.
- Always consult your physician before beginning or modifying any exercise program.
- The device, accessories, heart rate monitor, and related data are intended to be used only for recreational purposes and not for medical purposes and are not intended to diagnose, monitor, treat, cure, or prevent any disease or condition.
- The heart rate readings are for reference only, and no responsibility is accepted for the consequences of any erroneous readings.
- While the optical wrist heart rate monitor technology typically provides the best estimate of a user’s heart rate, there are inherent limitations with the technology that may cause some of the heart rate readings to be inaccurate under certain circumstances, including the user’s physical characteristics, fit of the device, and type and intensity of activity.
- The smart watch relies on sensors that track your movements and other metrics. The data and information provided by these devices are intended to be a close estimation of your activity and metrics tracked, but may not be completely accurate, including step, sleep, distance, heart rate, and calorie data.
- If you have eczema, allergies or asthma, you may be more likely to experience skin irritation or allergies from a wearable device.
- Whether you have the conditions above or not, if you start to experience any discomfort or skin irritation on your wrist, remove your device. If symptoms persist longer than 2-3 days of not using your device, contact your doctor.
- If you sweat for more than two hours while wearing your watch, be sure to clean and dry your band and your wrist to avoid skin irritation.
- Prolonged rubbing and pressure may irritate the skin, so give your wrist a break by removing the band for an hour after extended wear.
Maintenance
- Regularly clean your wrist and the smart watch, especially after sweating during exercise or being exposed to substances such as soap or detergent which may adhere to the internal side of the watch.
- Do NOT wash the watch with household cleanser.
Please use soapless detergent, rinse thoroughly and wipe with a soft towel or napkin.
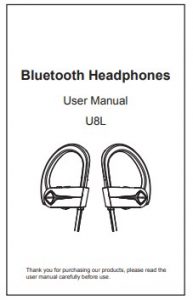
Letsfit Bluetooth Headphones User Manual
Package Contents
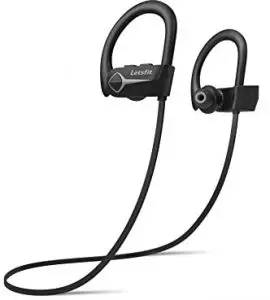
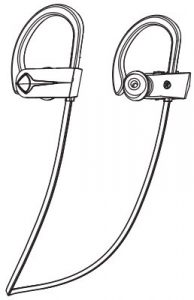
- Bluetooth headphones × 1
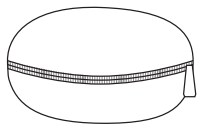
- Carry bag × 1
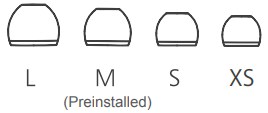
- Eartips × 4 pairs (L, M, S, XS)
- Micro USB cable × 1

- Wire clip (removable) × 1

- User manual × 1
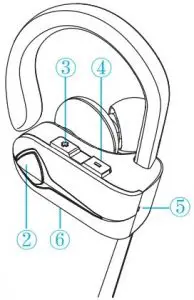
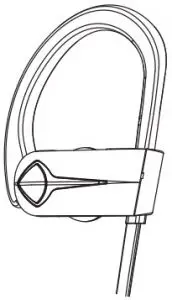
At a Glance
Right
(for the right ear)
Left
(for the left ear)
- Microphone
- MFB button (multi-function button)
- Volume + / Next
- Volume – / Previous
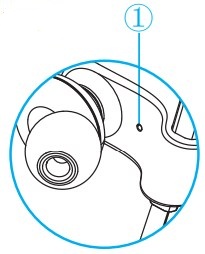
- LED indicator
- Micro USB port
LED Indicator Guide
- Power on: LED indicator flashes blue for one second
- Power off: LED indicator flashes red for 2 seconds
- Pairing mode: LED indicator flashes red and blue alternately
- Paired: LED indicator flashes blue once every 10 seconds
- Low battery: LED indicator flashes red twice every 3 minutes
- Charging: LED indicator stays red during charging and turns blue when headphones are fully charged
Get Comfortable
Wearing the Headphones
- Identify the right and left earbuds.
- Gently push the headphones into your ear and adjust the ear hooks until you feel comfortable with it. The eartips are in different sizes. Please choose the right size of eartips to find the most secure and comfortable option for yourself (usually the medium ones are suitable for 75% of people).

Using the Headphones
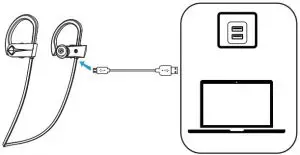
Charge the headphones
- Open the hinged door on the bottom of the right earphone.
- Plug the small end of the USB cable into the Micro USB port of the headphones.
- Plug the other end into a USB wall charger or computer (DC 5V) that is powered on.
Notes:
- Fully charge the headphones before using them for the first time.
- The indicator stays red during charging and turns blue when the headphones are fully charged.
- The indicator flashes red, and a voice reminder prompts when the headphones are in low battery.
Power on/off
- Power on: Press and hold the MFB button for 2 seconds.
- Power off: Press and hold the MFB button for 3 seconds when the headphones are on.
Pair
- Turn on the Bluetooth of your phone or other Bluetooth devices.
- Turn on the headphones when they are in shutdown state and the headphones enter pairing mode (indicator flashes red and blue alternately).
- In the list of found Bluetooth devices in your phone or other Bluetooth devices, choose “U8L” to pair.
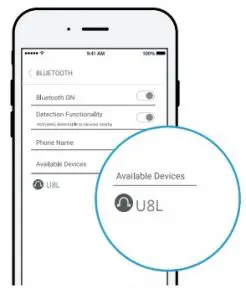
- Enter “0000” or “1234” if your phone or Bluetooth device asks you to enter a code to pair.
Notes:
- When the headphones are on but are not paired
with your phone or other Bluetooth devices, they will be automatically off in about 5 minutes (to enter pairing mode again, turn on the headphones). - The headphones will directly enter pairing mode the first time you turn them on, and they will connect to the last paired Bluetooth device automatically when turned on.
- To have the headphones enter the pairing mode when the headphones have been paired with a Bluetooth device, turn off the headphones and press and hold the MFB button for 5 seconds (indicator flashes red and blue alternately).
Volume up/down, next/previous song
- Press the “+” button to increase the volume; press and hold the “+” button for 2 seconds to skip to the next song.
- Press the “-” button to decrease the volume, press and hold the “-” button for 2 seconds to skip to the previous song.
Play/pause playing songs
Press the MFB button to pause and press the MFB button again to resume playing songs.
Answer/hang up/reject calls
- Press the MFB button or operate on your phone to answer an incoming call.
- Press the MFB button or operate on your phone to hang up an ongoing call.
- Hold the MFB button for 2 seconds to reject an incoming call.
Redial the last number
Hold the “+” and “-” buttons at the same time for 2 seconds.
Activate voice assistant of phone
Press the MFB button twice, and you will hear a “Du” sound to activate the voice assistant of your phone; press the MFB button again to exit the voice assistant of your phone.
Note:
This function works only when your phone has voice assistant function; please refer to the instructions of your phone for details.
Reset the headphones/Clear all pairing information on the headphones
- Turn off the headphones.
- Press and hold the MFB button for 12 seconds, and the headphones are off (You will hear the “power on” sound first and then hear the “pairing” sound; keep holding the MFB button and then you hear 3 tones; the headphones are off.)
FAQs
Q: I paired the headphones with my phone before, but I failed to pair them to my phone again.
Ans:
- Turn on the Bluetooth of your phone and in “MY DEVICES”, choose “U8L” and tap ”
 ” Forget This Device”.
 - Turn off the headphones.
- Reset the headphones by holding the MFB button for 12 seconds.
- Fully charge the headphones.
- Pair the headphones with your phone again following the instructions in the previous part “Pair”.
Q: I paired the headphones with my phone, but there is no sound from the headphones.
Ans: Make sure the headphones/phone are/is not muted. Some phones ask for the setup of the wireless headphones as an audio output device before the sound is transmitted. Please refer to the instructions of your phone for details. If you use a music player or other devices, please make sure it supports A2DP stereo music profile.
Q: Why isn’t the sound stable and consistent?
Ans: Make sure your headphones stay close to your phone (not away from your phone more than 33 feet, no obstacles between, and no radio or Wi-Fi interference nearby).
Q: Can I use the headphones during charging?
Ans: No, you can’t use the headphones during charging.
Q: My headphones will not switch on.
Ans: Please recharge the headphones and make sure they have enough battery power. If they are fully charged and still nothing happens or if you are not able to charge the unit, please contact our customer support for further information.
Specifications
- Bluetooth Standard: V5.0
- Wireless Profile: A2DP, HFP, HSP, AVRCP, SPP, PSAP
- Operating Range: 33 feet/10 meters (No obstacles between)
- Waterproof Rate: IPX7
- Standby Time: 250 hours
- Charging Time: 1-2 hours
- Talk/Playing Time: about 12-16 hours (Varies according to volume level and audio content)
- Charging Voltage: DC 5V
- Charging Current: 5V 500mA
- Battery Capacity: 120mAh/3.7V
Attention

Use original or certified cables.

Don’t expose to liquids.

Don’t disassemble.

Avoid dropping.

Avoid extreme temperatures.
SAFETY AND WARRANTY
Important Safety Instructions
- Use of headphones will impair your ability to hear other sounds. Use caution while using your headphones when you are engaging in any activity that requires your full attention.
- If you have a pacemaker or other electrical medical devices, you should consult your physician before using this product.
- This package contains small parts that may be hazardous to children and should be kept out of reach from children. This product is not a toy never allow children to play with this product. Always store the product out of reach from children. The bags themselves or the many small parts they contain may cause choking if ingested.
- Never try to dismantle the product yourself, or push objects of any kind into the products, as this may cause short circuits which could result in a fire or electric shock.
- None of the components can be replaced or repaired by users. Only authorized dealers or service centers may open the product. If any parts of your product require replacement for any reason, including normal wear and tear or breakage, please contact us.
- Avoid exposing your product to heat and humidity to protect against damage to the product or injury to you.
- Keep all products, cords, and cables away from operating machinery.
- If the product overheats, if the product has been dropped or damaged, if the product has a damaged cord or plug, or if the product has been dropped in a liquid, discontinue use and contact us.
- Do NOT use in areas where there are explosive hazards.
- Do NOT submerge the headphones in water. Do NOT expose the headphones to moving water (e.g., from a faucet, etc.).
- Do NOT wear the headphones while showering or bathing, or when participating in water sports, e.g., swimming, waterskiing, surfing, etc.
- This product contains magnetic material. Consult your physician on whether this might affect your implantable medical device.
- Leaving the product in hot or cold places, such as in a closed car in the summer and winter conditions, will reduce the capacity and lifetime of the headphones.
- Dispose of the product according to local standards and regulations.
- Remember: Always drive safely, avoid distractions and follow local laws!
Using the headphones while operating a motor vehicle, motorcycle, watercraft or bicycle may be dangerous, and is illegal in some jurisdictions, just as use of the headphones with both ears covered while driving is not permitted in certain jurisdictions. Check your local laws. Use caution while using your headphones when you are engaging in any activity that requires your full attention. While engaging in any such activity, removing the headphones from your ear or turning off your headphones will keep you from being distracted, so as to avoid accident or injury. Do not take notes or read documents while driving.
WARRANTY
We strive to build our products with the highest attention to detail and craftsmanship. However, sometimes there are occurrences of defect. We are happy to offer 1-year hassle-free warranty to all our products as we continue to make amazing wireless product. Please contact us if you have any questions about our devices.
Letsfit IW1 Smartwatch
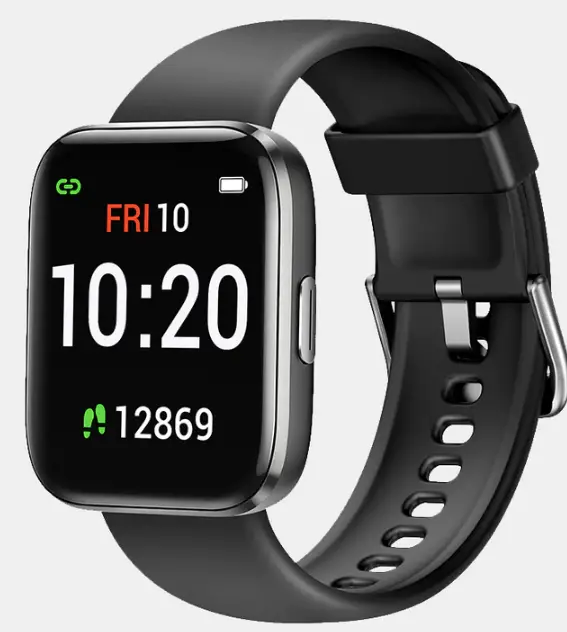
Letsfit IW1 Smartwatch
Thank you for purchasing our products. This manual addresses the safety guidelines, warranty, and operating instructions. Please review this manual thoroughly before operating your device.
All pictures in this manual are for illustration purpose only. Actual product may vary due to product firmware upgrade and app upgrade.
Getting Started
What’s in the Box
What’s in this Document
This manual gets you started quickly with setting up your watch. Setup ensures that your watch can synchronize its data with the Letsfit app, where you can get detailed information on your stats, view historical trends, log sleep, and more. As soon as setup is complete, you’re ready to start moving. The remainder of the manual walks you through every function on your IW1.
Setting up Your Watch
Charging Your Watch
Please fully charge your watch before initial use.
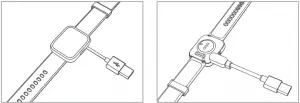
- Insert the USB plug of the charging cable into the USB port on your computer or a UL-certified USB wall charger.
- Hold the other end of the charging cable near the port on the back of the watch until it attaches magnetically.
- Make sure the pins on the charging cable lock securely with the port. The connection is secure when the watch vibrates and the battery icon with percent charged appears on the screen.
When the watch shows that the battery is low, connect the watch to a USB port with 5V-500mA.
While the watch charges, there is a battery progress circle on the screen and you can check the battery level at any time.
- Remove the watch from the power supply once fully charged.
- USB charger requirement: DC USB port (5V-500mA)
- Charging time: Approximately 2 hours
Disassembling / Assembling Your Watch
Disassembly
- To remove the wristbands, turn over the watch and find the quick-release lever.
- While pressing the quick-release lever inward, gently pull the wristband away from the watch to release it.
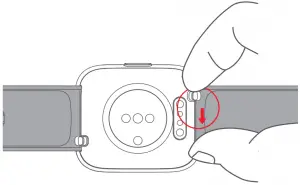
- Repeat on the other side.
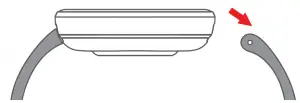
Assembly
- To reattach the wristbands, slide the pin (the side opposite the quick-release lever) into the notch on the watch. Attach the wristband with the clasp to the top of the watch.
- While pressing the quick-release lever inward, slide the other end of the wristband into place.
- When both ends of the pin are inserted, release the quick-release lever.
Wearing Your Watch
All-day Wear and Exercise
For all-day wear when you’re not exercising, wear the device on your wrist horizontally, a finger’s width below your wrist bone and lying flat, the same way you would put on a watch.
For optimized heart rate tracking, keep these tips in mind:
- Experiment with wearing the watch higher on your wrist during exercise. Because the blood flow in your arm increases the farther up you go, moving the watch up a couple of inches can improve the heart rate signal. Also, many exercises such as bike riding or weight lifting require you to bend your wrist frequently, which is more likely to interfere with the heart rate signal if the watch is lower on your wrist.
- Do not wear your watch too tight. A tight band restricts blood flow, potentially affecting the heart rate signal. This being said, the watch should also be slightly tighter (snug but not constricting) during exercise than during all-day wear.
Using Your Watch
App Installation
Use the watch with our customized Letsfit app. You can download Letsfit from App Store / Google Play or scan the QR codes below to download.

Note: The Letsfit app is only compatible with smartphones, not tablets or PCs.
Smart Phone System Requirements
- iOS 11.0 & higher
- Android 6.0 & higher
- Bluetooth 4.0 & higher
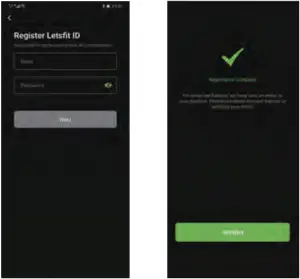
Account Registration and Login
Please register an account with a valid email address. After registration, check your email box to complete email verification, and then tap “Verified” to log in.
Pairing the Watch with Your Phone
Please pair the watch with your phone in the Letsfit app, NOT in the Bluetooth settings of your phone.
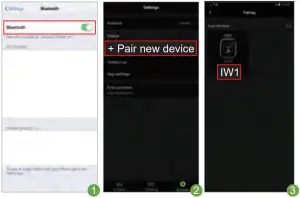
- Enable the Bluetooth of your smartphone.
- Open the Letsfit app on your smartphone and go to the “Settings” page, tap “+ Pair new device”.
- Tap “IW1”, and your smartphone starts scanning.
- Select the watch language on the watch and enter the QR code interface as instructed.
- Use the Letsfit app to scan the QR code displayed on your watch to connect the watch to your smartphone.
Notes:
- You can also search this device in the app to pair (Go to “Settings” page “+ Pair new device” “IW1” tap “Search Devices”).
- Once the watch is connected to your app, the watch will automatically search and reconnect itself if the connection is lost or when Bluetooth is restarted after manual disconnection.
- If you unpair the watch with the app, the information on the watch will be reset and the watch will be restarted. Please do not unpair the watch with the app unless there is an issue that will require a reset.
- The watch can only pair with one smartphone at a time. When pairing, please ensure the watch and your smartphone is within 0.5 meters distance.
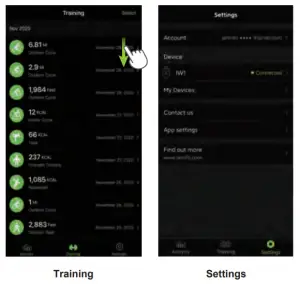
App Interfaces
When you start a sport mode on your watch, detailed data and graphs will be displayed here after the exercise is over (swipe down to sync data first).
Tap “IW1”, you can customize call / message / alarm alert or set other parameters.
Getting to Know Your Watch
Basic Operation
- Turn on / off the watch:
Press and hold the function button for 3 seconds. - Wake a dimmed screen:
Press the function button or turn your wrist towards you. - Return to the previous interface:
Press the function button or swipe the screen to the right.
Watch Interfaces
This is a touch screen; swipe the screen to go to different interfaces, and tap to enter the function.
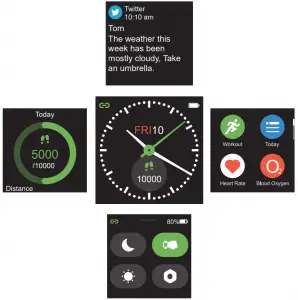
The home screen is a clock. On the clock:
- Swipe up to see the quick settings bar (do not disturb, wrist sense, night mode, settings).
- Swipe down to see notifications.
- Swipe left to the function list, including workout, today, heart rate, blood oxygen, breath, timer, stopwatch, alarm, music control, and settings.
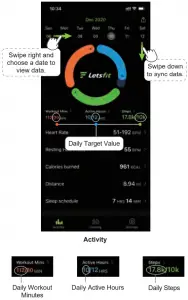
- Swipe right to view today’s daily activity data (You can customize this interface in the Letsfit app. Go to the “Setting” page “IW1” “Control Center”.)
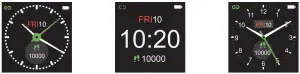
After the watch is paired with your phone, the home screen will display the time and date.
You can customize the home screen by following the steps below:
- Go to “Settings” “General” “Watch Face” on the watch.
- Swipe the screen to choose a watch face and tap to confirm.
- Open the Letsfit app, go to the “Settings” page “IW1” “Watch Faces”. Select a watch face and then choose the information you want to display on the home screen.
- Tap “Confirm” to finish setting
Function Introduction
 Tracks your exercise data in up to 14 sports modes. Choose the mode that you want to start on the watch.
 Check your daily activities and sleep data.
 Tracks your real-time heart rate automatically and continuously.
 Measures your 2 blood oxygen level.
 Guides your breathing for a relaxation.
 Customize your timer.
 Use the stopwatch to make your exercise more standardized.
 Control the music playing of your smartphone.
 Set different types of alarms in the app to make the watch vibrate to remind you.
 Some basic settings and information of the watch.
Tracking Sports
The watch tracks your exercise data in up to 14 sports modes.
Start a sport
Tap “Workout” Swipe the screen to select a sports mode you want to start.
GPS connecting (Only for Outdoor Run / Outdoor Cycle / Outdoor Walk modes)
When you start an outdoor sport, the watch begins searching GPS signal. Please let the Letsfit app run in the background and allow the location services on your phone, then move to an open area and stand still to better receive the signal. After the GPS is connected, tap ”  ” to start the exercise.

When the GPS signal is weak, you can start Outdoor Run, Outdoor Cycle, Outdoor Walk in non-GPS mode. Your movement route will not be displayed in your training record after the exercise is ended.

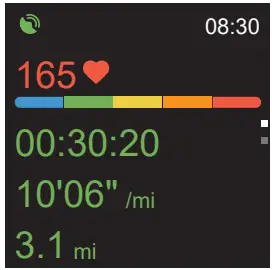
During sports
Swipe the screen up or down to flip through exercise data. Swipe the screen to the left so you can control the music playing on your phone.
End the sport
Press the function button and tap ”  ” to end the sport.
Exercise data is displayed after the exercise has ended. Swipe up the screen to flip through exercise data:
Notes:
- After ending an exercise, you can view detailed data and graphs in the app (Go to the “Training” page, swipe down the page to synchronize data, and tap the exercise you just ended).
- After you finish the outdoor cycling, outdoor running or outdoor walking exercise in GPS mode, your movement track will be displayed in the app (Go to the “Training” page of the app, and then tap on the exercise you just ended to view).
- Data of exercises less than 2 minutes will not be saved.
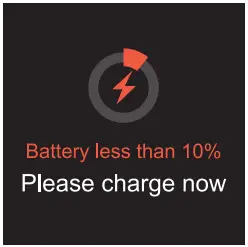
When the battery level is less than 10%, the watch enters low battery mode, in which you cannot start a sports mode. Please charge the watch to operate it again.

Tracking Daily Activity Data
The watch tracks your all-day activity data, including steps, distance, calories burned, sleep, and workout data.
Monitoring Heart Rate
After entering the heart rate interface, the watch tracks your real-time heart rate automatically and continuously. You can view your detailed heart rate data on the watch screen or in the app.

Note: To monitor heart rate more accurately, wear the watch on the upper position of your wrist and a bit tighter than usual when you exercise. In addition, complete your profile in the app.
Measuring Blood Oxygen Level
Before measuring, wear the watch a finger-width below the wrist bone and a bit tighter than usual.
- Tap “Blood Oxygen” to enter the blood oxygen level detection mode.
- When measuring, keep your arm flush with your chest and the watch screen facing up. Keep your arm still to ensure the accuracy of the data.

Sleep Detection Mode:
If you want the watch to track your blood oxygen level during sleep, please open the Letsfit app, go to the “Settings” page “IW1”, and turn on the blood oxygen measurement switch. The blood oxygen data will then be displayed in the app (Go to the “Activity” page “Sleep Schedule”).

Breathing Guide
Swipe the screen of the watch to enter breathing mode. Select the duration of the breathing training and follow the instructions to breathe. If you want to end the breathing training, press the function button, or swipe the screen to the right.
Setting Alarms
- Go to the “Settings” page in the Letsfit app and tap “IW1”.
- Tap “Alarm” to enter the alarm setting interface.
- Tap “Add” to add an alarm.
- Set the alarm time, name, vibration period and repeat time.
- Tap “Confirm” to save your settings.
You can enable / disable the alarm on your 07:00 am watch (Tap “Alarm” on the watch and turn Everyday on/off the alarm you set.)
Controlling Phone Music
After the watch is connected to the Letsfit app on your phone, tap “Music Control” on the watch to enter the function and control the music playing on your phone.
Note:
You can only control the music player that’s running on your phone.
More Functions
Call Notification
When there is an incoming call, the watch vibrates to alert you, and the screen displays the caller ID.
Tap ”  ” on the watch screen to reject the call.
Tap ”  ” to turn on vibration-free mode.
Notes:
- Only when “Notification alerts” is enabled in the app (“Settings” page “IW1” “Notification alerts”), will calls be notified.
- When the “Do not disturb” function is enabled in the app (“Settings” page “IW1” “Do Not Disturb”) or on the watch (Quick settings bar
 ), calls will not be notified on the watch during the do-not-disturb period.
Message Notification
When messages (like Facebook, Twitter, and Instagram messages) come in, the watch vibrates to alert you, and the screen displays the message content.

Notes:
- Only when “Notification alerts” is enabled in the app (“Settings” page “IW1” “Notification alerts”), will messages be notified.
- When the “Do not disturb” function is enabled in the app (“Settings” page “IW1” “Do Not Disturb”) or on the watch (Quick settings bar ), messages will not be notified on the watch during the do-not-disturb period.
Sedentary Reminder
The watch vibrates to remind you to get up and move around when you have been sitting too long (Go to “Activity” page “Active Hours” “Sedentary Alert Settings” enable the movement reminders function and set the remind interval.)
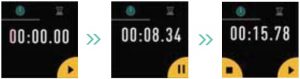
Stopwatch
1) Tap “Stopwatch” to enter the function.
2) Tap ”  ” to start.
Timer
1) Tap “Timer” to enter the function.
2) Choose the countdown time or customize your timer.
Basic Specifications
- Model No.: IW1
- Sync: Bluetooth 5.0
- Screen: 1.4″ TFT LCD
- Battery Capacity: 250mAh
- Working Voltage: 5V-500mA
- Working Temperature: -10C to 40C
- Weight: 1.2oz (34g)
- Waterproof Rating: IP68
- Working Time: 5-7 days
FAQs
◉Failure to re-pair the watch with the Letsfit app on your smartphone
- Swipe the screen of watch to enter settings mode. Tap “System” and choose “Reset”. The information on the watch will be reset and the watch will be restarted.
- Select the watch language on the watch and enter the QR code interface as instructed.
- Use the Letsfit app to scan the QR code displayed on your watch to pair.
If you still fails to connect the watch to the app, please kindly take the following steps:
- Make sure your smartphone’s Bluetooth is enabled and make sure the watch is not connected to other smartphones.
- Search this device in the app to pair (Go to the “Settings” page “+ Pair new device” “IW1” tap “Search Devices”).
- Make sure the distance between your smartphone and the watch does not exceed 0.5 meters and keep the watch screen always on when pairing.
◉ Occasional failure to connect with Bluetooth
Reboot your smartphone or restart your smartphone’s Bluetooth.
◉ Failure to receive SMS / calls notifications
Calls / SMS notification function works when the watch connects to your smartphone via the app. Please kindly refer to the following tips:
- Go to your smartphone Settings, find Letsfit app, enable the Location and all Notifications.
- Enable your phone’s Bluetooth and go to the Letsfit app to pair the watch.
- Open the app. Go to the “Settings” page “IW1” “Notification alerts”, turn on “Notification alerts”.
- Make sure the “Do not disturb” function is not enabled in the app or the watch.
◉ The watch is disconnected from the Letsfit app on your smartphone
The watch will disconnect from your smartphone in the following cases:
- Smartphone Bluetooth is off or exceeds the Bluetooth connection range (the maximum Bluetooth connection range is 10 meters and can easily be reduced by walls, furniture, etc.)
- The Letsfit app is closed on the phone. (This can occur automatically under certain circumstances.)
To reconnect the watch to your smartphone, please kindly take the following steps:
- Go to your smartphone system Settings, find the Letsfit app, and enable the Location and Bluetooth.
- Clear all running / background processes on your smartphone. Open the Letsfit app, go to the “Settings” page, tap “IW1”, and then the watch will reconnect to your smartphone and update data. You can also restart your smartphone and Bluetooth, then re-pair the watch in the app.
◉ Blood Oxygen Level Measurement Accuracy
The Blood oxygen level will be affected by factors such as motion, watch placement on the wrist, skin temperature and skin perfusion. These factors will cause fluctuations in blood oxygen measurements.
For a single measurement on the watch, please wear the watch a finger-width below the wrist bone, snug but comfortable on your wrist. When measuring, stay still and make sure your wrist is flat with the watch facing up. If you are sitting, you can rest your arm on a table with the watch facing up. For sleep blood oxygen detection, please wear the watch snugly but comfortable on the wrist when sleeping.
The smart watch blood oxygen sensor isn’t a medical device and won’t be able to diagnose or monitor any medical conditions. If there is a problem with the measurement, we recommend you consult your doctor.
Warranty
We strive to build our products with the highest attention to detail and craftsmanship. However, sometimes there are occurrences of a defect, so we are happy to offer a ONE-year hassle-free warranty on all our devices as we continue to make amazing products. Please contact us if you have any questions about our devices.
Important Safety Instructions
The device contains electrical equipment that may cause injury if not used properly. For example, prolonged contact may contribute to skin allergies for some users. To reduce irritation, please read the safety guidelines on the following pages to ensure proper use and care.
- Do not expose your device to liquid, moisture, humidity or rain while charging; do not charge your device when it is wet, as this may result in electrical shock and injury.
- Keep your device clean and dry. Do not use abrasive cleaners to clean your device.
- Consult your doctor before use if you have any preexisting conditions that might be affected by using this device.
- Do not wear it too tight. If your device feels hot or warm, or if it causes any skin irritation or other discomforts, please discontinue using your device and consult your doctor.
- Do not expose your watch to extremely high or low temperatures.
- Do not leave your watch near open flames such as cooking stoves, candles, or fireplaces.
- This product is NOT a toy never allow children or pets to play with this product. Always store the product out of the reach of children. The devices themselves or the many small parts they contain may cause choking if ingested.
- Never try to abuse, crush, open, repair or disassemble this device. Doing so will void the warranty and can result in a safety hazard.
- If any parts of your product require replacement for any reason, including normal wear and tear or breakage, please contact us.
- Do not use your device in a sauna or steam room.
- Dispose of this device, the device’s battery and its package in accordance with local regulations.
- Do not check any notifications, GPS, or any information on your device’s display while driving or in other situations where distractions could cause injury or hazard. Always be aware of your surroundings while exercising.
Battery Warnings
A lithium-ion battery is used in this device. If these guidelines are not followed, batteries may experience a shortened life span or may cause fire, chemical burn, electrolyte leakage, and/or injury.
- Do not disassemble, modify, remanufacture, puncture or damage the device or batteries.
- Do not remove or attempt to remove the non-user-replaceable battery.
- Do not expose the device or batteries to fire, explosion, or other hazards.
Health Warnings
- If you have a pacemaker or other internal electronic device, consult your physician before using a heart rate monitor.
- The optical wrist heart rate monitor emits green light and flashes occasionally. Consult your physician if you have epilepsy or are sensitive to flashing lights.
- Always consult your physician before beginning or modifying any exercise program.
- The device, accessories, heart rate monitor, blood oxygen level measurement and related data are intended to be used only for general fitness and wellness purposes, not for medical purposes, and are not intended to diagnose, monitor, treat, cure, or prevent any disease or condition.
- The heart rate and blood oxygen level readings are for reference only, and no responsibility is assumed for the consequences of any false readings.
- While the optical wrist heart rate monitor technology typically provides the best estimate of a user’s heart rate, there are inherent limitations with the technology that may cause some of the heart rate readings to be inaccurate under certain circumstances, including the user’s physical characteristics, fit of the device, and type and intensity of activity.
- The smart watch relies on sensors that track your movements and other metrics. The data and information provided by these devices are intended to be a close estimation of your activity and metrics tracked, but may not be completely accurate, including step, sleep, distance, heart rate, and calorie data and blood oxygen levels.
- If you have eczema, allergies or asthma, you may be more likely to experience skin irritation or allergies from a wearable device.
- Whether you have the conditions above or not, if you start to experience any discomfort or skin irritation on your wrist, remove your device. If symptoms persist longer than 2-3 days of not using your device, contact your doctor.
- If you sweat for more than two hours while wearing your watch, be sure to clean and dry your band and your wrist to avoid skin irritation.
- Prolonged rubbing and pressure may irritate the skin, so give your wrist a break by removing the band for an hour after extended wear.
Maintenance
- Regularly clean your wrist and the smart watch, especially after sweating during exercise or being exposed to substances such as soap or detergent which may adhere to the internal side of the watch.
- Do not wash the watch with household cleanser. Please use soapless detergent, rinse thoroughly and wipe with a soft towel or napkin.
While the watch is water resistant, wearing a wet band is not good for your skin. - If your bands get wet–for example after sweating or showering–clean and dry them thoroughly before putting them back on your wrist.
- Be sure your skin is dry before you put your bands back on.
- Do not bring your device into contact with any sharp objects, as this could cause scratches and other damage.
- For light-colored arm bands, minimize direct contact with dark-colored clothing, as color transfer can occur.
FAQ’S
What are the supported languages?
English, Simplified Chinese, Traditional Chinese, Korean, Spanish, French, German, Italian and Japanese.
What is the warranty period?
One year from the date of purchase.
Can you answer calls on Letsfit smart watch?
The device has a speaker and microphone that allow you to answer calls made to your smartphone.
How do you charge a Letsfit?
insert the built-in USB plug into a USB port for charging.
Does Letsfit measure blood pressure?
Letsfit EW1 Smartwatch with Blood Pressure Monitor | Free Shipping – Wellbots.
Is Letsfit IW1 waterproof?
IP68 waterproof grade means the IW1 protects against sweat, rain, water splashes and submergence.
Is there a Letsfit app?
Wide Compatibility: Our smart watch is compatible with our very own Letsfit app, and works with Android OS 6.0/iOS 11.0 or above and Bluetooth 4.0 or later (Suitable for smartphones only).
How do I set the time and date on my smartwatch?
Set your watch’s time and date
If the screen is dim, tap it to wake up the watch.
Swipe down from the top of the screen.
Tap Settings . If you don’t find it straight away, swipe left.
Tap System Date and time. Choose your time settings.
What is the charging time?
The charging time is about 1.5 hours.
How do I know when my watch needs to be charged?
When your watch shows that it needs to be charged, attach it to a charging cable and connect it to a computer or a UL-certified USB wall charger. The watch will charge automatically once connected to a power source.
Is there any way I can check if my watch is charging?
Yes, you can check if your watch is charging by looking at its screen. If you see a battery icon with a percent charged, then your watch is charging. If you don’t see any battery icon, then your watch isn’t connected to a power source or isn’t attached properly to a charging cable. Please make sure that your watch is connected properly and try again. If this doesn’t work, please contact us at [email protected] . We’ll be happy to help you!
How do I turn on my watch?
Press and hold down for about 2 seconds until its screen lights up, then release . You’ll see a battery icon with percent charged if your watch has been fully charged or an empty battery icon if it hasn’t been fully charged yet . If you don’t see either of these icons, please contact us at [email protected]. We’ll be happy to help!
How do I turn off my watch?
Press and hold down for about 2 seconds until its screen lights up, then release . You’ll see an empty battery icon if it hasn’t been fully charged yet or an empty battery icon with percent charged if it has been fully charged already . If you don’t see either of these icons, please contact us at [email protected]. We’ll be happy to help! Setting up Your Watch Watch Setup lets you connect your IW1 with Letsfit app via Bluetooth so that all data collected by Letsfit app can be synchronized with Letsfit app automatically.
Letsfit IW1 Smartwatch
www://letsfit.com/products/iw1-smart-watch

Letsfit IW1 Lite Smart Watch
Letsfit IW1 Lite Smart Watch
Quick Start Guide
IW1 Lite Smart Watch
This quick start guide will support you in getting started using your smartwatch. If you’re looking for a more detailed user manual, FAQs, and other information, please visit our official website. All pictures in this guide are for illustration purposes only. Actual products may vary due to product firmware and app upgrades.
Package Contents
- Smartwatch (IW1 Lite with bands)
- Charging cable
- Quick start guide
Charging
Please fully charge your watch before initial use.
- Insert the USB plug of the charging cable into a USB charger.
- Attach the other end to the charging contacts on the back of the watch.
Installing the Fitdock App 3
|
iOS 11.0 & above |
|
Android 6.0 & above |
| https://apps.apple.com/us/app/fitdock/id1575124602 | Fitdock | https://play.google.com/store/apps/details?com.honbow.fitdock |
Note: Fitdock app is only compatible with smartphones, not tablets or PCs.
Pairing
1 Turn on the Bluetooth of your phone.
2 Open the Fitdock app. Go to the “Device” page and tap “Pair device”.
3 Tap “ ” and scan the QR code on the watch to pair. Or tap “IW1 Lite” to search the device for pairing.
Controls
- Function Button
- Touch Screen
FAQ’S
What are the supported languages?
English, Simplified Chinese, Traditional Chinese, Korean, Spanish, French, German, Italian and Japanese.
What are the supported operating systems?
Android 4.4 and above; iOS 8.0 and above.
What is the warranty period?
One year from the date of purchase.
How to update the firmware of the watch?
Please visit our official website for more information.
How to reset the watch?
Please visit our official website for more information.
How to connect with a PC or Mac computer?
Please visit our official website for more information.
Is the IW1 Lite smart watch waterproof?
IP68 waterproof grade means the IW1 protects against sweat, rain, water splashes and submergence.
Can you answer calls on Letsfit smart watch?
The device has a speaker and microphone that allow you to answer calls made to your smartphone.
Does Letsfit work with iPhone?
Letsfit Smart Watch Fitness Tracker with Heart Rate & Sleep Monitor & Blood Oxygen Saturation Compatible with iPhone & Android Phones.
How do you charge a Letsfit?
insert the built-in USB plug into a USB port for charging.
How do I view my photos on a watch?
Browse photos in the Photos app on Apple Watch
Open the Photos app on your Apple Watch and use these actions to browse your photos. Tap a Memory, Featured Photos, or an album you’ve synced to your Apple Watch. Tap a photo to view it. Swipe left or right to see other photos.
Does Letsfit measure blood pressure?
Letsfit EW1 Lite Smartwatch with Blood Pressure Monitor | Free Shipping – Wellbots.
VIDEO
Letsfit IW1 Lite Smart Watch
www://letsfit.com/products/iw1-smart-watch
True Wireless Earbuds
User Manual
Thank you for purchasing our products. This manual addresses the safety guidelines, warranty, and operating instructions. Please review this manual thoroughly before operating your device.
Package Contents
- Wireless Earbuds × 1 Pair (Left and Right)
- Charging Case × 1
- USB Type-C Cable × 1
- User Manual × 1
- Ear Tips × 3 Pairs (Large / Medium (preinstalled) / Small)
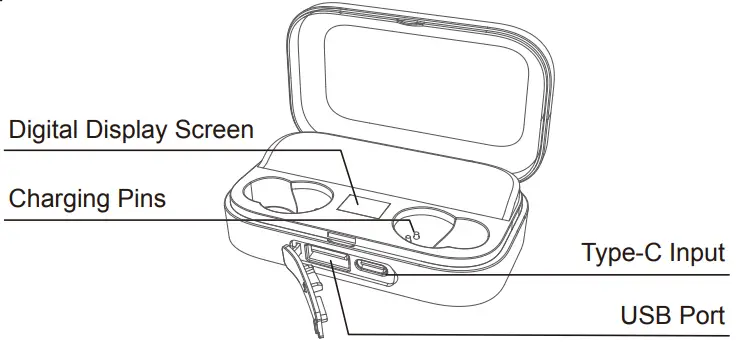
At a Glance
Charging Case
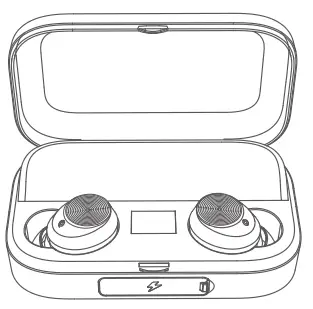
Earbuds
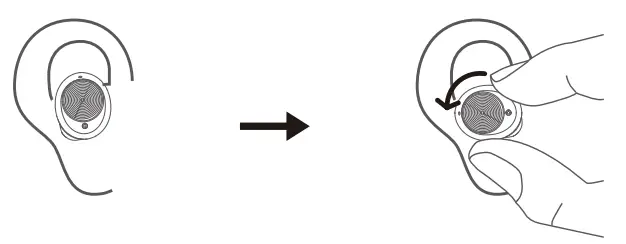
How to Wear
- Choose a pair of ear tips that fits your ears perfectly.
- Identify the left and right earbuds. Make sure the microphone on the earbud is facing down. Then insert the earbud into your ear and rotate backward to fit comfortably.
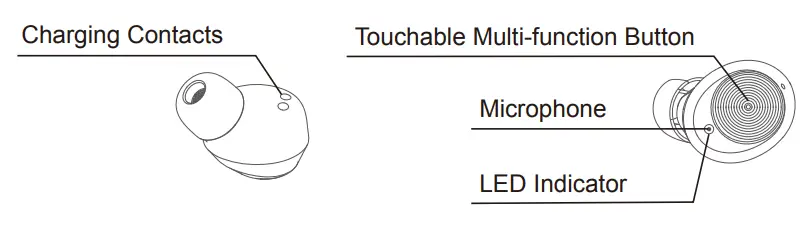
Earbuds LED Indicator Guide
| System State | Indicator Activity |
| Power on | The LED indicator stays red and white for 1 second. |
| Power off | The LED indicator stays red for 1 second. |
| Pairing mode | The LED indicator flashes red and white alternately. |
| Low battery | The LED indicator flashes red once every 5 seconds with a voice prompt. |
| Charging | The LED indicator stays red. |
| Fully charged | The LED indicator goes off. |
Digital Display Screen Indicator Guide
| System State | Indicator Activity |
| Charging the earbuds | The screen displays the real-time battery percentage of the charging case. |
| Being charged | The screen displays the real-time battery percentage of the charging case (Single-digit is flashing). |
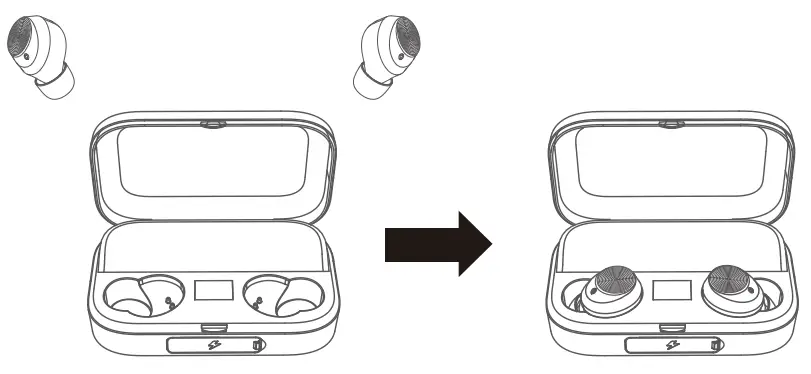
Using Your T22
Charging the Earbuds
- Align the charging contacts on the right earbud with the charging pins on the right side of the case.
- Repeat Step 1 to charge the left earbud.
- Close the case; the earbuds LED indicator will stay red. (The the digital display screen will display the battery percentage of the charging case)
Please note:
It takes approximately 1.5 hours to fully charge the earbuds.
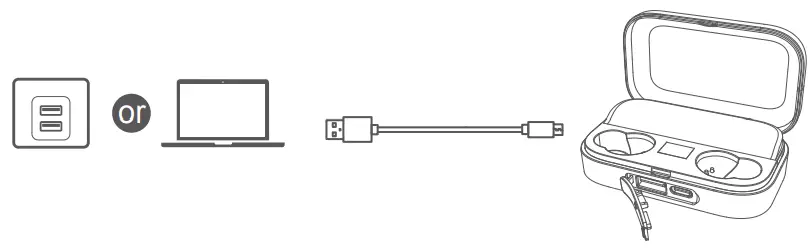
Charging the Charging Case
Method 1:
- Open the dust-proof cover of the charging case.
- Plug the small end of the USB Type-C cable into the Type-C input of the charging case.
- Plug the other end into a USB wall charger or computer (DC 5V) that is powered on.
Method 2:
Put the charging case on a Wireless Charger (Qi-Certified).
Please note:
- A fully charged charging case can charge the earbuds approximately 19 times.
- The earbuds and the charging case itself are charged simultaneously. The charging case can be used as a stand-alone charger.
Power On & Off
Automatic operation
Power on: Take the earbuds out of the charging case and the earbuds will automatically turn on.
Power off: Put the earbuds back into the charging case and the earbuds will automatically turn off.
Please note:
When the charging case is out of power, you cannot turn on/off the earbuds through the above operation. Please turn on/off the earbuds manually.
Manual operation
Power on: Tap and hold the Multi-function button on the left/right earbud for 2 seconds.
Power off: Tap and hold the Multi-function button on the left/right earbud for 4 seconds.
Pairing & Connectivity
- Turn on the Bluetooth of your Bluetooth device.
- Take the earbuds out of the charging case and they will enter pairing mode automatically and the LED indicator on the earbud will flash red and white alternately.
- Choose “T22” from the list of found Bluetooth devices on your Bluetooth device to pair.
Please note:
- Make sure the earbuds and your Bluetooth device are next to each other within 10 meters (33 feet) and there are no obstacles between.
- The earbuds will connect to the last paired Bluetooth device automatically when they are turned on. Please turn on the Bluetooth function of your Bluetooth-enabled device before turning on the earbuds.
- If pairing fails, put the earbuds back into the charging case, close the cover and make sure that they are off. Then take them out of the charging case and pair the earbuds with your Bluetooth-enabled device again following the steps in the previous section “Pairing & Connectivity”.
- When the earbuds are on but not paired with a Bluetooth device, they will be automatically shut down in 5 minutes.
Headphone Functions
| Function | What to do |
| Play/Pause | Tap the Multi-function Button once. |
| Next Track | Tap the Multi-function Button on the right earbud twice. |
| Previous Track | Tap the Multi-function Button on the left earbud twice. |
Call Functions
| Function | What to do |
| Answer/End Call | Tap the Multi-function Button once. |
| Decline an Incoming Call |
Tap and hold the Multi-function Button of the left/right earbud for 1 second. |
Activating Phone Voice Control
Tap the Multi-function Button three times when the earbuds are in the standby/music playing state. And tap the Multi-function Button
three times again to exit. (This function works only when your phone has voice control functionality; please refer to the instructions of your phone for details.)
Primary/Secondary Mode
These earbuds have a primary-secondary switch function.
- When the earbuds have been connected to a Bluetooth device, take out either of the two earbuds, it can be connected and used normally. During this period, you can take out the other one and they will pair with each other so you can use both of the earbuds.
- When both earbuds are connected to your phone, no matter which one is put back to the charging case, you can use the other one without interruption.
Charging Case to Be Used as a Portable Charger
- Plug the Type A connector of the USB cable into the USB port of the charging case.
- Plug the small end of the USB cable into the charging port of the device you want to charge.
Please note:
The USB port of the charging case supports a 5V/1A output.
When the charging case has power and is used as a portable charger to charge other devices, if the digital display screen does not display a number or the number flashes, it indicates a short circuit or over-current condition. In this case, please disconnect the USB cable first, and then plug in the cable again to charge your device.
Clear the Earbuds Pairing List
- Turn off the earbuds.
- Tap and hold the Multi-function Button of the left and right earbud simultaneously for approximately 10 seconds.
Cleaning Your Earbuds and Charging Case
Clean the earbuds and charging case only with a dry, soft cotton swab or equivalent.
FAQs
Q: Pairing fails?
A:
- Put the earbuds back to the charging case and make sure that they are off.
- Take the earbuds out of the case they will automatically turn on.
- Wait for the indicators on the earbuds to flash red and white alternately so that the earbuds enter pairing mode.
- Choose “T22” in your phone to pair.
If the pairing still fails, check the following points:
- Make sure the earbuds and your Bluetooth-enabled device are next to each other or within 10 meters (33 feet) and there are no obstacles between.
- There are no signal interferences nearby (check the question “Connection is not stable” for signal interference conditions).
Q: Earbuds are connected to phone A, but I want to pair earbuds with phone B when I am not able to disconnect earbuds from phone A?
A:
- Turn off the Bluetooth of phone A, and the earbuds will enter into pairing mode.
- Choose “T22” in phone B’s Bluetooth settings to pair.
Q: I paired the earbuds with my phone before, but I failed to pair them to my phone again?
A: Turn on the Bluetooth of your phone and in “My Devices”, choose “T22″ and tap ” 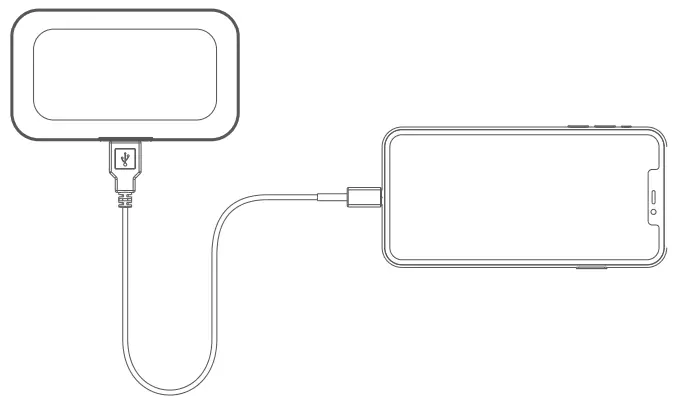 ” → “Forget This Device”. Then pair the earbuds with your phone again following the steps in the previous part “Pairing & Connectivity”.
Q: Connection is not stable?
A: Make sure that the Bluetooth connection distance is within 10 meters (33 feet) and there is no object between the earbuds and your Bluetooth device, no radio or Wi-Fi interference nearby.
Specifications
| Model | T22 |
| Bluetooth Version | V5.0 |
| Battery | 43mAh (each earbud), 2600mAh (charging case) |
| Charging Time | Approx. 1.5 hours (earbuds), 5 hours (charging case) |
| Wireless Charging Time | 6-7 hours (charging case) |
| Charging Voltage | DC 5V/1A |
| Music Playing/Call Time |
4-5 hours per charge Up to 100 hours (with charging case) |
| Waterproof Rate | IPX5 |
| Bluetooth Connection Distance |
Up to 10 meters (33 feet) |
| Supporting Protocols | HFP/HSP/A2DP/AVRCP |
| Working Temperature | -10°C to 40°C |
Attention!
 |
Use original or certified cables. |
 |
Don’t expose to liquids. |
 |
Don’t disassemble. |
 |
Avoid dropping. |
 |
Avoid extreme temperatures. |
Safety and Warranty
Important Safety Instructions
- The use of earbuds will impair your ability to hear other sounds. Use caution while using your earbuds when you are engaging in any
activity that requires your full attention. - If you have a pacemaker or other electrical medical devices, you should consult your physician before using this product.
- This package contains small parts that may be hazardous to children and should be kept out of reach from children. This product is not a toy – never allow children to play with this product. Always store the product out of reach from children.
The bags themselves or the many small parts they contain may cause choking if ingested. - Never try to dismantle the product yourself, or push objects of any kind into the products, as this may cause short circuits which could result in a fire or electric shock.
- None of the components can be replaced or repaired by users.
Only authorized dealers or service centers may open the product. If any parts of your product require replacement for any reason, including normal wear and tear or breakage, please contact us. - Avoid exposing your product to rain, moisture or other liquids to protect against damage to the product or injury to you.
- Keep all products, cords, and cables away from operating machinery.
- If the product overheats, if the product has been dropped or damaged, if the product has a damaged cord or plug, or if the product has been dropped in a liquid, please discontinue use and contact us.
- Do not use in areas where there are explosive hazards.
- Do not submerge the earbuds in water. Do not expose the earbuds to moving water (e.g., from a faucet, etc.).
- Do not wear the earbuds while showering or bathing, or when participating in water sports, e.g., swimming, water skiing, surfing, etc.
- This product contains magnetic material. Consult your physician on whether this might affect your implanted medical device.
- Leaving the product in hot or cold places, such as in a closed car in the summer and winter conditions, will reduce the capacity and lifetime of the earbuds.
- Dispose of the product according to local standards and regulations.
Please note: Always drive safely, avoid distractions and follow local laws!
- Using the earbuds while operating a motor vehicle, motorcycle, watercraft or bicycle may be dangerous, and is illegal in some jurisdictions, just as the use of the earbuds with both ears covered while driving is not permitted in certain jurisdictions. Check your local laws.
- Use caution while using your earbuds when you are engaging in any activity that requires your full attention. While engaging in any such activity, removing the earbuds from your ear or turning off your earbuds will keep you from being distracted, so as to avoid accident or injury. Do not take notes or read documents while driving.
- When using and charging this product, basic precautions should always be followed, including the following:
– Read all the instructions before using the charging case.
– To reduce the risk of injury, close supervision is necessary when the charging case is used near children.
– Do not expose the charging case to water, rain, liquids, or snow.
– Use of a power supply or charger that is not recommended or sold by a power pack manufacturer may result in a risk of fire or injury.
– Do not use the charging case in excess of its output range.
– Do not use a charging case that is damaged or modified.
Damaged or modified batteries may exhibit unpredictable behavior resulting in fire, explosion, or risk of injury.
– Do not disassemble the charging case. Incorrect reassembly may result in a risk of fire or injury.
– Do not open, crush or expose a charging case to fire or excessive temperature. Exposure to fire or extreme temperature may cause an explosion.
– Have servicing performed by a qualified repair person using only identical replacement parts.
Warranty
We strive to build our products with the highest attention to detail and craftsmanship. However, sometimes there are occurrences of defects.
We are happy to offer a one-year hassle-free warranty to support our customers as we continue to make amazing wireless products.
Please contact us if you have any questions about our devices.