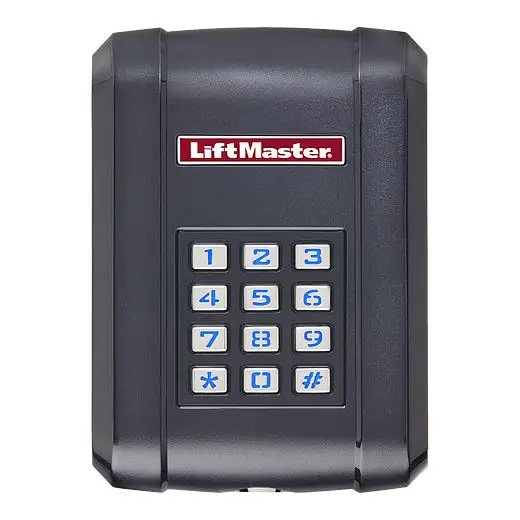
LiftMaster 850EV Wireless Keypad
Overview
This keypad should be programmed to only ONE operator. A wireless signal is transmitted when a valid 4-digit PIN and the # key is pressed. A long tone will sound. The keypad backlight will illuminate for 15 seconds when any key is pressed. If an invalid PIN or partial PIN is accidentally entered, an error tone will sound.
| Frequency and encryption:
LiftMaster Security+ 2.0® Tri-band 433 MHz (433.30MHz, 433.92MHz, 434.54MHz) |
PIN capacity
Up to 5 permanent PINs and Up to 10 unique temporary PINs |
| Intended use | Garage door and gate operators with Security+ 2.0 radio |
| Transmission Power | < 10 mW |
| Battery | 1 x 9V Lithium |
| Operating temperature range | -20°C to 60°C |
| IP rating | 55 |
WARNING!
Activate opener only when door/gate is in full view, free of obstruction and properly adjusted. No one should enter or leave while door/gate is in motion. Do not allow children to operate or play with push buttons or remote controls. Do not allow children to play near the door/gate.
NOTE: Only the original remote controls from the manufacturer should be used. Remote controls that may look very similar, but do not originate from the manufacturer are not compatible. Such third-party remotes create malfunctions such as automatic opening, and the guarantee on the function and safety expires.
Installation
- Choose a mounting location suitable for your application such as a wall, flat surface, or a pedestal with 76mm x 76mm mounting pattern, located equal or less than 2 m of installation height. Locate the keypad at least 1.8m away from any moving part of the gate and where the user cannot reach over, under, around or through the gate to operate the controls. The mounting location needs to be in line of sight of the moving gate.
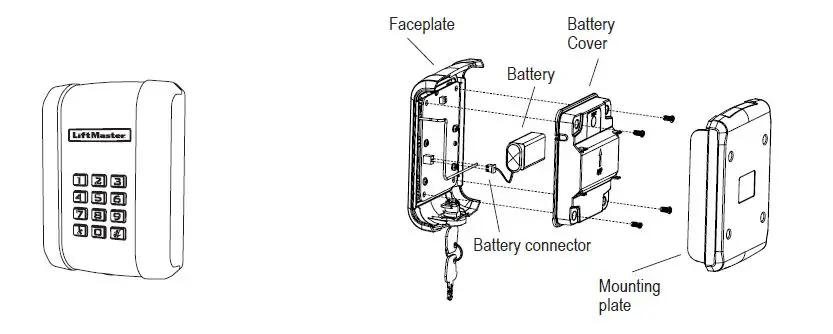
- Unlock and remove the faceplate from the mounting plate.
- Mount the mounting plate to the desired surface and secure with screws or bolts.
- Remove the battery cover using a screw driver. Connect the white battery connector to the PCBA (see illustration) and reinstall the cover.
- Reattach the faceplate to the mounting plate and lock with the key.
- The garage door / gate opener must be programmed to accept the new keypad code. See basic programming.
Basic Programming
The 850EV Keypad must be put into programming mode prior to any of the programming steps below unless otherwise indica-ted. The 6-digit Master Code is used to prevent unauthorized access to the system. A Master Code is required (factory default code: 888888) to setup the 850EV Keypad. It is highly recommended to change and record your unique Master Code.
The keypad backlight will remain on if the product is in programming mode. While in programming mode, if an invalid Master Code is entered, an error tone will sound. The keypad will remain in programming mode. After 60 seconds of inactivity, the keypad will exit the programming mode.
Set Master Code
| Programming Step | Keystroke Combination | Indicator |
| 1. Enter program mode | * (Master Code) # | Long tone |
| 2. Update Master Code | 09 # (New 6-digit Code) # (New 6-digit Code) # | Long tone |
| 3. Exit Program Mode | * * # | Keypad backlight will turn off |
Program your regular 4-digit PIN
| Programming Step | Keystroke Combination | Indicator |
| 1. Enter program mode | * (Master Code) # | Long tone |
| 2. Set new PIN | 01 # (New 4-digit PIN) # Repeat (new 4-digit PIN) # | Long tone |
| 3. Exit Program Mode | * * # | Keypad backlight will turn off |
NOTE: An error tone will sound if the maximum number of PINs is exceeded or if user tries to program a PIN already programmed in the memory.
Program to Operator
NOTE: The Master Code and a PIN need to be set before the operator can be connected to keypad. See Basic Programm-ing.
- Press the Learn Button on the operator.
- Within 30 seconds – Enter a valid 4-digit PIN then press #. A long tone will sound. The keypad is now programmed to the operator.
Additional Programming
To set up following features the keypad must be put into programming mode first.
Set Temporary PIN
A temporary 4-digit PIN can be programmed to allow access to visitors (maximum of 9 uses). The temporary PIN cannot be the same as any previously programmed PIN. The keypad will store up to 10 unique temporary PINs.
| Programming Step | Keystroke Combination | Indicator |
| 1. Enter program mode | * (Master Code) # | Long tone |
| 2. Set Temporary PIN | 05 # (New temporary 4-digit PIN) # (New temporary 4-digit PIN) # Number of uses (9 maximum) # | Long tone |
| 3. Exit Program Mode | * * # | Keypad backlight will turn off |
Delete Permanent or Temporary PIN
| Programming Step | Keystroke Combination | Indicator |
| 1. Enter program mode | * (Master Code) # | Long tone |
| 2. Delete PIN | 07 # (4-digit PIN to be deleted) # (4-digit PIN to be deleted) # | Long tone |
| 3. Exit Program Mode | * * # | Keypad backlight will turn off |
Reset Master Code
Resetting the Master Code will not remove PINs or temporary PINs from memory. After resetting the Master Code, the keypad will not operate any previously programmed operators until they are reprogrammed. To reset the Master Code to the factory default (888888):
- Unlock and remove the front cover.
- Press and hold the RESET button on the control board for 6 seconds. A long tone sounds indicating the Master Code has been reset.
Reset Keypad
Resetting the keypad will erase the Master Code, all permanent PINs and all temporary PINs. All settings will be set to factory default. After resetting, the keypad will not operate the previously programmed operators until they are reprogrammed. To reset the keypad:
- Unlock and remove the front cover.
- Press and hold RESET button on the control board for 6 seconds until a long tone sounds, then release.
- Press and hold RESET button on the control board for 15 seconds, 3 long tones will sound indicating the keypad has been reset.
Lockout Mode (Default is ON)
If the keypad receives five consecutive invalid PINs, the keypad will enter lockout mode and will not accept any keypad inputs for 30 seconds. After 30 seconds, the keypad will begin accepting new inputs.
| Programming Step | Keystroke Combination | Indicator |
| 1. Enter program mode | * (Master Code) # | Long tone |
| 2. Set Lockout mode to ON | 02 # 1 # | Long tone |
| 3. Exit Program Mode | * * # | Keypad backlight will turn off |
| Programming Step | Keystroke Combination | Indicator |
| 1. Enter program mode | * (Master Code) # | Long tone |
| 2. Set Lockout mode to
OFF |
02 # 0 # | Long tone |
| 3. Exit Program Mode | * * # | Keypad backlight will turn off |
Battery
WARNING!
Risk of explosion if the battery is replaced by an incorrect type. Do not ingest battery, Chemical Burn Hazard. This product contains a lithium battery. If swallowed, batteries can cause injuries, or death.
- Keep batteries out of sight and out of the reach of children, lithium batteries can be dangerous for children.
- Dispose of used lithium batteries immediately. Do not use defect/swallowed batteries.
- Check periodically if the battery compartments is secure, stop using if defect.
- If batteries might have been swallowed or placed inside any part of the body, seek immediate medical attention.
.The 9V Lithium battery should produce power for up to 5 years. To replace the battery:
- Unlock and remove the front cover from the mounting plate.
- Remove the battery cover using a screw driver.
- Remove the old battery and install new 9V Lithium battery. Reinstall inner cover.
- Reattach the front cover to the mounting plate and lock with the key.
Dispose of old battery according to the local rules.
Troubleshooting
| Symptom | Cause | Solution |
| The keypad will not program to the operator. | The operator product is not compatible to the keypad. | Choose the correct operator product or use compatible receivers 860EV or STAR1000EV. |
| The backlight and tone on the keypad no longer work. | Battery may be dead. | Replace battery with 9V Lithium battery |
| Key press turns on backlight but no beep. | Stuck button | Check that all buttons are not stuck. |
| PIN won’t learn. | PIN already learned. | Learn a new PIN. Exit Learn |
| PIN won’t learn. | Memory full. | Erase a PIN to add a new pin. Perform Factory Reset to erase all PINs |
Disposal
Our electrical and electronic equipment may not be disposed of with household waste and must be disposed of after use properly in accordance with WEEE Directive EU: 2012/19/EU; GB UK(NI): SI 2012 nr. 19 on waste electrical and electronic equipment in order to ensure that materials are recycled. Collecting waste electrical equipment separately means environmentally-friendly disposal and is completely free of charge for the consumer.
WEEE reg. no. in Germany: DE66256568.
Any waste packaging left over with the end consumer must be collected separately from mixed waste, in accordance with the Directive. Packaging may not be disposed of with household waste, organic waste or in nature. Packaging material must be separated according to its material and disposed of in the recycling containers provided and in certain council recycling bins.
Our batteries are marketed in compliance with the law. The ‘crossed-out waste bin’ indicates that batteries may not be disposed of with household waste. Batteries included in the product (technical data). In order to avoid causing harm to the environment or people’s health, used batteries must be returned for regulated disposal at council recycling centres or via retail outlets, as is prescribed by law. Batteries may only be brought for disposal once fully discharged and, in the case of lithium batteries, with their terminals taped over. The batteries can be easily removed from our equipment for disposal. Registration number in Germany: 21002670.
Hereby, Chamberlain GmbH declares that the keypad type 850EV is in compliance with Directive 2014/53/EU.
The full text of the EU declaration of conformity is available at the following internet address: https://doc.chamberlain.de/For GB (UK, NI) SI 2017 No. 1206 Radio Equipment Regulation: https://doc.chamberlain.de/