User Manual
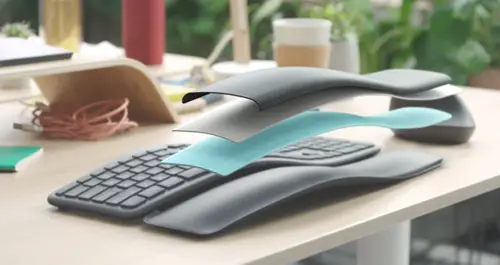
Introducing ERGO K860, a split ergonomic keyboard designed for better posture, less strain, and more support. You’ll type more naturally with a curved, split keyframe that improves typing posture.
Getting Started – ERGO K860 Split Ergonomic Keyboard

Time to make yourself comfortable!
Thank you for getting the new Ergo K860. We hope you will enjoy this ergonomic keyboard.
QUICK SETUP
Go to the interactive setup guide for quick setup instructions or follow the steps listed below.
![]()
Download Logitech Options to get the best experience and unlock the full potential of your new keyboard. Logitech Options comes with an array of features — key customization, Flow, app-specific settings, and device notifications.
Product Overview
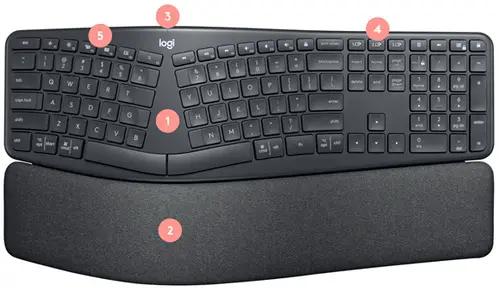
- Split keyboard design
- Curved palm rest
- On/off switch & power LED
- Easy-Switch keys
- Customizable shortcut
Connecting your Ergo K860
Ergo K860 can connect in two different ways:
Please follow the instructions below:
- Turn your Ergo K860 on.
- The Easy-Switch LED should blink quickly. If it doesn’t, press and hold one of the Easy-Switch keys for three seconds.
- On your computer, open Bluetooth settings:
- MacOS: Open System preferences > Bluetooth > and add Ergo K860.
- WIndows: Select Start > Settings > Devices > Add Bluetooth device > and add Ergo K860.
- Once the keyboard is connected, the LED on the selected Easy-Switch key light glows (white) for five seconds.
Click here for more details on how to do this on your computer. If you experience issues with Bluetooth, click here for Bluetooth troubleshooting.
- Make sure your Ergo K860 is turned on.
- Plug the Unifying USB receiver into a port on your computer.
- Once connected the LED on the selected easy-switch key glows (white) for five seconds.
When you’re not using the receiver, you can store it in the battery compartment on the back of the keyboard.
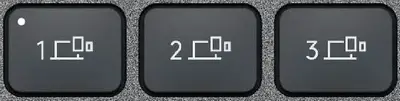
PAIR TO A SECOND COMPUTER WITH EASY-SWITCH
Your keyboard can be paired with up to three different computers using the Easy-Switch button to change the channel.
- Select the channel you want and press and hold the Easy-Switch button for three seconds. This will put the keyboard in discoverable mode so that it can be seen by your computer. The LED will start blinking fast.
- Choose between two ways to connect your keyboard to your computer:
- Bluetooth: Open the Bluetooth settings on your computer to complete the pairing. More details here.
- USB receiver: Plug the receiver to a USB port, open Logitech Options, and select: Add devices > Setup Unifying device, and follow the instructions.
- Once paired, a short press on the Easy-Switch button will allow you to switch channels.
LEARN MORE ABOUT YOUR PRODUCT
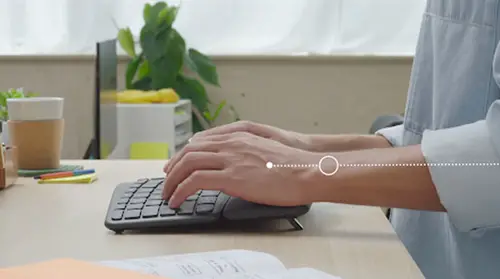
Ergonomic keyboard design
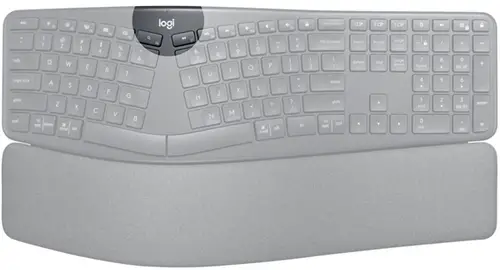
Ergo K860 is designed to promote a more natural posture. The 3D curved keyboard and the curved palm rest promotes a more natural, relaxed posture that will help you work more comfortably, for longer.
Ergo K860 is a unique ergonomic design so please allow yourself a bit of time to get familiar and comfortable with the keyboard.
To give you a better understanding of how the keyboard design promotes a more natural posture, please have a look at the section below.
Curved keyframe
The gentle curve on the keyboard pushes your wrists into a more natural position, reducing the pronation of your wrist.

Split keyframe
As the curve of the keyboard, the split keyframe allows the user to have more straight, neutral posture when typing on the keyboard, having the wrist and forearm in a more linear posture.

Curved palm rest
The curved palm rest reduces the bending in the wrist also known as wrist extension, by pushing your wrist posture into a more natural angle.
Advanced palm rest
Ergo K860 features a curved, three-layer palm rest, to support your wrist and promote a more natural, relaxed wrist posture.
The three layers are:
- Easy to clean fabric
- High-density foam
- A coated fabric
The two-layer foam gives soft support on your wrist and alleviates pressure when resting your hands and wrist on the palm rest. The coated fabric gives a nice soft touch while being easy to clean.
To learn more about how to set up your workspace in a more ergonomic manner, please take a look at our interactive guide.
Palm lift
Ergo K860 has two sets of integrated, adjustable palm-lift legs on the bottom of the keyboard. You can choose between 0 degrees, 4 degrees, and 7 degrees.
The palm lift allows you to adjust the angle of the keyboard to your needs and workstation, so your forearm and wrist will be in a more natural, relaxed posture when using the keyboard.
Key customization
Logitech Options allows you to customize shortcut keys to your preferences or needs. Download Logitech Options.
Flow
Ergo K860 is Flow-compatible. With Logitech Flow, you can use the mouse cursor to move from one computer to the next. You can even copy and paste between computers. If you have a compatible Logitech keyboard, such as Ergo K860, the keyboard will follow the mouse and switch computers at the same time.
You will need to install Logitech Options software on both computers. Follow these instructions.
App-Specific Settings
Your keyboard can be assigned to perform different functions for different applications.
When installing Logitech Options, you will have the possibility to install predefined app-specific settings that will adapt the mouse button behavior to be optimized in selected applications.
Each of these settings can be customized manually, for any application.
Notifications
Low battery Indication
When your keyboard reaches 10% of battery left, backlighting turns OFF and you get an onscreen battery notification.
![]()
Fn Lock switch
When you do press F-lock you swap between Media keys and F-Keys. The on-screen notification will indicate your setting.

By default, the keyboard has direct access to Media Keys.
Battery Information
Ergo K860 uses two AAA batteries and has 24-months of battery life, depending on usage and operating conditions.
The power LED on top of Ergo K860 indicates when the keyboard is turned on (green) and will turn red when the battery level is low. The light will turn off after 20 seconds.
| LED Color | Indication |
| Green | From 100% to 10% charge |
| Red | 10% charge or below |
* Battery life may vary depending on usage and operating conditions.
Specs and Details
Dimensions
Height: 9.17 in (233 mm)Width: 17.95 in (456 mm)Depth: 1.89 in (48 mm)Weight: 40.92 oz (1160 g)
Technical Specifications
Connection support
- USB Receiver
- Bluetooth Low Energy Technology
Customization software
- Supported by Logi Options+ on macOS 10.15 or later and Windows 10 or later
Battery type
- 2 x AAA Batteries
Wireless range
- 10 m (33-ft) wireless range
- Wireless encryption
Sustainability
- Graphite plastics: 71% post-consumer recycled material
- Paper Packaging: FSC™ -certified
Warranty Information
1-Year Limited Hardware Warranty
Part Number
- 920-009166
California Warnings
-
WARNING: Proposition 65 Warning
Read More About:
FAQ – Frequently Asked Questions
Keystroke ghosting on Logitech membrane keyboards
The two most common Logitech keyboards are mechanical and membrane, with the primary difference being how the key activates the signal that is sent to your computer.
With membrane, the activation is made between the membrane surface and circuit board and these keyboards can be susceptible to ghosting. When certain multiple keys (usually three or more*) are pressed simultaneously, not all of the keystrokes will appear and one or more may disappear ( ghosted).
An example would be if you would type XML very rapidly but don’t release the X key before pressing the M key and subsequently press the L key, then only X and L would appear.
Logitech Craft, MX Keys and the K860 are membrane keyboards and may experience ghosting. If this is a concern we would recommend to try a mechanical keyboard instead.
*Pressing two modifier keys (Left Ctrl, Right Ctrl, Left Alt, Right Alt, Left Shift, Right Shift and Left Win) together with one regular key should still work as expected.
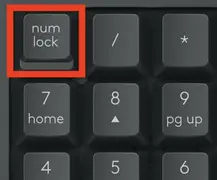
My NumPad/KeyPad is not working, what should I do?
– Make sure that the NumLock key is enabled. If pressing the key once doesn’t enable NumLock, press and hold the key for five seconds.
– Verify that the correct keyboard layout is selected in Windows Settings and that the layout matches your keyboard.
– Try enabling and disabling other toggle keys such as Caps Lock, Scroll Lock, and – – Insert while checking if the number keys work on different apps or programs.
– Disable Turn on Mouse Keys:
1. Open the Ease of Access Center — click the Start key, then click Control Panel > Ease of Access and then Ease of Access Center.
2. Click Make the mouse easier to use.
3. Under Control the mouse with the keyboard, uncheck Turn on Mouse Keys.
– Disable Sticky Keys, Toggle Keys & Filter Keys:
1.Open the Ease of Access Center — click the Start key, then click Control Panel > Ease of Access and then Ease of Access Center.
2. Click Make the keyboard easier to use.
3. Under Make it easier to type, make sure all checkboxes are unchecked.
– Verify the product or receiver is connected directly to the computer and not to a hub, extender, switch, or something similar.
– Make sure the keyboard drivers are updated. Click here to learn how to do this in Windows.
– Try using the device with a new or different user profile.
– Test to see if the mouse/keyboard or receiver on a different computer.
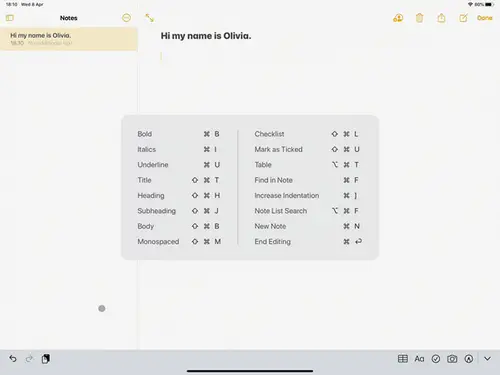
External keyboard shortcuts for iPadOS
You can view the available keyboard shortcuts for your external keyboard. Press and hold the Command key on your keyboard to display the shortcuts.
Change modifer keys of external keyboard on iPadOS
You can change the position of your modifier keys at any time. Here’s how:
– Go to Settings > General > Keyboard > Hardware keyboard > Modifier Keys.
Toggle between multiple languages on iPadOS with an external keyboard
If you have more than one keyboard language on your iPad, you can move from one to the other using your external keyboard. Here’s how:
1. Press Shift + Control + Space bar.
2. Repeat the combination to move between each language.
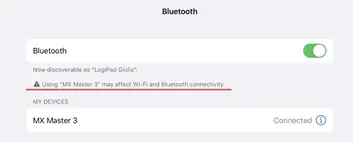
Warning message when Logitech device is connected to iPadOS
When you connect your Logitech device, you might see a warning message.
If this happens, make sure to connect only the devices you’ll be using. The more devices that are connected, the more interference you might have between them.
If you are having connectivity issues, disconnect any Bluetooth accessories that you’re not using. To disconnect a device:
– In Settings > Bluetooth, tap the information button next to the device name, then tap Disconnect.
ERGO K860 is certified ergonomic by United States Ergonomic. What does that mean?
ERGO K860 has been designed, developed and tested with criteria set out by leading ergonomists, including improving posture and lowering muscle strain, to receive the certification. A product that has been certified provides quantifiable ergonomic benefits to the anticipated users by improving comfort, fit and productivity while minimizing the risk factors that may contribute to the development of injuries. Our process follows guidelines established by the International Ergonomic Association (IEA) to ensure the ergonomic quality of a product.
What are the ergonomic benefits of using ERGO K860?
The keyboard’s pillowed wrist support offers 54 percent more wrist support and reduces wrist bending by 25 percent. ERGO K860 reduces muscle activity by 21 percent in the upper trapezius muscle, a key muscle in the center of the back that stabilizes and facilitates shoulder and neck movement.
What makes Ergo K860 ergonomic?
The ERGO K860 keyboard is designed to promote a more natural posture. The curved keyboard and palm rest design alleviates wrist pronation, wrist deviation & wrist extension, and promotes a more neutral wrist posture when you type on your keyboard.
What is unique about the design?
Your ERGO K860 keyboard is designed to promote better posture and reduce muscle strain on your wrists and forearms without compromising performance. The keyboard has a split, curved keyframe that’s optimized for an ergonomic posture and a pillowed wrist-rest for optimal wrist comfort and support. Your fingers will glide effortlessly across Perfect Stroke keys while the adjustable palm lift raises your palms into the ideal ergonomic position, whether you’re seated or standing.
How do I set up ERGO K860?
ERGO K860 keyboard is easy to set up with a user-friendly online onboarding process at Ergosetup.logi.com, where you can also find workstation tips.
Who is the target audience for ERGO K860?
The ERGO K860 keyboard is designed for users that want a comfortable keyboard that promotes better posture and helps prevent wrist or forearm pain without compromising productivity.
Do you sell ERGO K860 and MX VERTICAL as a bundle?
The ERGO K860 keyboard and MX VERTICAL mouse are sold individually and can be purchased at Logitech.com.
How does ERGO K860 use Logitech Flow?
ERGO K860 follows a Logitech Flow-enabled mouse from one computer to another. This means you can type on multiple devices in one fluid workflow. You can transfer files, documents, and images across computers and Mac and Windows operating systems.
What can I do with Logitech Options?
After you’ve installed Logitech Options, you can customize the Fn keys, create custom shortcuts, and get battery-life notifications. You can download Logitech Options from this product’s Downloads page.
Do I need to install Logitech Options?
You can use your ERGO K860 keyboard without installing Logitech Options. However, you will need the software to unlock all of the advanced features such as shortcuts, button customizations, and battery notifications.
Do I need to use a specific mouse with the ERGO K860?
You can use any mouse with your ERGO K860 keyboard, but we recommend using a Logitech mouse. The MX Vertical mouse complements the ergonomic setup, as the natural handshake position reduces wrist pressure and forearm strain.
Bluetooth mouse or keyboard not recognized after reboot on macOS (Intel-based Mac) – FileVault
If your Bluetooth mouse or keyboard does not reconnect after a reboot at the login screen and only reconnects after the login, this might be related to FileVault encryption.
When FileVault is enabled, Bluetooth mice and keyboards will only re-connect after login.
Potential solutions:
– If your Logitech device came with a USB receiver, using it will solve the issue.
– Use your MacBook keyboard and trackpad to login.
– Use a USB keyboard or mouse to login.
Note: This issue is fixed from macOS 12.3 or later on M1. Users with an older version might still experience it.
Pair to a second computer with Easy-Switch
Your mouse can be paired with up to three different computers using the Easy-Switch button to change the channel.
1. Select the channel you want and press and hold the Easy-Switch button for three seconds. This will put the keyboard in discoverable mode so that it can be seen by your computer. The LED will start blinking quickly.
2. Choose between two ways to connect your keyboard to your computer:
– Bluetooth: Open the Bluetooth settings on your computer to complete the pairing. More details here.
– USB receiver: Plug the receiver to a USB port, open Logitech Options, and select: Add devices > Setup Unifying device, and follow the instructions.
3. Once paired, a short press on the Easy-Switch button will allow you to switch channels.
How to enable direct access to F-keys
Your keyboard has by default access to the Media and Hotkeys such as Volume Up, Play/Pause, Desktop view, and so on.
If you prefer to have direct access to your F-keys simply press Fn + Esc on your keyboard to swap them.
You can download Logitech Options to get on-screen notifications when you swap from one to the other. Find the software here.

Logitech Options compatibility with Linux and Chrome
Logitech Options is supported on Windows and Mac only.
You can find out more about Logitech Options features here.
Connect new device to a USB receiver
Each USB receiver can host up to six devices.
To add a new device to an existing USB receiver:
1. Open Logitech Options.
2. Click Add Device, and then Add Unifying device.
4. Follow the on-screen instructions.
NOTE: If you don’t have Logitech Options you can download it here.
You can connect your device with a Unifying receiver other than the one included with your product.
You can determine if your Logitech devices are Unifying by the logo in orange on the side of the USB receiver:

Backup device settings to the cloud in Logitech Options+
– INTRODUCTION
– HOW IT WORKS
– WHAT SETTINGS GET BACKED UP
INTRODUCTION
This feature on Logi Options+ allows you to backup the customization of your Options+ supported device automatically to the cloud after creating an account. If you are planning to use your device on a new computer or wish to go back to your old settings on the same computer, log into your Options+ account on that computer and fetch the settings you want from a backup to set up your device and get going.
HOW IT WORKS
When you are logged into Logi Options+ with a verified account, your device settings are automatically backed up to the cloud by default. You can manage the settings and the backups from the Backups tab under More settings of your device (as shown):
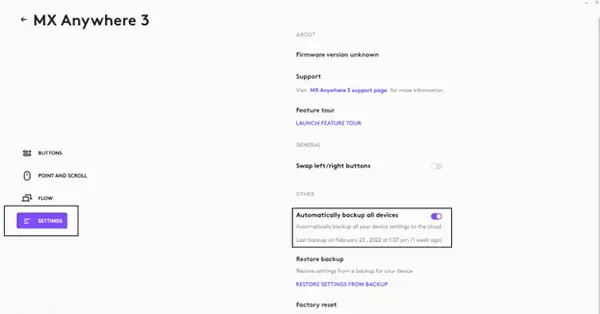
Manage settings and backups by clicking on More > Backups:
AUTOMATIC BACKUP OF SETTINGS — if the Automatically create backups of settings for all devices checkbox is enabled, any settings you have or modify for all of your devices on that computer are backed up to the cloud automatically. The checkbox is enabled by default. You can disable it if you don’t want the settings of your devices to be backed up automatically.
CREATE A BACKUP NOW — this button allows you to backup your current device settings now, if you need to fetch them later.
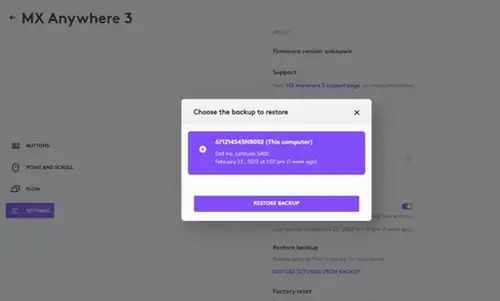
RESTORE SETTINGS FROM BACKUP — this button lets you view and restore all the available backups you have for that device that are compatible with that computer, as shown above.
The settings for a device are backed up for every computer that you have your device connected to and have Logi Options+ that you are logged into. Every time you make some modifications to your device settings, they get backed up with that computer name. The backups can be differentiated based on the following:
1. Name of the computer. (Ex. John’s Work Laptop)
2. Make and/or model of the computer. (Ex. Dell Inc., Macbook Pro (13-inch) and so on)
3. The time when the backup was made
The desired settings can then be selected and restored accordingly.
WHAT SETTINGS GET BACKED UP
– Configuration of all the buttons of your mouse
– Configuration of all the keys of your keyboard
– Point & Scroll settings of your mouse
– Any application-specific settings of your device
WHAT SETTINGS ARE NOT BACKED UP
– Flow settings
– Options+ app settings
Keyboard/Mice – Buttons or keys do not work correctly
Likely Cause(s):
– Potential hardware issue
– Operating system /software settings
– USB port issue
Symptom(s):
– Single-click results in double-click (mice and pointers)
– Repeating or strange characters when typing on the keyboard
– Button/key/control gets stuck or responds intermittently
Possible solutions:
1. Clean the button/key with compressed air.
2. Verify the product or receiver is connected directly to the computer and not to a hub, extender, switch or something similar.
3. Unpair/repair or disconnect/reconnect hardware.
4. Upgrade firmware if available.
5. Windows only — try a different USB port. If it makes a difference, try updating the motherboard USB chipset driver.
6. Try on a different computer. Windows only — if it works on a different computer, then the issue might be related to a USB chipset driver.
*Pointing devices only:
– If you’re not sure if the problem is a hardware or software issue, try switching the buttons in the settings (left click becomes right click and right click becomes left click). If the problem moves to the new button it is a software setting or application issue and hardware troubleshooting cannot resolve it. – If the problem stays with the same button it is a hardware issue.
– If a single-click always double-clicks, check the settings (Windows mouse settings and/or in Logitech SetPoint/Options/G HUB/Control Center/Gaming Software) to verify if the button is set to Single Click is Double Click.
NOTE: If buttons or keys respond incorrectly in a particular program, verify if the problem is specific to the software by testing in other programs.
Delay when typing
Likely Cause(s)
– Potential hardware issue
– Interference issue
– USB port issue
Symptom(s)
– Typed characters take a few seconds to appear on the screen
Possible solutions
1. Verify the product or receiver is connected directly to the computer and not to a hub, extender, switch or something similar.
2. Move the keyboard closer to the USB receiver. If your receiver is in the back of your computer, it may help to relocate the receiver to a front port. In some cases the receiver signal gets blocked by the computer case, causing a delay.
3. Keep other electrical wireless devices away from the USB receiver to avoid interferences.
4. Unpair/repair or disconnect/reconnect hardware.
– If you have a Unifying receiver, identified by this logo,  see Unpair a mouse or keyboard from the Unifying receiver.
– If your receiver is non-Unifying, it cannot be unpaired. However, if you have a replacement receiver, you can use the Connection Utility software to perform the pairing.
5. Upgrade the firmware for your device if available.
6. Windows only — check if there are any Windows updates running in the background that may cause the delay.
7. Mac only — check if there are any background updates that may cause the delay.
Try on a different computer.
Unable to pair to Unifying receiver
If you’re unable to pair your device to the Unifying receiver, please do the following:
STEP A:
1. Make sure the device is found in Devices and Printers. If the device is not there, follow steps 2 and 3.
2. If connected to a USB HUB, USB Extender or to the PC case, try connecting to a port directly on the computer motherboard.
3. Try a different USB port; if a USB 3.0 port was used previously, try a USB 2.0 port instead.
STEP B:
– Open Unifying Software and see if your device is listed there. If not, follow the steps to connect the device to a Unifying receiver.
USB receiver does not work or is not recognized
If your device stops responding, confirm that the USB receiver is working properly.
The steps below will help to identify if the issue is related to the USB receiver:
1. Open Device Manager and make sure your product is listed.
2. If the receiver is plugged into a USB hub or extender, try plugging it into a port directly on the computer
3. Windows only — try a different USB port. If it makes a difference, try updating the motherboard USB chipset driver.
4. If the receiver is Unifying, identified by this logo, open Unifying Software and check if the device is found there.
5. If not, follow the steps to connect the device to a Unifying receiver.
6. Try using the receiver on a different computer.
7. If it’s still not working on the second computer, check Device Manager to see if the device is recognized.
8. If your product is still not recognized, the fault is most likely related to the USB receiver rather than the keyboard or mouse.
Flow network setup check for Mac
If you are having difficulty establishing a connection between two computers for Flow, follow these steps:
1. Check both systems are connected to the internet:
– On each computer, open a web browser and check the internet connection by navigating to a webpage.
2. Check that both computers are connected to the same network:
– Open the Terminal: For Mac, open your Applications folder, then open the Utilities folder. Open the Terminal application.
– In the Terminal, type: Ifconfig
– Check and note the IP address and Subnet mask. Make sure that both systems are in the same Subnet.
3. Ping the systems by IP address and make sure that ping works:
– Open the Terminal and type ping <IP address> [Where the <IP address is the IP address of the other computer noted in Step 2 above]
4. Check that the Firewall and Ports are correct:
Ports used for Flow:
TCP : 59866
UDP : 59867,59868
1. Open the Terminal and type the following cmd to show the ports in use:
> sudo lsof +c15|grep IPv4
2. This is the expected result when Flow is using the default ports:
NOTE: Normally Flow uses the default ports but if those ports are already in use by another application Flow might use other ports.
3. Check that the Logitech Options Daemon is added automatically when Flow is enabled:
– Go to System Preferences > Security & Privacy
– In Security & Privacy go to the Firewall tab. Make sure the Firewall is on, then click on Firewall Options. (NOTE: You may have to click the lock in the bottom left corner to make changes which will prompt you to enter the account password.)
NOTE: On macOS, the firewall default settings automatically allow ports opened by signed apps through the firewall. As Logi Options is signed it should be added automatically without prompting the user.
4. This is the expected result: The two “Automatically allow” options are checked by default. The “Logitech Options Daemon” in the list box is added automatically when Flow is enabled.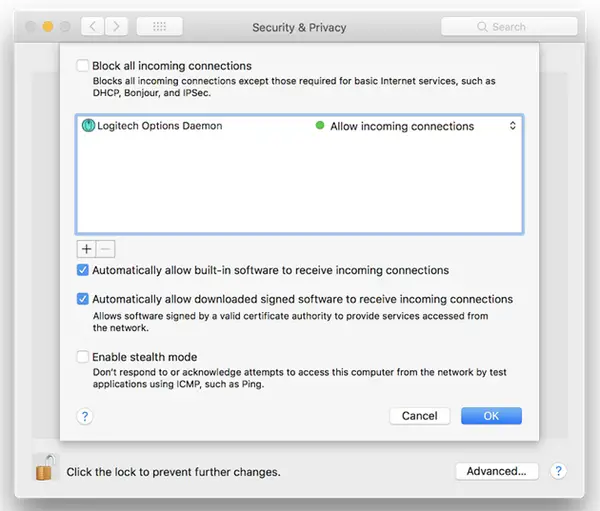
5. If Logitech Options Daemon is not there, try the following:
– Uninstall Logitech Options
– Reboot your Mac
– Install Logitech Options again
6. Disable Antivirus and reinstall:
– Try disabling your Antivirus program first, then reinstall Logitech Options.
– Once Flow is working, re-enable your Antivirus program.
Compatible Antivirus Programs

Flow network setup check for Windows
If you are having difficulty establishing a connection between two computers for Flow, follow these steps:
1. Check both systems are connected to the internet:
– On each computer, open a web browser and check the internet connection by navigating to a webpage.
2. Check both computers connected to the same network: Open a CMD prompt/Terminal:
– Press Win+R to open Run.
– Type cmd and click OK.
– In the CMD prompt type: ipconfig /all
– Check and note the IP address and Subnet mask. Make sure that both systems are in the same Subnet.
3. Ping the systems by IP address and make sure that ping works:
– Open a CMD prompt and type: ping <IP address> [Where the <IP address is the IP address of the other computer noted in step 2 above].
4. Check that the Firewall & Ports are correct:
Ports used for Flow:
– TCP : 59866
– UDP : 59867,59868
– Check the port is allowed: Press Win + R to open Run
– Type wf.msc and click OK. This should open “Windows Defender Firewall with Advanced Security” window.
– Go to Inbound Rules and make sure LogiOptionsMgr.Exe is there and is allowed
Example:

5. If you don’t see the entry, it could be that one of your antivirus/firewall applications are blocking the rule creation, or you were initially denied access. Try the following:
1. Disable the antivirus/firewall application temporarily.
2. Recreate the firewall inbound rule by:
– Uninstalling Logitech Options
– Reboot your computer
– Make sure the antivirus/firewall app is still disabled
– Install Logitech Options again
– Re-enable your antivirus
Compatible Antivirus Programs

Resolve Bluetooth Wireless issues on macOS
These troubleshooting steps go from easy to more advanced.
Please follow the steps in order and check if the device works after each step.
Make sure you have the latest version of macOS
Apple is regularly improving the way macOS handles Bluetooth devices.
Click here for instructions on how to update macOS.
Make sure you have the right Bluetooth parameters
1. Navigate to the Bluetooth preference pane in System Preferences:
Go to Apple Menu > System Preferences > Bluetooth 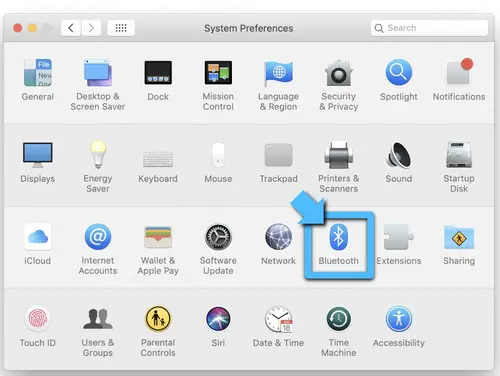
2. Make sure that Bluetooth is turned On. 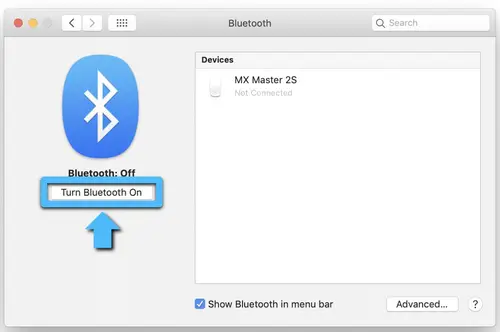
3. In the bottom-right corner of the Bluetooth Preference window, click Advanced. 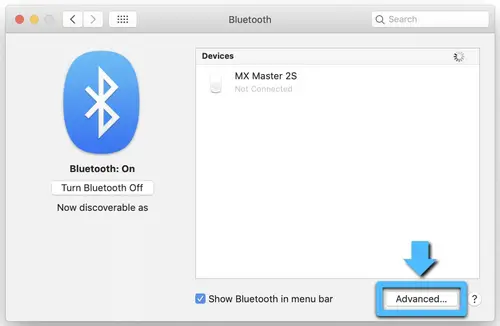
4. Make sure all three options are checked: Open Bluetooth Setup Assistant at startup if no keyboard is detected
5. Open Bluetooth Setup Assistant at startup if no mouse or trackpad is detected
Allow Bluetooth devices to wake this computer 
NOTE: These options ensure that Bluetooth-enabled devices can wake your Mac and that the OS Bluetooth Setup Assistant will launch if a Bluetooth keyboard, mouse or trackpad is not detected as connected to your Mac.
6. Click OK.
Restart the Mac Bluetooth Connection on your Mac
1. Navigate to the Bluetooth preference pane in System Preferences:
– Go to Apple Menu > System Preferences > Bluetooth
2. Click Turn Bluetooth Off. 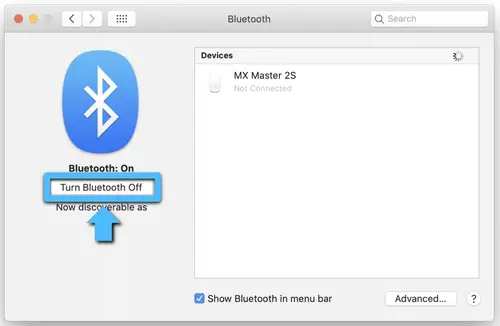
3. Wait a few seconds, and then click Turn Bluetooth On. 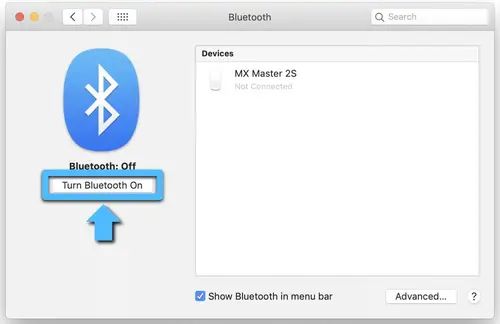
4. Check to see if the Logitech Bluetooth device is working. If not, go to the next steps.
Remove your Logitech device from the list of devices and try to pair again
1. Navigate to the Bluetooth preference pane in System Preferences:
– Go to Apple Menu > System Preferences > Bluetooth
2. Locate your device in the Devices list, and click on the “x” to remove it. 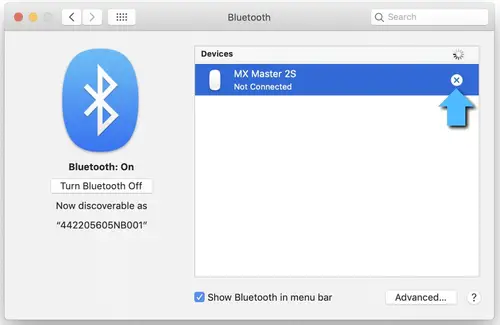

3. Re-pair your device by following the procedure described here.
Disable the hand-off feature
In some cases, disabling the iCloud hand-off functionality can help.
1. Navigate to the General preference pane in System Preferences:
– Go to Apple Menu > System Preferences > General 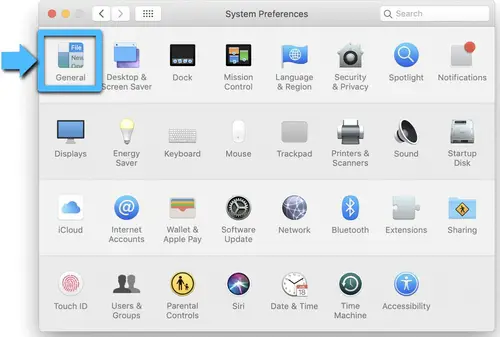
2. Make sure Handoff is unchecked. 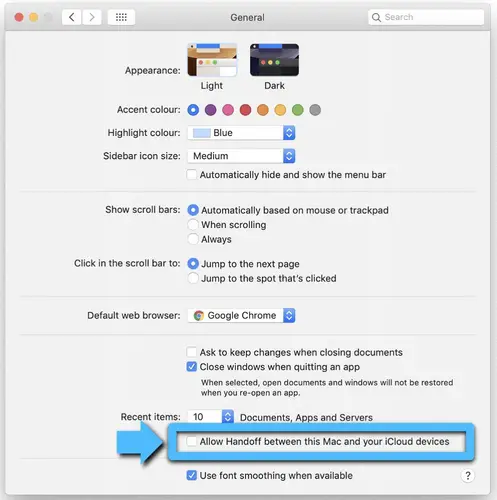
Reset the Mac’s Bluetooth settings
WARNING: This will reset your Mac, and cause it to forget all of the Bluetooth devices you have ever used. You will need to re-configure each device.
1. Make sure Bluetooth is enabled and that you can see the Bluetooth icon in the Mac Menu Bar at the top of the screen. (You’ll need to check the box Show Bluetooth in menu bar in the Bluetooth preferences).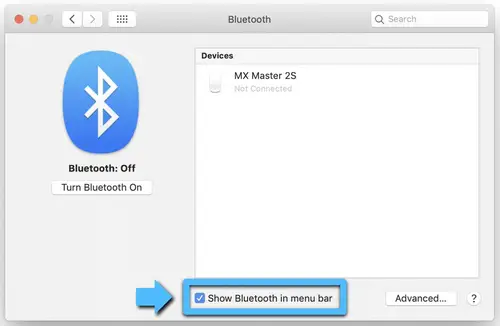
2. Hold down the Shift and Option keys, and then click the Bluetooth icon in the Mac Menu Bar.
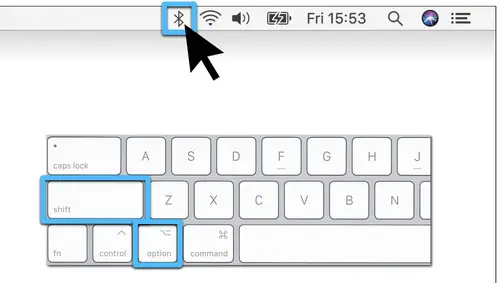
3. The Bluetooth menu will appear, and you will see additional hidden items in the drop-down menu. Select Debug and then Remove all devices. This clears the Bluetooth device table and you’ll then need to reset the Bluetooth system. 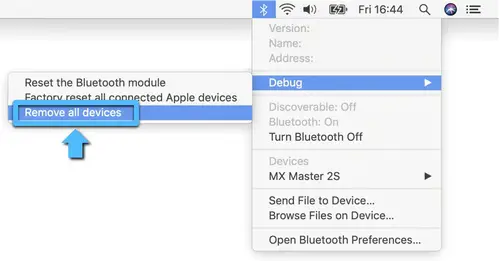
4. Hold down the Shift and Option keys again, click on the Bluetooth menu and select Debug > Reset the Bluetooth Module. 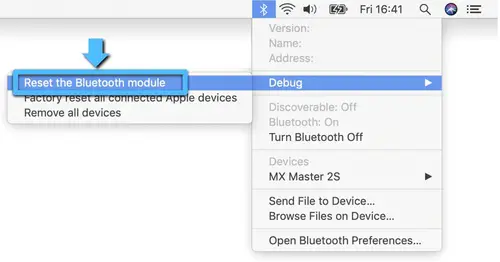
5. You will now need to repair all your Bluetooth devices following standard Bluetooth pairing procedures.
To re-pair your Logitech Bluetooth device:
NOTE: Make sure all your Bluetooth devices are on and have enough battery life before you re-pair them.
When the new Bluetooth Preference file is created, you’ll need to re-pair all your Bluetooth devices with your Mac. Here’s how:
1. If the Bluetooth Assistant starts up, follow the onscreen instructions and you should be ready to go. If the Assistant doesn’t appear, go to Step 3.
2. Click Apple > System Preferences, and select the Bluetooth Preference pane.
3. Your Bluetooth devices should be listed with a Pair button next to each unpaired device. Click Pair to associate each Bluetooth device with your Mac.
4. Check to see if the Logitech Bluetooth device is working. If not, go to the next steps.
Delete your Mac’s Bluetooth Preference List
The Mac’s Bluetooth Preference List may be corrupted. This preference list stores all the Bluetooth devices pairings and their current states. If the list is corrupted, you’ll need to remove your Mac’s Bluetooth Preference List and re-pair your device.
NOTE: This will delete all pairing for your Bluetooth devices from your computer, not just Logitech devices.
1. Click Apple > System Preferences, and select the Bluetooth Preference pane.
2. Click Turn Bluetooth Off. 
3. Open a Finder window and navigate to the /YourStartupDrive/Library/Preferences folder. Press Command-Shift-G on your keyboard and enter /Library/Preferences in the box.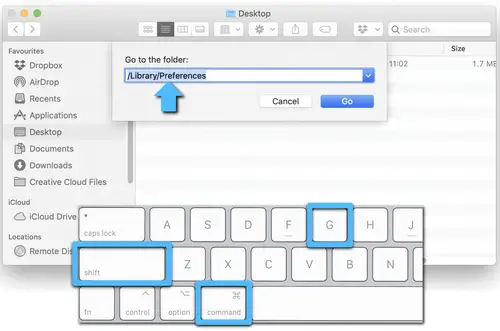
Typically this will be in /Macintosh HD/Library/Preferences. If you changed the name of your startup drive, then the first part of the pathname above will be that [Name]; for example, [Name]/Library/Preferences.
4. With the Preferences folder open in the Finder, look for the file called com.apple.Bluetooth.plist. This is your Bluetooth Preference List. This file could be corrupted and cause problems with your Logitech Bluetooth device.
5. Select the com.apple.Bluetooth.plist file and drag it to the desktop.
NOTE: This will create a backup file on your desktop if you ever want to go back to the original setup. At any point, you can drag this file back to the Preferences folder.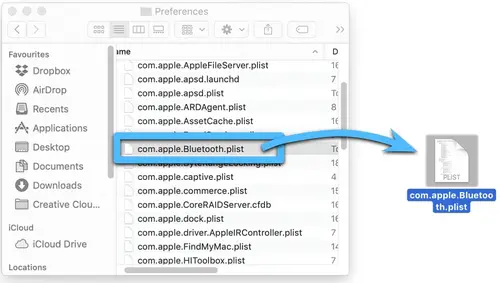
6. In the Finder window that is open to the /YourStartupDrive/Library/Preferences folder, right-click the com.apple.Bluetooth.plist file and select Move to Trash from the pop-up menu. 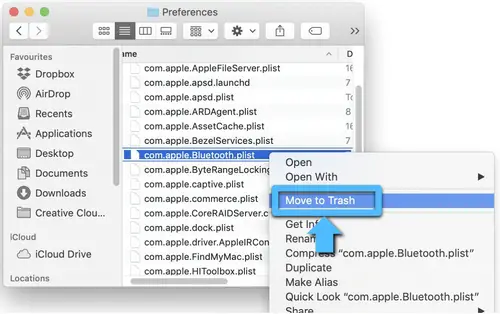
7. If you are asked for an administrator password to move the file to the trash, enter the password and click OK.
8. Close any open applications, then restart your Mac.
9. Re-pair your Logitech Bluetooth device.