Logitech Professional Multi-Instrument LCD
Panel Simulation Controller User Guide


Getting Started: FLIGHT INSTRUMENT PANEL
Congratulations on buying the Logitech G Flight Instrument Panel. The Instrument Panel interacts in real time with Microsoft Flight Simulator X to display a choice of cockpit screens, improving control and making your flying experiences more realistic.
Installing the Instrument Panel
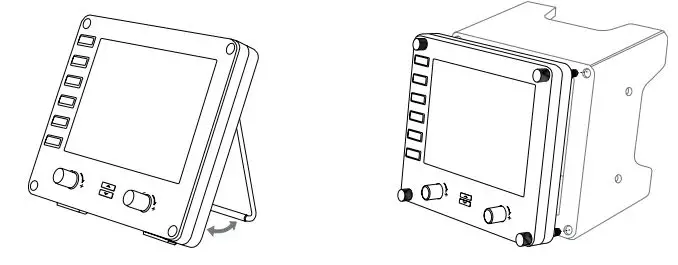
To use the Instrument Panel as a standalone device, simply extend the support stand at the back of unit as shown.
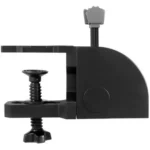
You can also fix the panel to the supplied mounting bracket. Insert the screws through the holes at the corners of the panel into the bracket behind and tighten. If you already own a Logitech Flight Yoke System, you can mount the panel and bracket on top of the yoke unit using the screws provided.
INSTALLATION FOR WINDOWS® 10, WINDOWS® 8.1 AND WINDOWS® 7
DRIVER INSTALLATION
- Visit logitech.com/support/FIP to download the latest drivers and software for your operating system.
- With device disconnected, follow the onscreen instructions to complete the installation.
- At the Driver Setup screen, only when prompted, insert USB cable into one of your computer’s USB ports, then click Next.
- Screen displays
How to assign Flight Simulator X instrument displays to the Pro Flight Instrument Panel
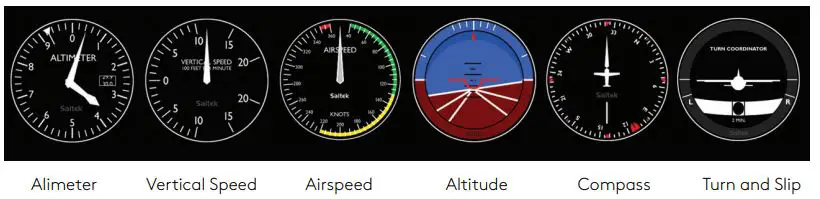
Once you have installed the appropriate plug-in for Flight Simulator X (FSX), the next time you run FSX it will prompt you that it is attempting to load the Logitech G Panel(s) Plug-in for FSX – click Yes on this screen. After that you should see a Windows security warning asking you if you want to run LogiFlightSimX.exe – click Yes on that screen. Finally, FSX will prompt you if you wish to make LogiFlightSimX.exe a trusted piece of software – click Yes. Once you have installed the Panel software, the Panel buttons and controls should be automatically configured to control their functions in FSX software. If your FSX software does not recognize the Panel, unplug the USB cable and plug it back in. For further help with other sims or any other questions, check the support page at logitech.com/support/FIP. You can select one of the above six screens to be displayed on the Flight Instrument Panel. Press the cursor up or down buttons at the bottom center of the panel to scroll through the screen displays.
Additional buttons
The six buttons on the left of the Instrument Panel open additional cockpit screens or displays when flying in FSX. Each button is labelled with the corresponding display to the right of it. The Map, Main Panel, Radios and GPS buttons will open those screens or cockpit panels when flying most aircraft. The panel 4 and 5 buttons will open different screens or panels depending on the aircraft being flown. Press the button once to open the panel or screen and again to close it (except map where you must click on OK or press return to close the map screen).
Note: Pressing any of the six buttons when FSX is not loaded will switch the panel display off and on.
You can connect multiple Instrument Panels to your PC to show different cockpit displays simultaneously. Each panel uses system resources – see Advanced options below to connect multiple panels with maximum system performance.
Advanced options
If you have more than one PC connected to a LAN you can connect multiple instrument panels to a secondary PC which will display flight information from Microsoft FSX running on your primary PC. This can be useful to free up system resources for FSX.
Definitions

Server = The PC that will be running FSX and the main Flight controllers attached. Client = The PC that will be linked to the Server via the LAN. The instrument panels will be connected to this PC to alleviate the processing stress of having multiple screens connected to one PC.
On the Server PC
- Ensure FSX and the FIP drivers are installed and running.
- Original retail DVD1: FSX Deluxe edition; Navigate to the SDK folder and run Setup.exe.
- Show hidden files. In Windows Explorer (if running Vista press Alt key) navigate to Tools > Folder Options. Select View tab. In Advance Settings > Hidden Files and Folders section, Select Show Hidden Files and Folders.
- Locate SimConnect.xml
On Vista: C:C:UsersusernameAppDataRoamingMicrosoftFSX
On XP: C:Documents and SettingsApplication DataMicrosoftFSX
Add section within the section <SimBase.Document..>
<SimConnect.Comm>
<Disabled>False</Disabled>
<Protocol>IPv4</Protocol>
<Scope>global</Scope>
<Address>SERVER_MACHINE_IP_ADDRESS</Address> <MaxClients>64</MaxClients> <Port>SERVER_MACHINE_PORT_NUMBER</Port> <MaxRecvSize>4096</MaxRecvSize>
<DisableNagle>False</DisableNagle>
</SimConnect.Comm>Note: Find and insert the server machine IP address into the field above from Control Panel > Network Connections > Local Area Connection. Select Support tab.
Note: Select a port number greater than 1024 (Not 8080). We recommend using 2001. Note: You will need to make a note of the Server machine IP address and the port number when setting up the client machine.
On the Client PC - Ensure that the Flight Instrument Panel drivers are installed and working correctly.
- Download and install Microsoft Visual C++ 2005 Redistributable Package (x86).
NOT the SP1 variant! - Copy SimConnect.msi from server machine and install. On server machine, default location: C:Program FilesMicrosoft GamesMicrosoft Flight Simulator X SDKSDKCore Utilities KitSimConnectSDKlib
- Create file in My Documents, a text document, rename to Sim Connect.cfg
This contains:
[SimConnect]
Protocol=IPv4 Address=SERVER_MACHINE_IP_ADDRESS Port=SERVER_MACHINE_PORT_NUMBER
MaxReceiveSize=4096
DisableNagle=0
Note: Fill in the Server machine IP address and the port number selected from Step 4.
- To start the instrument panel, start FSX on the server. You may need to allow FSX to act as a server in the Firewall settings. If you have trouble connecting to this machine, temporarily disable the Firewall to see if a connection can be made.
- On the client PC, start LogiFlightSimX.exe Locate at: C:Program FilesLogitechFSX Plugin
Note: If nothing appears to happen, open Task Manager and check that LogiFlightSimX.exe is in the list of running Processes. If Sim Connect cannot find or connect to the Server PC, LogiFlightSimX.exe will only run very briefly and will not display any gauges. If this is the case try disabling the Firewall.
Tip: If the client machine fails to connect, please check the Advanced Network Settings. Navigate Control Panel > Network Connections > Local Area Connection. Select Properties. Highlight Internet Protocol (TCP/IP) and Select Properties. Select Advanced. Select WINS tab. Select Enable NetBIOS over TCP/IP. Select OK or Close and all opened windows. Please see www.fsdeveloper.com navigate to wiki > simconnect > remote_connection for further details.
TECHNICAL SUPPORT
Online Support: support.logitech.com