

SETUP INSTRUCTIONS
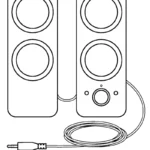
- A wireless receiver attached to the USB adapter can be found in the accessory box Plug one end of the cable into your PC, and the other end into the USB adapter and receiver
– The receiver can also be used plugged directly into your PC However, using the cable and adapter when in wireless mode is recommended and allows for better connectivity and easy access to the cable for recharging - Turn mouse on via the switch on the bottom of the mouse
- Download Logitech G HUB gaming software

4 To charge, disconnect the cable from the adapter and plug into the front of the mouse Your mouse will operate in data‑over‑cable mode whenever it is plugged in directly to a PC Full charge from empty requires around 2 hours plugged into a PC USB port
Tips:
– Keep the mouse and receiver 2 m+ away from wireless routers or other 2 4GHz wireless devices to minimize environmental noise
– G502 LIGHTSPEED has a wireless range of up to 10 meters To ensure optimal performance in noisy wireless environments, and to keep the charging cable easily accessible, it is recommended to keep the receiver within 20 cm of the mouse

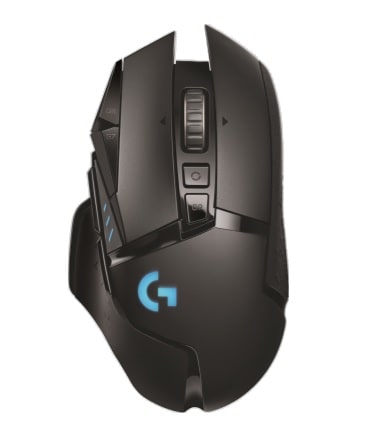
11 FULLY PROGRAMMABLE BUTTONS
- Left-click (Button G1)
- Right-click (Button G2)
- DPI up (Button G8)
- Scroll left (Wheel tilt left)
- Scroll right (Wheel tilt right)
- DPI down (Button G7)
- Middle-click (Button G3)
- DPI shift/Sniper button (Button G6)
- Wheel mode toggle button (not programmable)
- Forward (Button G5)
- Battery status (Button G9)
- Back (Button G4)
- Upper weight door (bottom of mouse)
- On/Off switch (bottom of mouse, not programmable)
- Lower weight and receiver storage door (bottom of mouse)

WEIGHT CUSTOMIZATION, RECEIVER STORAGE, AND POWERPLAY
The upper weight door can be open by pulling on its right edge 4x 2‑gram weights can be added
The lower weight and receiver storage cover can be opened by pressing inwards at the bottom of the cover with the thumb and pulling it out with the other hand 2x 4‑gram weights can be added inside the receiver storage cover The receiver storage cover and weights can be replaced by the POWERCORE adapter available with the POWERPLAY wireless charging system (sold separately)

LIGHTSPEED BATTERY LIFE
G502 LIGHTSPEED has a rechargeable 250mAH LiPol battery which provides it with up to 55 hours of non‑stop gaming at 1ms report rate with lights off, or 48 hours non‑stop gaming at 1ms report rate with RGB color cycling on *
– Charge level can be checked when the mouse is powered on or by pressing the G9 button or using Logitech G HUB to assign a button to check charge level
– Charge level is displayed for seven seconds at mouse power‑on using the color and number of bars illuminated on the DPI indicator:
– 3 green lines = 50–100%
– 2 green lines = 30–50%
– 1 green line = 15–30%
– 1 flashing red line = <15%
Tips:
– The bottom dot will flash red when the battery is at 15% or less When this happens, plug in your mouse to charge
– Charge level, power draw, and estimated remaining battery life can be checked in Logitech G HUB
* Battery life and capacity may vary with age and use Rechargeable batteries have a limited number of charge cycles

CHARGING/DATA OVER CABLE
Plug your mouse in via the provided USB charging cable when the battery is low G502 LIGHTSPEED is also compatible with the Logitech G POWERPLAY wireless charging system, sold separately
LOGITECH G HUB
You can customize the onboard profile settings using the Logitech G HUB These settings include button programming, report rate, performance/endurance modes and tracking behavior G502 LIGHTSPEED allows up to 5 DPI settings By default, G502 LIGHTSPEED has the following settings:
– DPI: 400/800/1600/3200/6400
– Report rate: 1ms
Tips:
– G502 LIGHTSPEED has 1 onboard profile by default but supports up to 5 onboard profiles Extra profiles can be added using Logitech G HUB

DPI/ONBOARD PROFILE INDICATORS
DPI/Onboard profiles are shown using three LEDs above the thumb buttons The illustrations above shows which values are being indicated by the LED panel