Logitech Harmony Hub Remote Control
Package Contents
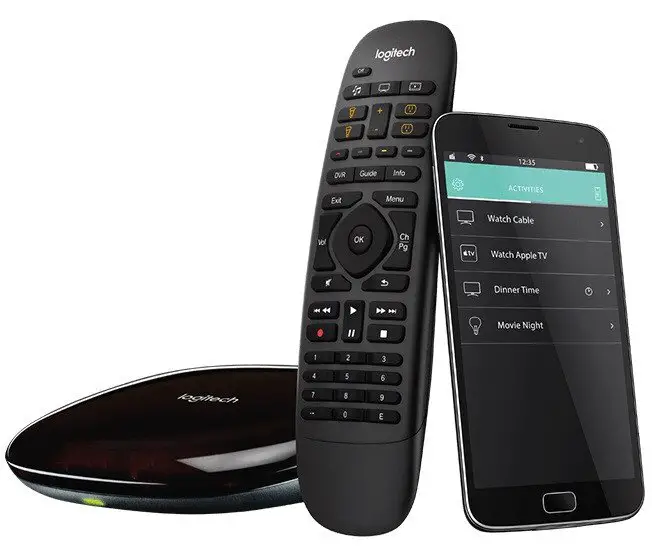
- Harmony Pro 2400 Remote
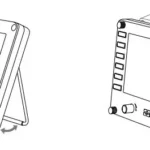
- Harmony Pro 2400 Hub
- Remote charging station
- Charging station:
power adapter
Provides power to the remote charging station. - Hub power adapter: Provides power to Harmony Pro 2400 Hub.
- 3.5mm M2M cable: Connect IR devices directly when used with Harmony Pro 2400 Hub.
- Three 3.5mm to IR emitters: IR emitters attach directly to device IR windows for more precise control than a general IR blaster.
Congratulations on the purchase of Harmony Pro 2400
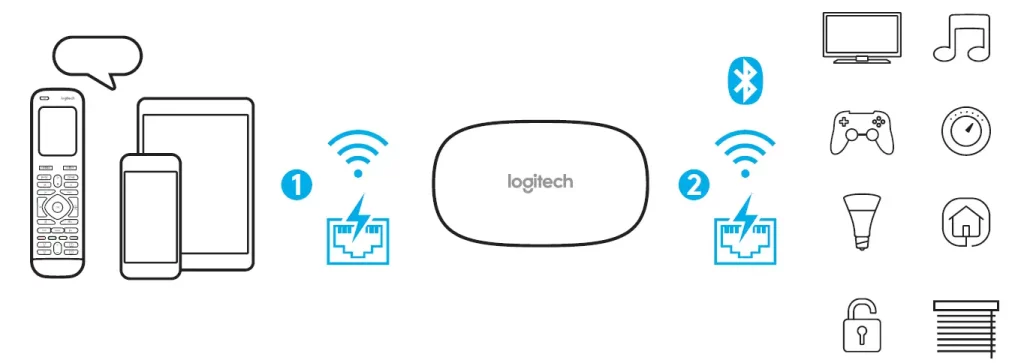
Harmony Pro 2400 Hub is the center of your Harmony system — always keep it powered on!
- The hub receives commands from the remote, mobile app, as well as approved partner manufacturers. The remote itself does not send commands directly to devices unless it has been configured to do so from the Harmony app or remote.
- The hub sends commands to entertainment and home control devices over Bluetooth, a cloud based and local network API (IP), or with infrared signals (IR) depending on the specific device.
- Harmony Pro 2400 is also equipped with a detachable SMA antenna. The included antenna is designed to increase RF range between the remote and hub, and can be used with a cable lead to move the antenna to a location with less interference. An example would be moving the antenna outside a rack in order to increase reception. For more information, please visit: support.myharmony.com/pro
Lets Get Started
STEP 1: Properly positioning the hub
Harmony Pro 2400 Hub can be placed in any unobstructed location where IR signals can be transmitted to AV equipment. It can also be placed in cabinets using 3.5mm IR emitters or 3.5mm male to male cables positioned properly and connected to the hub.
Power Options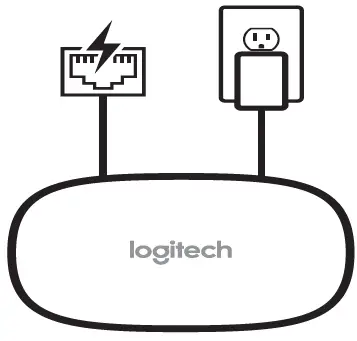
Harmony Pro 2400 hub can be powered by the included AC adapter, or a PoE connected Ethernet cable. When using a PoE connected Ethernet cable, the AC adapter is not required.
Once plugged in, the hub takes approximately 30 seconds to power up. The LED will glow red initially, then flash red when ready to pair with your BT enabled mobile device. Once it has successfully been connected to a Harmony account the LED will glow green (Step 3).
STEP 2: Charge your Remote
Plug in the charging station and place the remote in it.
Keep the remote in the charging station until setup is complete. The remote will hold a charge for 2-3 days of typical use. Make sure your client knows they should place the remote in the charging base when they aren’t using it.
STEP 3: Install the Harmony App

Visit the Apple App Store or Google Play and install the Harmony App.
Open your Logitech Pro Portal Account
You’ll need a Logitech Pro Portal account to take advantage of features only available to dealers in the portal. If you don’t already have a dealer account, please visit pro.myharmony.com
In addition to managing all of your clients, you can program and push syncs while off-site to decrease the need for truck rolls. You also gain access to online training, collateral, webinars, and other tools created specifically for the installer channel.
For more detailed instructions and product info, please visit support.myharmony.com/pro
The remainder of the setup will be done using your iOS or Android mobile device. Make sure the Bluetooth® connection on your mobile device is turned on. See the next section for an overview of what to expect.
Mobile App Setup Overview
Make sure you’ve signed up as a dealer on the Logitech Pro Portal and downloaded the Harmony mobile app.
- Log into your Logitech Pro Portal account. Select add client or add remote. If you don’t currently have a dealer account, go to: pro.myharmony.com to sign up.
- Set up client account. The Harmony app will auto launch and prompt you to enter your client’s email and information. The remote can initially be programmed without a password so the client doesn’t need to be immediately available to start programming.
- Scan your network. Harmony automatically looks for devices that can be controlled and adds them without the need to enter IP or MAC information (e.g. Sonos, Lutron, Roku, Hue, Smart TVs).
- Add home entertainment devices. For products not found during the network scan, just enter the manufacturer and model number (e.g. TV, cable box, AVR, game console, Blu-ray player).
- Add home control devices. Harmony supports various devices such as select lights, locks, thermostats and home control platforms. See Home Controls Explained section for further detail.
- Create Activities. You’ll be guided through creating Activities such as Watch TV, Listen to Music, and Good Night. See the One-touch Activities section below for further details.
- Software update and sync. Your remote’s software may need to be updated. If necessary (you will be informed after completing mobile setup), simply keep the remote in the cradle. The remote will show it’s syncing and when it’s done and ready to use.
One-touch Activities
Obviously, “Watch TV” or “Watch Movie” are the most popular Harmony Activities. Get creative and show your clients how technology can help set the mood in the house no matter what they’re doing! Soon they’ll be calling you back to add even more activities and with the Logitech Pro Portal you can add them without rolling a truck.
- Get in the Cooking mood using the Harmony App to brighten the lights in the kitchen and turn on their cooking playlist; or turn on the TV and switch to their favorite cooking channel. Voice control can be a favorite in the kitchen as well!
- Create the perfect Dinner Party mood and with one-touch-launch their favorite dinner playlist, dim the lights a bit, and turn up the heat.
- Dinner may be over, but Party Time can group more wireless speakers, adjust the volume by room, and change the playlist to something more upbeat. Plus adjust lighting throughout the home, and turn the thermostat down just a bit.
- The party’s over as one-touch dims the lights and turns on some relaxing music at the perfect volume – it’s time to Relax.
- Finally, add a Good Night activity that turns off all the lights, lowers your blinds, adjusts the thermostat, and locks your doors.
How To Use Your Remote
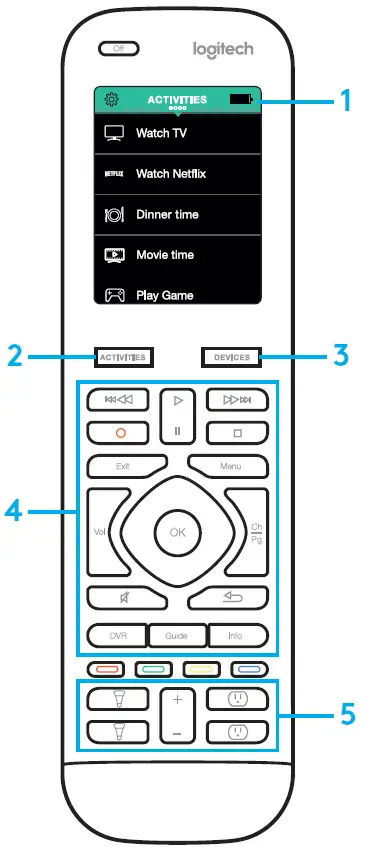
- Clock/Battery
Tap to toggle between the clock and battery meter. By default the clock is displayed, but if the battery drops below 20%, it will switch to the battery meter. - Activities
Tap the Activities “soft button” to access the Activities Home Screen. You will see a scrollable list of all Activities that have been created for the account. - Devices
Tap the Devices “soft button” to access the Devices Home Screen. You will see a scrollable list of all Entertainment and Home Control devices. Tap a device name to view its controls. Press Activities to get back to the current Activity. - Transport Control
Button are automatically mapped to the appropriate device controls selected during Activity creation. Button mappings may be customized manually if desired. - Home Control
The Harmony Pro 2400 includes programmable buttons that can be used with supported Home Control devices. For example, map a button to turn your lights on and off, while using the +/- button to adjust the brightness.
Harmony Pro 2400 Hub Features
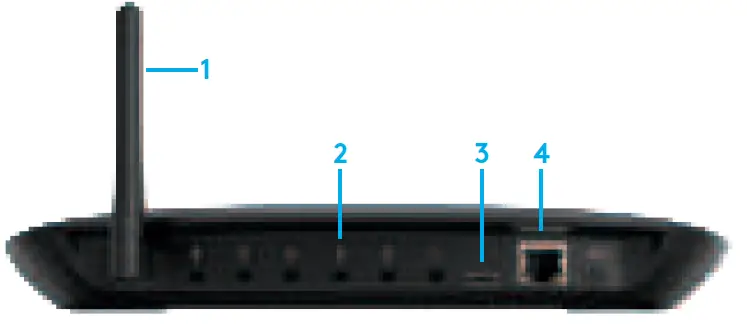
- Detachable SMA Antenna
External antenna allows for greater range – or add a cable lead to the antenna for even greater flexibility. - 3.5mm Assignable IR Ports
Standard 3.5mm IR ports, individually assignable for male-to-male connections, duplicate devices, and precision IR emitters. - Micro USB Power Connection
Power the hub with the included 5v/2amp power adapter. Please note, this is a different adapter than the one included for the charging station – both are labeled for easy identification. - Ethernet and PoE Connection
An Ethernet connection is possible with Harmony Pro 2400, along with the 2.4ghz WiFi connection. The Ethernet port is also PoE enabled, allowing you to send power and data over the Ethernet cable when connected to a PoE enabled switch.
Additional Setup Tips
Programming Favorites: For Activities using TV, Sonos, Heos, or Roku, you can make often used channels easier to select with favorites. This only takes a few minutes to set up, and provides an experience similiar to selecting an app on your client’s phone.
Gestures & Gesture Hints: When an Activity is running, swiping down from the top of any screen will display the gesture screen. Here, simple taps and swipes will perform functions related to the current Activity. Tap the button at the top to see what gestures are available for each Activity.
Remote Customization: Click the gear icon in the upper left to change remote settings like vibration, back lighting, and the tilt sensor, as well as touch duration for starting Activities. This allows for a more custom experience, and only takes a minute or two to set up.
© 2019 Logitech. Logitech, the Logitech logo, Logi, Harmony, and other Logitech marks are owned by Logitech and may be registered. All other trademarks are the property of their respective owners. Logitech assumes no responsibility for any errors that may appear in this manual. Information contained herein is subject to change without notice.