logitech K480 Bluetooth Multi-Device Keyboard

logitech K480 Bluetooth Multi-Device Keyboard
K480 is a comfortable and space-saving multi-device keyboard that brings better typing to your laptop, tablet or phone. With impressive durability and long battery life, this tightly designed is what everyone needs to multi-task and get more done (from anywhere).
ABOUT THE KEYBOARD

You aren’t limited to a single device, so why should your keyboard be?
A new standard for wireless convenience and versatility, the Logitech Bluetooth® Multi-Device Keyboard K480 connects with up to three Bluetooth wireless–capable computers or mobile devices and lets you switch effortlessly between them.
Windows®, Android™, Chrome™, Mac OS® X, and iOS—the Logitech Keyboard K480 works with all types of devices that support an external keyboard.
KEYBOARD K480 TOP
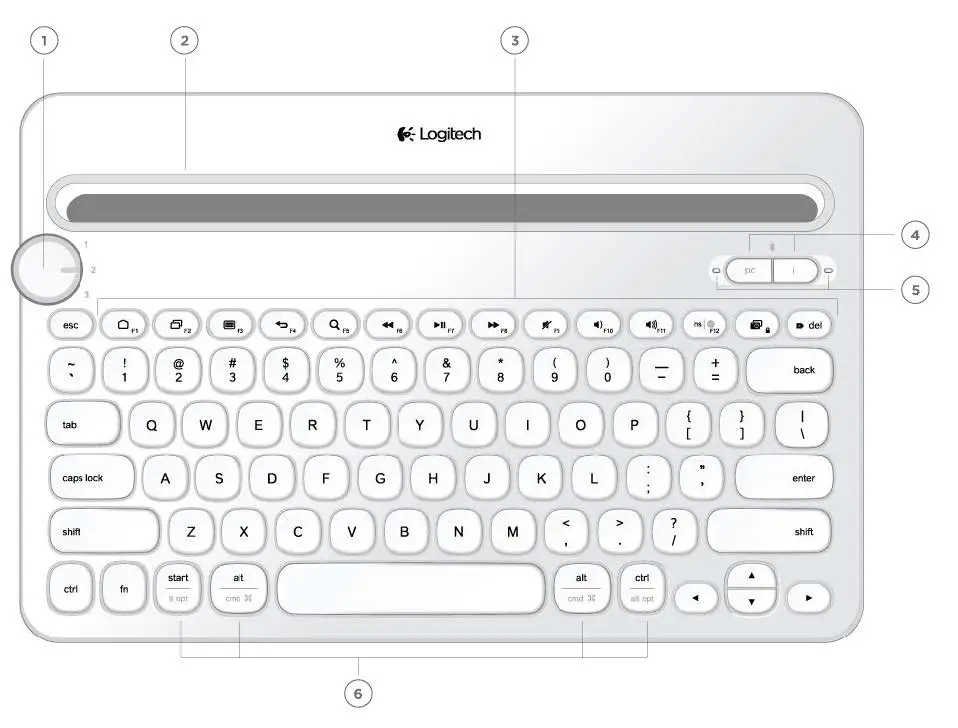
- Selection dial Turn to choose a Bluetooth wireless channel or device
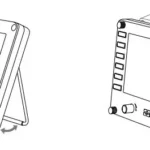
- Cradle Holds phone or tablet at a comfortable angle
- Shortcut keys Function keys
- Connect buttons Press to pair with Bluetooth wireless devices
- Status lights Indicate state of Bluetooth wireless connection
- Split keys Effect changes depending on connected device
KEYBOARD K480 BASE
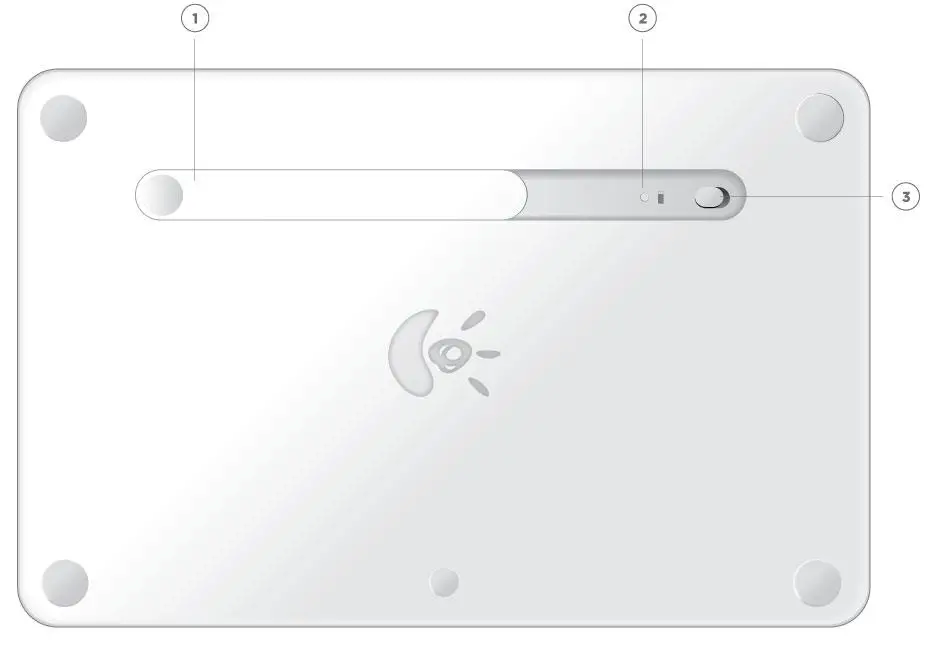
- Battery compartment
- Battery status light
- On/Off switch
FIRST-TIME SETUP

POWER ON
Pull the tab from the battery compartment to power on the keyboard.
(Out of the box, the keyboard’s On/Off switch is in the On position.) 
PAIR THE KEYBOARD WITH A DEVICE On the keyboard
Select a Bluetooth wireless channel.
Turn the selector dial to 1 (the factory setting).
To connect to a computer or mobile device running Windows, Android, or Chrome: Press and hold down the “pc” connect button for 3 seconds. 
To connect to an Apple Macintosh, iPhone®, or iPad®: Press and hold down the “i” connect button for 3 seconds. 
The keyboard remains in “discovery” mode for about 3 minutes.
Windows 7 
On a computer running Windows 7:
In the Start menu, click Devices and Printers.
Click Add a device to display icons of available Bluetooth wireless devices.
Select Logitech Keyboard K480 and click Next. Follow the onscreen instructions to complete the pairing.
Windows 8
Click Settings in the upper-right corner of the display.
Click Change PC Settings.
Click PC and Devices and select Bluetooth.
Select Logitech Keyboard K480 and follow the onscreen instructions to complete the pairing.
Note: When you make a new Bluetooth wireless connection, Windows may need to update some resource files. These updates may still be in progress even after your computer tells you it has connected to the keyboard. Wait until the status light next to the connect button is lit solidly for 5 seconds before attempting to use the keyboard with your computer. (It may take as long as 20 minutes for Windows to complete the updates.)
Mac OS X 
Open System Preferences and click Keyboard.
Click Set Up Bluetooth Keyboard to start a search for nearby keyboards.
When the message “Found Logitech Keyboard K480” appears, click Continue.
Follow the onscreen instructions to complete the pairing.
Chrome OS 
Click the status area in the lower-right corner of the screen (where your account avatar is displayed).
In the drop-down menu, select Bluetooth status.
Select Logitech Keyboard K480 from the list of available Bluetooth wireless devices and click Connect.
Follow the onscreen instructions to complete the pairing.
Android 
On an Android device:
In Settings > Wireless and Networks, tap Bluetooth and confirm it is active.
When a list of Bluetooth wireless devices appears, select Logitech Keyboard K480 and click Next.
Follow the onscreen instructions to complete the pairing.
iOS

On an iPhone or iPad (iOS):
Go to Settings > Bluetooth. (Turn on Bluetooth if it’s not already active.) When a list of Bluetooth wireless devices appears, tap Logitech Keyboard K480.
Note: If your device requests a PIN, enter the code on your Logitech Keyboard K480, not the device’s virtual keyboard.
On the keyboard
When your keyboard is successfully paired with a device, the light next to the connect button illuminates steadily for 5 seconds.
ADD MORE DEVICES
You can connect your Logitech Keyboard K480 to as many as three Bluetooth wireless devices at a time.
Note: Before attempting to connect to another device, make sure you’re able to type on the device you connected to the keyboard on channel 1. After confirming there is an active connection between the device and the keyboard, proceed with the instructions below.

Select an unused Bluetooth wireless channel.
If you already paired the keyboard with a device on channel 1, turn the selector dial to channel 2 or 3.
To complete pairing of the keyboard with another computer, tablet, or smartphone, repeat the instructions in FIRST-TIME SETUP, “Pair the keyboard with a device.”
SELECT A DEVICE

After pairing the keyboard with your devices, you can select a device to use with the keyboard
To select a device
Turn the selector dial to the channel you used to connect the computer, tablet, or smartphone to the keyboard.
The light next to the associated connect button slowly blinks before turning solid blue for 5 seconds, confirming the selection.
Now use the keyboard to type on the selected computer or mobile device.
DO MORE—GET THE SOFTWARE!
Get Logitech software to take your keyboard experience to the next level. Go
to support.logitech.com/product/multi-device-keyboard-k480 and follow the instructions for downloading free Logitech keyboard software designed to work with your computer or mobile device. Logitech Options (for PC)
Logitech Options gives you more control over your keyboard, making you more productive while increasing enjoyment of your keyboard.
Use Logitech Options to:
- Set up the shortcut keys to perform common commands or custom keyboard shortcuts.
- Disable (and enable) keys—Caps Lock, Insert, and Windows Start.
- Show Caps Lock notification on your PC display.
- Show a low-battery warning on your PC display.
Logitech Preference Manager (for Mac OS X)
Logitech Preference Manager lets you take full advantage of your shortcut keys and function keys.
Logitech Preference Manager lets you:
- Use the top row of shortcut keys as standard function keys. (You can still perform shortcuts by pressing the fn key in combination with one of the top-row keys.)
- Show Caps Lock notification or status on your Mac display.
- Show a low-battery warning on your Mac display.
Logitech Keyboard Plus App (for Android)
If you’re using the Logitech Keyboard K480 with an Android tablet or smartphone, you’ll appreciate how Logitech Keyboard Plus improves your typing experience.
Use Logitech Keyboard Plus to:
- Select from 13 international keyboard layouts (U.S. layout not included). Apply the correct layout to your keyboard to enjoy full support for all keys and features.
- Run a wizard that guides you through setup and Bluetooth wireless pairing.
- Effortlessly switch between the Keyboard K480 and the Android onscreen keyboard when powering the device on or off.
SWAPPING DEVICES
The keyboard can connect to three devices at a time, but there’s no limit to the number of computers, tablets, or smartphones you can use with it. It’s easy to reassign any of the three channels to other devices. (You can easily reconnect with a device at any time.)
To swap devices
Open Bluetooth Wireless settings on a currently connected computer or mobile device and direct it to “forget” the keyboard.
Note: Steps for forgetting a Bluetooth wireless device differ depending on the type of device and the operating system. See the user manual that came with your computer or mobile device for more information on forgetting a Bluetooth wireless device.
Now follow the instructions in FIRST-TIME SETUP, “Pair the keyboard with a device,” to connect another computer or mobile device on the newly available channel.
MULTIPLE KEY LAYOUTS IN ONE

Key label color
Gray labels indicate functions available on Apple® devices running Mac OS X or iOS.
White labels on gray circles identify symbols reserved for use with ALT GR on Windows computers.
Split keys
Modifier keys on either side of the space bar display two sets of labels separated by split lines.
The label above the split line identifies the modifier sent to a Windows, Android, or Chrome device.
The label below the split line identifies the modifier sent to an Apple Macintosh, iPhone, or iPad. The keyboard automatically uses modifiers associated with the currently selected device.
Universal keys
All other keys perform the same action on all devices and operating systems.
SHORTCUT KEYS and FUNCTION KEYS
Shortcut keys
The table below shows the shortcut assignments for Windows, Mac OS X, Android and iOS.
Note: An asterisk (*) identifies actions that require installing Logitech software. 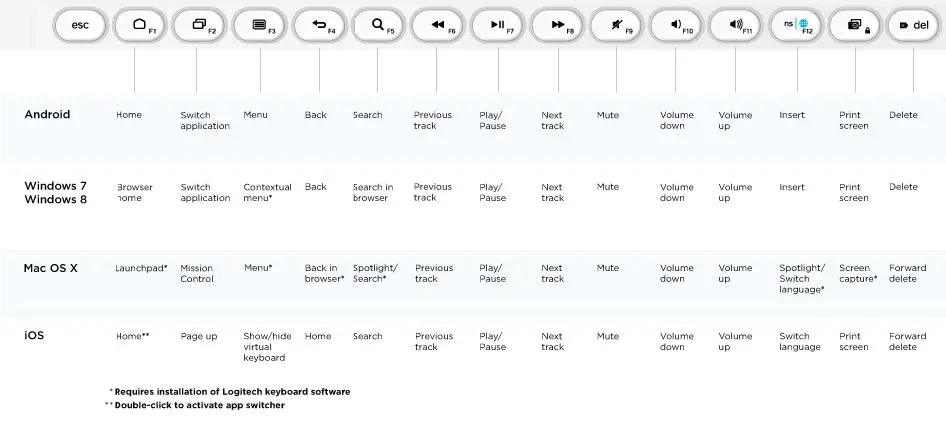 Function keys
Use function keys by holding down the fn key and pressing the shortcut key associated with the function number and action. The table below describes special key combinations for different operating systems.
If you typically use function keys more often than shortcut keys, you can install Logitech software and use it to set up the shortcut keys as function keys that you can press directly (without having to hold down the fn key).
Note: An asterisk (*) identifies actions that require installing Logitech software.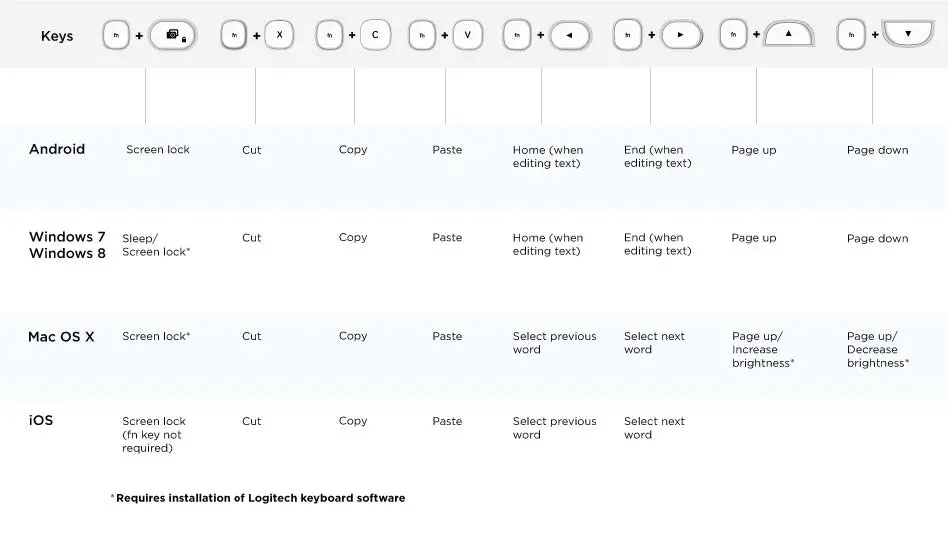
REPLACE THE BATTERIES

Slide the battery compartment door toward the On/Off switch and lift the door.
Replace the old batteries with two new AAA batteries and reattach the compartment door.
COMPATIBLE DEVICES
The Logitech Keyboard K480 works with Bluetooth wireless–enabled computers, tablets, and smartphones that support external keyboards.
The keyboard is compatible with all major operating systems:
- Windows® OS version 7 and later
- Mac OS® X 10.9 or later • Chrome OS™
- Apple® iPhone and iPad, iOS® 5 or later
- Android™ OS tablet or smartphone, Android 3.2 or later
If you’re unsure which operating system is running on a device that you want to use with the keyboard, see the device user guide for more information.
Note: An Internet connection is required for downloading Logitech software.
TROUBLESHOOTING
I can’t pair the keyboard with my device.
Your keyboard only connects to Bluetooth wireless–enabled devices. Confirm that the device you’re trying to pair with is Bluetooth wireless–capable. Note: The Logitech Keyboard K480 is not compatible with a Logitech Unifying receiver based on different wireless technology.
Restart the device and try pairing it with the keyboard again on the original channel or another channel.
Note: On a Windows computer, a new Bluetooth wireless connection will sometimes require additional software updates—a process that may still be ongoing after a message appears indicating a successful completion. Wait at least 20 minutes after pairing to make sure all updates are completed before restarting the computer.
Confirm that the device is configured to accept Bluetooth wireless connections. (Windows)
Go to Bluetooth Devices > Open Settings and select the following checkboxes:
- Allow Bluetooth devices to find this computer
- Allow Bluetooth devices to connect to this computer
- Alert me when a Bluetooth device wants to connect
Confirm that your computer, tablet, or smartphone is compatible with the Logitech Keyboard K480. (See COMPATIBLE DEVICES.)
Make sure your computer, tablet, or smartphone supports an external keyboard (HID profile). Check the user manual that came with the device or contact the manufacturer.
My keyboard isn’t working.
- Confirm the correct channel is selected.
- Press any key to wake the keyboard from sleep mode.
- Turn the keyboard off and back on.
- Turn Bluetooth wireless off and restart the computer. (Windows)
On the device:
Go to Bluetooth Wireless settings and turn off Bluetooth Wireless.
Restart the device and turn on Bluetooth Wireless. Reconnect the keyboard.
- Replace the keyboard batteries.
- Confirm that the keyboard is paired with the device.
- Pair the keyboard again with your computer, tablet, or smartphone.
On the device
Go to Bluetooth Wireless settings and “forget” the Logitech Keyboard K480. Turn off Bluetooth Wireless. Restart the device and turn on Bluetooth Wireless. Pair the device and keyboard again, following the steps in FIRST-TIME SETUP, “Pair the keyboard with a device.” My keyboard stopped working, or works only intermittently. If your device is Bluetooth wireless–capable, this problem is likely caused by a lost Bluetooth wireless connection. Several environmental factors can cause the connection between the Logitech Keyboard K480 and a computer or mobile device to fail.
- Check the keyboard batteries.
- Make sure your keyboard isn’t resting on a metal surface that can interfere with a Bluetooth wireless signal.
- Verify that another wireless source isn’t interfering with the Bluetooth wireless signal.
- Possible sources of interference include wireless speakers, a computer power supply, a display monitor, cell phones, and garage door openers.
- Make sure other electrical devices are at least 8 inches (20 cm) from your keyboard and the computer or mobile device.
- Try moving the keyboard closer to the computer or mobile device.
- My keyboard doesn’t work after the connected PC wakes from sleep mode.
- On the PC, change the Bluetooth wireless adapter power settings:
Go to Control Panel > System and Security > System > Device Manager. In Bluetooth Radios, right-click on the Bluetooth wireless adapter (for example, Dell Wireless 370 adapter) and click Properties. In the Properties window, click the Power Management tab and uncheck Allow the computer to turn off this device to save power. Click OK to save the settings and restart the PC. The characters I’m typing don’t match the key labels.
- Make sure you used the correct Bluetooth wireless connect button to pair the keyboard with your device.
Review the instructions in FIRST-TIME SETUP, “Pair the keyboard with a device.”
When you select a paired device with the selection dial, the status light next to the connect button you used for pairing starts blinking. If you used the wrong connect button, pair the device again by holding down the other connect button until its status light next starts blinking.
Specs and Details
Dimensions
Height: 7.68 in (195 mm)Width: 11.77 in (299 mm)Depth: 0.79 in (20 mm)Weight: 28.92 oz (820 g)
Technical Specifications
Connection Type
- Bluetooth
- Wireless range: >33 ft / 10m wireless range
Customization software
- Logi Options+ for Mac: OS 10.15 or later
- Logi Options+ for Windows: 10 or later
Indicator Lights (LED)
- Battery indicator light
Battery
- Battery: 2 x AAA (included)
- Battery life: 24 months 2
Special Keys
- Hotkeys (e.g. Home, Search, Back, App-Switch and Contextual Menu), Easy-Switch
- Connect/Power: On/Off Switch
Key Life
- Up to 5 million keystrokes
Tablet Cover and Stand
- Fits most phones and tablets up to 0.4 inches (10.5 mm) thick and 10 inches (258 mm) wide.
Warranty Information
1-Year Limited Hardware Warranty
Part Number
- Black English:
- White English:
Q/A
Logitech Keyboard, Presentation and Mice Software – macOS 11 (Big Sur) Compatibility
Apple has announced a forthcoming update macOS 11 (Big Sur) due to be released in the fall of 2020.
|
|
Limited Full Compatibility Logitech Control Center will be fully compatible with macOS 11 (Big Sur), but only for a limited compatibility period. macOS 11 (Big Sur) support for Logitech Control Center will end early 2021. |
|
Fully Compatible |
Fully Compatible
|
|
|
|
External keyboard shortcuts for iPadOS
You can view the available keyboard shortcuts for your external keyboard. Press and hold the Command key on your keyboard to display the shortcuts.
Change modifer keys of external keyboard on iPadOS
You can change the position of your modifier keys at any time. Here’s how:
– Go to Settings > General > Keyboard > Hardware keyboard > Modifier Keys.
Toggle between multiple languages on iPadOS with an external keyboard
If you have more than one keyboard language on your iPad, you can move from one to the other using your external keyboard. Here’s how:
1. Press Shift + Control + Space bar.
2. Repeat the combination to move between each language.
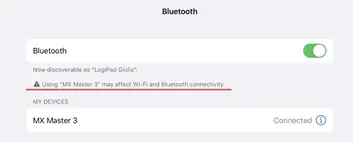
Warning message when Logitech device is connected to iPadOS
When you connect your Logitech device, you might see a warning message.
If this happens, make sure to connect only the devices you’ll be using. The more devices that are connected, the more interference you might have between them.
If you are having connectivity issues, disconnect any Bluetooth accessories that you’re not using. To disconnect a device:
– In Settings > Bluetooth, tap the information button next to the device name, then tap Disconnect.
Use Google Zhuyin Input for Chinese characters on your Android device
Google Zhuyin Input is a third-party app that lets you type traditional Chinese on your Android device. Follow these steps to download and configure the app:
Download and install the app
1. Run the Google Play Store app on your Android smartphone or tablet.
2. Search for Google Zhuyin Input.
3. Tap Install to install the app.

Configure the Google Zhuyin Input app
After you’ve installed the app, run Google Zhuyin Input and follow the on-screen instructions to configure it.


Using the Google Zhuyin Input app to input Chinese text
1. Use the arrow keys to go between characters, then press Enter to select a character.

2. When you input characters, press the SHIFT key to switch between Chinese and English input.


NOTE: Google Pinyin Input can also be used.
Connect the K480 keyboard to a Bluetooth device
You can use the selector dial on the left side of your K480 keyboard to pair it with up to three of these devices at once:

– Computers running Windows 7 and Windows 8 (see 51749 for help)
– iOS devices running iOS 4.0 and later (see 51750 for help)
– Android devices with Android OS 3.0 and later (see 51751 for help)
NOTE: While you can pair three devices, the keyboard can only connect to, and work with one of them at a time. For help with switching between devices you’ve already paired, see article 51752.
Supported operating systems for the K480 Bluetooth keyboard
At the time of release, this product is supported on:
– Windows 7
– Windows 8
– Mac OS X and later
– Android 3.2 and later
– iOS 5 and later
– Chrome OS
Customizing software is available for this product. See article 360023422533 for more information.
Sending texts with the K480 Bluetooth keyboard
You can use your K480 keyboard to write and send texts on both Android and iOS devices. Depending on which system you use, pressing Enter within a text conversation will have different results:
– iOS – Pressing Enter will move the cursor to the next line in the text. You can send the text by tapping the Send button on the phone display.
– Android – Pressing Enter will send the text.
Switching between devices with the K480 Bluetooth keyboard
If you have multiple devices (ex. smartphone, tablet, or computer) paired with your K480 keyboard, you can switch between them using the selector dial on the upper left side of the keyboard.
1. Before you switch, make sure Bluetooth is active on the device you want to switch to.
2. Turn the dial on your keyboard to the setting that corresponds to the device (1, 2, or 3).
Your keyboard should now be connected to the Bluetooth device you selected.
NOTE: Some Bluetooth devices may not support multiple Bluetooth connections. If your keyboard isn’t connecting, make sure you don’t have such a device connected at the same time.
Logitech Options does not find Bluetooth Multi-Device Keyboard K480
If you’re running a non-Microsoft version of Bluetooth stack, there is a chance Logitech Options software won’t see your K480 Bluetooth keyboard. This is a known compatibility issue. Unfortunately, there is no workaround.
Connect the K480 keyboard to an iPad or iPhone
You can connect your keyboard to an iPad or iPhone running iOS 5.0 or later. Here’s how:
1. With your iPad or iPhone turned on, tap the Settings icon.

2. In Settings, tap General and then Bluetooth.

3. If the on-screen switch beside Bluetooth doesn’t currently show as ON, tap it once to enable it.

4. Turn the keyboard on by sliding the power switch on the bottom of the keyboard over to the right.
5. Using the device memory wheel on the top left of the keyboard, select 1, 2, or 3. 6. You can save up to three devices to memory on the keyboard.
7. At the top right of the keyboard, press and hold the “i” button until the light to the right of the button rapidly blinks blue.
8. On your iPad or iPhone, in the Devices list, tap Logitech Keyboard K480 to pair it.

9. Your keyboard may pair automatically, or it may request a PIN code to complete the connection. On your keyboard, type the code shown on-screen, and then press the Return or Enter key.
NOTE: Each connect code is randomly generated. Make sure you enter the one shown on your iPad or iPhone screen.
Once you press Enter (if required), the pop-up will disappear and the word Connected will show beside your keyboard in the Devices list.
Your keyboard should now be connected to your iPad or iPhone.

NOTE: If the K480 is already paired but having problems connecting, you can remove it from the Devices list and follow the instructions above to connect it.
Logitech Options software for the K480 Bluetooth keyboard
Logitech Options software is available for Windows 7 and Windows 8. You can download the software from this keyboard’s main support page.
Connect the K480 keyboard to a computer running Windows
You can connect your keyboard to a computer running Windows 7 or 8. Here’s how:
1. Turn the keyboard on by sliding the power switch on the bottom of the keyboard over to the right.
2. Using the device memory wheel on the top left of the keyboard, select 1, 2, or 3. 3. You can save up to three devices to memory on the keyboard.
4. At the top right of the keyboard, press and hold the PC button until the light to the left of the button rapidly blinks blue.
Add the keyboard to your computer:
– Windows 7: Go to Start > Control Panel > Devices and Printers
– Windows 8: On the Start screen, right-click in an empty space, and then select All apps > Control Panel > Devices and Printers
NOTE:
If you can’t locate “Devices and Printers”, set the Control Panel to “View by: Small icons”. You should then be able to see all Control Panel items.

5. Click Add a device.

6. Choose “Logitech Keyboard K810” from the device list and then click Next.

7. Type the pin code and then press the Enter key on the keyboard.

8. Click Close to exit.

NOTE:
If the K480 is already paired but having problems connecting, you can remove it from the device list and follow the instructions above to connect it.
K480 Bluetooth keyboard not working or frequently losing connection
– Keyboard isn’t working
– Keyboard frequently stops working
– Before reconnecting your keyboard
– Reconnecting your keyboard
—————————————————————————
Keyboard isn’t working
In order for your K480 keyboard to work with your computer, your computer must have built-in Bluetooth capability or be using a third-party Bluetooth receiver or dongle. The K480 keyboard isn’t compatible with a Logitech Unifying receiver, which uses Logitech unifying wireless technology.
If your system is Bluetooth-capable and the keyboard isn’t working, the problem is likely a lost connection. The connection between the K480 keyboard and the computer or tablet can be lost for several reasons, such as:
– Low battery power
– Using your wireless keyboard on metal surfaces
– Radio frequency (RF) interference from other wireless devices, such as:
– Wireless speakers
– Computer power supplies
– Monitors
– Cell phones
– Garage door openers
Try to rule out these and other possible problem sources that might be affecting your keyboard.
Keyboard frequently loses connection
If your keyboard frequently stops working and you keep having to reconnect it, try these suggestions:
– Keep other electrical devices at least 8 inches (20 cm) away from the Unifying receiver.
– Move the keyboard closer to the computer or tablet.
Before reconnecting your keyboard
Before you try to connect your keyboard again:
1. Check the battery power by turning the keyboard off and then back on again using the ON/OFF switch on the bottom of the keyboard. Notice the LED indicator color to the left of the ON/OFF switch. If the LED indicator is red, the batteries need to be replaced.
2. Try using the Windows key or type something to verify it’s working.
3. If it’s still not working, follow the link below to reconnect your keyboard.
Reconnecting your keyboard
To reconnect your keyboard, click the link for your device:
– 360023422173 – Connect the K480 keyboard to a computer running Windows
– 360023422173 – Connect the K480 keyboard to an iPad or iPhone
– 360023422173 – Connect the K480 keyboard to an Android tablet or smartphone
How to remove custom options settings when uninstalling Logitech Options software
If you want to uninstall Logitech Options, so you can reinstall the software and start with new customized settings, you’ll need to delete the LogiOptions folder after you uninstall. The folder is at the following location:
– C:UsersnameAppDataRoamingLogishrd
NOTE: This applies to standard account settings. If you’re logged in as an administrator, you can skip this step.
VIDEO – Set up the K480 keyboard
To turn subtitles on and view machine-translation, see YouTube Help.
Connect the K480 keyboard to an Android tablet or smartphone
You can connect the K480 keyboard to an Android device running Android 3.2 and later. Here’s how:
1. On your Android device, go to Settings > Bluetooth to turn on Bluetooth.

2. Turn the keyboard on by sliding the power switch on the bottom of the keyboard over to the right.
3. Using the device memory wheel on the top left of the keyboard, select 1, 2, or 3. You can save up to three devices to memory on the keyboard.
4. At the top right of the keyboard, press and hold the PC button until the light to the left of the button rapidly blinks blue.
5. On your Android device, in the Bluetooth Settings screen, tap once on Logitech Keyboard K480 to select it.

6. On your keyboard, type the PIN code displayed on your device’s screen, and then press Enter.

NOTE: Each connect code is randomly generated. Make sure you enter the one shown on your device’s screen.
7. Once you press Enter, the pop-up will disappear and the word Connected will show beside your keyboard in the Devices list.

8. Your K480 keyboard is now connected.
NOTES: Settings may vary between Android 3.0+ and 4.0+ devices. See your device’s user guide if you’re unable to pair the K480 keyboard.
9. If the K480 is already paired but having problems connecting, you can remove it from the device list and follow the instructions above to connect it.
Customize your keyboard on Windows 7 and Windows 8 with Logitech Options
With Logitech Options software, you can customize some of the function keys on your keyboard when you’re connected to a Windows 7 or Windows 8 computer.
For example, you can change what the F1-F5 function keys and Camera/Screenshot buttons do when pressed with the fn key. Each button or key will has a list of special functions you can assign to it.
You can get Logitech Options from your device’s main support page.
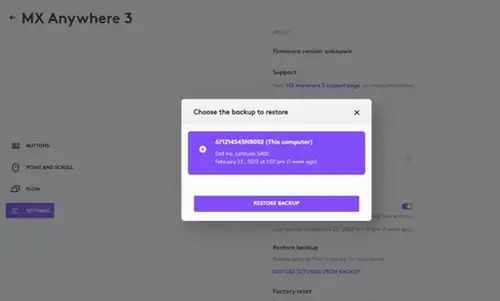
Backup device settings to the cloud in Logitech Options+
INTRODUCTION
This feature on Logi Options+ allows you to backup the customization of your Options+ supported device automatically to the cloud after creating an account. If you are planning to use your device on a new computer or wish to go back to your old settings on the same computer, log into your Options+ account on that computer and fetch the settings you want from a backup to set up your device and get going.
HOW IT WORKS
When you are logged into Logi Options+ with a verified account, your device settings are automatically backed up to the cloud by default. You can manage the settings and the backups from the Backups tab under More settings of your device (as shown):
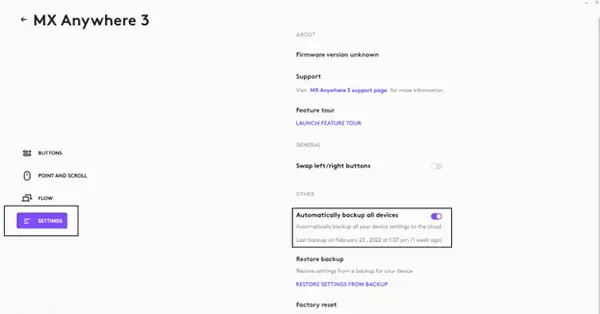
Manage settings and backups by clicking on More > Backups:
AUTOMATIC BACKUP OF SETTINGS — if the Automatically create backups of settings for all devices checkbox is enabled, any settings you have or modify for all of your devices on that computer are backed up to the cloud automatically. The checkbox is enabled by default. You can disable it if you don’t want the settings of your devices to be backed up automatically.
CREATE A BACKUP NOW — this button allows you to backup your current device settings now, if you need to fetch them later.
RESTORE SETTINGS FROM BACKUP — this button lets you view and restore all the available backups you have for that device that are compatible with that computer, as shown above.
The settings for a device are backed up for every computer that you have your device connected to and have Logi Options+ that you are logged into. Every time you make some modifications to your device settings, they get backed up with that computer name. The backups can be differentiated based on the following:
1. Name of the computer. (Ex. John’s Work Laptop)
2. Make and/or model of the computer. (Ex. Dell Inc., Macbook Pro (13-inch) and so on)
3. The time when the backup was made
The desired settings can then be selected and restored accordingly.
WHAT SETTINGS GET BACKED UP
– Configuration of all the buttons of your mouse
– Configuration of all the keys of your keyboard
– Point & Scroll settings of your mouse
– Any application-specific settings of your device
WHAT SETTINGS ARE NOT BACKED UP
– Flow settings
– Options+ app settings
Logitech Options permission prompts on macOS Monterey, macOS Big Sur, macOS Catalina, and macOS Mojave
– Logitech Options permission prompts on macOS Monterey and macOS Big Sur
– Logitech Options permission prompts on macOS Catalina
– Logitech Options permission prompts on macOS Mojave
– Download the latest version of Logitech Options software.
Logitech Options permission prompts on macOS Monterey and macOS Big Sur
For official macOS Monterey and macOS Big Sur support, please upgrade to the latest version of Logitech Options (9.40 or later).
Starting with macOS Catalina (10.15), Apple has a new policy that requires user permission for our Options software for the following features:
– Bluetooth Privacy prompt needs to be accepted to connect Bluetooth devices through Options.
– Accessibility access is needed for scrolling, gesture button, back/forward, zoom, and several other features.
– Input monitoring access is needed for all the features enabled by the software such as scrolling, gesture button, and back/forward among others for devices connected via Bluetooth.
– Screen recording access is needed to capture screenshots using a keyboard or a mouse.
– System Events access is needed for the Notifications feature and Keystroke assignments under different applications.
– Finder access is needed for the Search feature.
– System Preferences access if needed for launching Logitech Control Center (LCC) from Options.
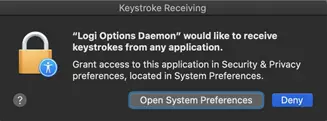
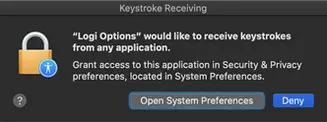
Bluetooth Privacy prompt
When an Options supported device is connected with Bluetooth/Bluetooth Low Energy, launching the software for the first time will show the below pop-up for Logi Options and Logi Options Daemon:
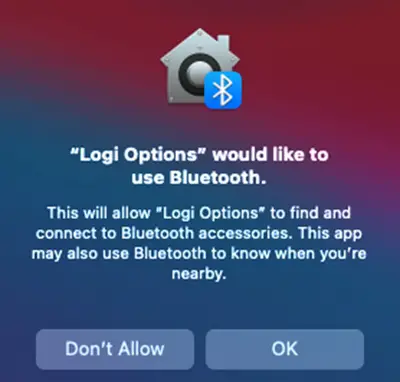
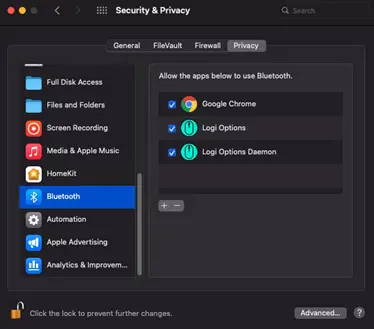
Once you click OK, you will be prompted to enable the checkbox for Logi Options in Security & Privacy > Bluetooth.
When you enable the checkbox, you will see a prompt to Quit & Reopen. Click on Quit & Reopen for the changes to take effect.

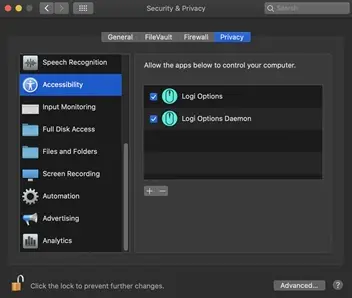
Once the Bluetooth Privacy settings are enabled for both Logi Options and Logi Options Daemon, the Security & Privacy tab will appear as shown:
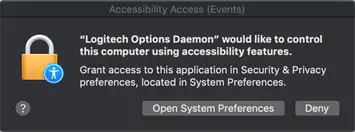
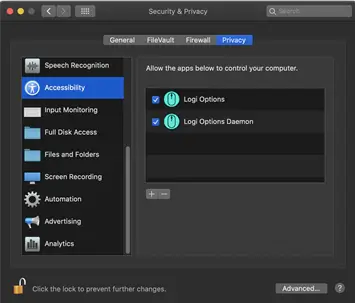
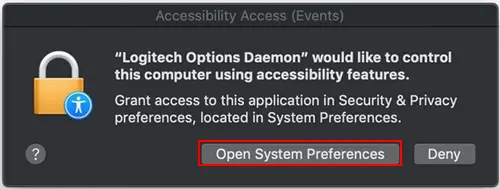
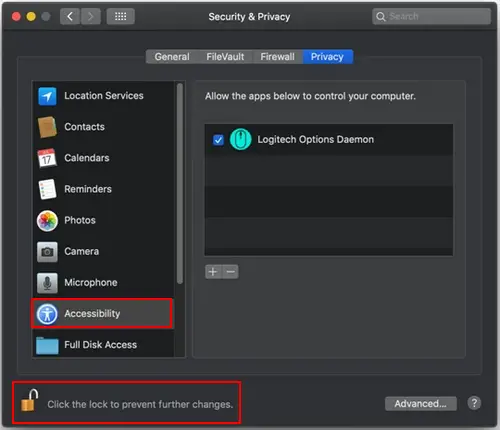
Accessibility Access
Accessibility access is needed for most of our basic features such as scrolling, gesture button functionality, volume, zoom, and so on. The first time you use any feature that requires accessibility permission, you’ll be presented with the following prompt:
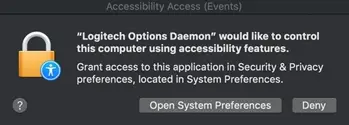
To provide access:
1. Click Open System Preferences.
2. In System Preferences, click the lock at the bottom left corner to unlock.
3. In the right panel, check the boxes for Logitech Options and Logitech Options Daemon.
If you already clicked Deny, follow these steps to manually allow access:
1. Launch System Preferences.
2. Click Security & Privacy, then click the Privacy tab.
3. In the left panel, click Accessibility and then follow steps 2-3 above.
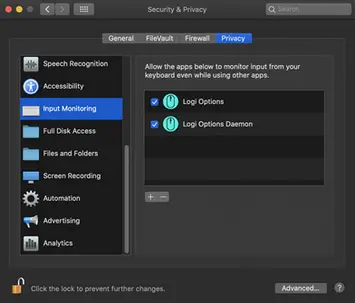
Input Monitoring Access
Input monitoring access is needed when devices are connected using Bluetooth for all features enabled by the software such as scrolling, gesture button, and back/forward to work. The following prompts will be displayed when access is needed:
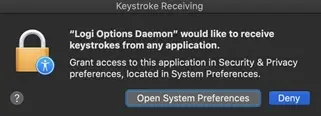
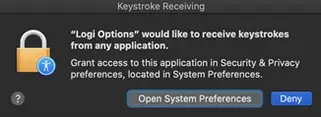
1. Click Open System Preferences.
2. In System Preferences, click the lock at the bottom left corner to unlock.
3. In the right panel, check the boxes for Logitech Options and Logitech Options Daemon.

4. After you check the boxes, select Quit Now to restart the application and allow the changes to take effect.


If you already clicked Deny, please do the following to allow access manually:
1. Launch System Preferences.
2. Click Security & Privacy, and then click the Privacy tab.
3. In the left panel, click Input Monitoring and then follow steps 2-4 from above.
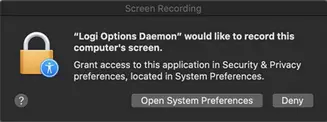
Screen Recording Access
Screen recording access is needed to capture screenshots using any supported device. You’ll be presented with the prompt below when you first use the screen capture feature:
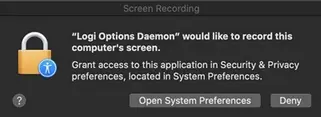
1. Click Open System Preferences.
2. In System Preferences, click the lock at the bottom left corner to unlock.
3. In the right panel, check the box for Logitech Options Daemon.
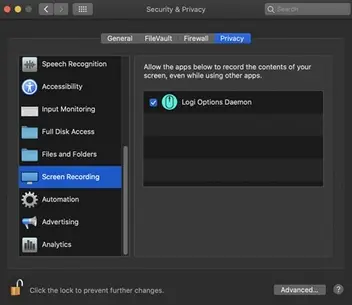
4. Once you check the box, select Quit Now to restart the application and allow the changes to take effect.

If you already clicked Deny, use the following steps to allow access manually:
1.Launch System Preferences.
2. Click Security & Privacy, then click the Privacy tab.
3. In the left panel, click on Screen Recording and follow steps 2-4 from above.
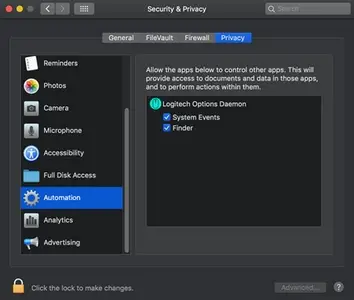
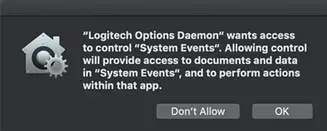
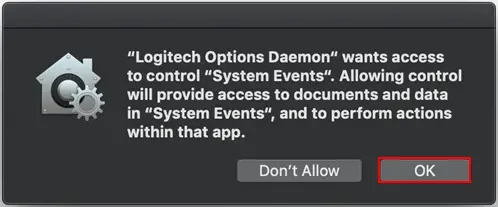
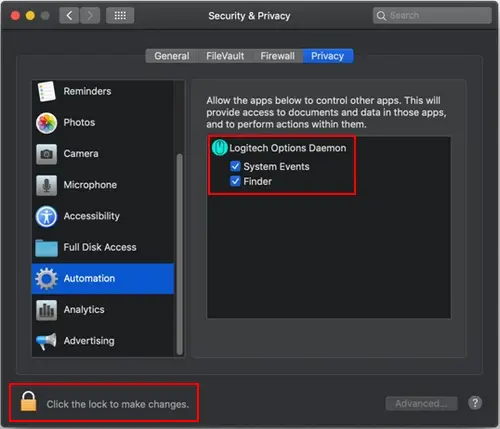
System Events prompts
If a feature requires access to a specific item like System Events or Finder, you will see a prompt the first time you use this feature. Please note that this prompt appears only once to request access for a specific item. If you deny access, all the other features that need access to the same item will not work and another prompt will not be shown.
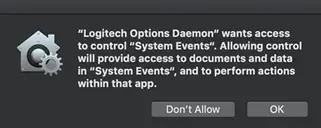
Please click OK to allow access for Logitech Options Daemon so that you can continue to use these features.
If you already clicked on Don’t Allow, use the following steps to allow access manually:
1. Launch System Preferences.
2. Click Security & Privacy.
3. Click the Privacy tab.
4. In the left panel, click Automation and then check the boxes under Logitech Options Daemon to provide access. If you are unable to interact with the checkboxes, please click the lock icon on the bottom left corner and then check the boxes.
NOTE: If a feature still doesn’t work after you grant access, please reboot the system.
Logitech Options permission prompts on macOS Catalina
For official macOS Catalina support, please upgrade to the latest version of Logitech Options (8.02 or later).
Starting with macOS Catalina (10.15), Apple has a new policy that requires user permission for our Options software for the following features:
– Accessibility access is needed for scrolling, gesture button, back/forward, zoom and several other features
– Input monitoring (new) access is needed for all the features enabled by the software such as scrolling, gesture button and back/forward among others for devices connected via Bluetooth
– Screen recording (new) access is needed to capture screenshots using a keyboard or a mouse
– System Events access is needed for Notifications feature and Keystroke assignments under different applications
– Finder access is needed for the Search feature
– System Preferences access if needed for launching Logitech Control Center (LCC) from Options
Accessibility Access
Accessibility access is needed for most of our basic features like scrolling, gesture button functionality, volume, zoom, and so on. The first time you use any feature that requires accessibility permission, you’ll be presented with the following prompt:
To provide access:
1. Click Open System Preferences.
2. In System Preferences, click the lock at the bottom left corner to unlock.
3. In the right panel, check the boxes for Logitech Options and Logitech Options Daemon.
If you already clicked ‘Deny’, do the following to allow access manually:
1. Launch System Preferences.
2. Click Security & Privacy, then click the Privacy tab.
3. In the left panel, click Accessibility and then follow steps 2-3 above.
Input Monitoring Access
Input monitoring access is needed when devices are connected using Bluetooth for all features enabled by the software such as scrolling, gesture button and back/forward to work. The following prompts will be displayed when access is needed:
1. Click Open System Preferences.
2. In System Preferences, click the lock at the bottom left corner to unlock.
3. In the right panel, check the boxes for Logitech Options and Logitech Options Daemon.
4. After you check the boxes, select Quit Now to restart the application and allow the changes to take effect.


If you already clicked ‘Deny’, please do the following to allow access manually:
1. Launch System Preferences.
2. Click Security & Privacy, and then click the Privacy tab.
3. In the left panel, click Input Monitoring and then follow steps 2-4 from above.
Screen Recording Access
Screen recording access is needed to capture screenshots using any supported device. You’ll be presented with the prompt below when you first use the screen capture feature.
1. Click Open System Preferences.
2. In System Preferences, click the lock at the bottom left corner to unlock.
3. In the right panel, check the box for Logitech Options Daemon.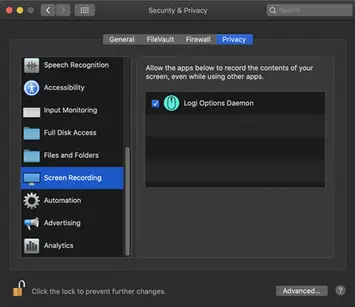
4. Once you check the box, select Quit Now to restart the application and allow the changes to take effect.

If you already clicked ‘Deny’, use the following steps to allow access manually:
1. Launch System Preferences.
2. Click Security & Privacy, then click the Privacy tab.
3. In the left panel, click on Screen Recording and follow steps 2-4 from above.
System Events prompts
If a feature requires access to a specific item like System Events or Finder, you will see a prompt the first time you use this feature. Please note that this prompt appears only once to request access for a specific item. If you deny access, all the other features that need access to the same item will not work and another prompt will not be shown.
Please click on OK to allow access for Logitech Options Daemon so that you can continue to use these features.
If you already clicked on Don’t Allow, use the following steps to allow access manually:
1. Launch System Preferences.
2. Click Security & Privacy.
3. Click the Privacy tab.
4. In the left panel, click Automation and then check the boxes under Logitech Options Daemon to provide access. If you are unable to interact with the checkboxes, please click the lock icon on the bottom left corner and then check the boxes.

NOTE: If a feature still doesn’t work after you grant access, please reboot the system.
– Click here for information on macOS Catalina and macOS Mojave permissions on Logitech Control Center.
– Click here for information on macOS Catalina and macOS Mojave permissions on Logitech Presentation software.
Logitech Options permission prompts on macOS Mojave
For official macOS Mojave support, please upgrade to the latest version of Logitech Options (6.94 or later).
Starting with macOS Mojave (10.14), Apple has a new policy that requires user permission for our Options software for the following features:
– Accessibility access is needed for scrolling, gesture button, back/forward, zoom and several other features
– Notifications feature and keystroke assignments under different applications need access to System Events
– Search feature needs access to Finder
– Launching Logitech Control Center (LCC) from Options requires access to System Preferences
The following are the user permissions the software needs for you to get complete functionality for your Options-supported mouse and/or keyboard.
Accessibility Access
Accessibility access is needed for most of our basic features like scrolling, gesture button functionality, volume, zoom, and so on. The first time you use any feature that requires accessibility permission, you’ll see a prompt as shown below.
Click Open System Preferences and then turn on the checkbox for Logitech Options Daemon.
In case you clicked Deny, use the following steps to allow access manually:
1. Launch System Preferences.
2. Click on Security & Privacy.
3. Click the Privacy tab.
4. In the left panel, click on Accessibility and check the boxes under Logitech Options Daemon to provide access (as shown below). If you are unable to interact with the checkboxes, please click the lock icon on the bottom left corner and then check the boxes.
System Events prompts
If a feature requires access to any specific item such as System Events or Finder, you will see a prompt (similar to the screenshot below) the first time you use this feature. Please note that this prompt appears only once, requesting access for a specific item. If you deny access, all the other features that need access to the same item will not work and another prompt will not be shown.
Click OK to allow access for Logitech Options Daemon so that you can continue to use these features.
In case you clicked Don’t Allow, use the following steps to allow access manually:
1. Launch System Preferences.
2. Click Security & Privacy.
3. Click the Privacy tab.
4. In the left panel, click Automation and then check the boxes under Logitech Options Daemon to provide access (as shown below). If you are unable to interact with the checkboxes, please click the lock icon on the bottom left corner and then check the boxes.
NOTE: If a feature still doesn’t work after you grant access, please reboot the system.
Logitech Bluetooth keyboard unable to pair with Android 7.x device
Some users have reported that their Logitech keyboard will not pair with their Android 7.x device after they’ve entered the pairing code.
– Users get a “connection timed out” error or no error message at all.
– Clearing the Bluetooth cache, power cycling the device, attempting to pair again, or pair to another Android 7.x device does not work.
If you are experiencing this issue, please try the following:
1. Boot your Andriod 7.x device into Safe Mode. This typically involves holding down the power button and volume key at the same time, but you should confirm the exact steps on your device manufacturer’s website.
NOTE: You’ll see an on-screen notification when the device is in Safe Mode.
2. While in Safe Mode, pair the keyboard with your device.
3. After the keyboard has successfully paired, restart your device normally. The keyboard should continue to be paired with your device.
System Extension Blocked message when installing Logitech Options or LCC
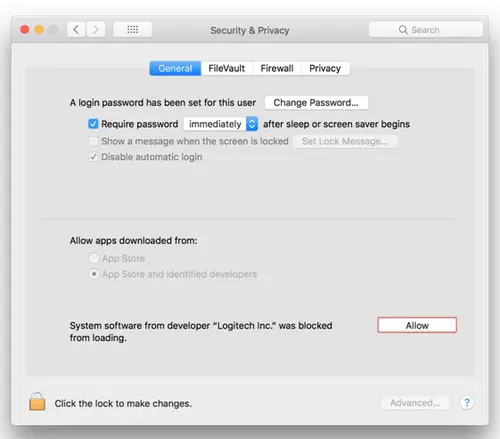
Starting with macOS High Sierra (10.13), Apple has a new policy that requires user approval for all KEXT (driver) loading. You may see a “System Extension Blocked” prompt (shown below) during the installation of Logitech Options or Logitech Control Center (LCC). 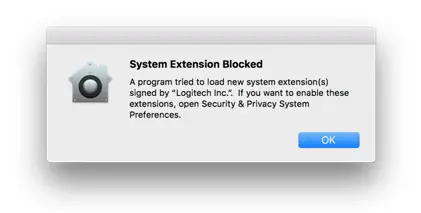
If you see this message, you’ll need to approve the loading of the KEXT manually so that your device drivers can be loaded and you can continue to use its functionality with our software. To allow KEXT loading, please open System Preferences and navigate to the Security & Privacy section. On the General tab, you should see a message and an Allow button, as shown below. In order to load the drivers, click Allow. You may need to reboot your system so the drivers are properly loaded and the functionality of your mouse is restored.
NOTE: As set by the system, the Allow button is only available for 30 minutes. If it has been longer than that since you installed LCC or Logitech Options, please restart your system to see the Allow button under the Security & Privacy section of System Preferences.
NOTE: If you don’t allow KEXT loading, all devices supported by LCC will not be detected by software. For Logitech Options, you need to perform this operation if you’re using following devices:
– T651 Rechargeable trackpad
– Solar Keyboard K760
– K811 Bluetooth keyboard
– T630/T631 Touch mouse
– Bluetooth Mouse M557/M558
Logitech Options issues when Secure Input is enabled
Ideally, Secure Input should only be enabled while the cursor is active in a sensitive information field, such as when you enter a password, and should be disabled right after you leave the password field. However, some applications may leave the Secure Input state enabled. In that case, you may experience the following issues with devices supported by Logitech Options:
– When the device is paired in Bluetooth mode, it’s either not detected by Logitech Options or none of the software-assigned features work (basic device functionality will continue to work, however).
– When the device is paired in Unifying mode, it’s not possible to perform keystroke assignments.
If you encounter these issues, check to see if Secure Input is enabled on your system. Do following:
1. Launch Terminal from /Applications/Utilities folder.
2. Type the following command in Terminal and press Enter:ioreg -l -d 1 -w 0 | grep SecureInput
– If the command returns back no information, then Secure Input is not enabled on the system.
– If the command returns back some information, then look for “kCGSSessionSecureInputPID”=xxxx. The number xxxx points to the Process ID (PID) of the application that has Secure Input enabled:Launch Activity Monitor from /Applications/Utilities folder.
Search for PID which has secure input enabled.
Once you know which application has Secure Input enabled, close that application to resolve the issues with Logitech Options.
Bluetooth device doesn’t work after computer wakes from sleep mode
To begin troubleshooting, please select your operating system:
– Windows
– Mac
Windows
1. In the Device Manager, change the Bluetooth wireless adapter power settings:
– Go to Control Panel > System and Security > System > Device Manager
2. In Device Manager, expand Bluetooth Radios, right-click on the Bluetooth wireless adapter (ex. Dell Wireless 370 adapter), and then click Properties.
3. In the Properties window, click the Power Management tab and uncheck Allow the computer to turn off this device to save power.
4. Click OK.
5. Restart your computer to apply the change.
Macintosh
1. Navigate to the Bluetooth preference pane in System Preferences:
– Go to Apple Menu > System Preferences > Bluetooth
2. In the bottom-right corner of the Bluetooth preference window, click Advanced.
3. Make sure all three options are checked: Open Bluetooth Setup Assistant at startup if no keyboard is detected
4. Open Bluetooth Setup Assistant at startup if no mouse or trackpad is detected
Allow Bluetooth devices to wake this computer 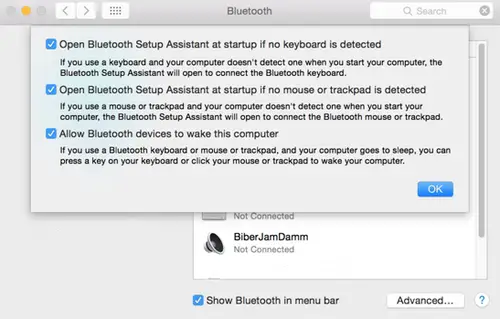
NOTE: These options ensure that Bluetooth-enabled devices can wake your Mac, and that the OS X Bluetooth Setup Assistant will launch if a Bluetooth keyboard, mouse or trackpad is not detected as connected to your Mac.
5. Click OK.
Num Lock disabled after Windows 10 starts
By default, the Num Lock on your keyboard is disabled each time Windows 10 boots up after a shutdown or restart.
To configure your operating system so that Num Lock stays on during startup, please contact professional support for your operating system. This requires advanced changes that need to be done under the guidance of a professional technician.
Connect your Logitech Bluetooth device
The following steps show you how to prepare your Logitech device for Bluetooth pairing and then how to pair it to computers or devices running:
- Windows
- macOS
- Chrome OS
- Android
- iOS
Prepare your Logitech device for Bluetooth pairing
Most Logitech products are equipped with a Connect button and will have a Bluetooth Status LED. Usually the pairing sequence is started by holding down the Connect button until the LED starts blinking rapidly. This indicates that the device is ready for pairing.
NOTE: If you’re having trouble starting the pairing process, please refer to the user documentation that came with your device, or visit the support page for your product at support.logitech.com.
Windows
Select the version of Windows you’re running and then follow the steps to pair your device.
- Windows 7
- Windows 8
- Windows 10
Windows 7
- Open the Control Panel.
- Select Hardware and Sound.
- Select Devices and Printers.
- Select Bluetooth Devices.
- Select Add a device.
- In the list of Bluetooth devices, select the Logitech device you want to connect to and click Next.
- Follow the onscreen instructions to finish pairing.
Windows 8
- Go to Apps, then find and select Control Panel.
- Select Devices and Printers.
- Select Add a device.
- In the list of Bluetooth devices, select the Logitech device you want to connect to and select Next.
- Follow the onscreen instructions to finish pairing.
Windows 10
- Select the Windows icon, then select Settings.
- Select Devices, then Bluetooth in the left pane.
- In the list of Bluetooth devices, select the Logitech device you want to connect to and select Pair.
- Follow the onscreen instructions to finish pairing.
NOTE: It may take up to five minutes for Windows to download and enable all drivers, depending on your computer’s specifications and your internet speed. If you have not been able to connect your device, repeat the pairing steps and wait a while before you test the connection.
macOS
- Open System Preferences and click Bluetooth.
- Select the Logitech device you want to connect to from the Devices list and click Pair.
- Follow the onscreen instructions to finish pairing.
Upon pairing, the LED light on your Logitech device stops blinking and glows steady for 5 seconds. The light then turns off to save energy.
Chrome OS
- Click the status area in the lower right corner of your desktop.
- Click Bluetooth enabled or Bluetooth disabled in the pop-up menu.
NOTE: If you had to click on Bluetooth disabled, that means the Bluetooth connection on your Chrome device needs to first be enabled. - Select Manage devices… and click Add Bluetooth device.
- Select the name of the Logitech device you want to connect to from the list of available devices and click Connect.
- Follow the onscreen instructions to finish pairing.
Upon pairing, the LED light on your Logitech device stops blinking and glows steady for 5 seconds. The light then turns off to save energy.
Android
- Go to Settings and Networks and select Bluetooth.
- Select name of the Logitech device you want to connect from the list of available devices and click Pair.
- Follow the onscreen instructions to finish pairing.
Upon pairing, the LED light on the Logitech device stops blinking and glows steady for 5 seconds. The light then turns off to save energy.
iOS
- Open Settings and click Bluetooth.
- Tap on the Logitech device you want to connect to from the Other Devices list.
- The Logitech device will be listed under My Devices when paired successfully.
Upon pairing, the LED light on the Logitech device stops blinking and glows steady for 5 seconds. The light then turns off to save energy.
Unifying devices not detected after macOS 10.12.1 Sierra update
We are aware that after updating from macOS 10.12 Sierra to macOS Sierra 10.12.1, Logitech Options software does not detect supported Unifying devices on some systems. To fix this issue, unplug the Unifying receiver and then plug it back into the USB port. If Logitech Options still doesn’t detect the device, you may also need to reboot your system.
DOWNLOAD RESOURCES
- logitech K480 Bluetooth Multi-Device Keyboard [pdf] User Manual K480, Bluetooth Multi-Device Keyboard
- Read more: https://manuals.plus/logitech/k480-bluetooth-multi-device-keyboard-manual#ixzz7hukgmQQq
FAQ’S
How to connect the keyboard with my device?
Press the connect button on the keyboard, then press the connect button on your device.
How to pair the keyboard with another device?
Press the connect button on the keyboard, then press the connect button on your device.
How to switch between devices?
Press and hold Fn + F1-F3 keys for more than 3 seconds. The LED will flash quickly for 3 times. Then release Fn + F1-F3 keys, and press Fn + F1-F3 keys to switch between devices.
How to turn off the keyboard?
Press and hold Fn + F4 keys for more than 3 seconds. The LED will flash quickly for 3 times. Then release Fn + F4 keys, and press Fn + F4 keys to turn off the keyboard.
Why won’t my Logitech Bluetooth keyboard connect?
Turn the keyboard off and then back on again. Make sure the batteries in the keyboard aren’t worn out. Press the connect or reset button on your USB receiver if it has one. Press the connect or reset button on your keyboard if it has one.
Where is the pairing button on Logitech keyboard?
You may press the Easy-Switch button on your wireless keyboard to enter pairing mode. Turn on Bluetooth on the device you’re trying to connect to your Logitech keyboard. Tap Bluetooth settings for the device and select the “Add Bluetooth or other devices” option.
How do I reset my Logitech wireless keyboard?
Ensure you turn off the keyboard first, then press on the ESC key. As you still press on the key, turn the keyboard on, and after five seconds, release the ESC key. The keyboard should produce some flashlight which indicates that the reset is successful.
What do you do when your wireless keyboard stops working?
Check all of the cables are plugged in: obvious, but try it. Replace the batteries in the keyboard and/or mouse. Reconnect the devices by pressing the reconnect button on the wireless receiver, and on the keyboard and mouse.
Why does my Logitech keyboard keep disconnecting?
In most cases, the keyboard keeps disconnecting due to issues with the components (cables, ports, internal keyboard parts, etc.). Misconfigured power settings can also lead to power supply issues that result in a keyboard that doesn’t work properly.
What does flashing 3 mean on Logitech keyboard?
Remember, you have to pair them first and the k480 has three (F1 thru F3) keys that allow you to interface to three different Bluetooth types devices. Could be that your desired connecting device is no longer paired and then make sure that the Flashing F3 key is paired for your desired device.
How do I check the battery level on my Logitech keyboard?
Press and hold the FN key, then press the F12 key: If the LED glows green, the batteries are good. If the LED blinks red, the battery level is low and you should consider changing batteries. You can also turn the keyboard off then back on using the On/Off switch on top of the keyboard.
Does Logitech K480 work with smart TV?
The K480 should connect to your TV as long as it has Bluetooth input capability.
logitech K480 Bluetooth Multi-Device Keyboard
www://logitech.com/