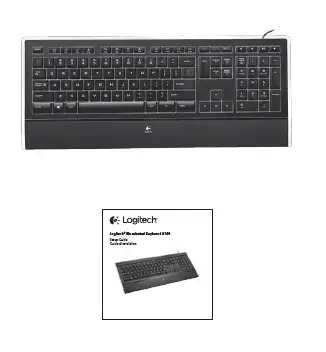
User Manual
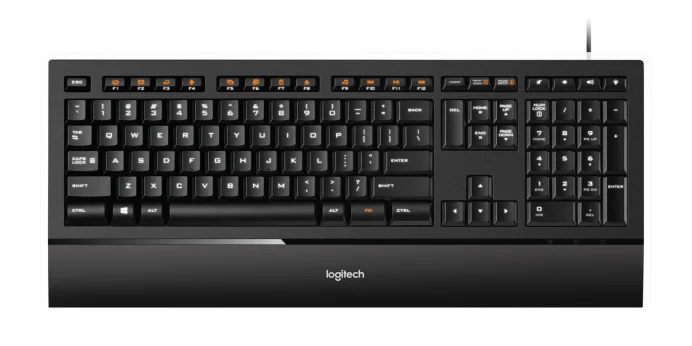
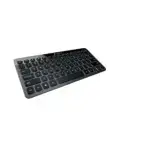
Illuminated Keyboard K740 lets you type day or night with bright illuminated keys. The natural fluidity and comfort of the PerfectStroke™ key system distributes typing force evenly across the key surfaces.
PACKAGE LIST

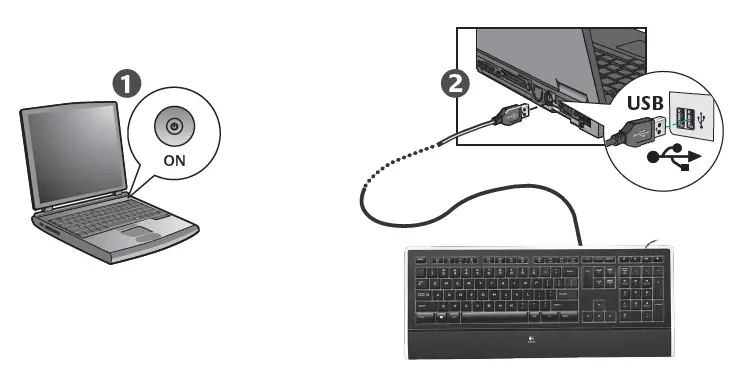
ASSEMBLE
Congratulations! You are now ready to use your keyboard.
Troubleshooting
- Plug USB cable into a different USB port on the computer.
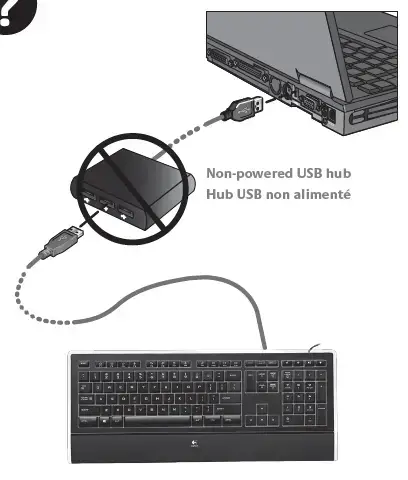
- Due to the backlight feature, this keyboard is a high-powered USB device that will only work if plugged directly into the computer or a powered USB hub.
- To enable enhanced features, install the Logitech software. To get the latest software go to www.logitech.com/support/k740.
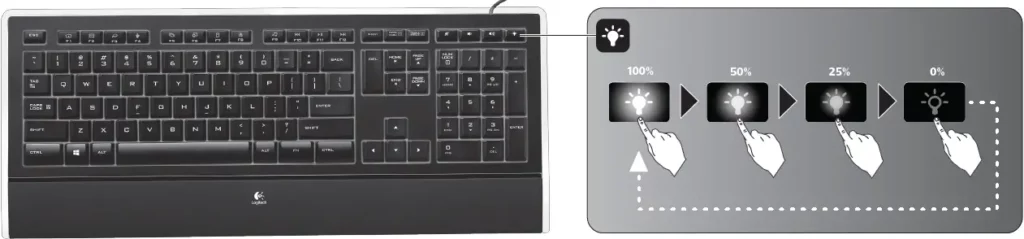
Backlight intensity control. Four steps of light intensity allow you to choose the right amount of backlight. Each press of the backlight control key provides another step.
FUNCTION KEY
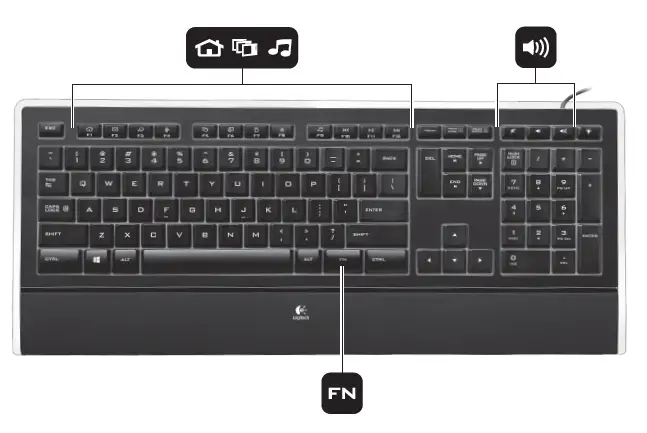
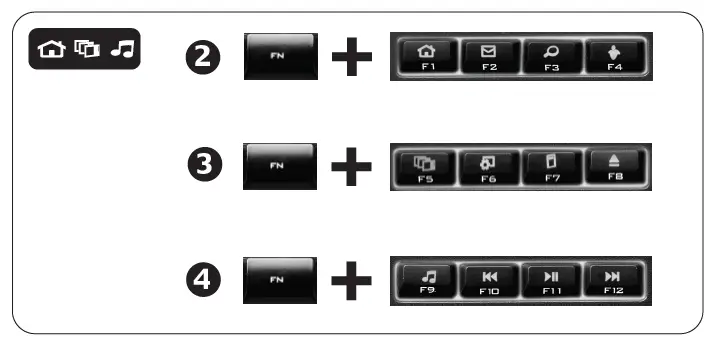
1. F-keys
User-friendly enhanced F-keys let you easily launch applications or control your music.
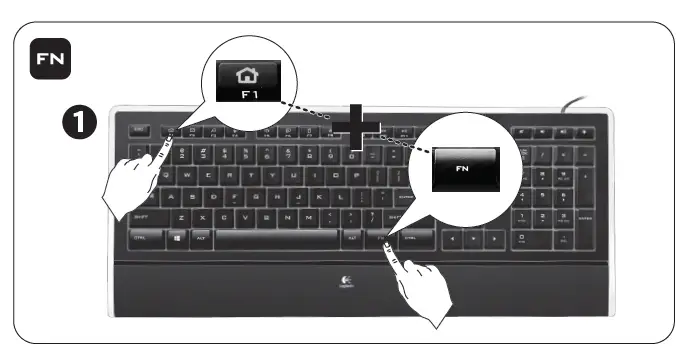
To use the enhanced functions (orange icons), press the FN key and the F-Key you want to use simultaneously.
Tip In the software settings, you can invert the FN mode if you prefer to access directly the enhanced functions without having to press the FN key.*
2. Internet zone
Instantly launch your Web applications:
FN+F1 Launches default web browser
FN+F2 Launches default e-mail application
FN+F3 Launches search engine*
FN+F4 Launches instant messaging or mail*
3. Convenience zone
Directly access convenient features, such as:
FN+F5 Switches between applications*
FN+F6 Gadgets or settings*
FN+F7 Displays on-screen calculator
FN+F8 Ejects CD
4. Media zone
Easily control your music or video playback:
FN+F9 Launches default media application
FN+F10 Previous track
FN+F11 Play/pause
FN+F12 Next track
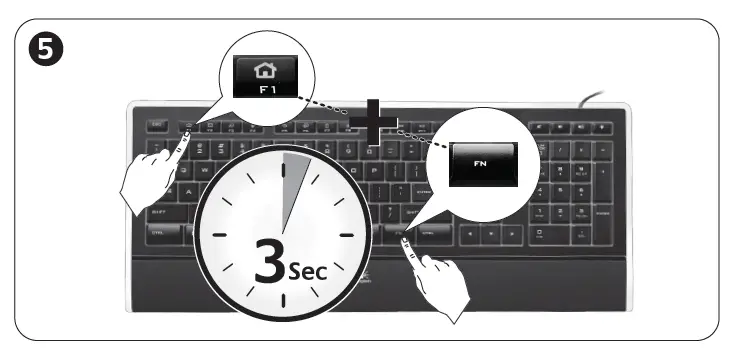
5. Software settings
In software settings, you can easily reassign an enhanced F-key (F1 to F8) to another function. Hold down for three seconds both the FN key and the F-key you want to reassign in order to launch software settings.
*Requires SetPoint™ Software (available for download at www.logitech.com/support/k740). Function can vary depending on Windows OS.
Argentina +0800 555 3284
Brasil +0800 891 4173
Canada +1-866-934-5644
Chile +1230 020 5484
Colombia 01-800-913-6668
Latin America +1 800-578-9619
Mexico 01.800.800.4500
United States +1 646-454-3200
© 2013 Logitech. All rights reserved. Logitech, the Logitech logo, and other Logitech marks are owned by Logitech and may be registered. All other trademarks are the property of their respective owners. Logitech assumes no responsibility for any errors that may appear in this manual. Information contained herein is subject to change without notice.
Specs and Details
Dimensions
Width: 17.95 in (456 mm)Height: 7.48 in (190 mm)Depth: 0.37 in (9.3 mm)Weight: 37.04 oz (1050 g)
Warranty Information
3-year limited hardware warranty
Part Number
- 920-000914
FAQ – Frequently Asked Questions
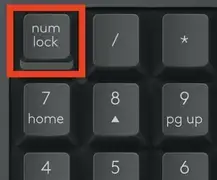
My NumPad/KeyPad is not working, what should I do?
– Make sure that the NumLock key is enabled. If pressing the key once doesn’t enable NumLock, press and hold the key for five seconds.
– Verify that the correct keyboard layout is selected in Windows Settings and that the layout matches your keyboard.
– Try enabling and disabling other toggle keys such as Caps Lock, Scroll Lock, and Insert while checking if the number keys work on different apps or programs.
– Disable Turn on Mouse Keys:
1. Open the Ease of Access Center — click the Start key, then click Control Panel > Ease of Access and then Ease of Access Center.
2. Click Make the mouse easier to use.
3. Under Control the mouse with the keyboard, uncheck Turn on Mouse Keys.
– Disable Sticky Keys, Toggle Keys & Filter Keys:
1. Open the Ease of Access Center — click the Start key, then click Control Panel > Ease of Access and then Ease of Access Center.
2. Click Make the keyboard easier to use.
3. Under Make it easier to type, make sure all checkboxes are unchecked.
– Verify the product or receiver is connected directly to the computer and not to a hub, extender, switch, or something similar.
– Make sure the keyboard drivers are updated. Click here to learn how to do this in Windows.
– Try using the device with a new or different user profile.
– Test to see if the mouse/keyboard or receiver on a different computer.
Supported operating systems for the Illuminated Keyboard K740
At the time of release, this product is supported on:
– Windows 8
– Windows 7
– Windows XP
– Windows Vista
See this product’s Downloads page for the latest software support.
Some multi-key combinations do not work on K740 keyboard
The K740 keyboard uses a matrix to let the computer know which keys are being pressed. The matrix used is optimized for desktop typing, and doesn’t support the “W + Shift + Space” key and some other multiple-key commands. This is a design limitation typical of non-gaming keyboards to avoid potential conflicts with other key combinations.
Unable to access BIOS setup with the K740 keyboard
NOTE: The K740 keyboard might not be able to access the BIOS settings on some systems. Even if you aren’t able to access the BIOS settings, you can still use the keyboard with those systems.
To access your BIOS settings with the K740 keyboard, make sure the keyboard is plugged directly and securely into a USB port on your computer.
If you still can’t access the BIOS settings, you can try using another keyboard to access BIOS to:
– Enable legacy USB support
– Update the system BIOS
NOTE: Either of these steps might let you access BIOS settings with the K740 keyboard. See your computer’s documentation for help.
K740 keyboard Caps Lock and Num Lock indicators
– Caps Lock indicators
– Num Lock indicators
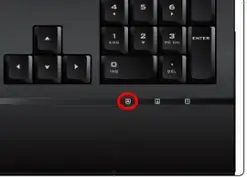
Caps Lock indicators
There is a Caps Lock indicator light below the number pad. The light indicates when Caps Lock is on.
On-screen notification
To know if Caps Lock is on, press the Caps Lock key and look at the on-screen notification.
NOTE:
You need to have Logitech SetPoint software installed in order to receive on-screen notifications. If you don’t have SetPoint installed, you can download it.
Caps Lock On — When you press the Caps Lock key and see the following “Caps Lock On” message, unless you press and hold the Shift key, all of the letters you type will appear in uppercase.
Caps Lock Off — When you press the Caps Lock key and see the following “Caps Lock Off” message, unless you use the Shift key, all of the letters you type will appear in lowercase.
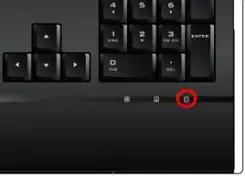
Num Lock indicator
There is a Num Lock indicator light below the number pad. The light indicates when Num Lock is on.

On-screen notification
To know if Num Lock is on, press the Num Lock key and look at the on-screen notification.
NOTE:
You need to have Logitech SetPoint software installed in order to receive on-screen notifications. If you don’t have SetPoint installed, you can download it.
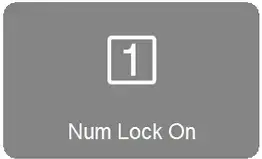
Num Lock On — When you press the Num Lock key at the top left of the keypad and see the following “Num Lock On” message, the keypad will enter numbers.
Num Lock Off — When you press the Num Lock key at the top left of your keypad and see the following “Num Lock Off” message, the keypad will move your cursor in the direction of the arrows printed on them.
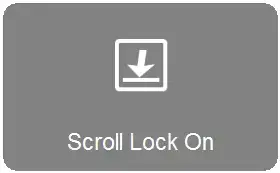
Scroll lock feature on the K740 keyboard
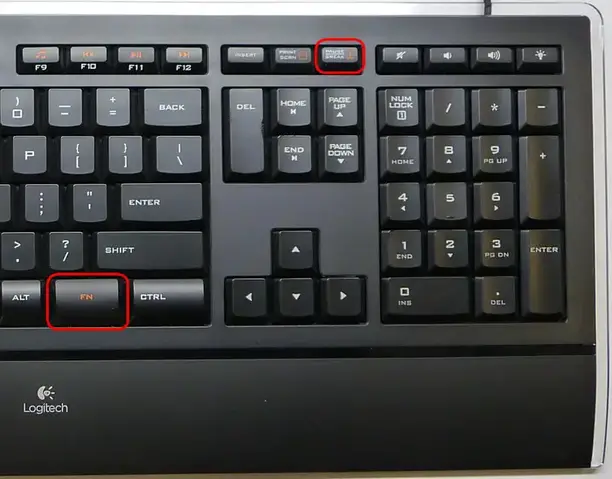
Your K740 keyboard’s Scroll Lock is on the PAUSE/BREAK key located in the top row just above the PAGE UP key.
To toggle Scroll Lock off or on, press the FN + PAUSE/BREAK key at the same time. The FN key is beneath the shift key on the right side of the keyboard.

NOTE:
If you’ve installed the Logitech SetPoint mouse and keyboard software, the confirmation message “Scroll Lock Off” or “Scroll Lock On” will be displayed for about two seconds in the lower portion of your monitor each time you toggle the key. If you don’t have SetPoint installed, you can download it.
Customize the K740 keyboard with Logitech SetPoint software
Follow these links to learn how you can customize your K740 keyboard using Logitech SetPoint mouse and keyboard software.
NOTE:
If you don’t already have SetPoint installed, you can download it.
– Programming function keys (see answer 360023254814)
– Disabling keys (see answer 360023254814)
Cleaning your Logitech device
In the event your Logitech device needs cleaning we have some recommendations:
Before You Clean
– If your device is cabled, please unplug your device from your computer first.
– If your device has user-replaceable batteries, please remove the batteries.
– Be sure to switch off your device and then wait 5-10 seconds before starting to clean.
– Don’t put cleaning liquids directly on your device.
– For devices that are not waterproof, please keep moisture to a minimum and avoid any liquid dripping or seeping into the device
– When using cleaning sprays, spray the cloth and wipe — do not spray the device directly. Never submerge the device in a liquid, cleaning or otherwise.
– Don’t use bleach, acetone/nail polish remover, strong solvents, or abrasives.
Cleaning Keyboards
– To clean the keys, use regular tap water to lightly moisten a soft, lint-free cloth and gently wipe down the keys.
– Use compressed air to remove any loose debris and dust between the keys. If you do not have compressed air available, you could also use cold-air from a hair-dryer.
– You can also use fragrance-free disinfecting wipes, fragrance-free anti-bacterial wet wipes, makeup removing tissue, or alcohol swabs containing less than 25% concentration of alcohol.
– Don’t use bleach, acetone/nail polish remover, strong solvents, or abrasives.
Cleaning Mice or Presentation Devices
– Use tap water to lightly moisten a soft, lint-free cloth and gently wipe down the device.
– Use lens cleaner to lightly moisten a soft, lint-free cloth and gently wipe down your device.
– You can also use fragrance-free disinfecting wipes, fragrance-free anti-bacterial wet wipes, makeup removing tissue, or alcohol swabs containing less than 25% concentration of alcohol.
– Don’t use bleach, acetone/nail polish remover, strong solvents, or abrasives.
Cleaning Headsets
– Plastic parts (headband, mic boom, etc.): it is recommended to use fragrance-free disinfecting wipes, fragrance-free anti-bacterial wet wipes, makeup-removing tissue, or alcohol swabs containing less than 25% concentration of alcohol.
– Leatherette earpads: it is recommended to use fragrance-free disinfecting wipes, fragrance-free anti-bacterial wet wipes, or make-up removal tissue. Alcohol wipes can be used on a limited basis.
– For the braided cable: it is recommended to use anti-bacterial wet wipes. When wiping cables and cords, grip the cord mid-way and pull towards the product. Don’t forcefully pull the cable away from the product or away from the computer.
– Don’t use bleach, acetone/nail polish remover, strong solvents, or abrasives.
Cleaning Webcams
– Use tap water to lightly moisten a soft, lint-free cloth and gently wipe down the device.
– Use lens cleaner to lightly moisten a soft, lint-free cloth and gently wipe down the webcam lens.
– Don’t use bleach, acetone/nail polish remover, strong solvents, or abrasives.
If Your Device Still Isn’t Clean
– In most cases, you can use isopropyl alcohol (rubbing alcohol) or fragrance-free anti-bacterial wipes and apply more pressure when cleaning. Before using rubbing alcohol or wipes, we suggest you test it first in an inconspicuous area to make sure it doesn’t cause discoloration or remove any printing on your device.
– If you’re still not able to get your device clean, please consider contacting us.
COVID-19
Logitech encourages users to properly sanitize their products in accordance with guidelines put out by the World Health Organization and the Centers for Disease Control guidelines.
K740 keyboard not working
If your keyboard isn’t working, there could be an issue with the USB connection.
To fix it:
– If you’re using a USB hub, try connecting the keyboard directly to a USB port on your computer instead.
– Try moving the keyboard to a different USB port on your computer.
Uninstalling Logitech SetPoint Software
To uninstall Logitech SetPoint software, first select your operating system:
– Windows XP
– Windows 7 and Vista
– Windows 8
– Windows 10
————————
Windows XP
1. Go to Add or Remove Programs:
– Default Start Menu: Start > Control Panel > Add or Remove Programs
– Classic Start Menu: Start > Settings > Control Panel > Add or Remove Programs
2. Select “Logitech SetPoint” from the list.

3. Click the Remove button.
4. Follow the on-screen instructions to remove SetPoint from your system.
NOTE: You may need to restart your computer to finish uninstalling SetPoint.
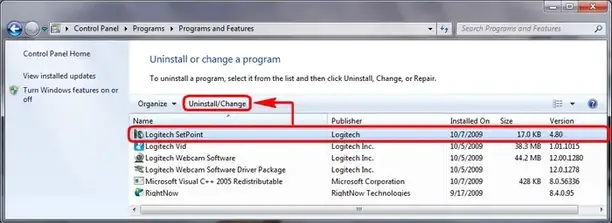
Windows 7 and Vista
1. Go to Uninstall a program:
– Default Start Menu: Start > Control Panel > Uninstall a program
– Classic Start Menu: Start > Settings > Control Panel > Programs and Features
2. Select “Logitech SetPoint” from the list.
3. Click Uninstall.
4. Follow the on-screen instructions to remove SetPoint from your system.
NOTE: You may need to restart your computer to finish uninstalling SetPoint.
Windows 8
1. Go to Uninstall a program:
– Start screen > Right-click on Mouse and Keyboard Settings > Uninstall
– Start screen > Right-click on empty space and select All apps > Control Panel > Uninstall a program
2. Select “Logitech SetPoint” from the list.
3. Click Uninstall.
4. Follow the on-screen instructions to remove SetPoint from your system.
NOTE: You may need to restart your computer to finish uninstalling SetPoint.
Windows 10
1. Go to Programs and Features:
– Right-click on the Windows logo on the bottom left of the window, then click Programs and Features
– Select Logitech SetPoint from the list of programs.
2. Click on Uninstall and follow the on-screen instructions to uninstall Setpoint.
NOTE: You may need to restart your computer to finish uninstalling.
Mouse and keyboard compatibility with USB hubs and KVM switches
We do not support the use of third-party devices with our mice and keyboards. They can interfere with communication between a mouse or keyboard and the computer.
Unsupported third-party devices include:
– KVM switch boxes
– Port replicators
– Docking stations
– USB hubs
NOTE: The manufacturers of these third-party devices implement keyboard and mouse support in different ways. There is currently no industry standard.
Unable to customize my mouse or keyboard in SetPoint
Normally, you should be able to customize your mouse or keyboard settings in the Logitech SetPoint mouse and keyboard software on the My Mouse / My Keyboard tab.
Without the My Mouse / My Keyboard tab in SetPoint, only the Tools tab will display, as shown here:

If the My Mouse / My Keyboard tab isn’t displayed, you’ll need to uninstall and re-install SetPoint following the instructions below.
To uninstall and re-install SetPoint:
– Windows XP
– Windows Vista and Windows 7
– Windows 8
————————————-
Windows XP
1. Go to Add or Remove Programs.
– Default Start Menu view: Start > Control Panel > Add/Remove Programs
– Classic Start Menu view: Start > Settings > Control Panel > Add/Remove Programs
2. Select Logitech SetPoint from the list of programs displayed.
3. Click the Change / Remove button and follow the on-screen instructions to uninstall SetPoint.
4. Download and install the latest version of SetPoint from the Web Downloads Page.
NOTE: You may need to restart your system after SetPoint has been installed.
5. After your system restarts, open SetPoint to verify that the My Mouse / My Keyboard tab is available.
If the My Mouse / My Keyboard tab is still missing:
1. Right-click on the SetPoint icon in the system tray (at the bottom right of your screen) and select Exit.
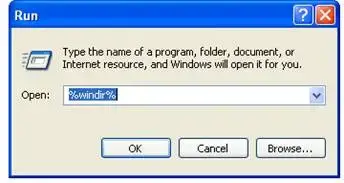
2. Click the Windows Start button.
3. Choose Run.
4. Type %windir% in the Run dialog box.
5. Double-click the System32 folder to open it.
6. Double-click the drivers folder.
7. Rename the file wdf01000.sys to wdf01000.bak.
8. Re-install SetPoint.
IMPORTANT: Before you restart your system, make sure the wdf01000.sys file is present in the drivers folders. If you restart without this file, it may prevent some of your hardware — including mice and keyboards — from working properly.
9. If the wdf01000.sys file isn’t in the drivers folder, change wdf01000.bak back to wdf01000.sys.
10. Restart the computer.
11. After your system restarts, open SetPoint to verify that the My Mouse / My Keyboard tab is present.
Windows Vista and Windows 7
1. Go to Uninstall a program.
– Default Start Menu view: Start > Control Panel > Uninstall a program
– Classic Start Menu view: Start > Settings > Control Panel > Programs and Features
2. Select Logitech SetPoint from the list of programs displayed.
3. Click the Uninstall button highlighted above and follow the on-screen instructions to uninstall SetPoint.
4. Download and install the latest version of SetPoint from the Web Download page.
5. After your system restarts, open SetPoint to make sure the My Mouse / My Keyboard tab is available.
Windows 8
1. Go to Uninstall a program.
– Start screen > Right-click on Mouse and Keyboard Settings > Uninstall
– Start screen > Right-click on empty space and select All apps > Control Panel > Uninstall a program
2. Select “Logitech SetPoint” from the list.
3. Click Uninstall.
4. Follow the on-screen instructions to remove SetPoint from your system.
NOTE: You may need to restart your computer to finish uninstalling SetPoint.
Num Lock disabled after Windows 10 starts
By default, the Num Lock on your keyboard is disabled each time Windows 10 boots up after a shutdown or restart.
To configure your operating system so that Num Lock stays on during startup, please contact professional support for your operating system. This requires advanced changes that need to be done under the guidance of a professional technician.