logitech K800 Wireless Illuminated Keyboard

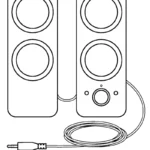
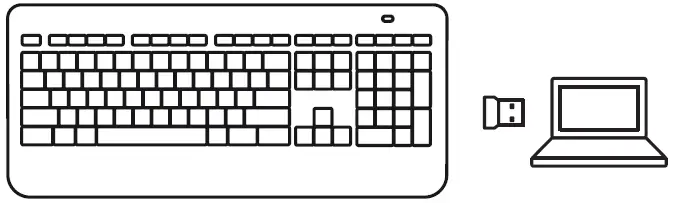
WHAT’S IN THE BOX
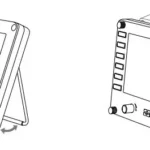
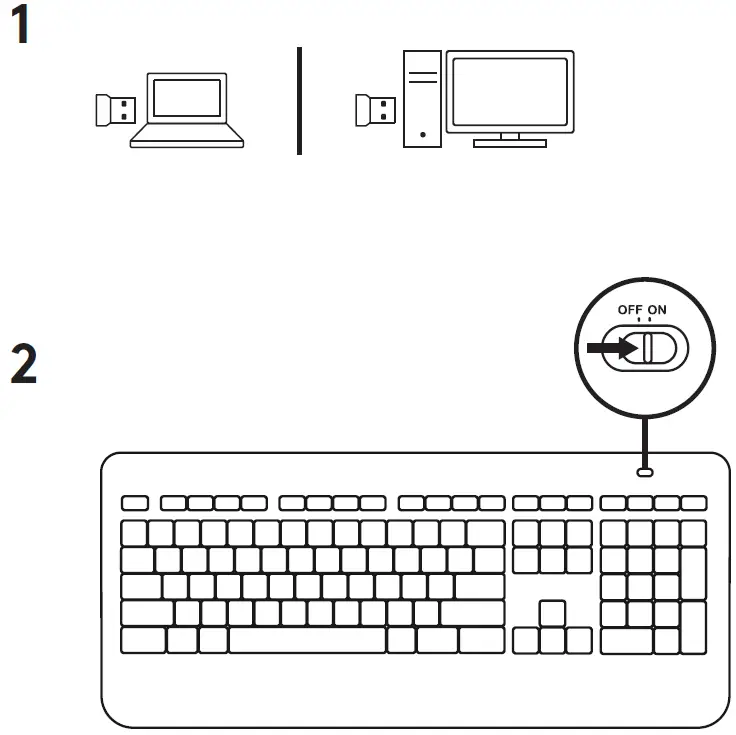
SET UP
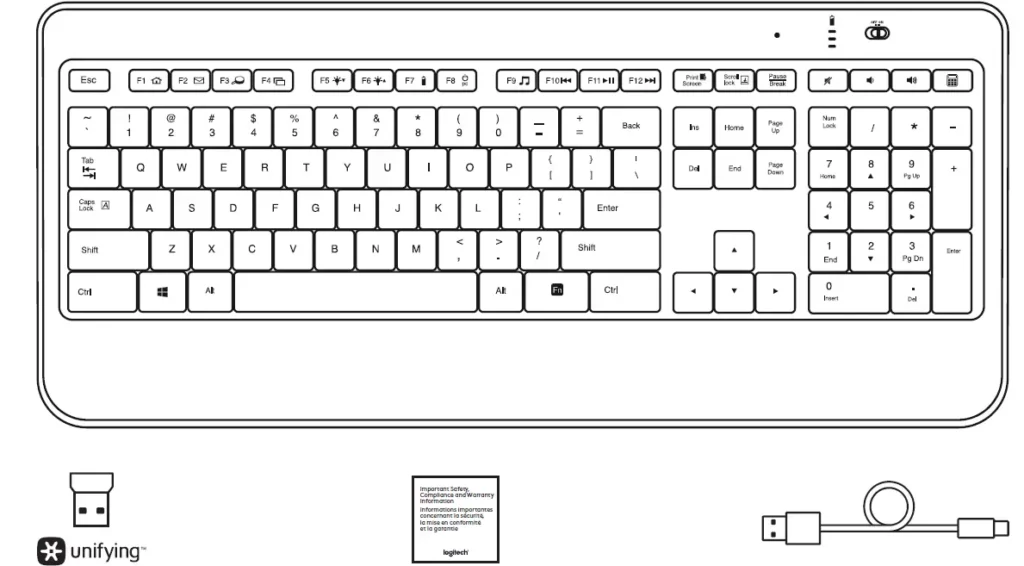
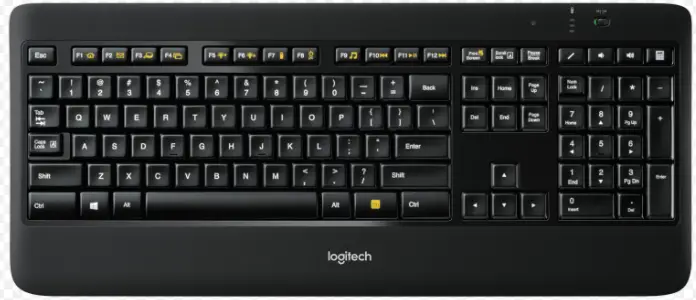
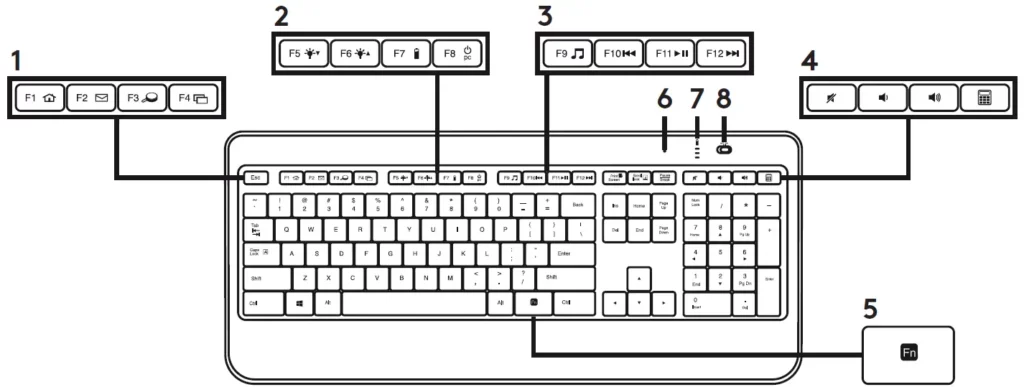
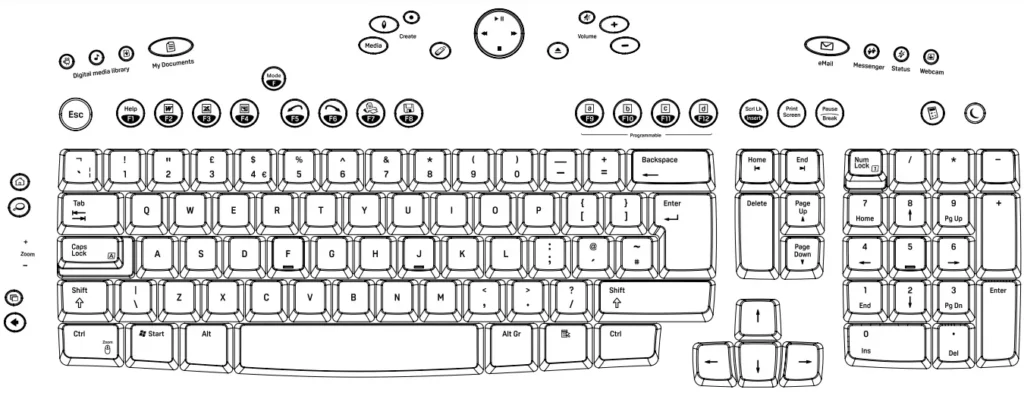
KEYBOARD FEATURES

- Application zone
Fn+ F1 Launch Internet browser
Fn+ F2 Launch e-mail application
Fn+ F3 Launch Search
Fn+ F4 Flip - Convenience zone
Fn+ F5 Backlight down by 25%
Fn+ F6 Backlight up by 25%
Fn+ F7 Battery check
Fn+ F8 Sleep mode - Multimedia navigation zone
Fn+ F9 Launch media
Fn+ F10 Previous track
Fn+ F11 Play/Pause
Fn+ F12 Next track - Multimedia volume zone Mute
Volume down
Volume up
Calculator - Fn key
- Automatic light sensor (ALS)
- Battery status indicator
- Keyboard power switch.
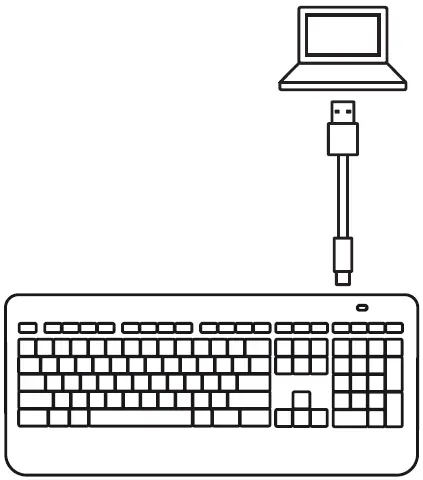
RECHARGING
Recharging the keyboard
Typically, you can expect about 10 days of battery life before you will need to recharge the keyboard battery.* If the backlighting level is set to 100%, you have about 15 hours of battery life.
To recharge the keyboard, connect it to your computer using the USB recharging cable. A full battery recharge takes about 5 hours and only 3 hours if the keyboard has been switched off.
Battery life varies with usage, backlighting level, and computing conditions. Heavy usage usually results in shorter battery life.
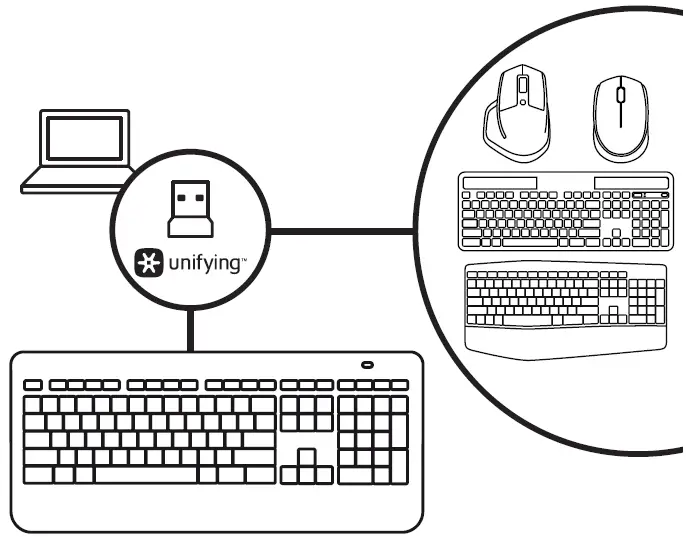
UNIFYING
Logitech® Unifying technology connects up to six compatible Logitech mice and keyboards to the same receiver, using only one USB port for multiple devices.
To learn more, visit: www.logitech.com/support/unifying
TROUBLESHOOTING
Keyboard not working?
- Slide the keyboard’s Off/On switch to Off and then On. The keyboard’s battery status indicator LEDs should light up.
- Confirm that the keyboard is charged. The battery status indicator is red when the battery is low.
- Try plugging the Unifying receiver into another USB port.
- Move the Unifying receiver closer to the keyboard.
- Try reconnecting the keyboard and Unifying receiver using the Logitech Unifying software (see the Unifying section).
- Restart the computer.
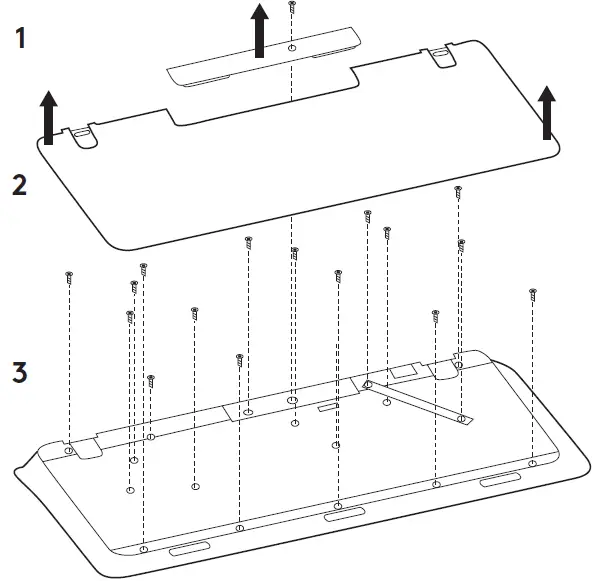
BATTERY REMOVAL INFORMATION
- Remove 1 screw and battery door.
- Remove bottom panel.
- Remove 17 screws.
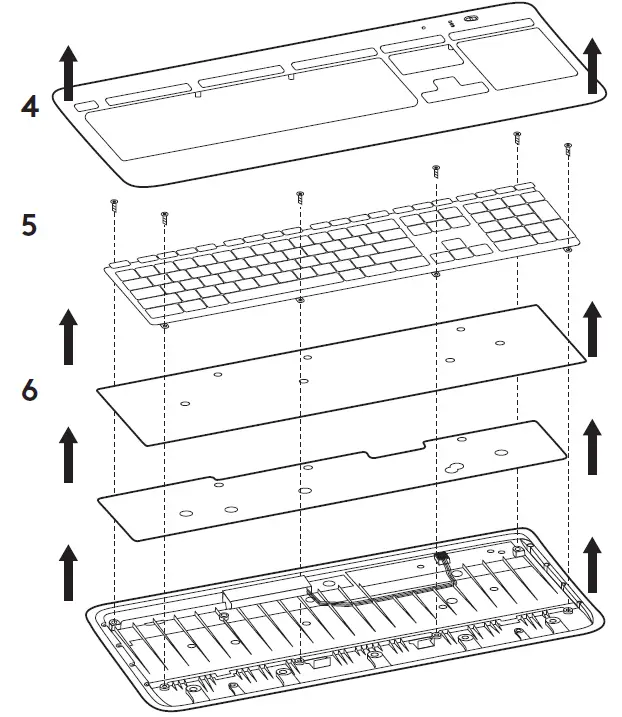
- Remove top case.
- Remove 6 screws.
- Remove keyframe, light guide panel and metal plate.
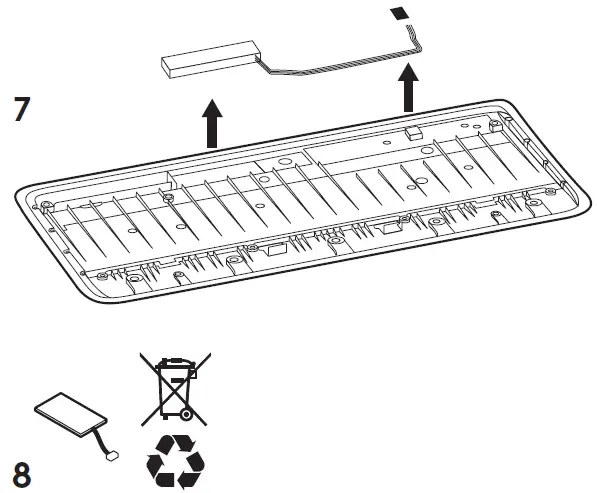
- Remove tape, then disconnect the battery cables from the main circuit board, remove battery from the bottom case.
- Dispose of the battery and product according to local laws.
© 2020 Logitech, Logi and the Logitech Logo are trademarks or registered trademarks of Logitech Europe S.A. and/or its affiliates in the U.S. and other countries. Logitech assumes no responsibility for any errors that may appear in this manual. Information contained herein is subject to change without notice.
Specs and Details
Dimensions
Keyboard
- Width: 19.17 in (487 mm)
- Height: 7.68 in (195 mm)
- Depth: 1.06 in (27 mm)
- Weight (without batteries): 26.46 oz (750 g)
USB Receiver
- Width: 0.57 in (14.4 mm)
- Height: 0.74 in (18.7 mm)
- Depth: 0.24 in (6.1 mm)
- Weight: 0.06 oz (1.8 g)
Warranty Information
3-year limited hardware warranty
Part Number
- 920-002359
California Warnings
-
WARNING: Proposition 65 Warning
FAQ – Frequently Asked Questions
My NumPad/KeyPad is not working, what should I do?
– Make sure that the NumLock key is enabled. If pressing the key once doesn’t enable NumLock, press and hold the key for five seconds.
– Verify that the correct keyboard layout is selected in Windows Settings and that the layout matches your keyboard.
– Try enabling and disabling other toggle keys such as Caps Lock, Scroll Lock, and Insert while checking if the number keys work on different apps or programs.
– Disable Turn on Mouse Keys:
1. Open the Ease of Access Center — click the Start key, then click Control Panel > Ease of Access and then Ease of Access Center.
2. Click Make the mouse easier to use.
3. Under Control the mouse with the keyboard, uncheck Turn on Mouse Keys.
– Disable Sticky Keys, Toggle Keys & Filter Keys:
1. Open the Ease of Access Center — click the Start key, then click Control Panel > Ease of Access and then Ease of Access Center.
2. Click Make the keyboard easier to use.
3. Under Make it easier to type, make sure all checkboxes are unchecked.
Verify the product or receiver is connected directly to the computer and not to a hub, extender, switch, or something similar.
– Make sure the keyboard drivers are updated. Click here to learn how to do this in Windows.
– Try using the device with a new or different user profile.
– Test to see if the mouse/keyboard or receiver on a different computer.
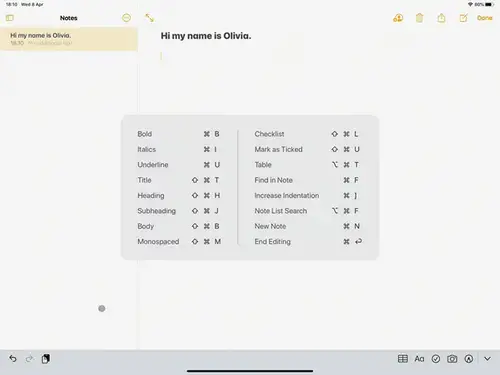
External keyboard shortcuts for iPadOS
You can view the available keyboard shortcuts for your external keyboard. Press and hold the Command key on your keyboard to display the shortcuts.
Change modifer keys of external keyboard on iPadOS
You can change the position of your modifier keys at any time. Here’s how:
– Go to Settings > General > Keyboard > Hardware keyboard > Modifier Keys.
Toggle between multiple languages on iPadOS with an external keyboard
If you have more than one keyboard language on your iPad, you can move from one to the other using your external keyboard. Here’s how:
– Press Shift + Control + Space bar.
– Repeat the combination to move between each language.
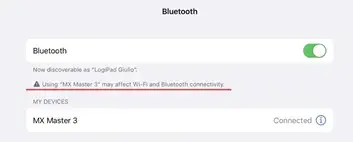
Warning message when Logitech device is connected to iPadOS
When you connect your Logitech device, you might see a warning message.
If this happens, make sure to connect only the devices you’ll be using. The more devices that are connected, the more interference you might have between them.
If you are having connectivity issues, disconnect any Bluetooth accessories that you’re not using. To disconnect a device:
– In Settings > Bluetooth, tap the information button next to the device name, then tap Disconnect.
Cleaning your Logitech device
In the event your Logitech device needs cleaning we have some recommendations:
Before You Clean
– If your device is cabled, please unplug your device from your computer first.
– If your device has user-replaceable batteries, please remove the batteries.
Be sure to switch off your device and then wait 5-10 seconds before starting to clean.
– Don’t put cleaning liquids directly on your device.
– For devices that are not waterproof, please keep moisture to a minimum and avoid any liquid dripping or seeping into the device
– When using cleaning sprays, spray the cloth and wipe — do not spray the device directly. Never submerge the device in a liquid, cleaning or otherwise.
– Don’t use bleach, acetone/nail polish remover, strong solvents, or abrasives.
Cleaning Keyboards
– To clean the keys, use regular tap water to lightly moisten a soft, lint-free cloth and gently wipe down the keys.
– Use compressed air to remove any loose debris and dust between the keys. If you do not have compressed air available, you could also use cold-air from a hair-dryer.
– You can also use fragrance-free disinfecting wipes, fragrance-free anti-bacterial wet wipes, makeup removing tissue, or alcohol swabs containing less than 25% concentration of alcohol.
– Don’t use bleach, acetone/nail polish remover, strong solvents, or abrasives.
Cleaning Mice or Presentation Devices
– Use tap water to lightly moisten a soft, lint-free cloth and gently wipe down the device.
– Use lens cleaner to lightly moisten a soft, lint-free cloth and gently wipe down your device.
– You can also use fragrance-free disinfecting wipes, fragrance-free anti-bacterial wet wipes, makeup removing tissue, or alcohol swabs containing less than 25% concentration of alcohol.
– Don’t use bleach, acetone/nail polish remover, strong solvents, or abrasives.
Cleaning Headsets
– Plastic parts (headband, mic boom, etc.): it is recommended to use fragrance-free disinfecting wipes, fragrance-free anti-bacterial wet wipes, makeup-removing tissue, or alcohol swabs containing less than 25% concentration of alcohol.
– Leatherette earpads: it is recommended to use fragrance-free disinfecting wipes, fragrance-free anti-bacterial wet wipes, or make-up removal tissue. Alcohol wipes can be used on a limited basis.
– For the braided cable: it is recommended to use anti-bacterial wet wipes. When wiping cables and cords, grip the cord mid-way and pull towards the product. Don’t forcefully pull the cable away from the product or away from the computer.
– Don’t use bleach, acetone/nail polish remover, strong solvents, or abrasives.
Cleaning Webcams
– Use tap water to lightly moisten a soft, lint-free cloth and gently wipe down the device.
– Use lens cleaner to lightly moisten a soft, lint-free cloth and gently wipe down the webcam lens.
– Don’t use bleach, acetone/nail polish remover, strong solvents, or abrasives.
If Your Device Still Isn’t Clean
– In most cases, you can use isopropyl alcohol (rubbing alcohol) or fragrance-free anti-bacterial wipes and apply more pressure when cleaning. Before using rubbing alcohol or wipes, we suggest you test it first in an inconspicuous area to make sure it doesn’t cause discoloration or remove any printing on your device.
– If you’re still not able to get your device clean, please consider contacting us.
COVID-19
Logitech encourages users to properly sanitize their products in accordance with guidelines put out by the World Health Organization and the Centers for Disease Control guidelines.
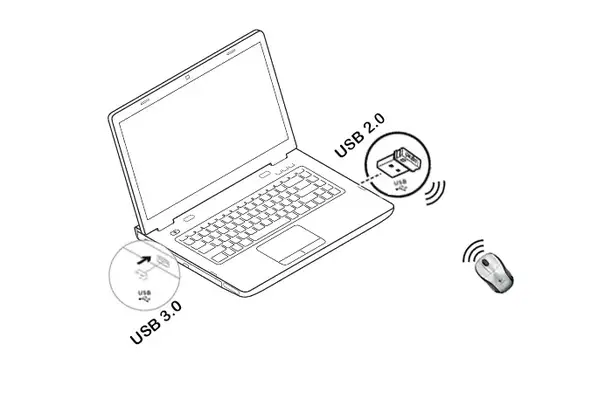
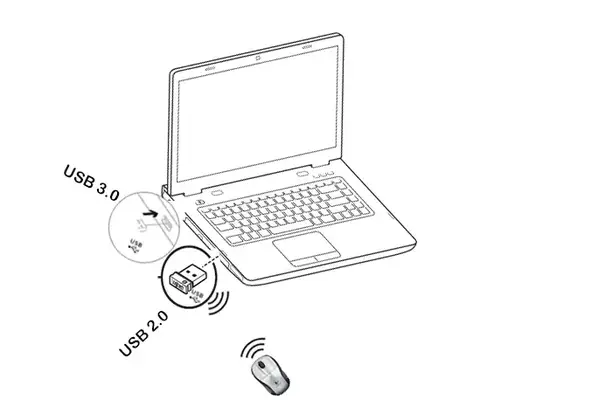
Wireless product not working properly when also using a USB 3.0 device
When using a USB 2.0 2.4GHz wireless peripheral device (such as a mouse, keyboard, or headphones) with a PC that also has a USB 3.0 peripheral device plugged in, you may experience erratic operation caused by interference. This is especially likely to happen when using USB 3.0 remote hard drives or flash drives.
This interference may result in:
– Delayed response to mouse or keyboard inputs
– Missing keyboard characters or mouse commands
– Decreased operating distance between the USB 2.0 wireless device and its receiver
There are some techniques that can help early adopters of USB 3.0 to mitigate potential problems with their existing 2.4GHz wireless devices:
– If your PC has multiple USB 2.0 connectors available, separate your USB 3.0 and USB 2.0 receivers by as much distance as possible. For example, if your PC has a choice of USB 2.0 connectors, use the one on the opposite side of the PC from the USB 3.0 connector.
– Position your USB 2.0 receiver as close as possible to your wireless peripheral (mouse, keyboard, headphones, etc.).
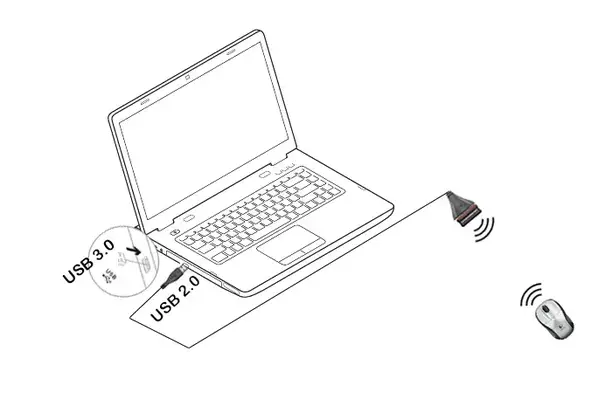
– Use a standard, USB-extender cable to position your USB 2.0 wireless receiver as far away as possible from your USB 3.0 connector.
A USB-extender cable is available for Logitech customers who are experiencing this problem (click here for more information).
NOTE: A USB 3.0 connector sometimes referred to as Super Speed USB or SS, normally has a blue plastic insert in the connector. Unlike a USB 2.0 connector which has 4 pins within the connector, a USB 3.0 connector has 9 pins.
Move your USB 2.0 wireless receiver to the opposite side of your computer:
Make sure your USB 2.0 wireless receiver is in the USB 2.0 connector closest to your wireless peripheral:
Use a USB extended cable to position your wireless receiver as far away from your USB 3.0 peripheral as possible:
Windows 8 and Windows 10 product support and device compatibility
To check if your Logitech product works with Windows 8 or Windows 10, first select the appropriate product category from the list below.
– Mice and keyboards
– Tablet and laptop accessories
– Gaming products
– Harmony remotes
– Speakers
– Headphones and headsets
– Smart radios
– Squeezebox network music players
– Alert security cameras
– WiLife security cameras
– Webcams
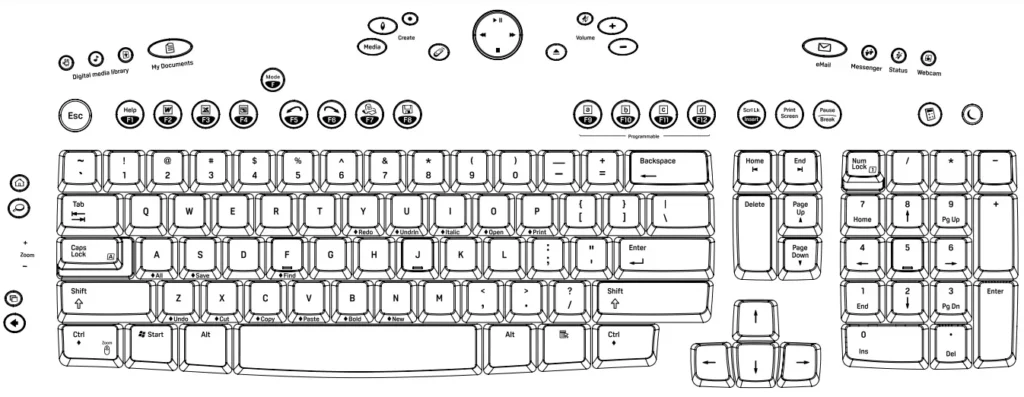
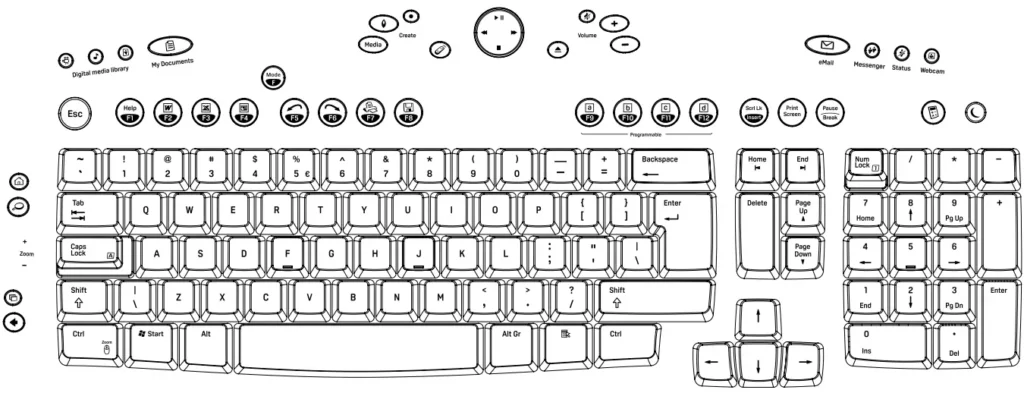
US, US International and United Kingdom keyboard layouts
See the following for generic English-language keyboard layouts:
– US
– US International
– United Kingdom
—————————-
US
US International
United Kingdom
My Unifying mouse or keyboard wakes the computer even when it is set not to
Symptom
After disabling the ability to wake-up the system in Windows Device Manager, the Unifying mouse or keyboard still brings the system out of sleep mode.
Solution
Even if you bought a mouse-only or keyboard-only product, the Unifying receiver that came with it still enumerates for both the mouse and keyboard interfaces.
Example
If you have two mice attached, then you would need to uncheck the “Allow this device to wake the computer” option for both mice plus a keyboard in the Windows Device Manager.
Use the process below to identify and configure the Unifying devices to not wake up the system in Windows Device Manager.
Changing wake-up settings in the Device Manager
To change the wake-up settings in Windows Device Manager, you’ll need to launch it through Computer Management and then make your selections. Here’s how:
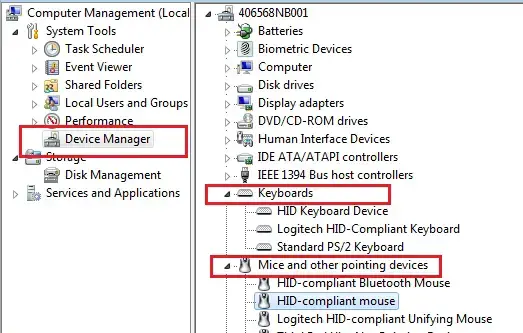
1. Click Start, right-click Computer, and then click Manage.
2. Click Device Manager in the navigation pane on the left.
3. Select and expand either the “Keyboards” or “Mice and other pointing devices” category.
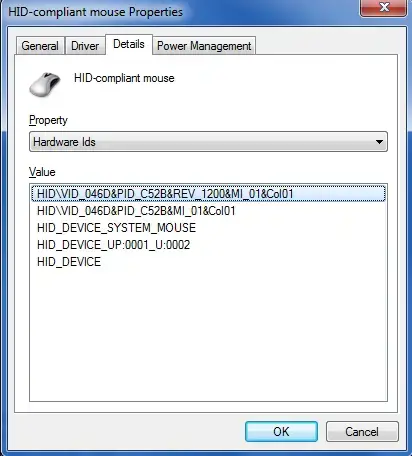
4. Right-click on the first entry and go to Properties > Details tab > Hardware IDs under the Property section.
5. Make sure the Value section contains: HIDVID_046D&PID_C52B. If it doesn’t, click Cancel and open the next mouse or keyboard entry in the list.
6. Select the “Power Management” tab and uncheck the “Allow this device to wake the computer” check box.
7. Repeat the same steps for all entries in both the “Keyboards” and “Mice and other pointing devices” categories.
Customizing my K800 keyboard with Logitech SetPoint Software
This tutorial shows you how to use these features in the Logitech SetPoint Mouse and Keyboard Software:
– Customizing programmable keys
– Programming function keys
– Checking battery status
– Disabling keys
– Using the Unifying Software
– Keyboard illumination settings
Customizing programmable keys:
To assign keystrokes to one key or change key assignments:
1. Launch SetPoint (Start > Programs > Logitech > Mouse and Keyboard > Mouse and Keyboard Settings).
NOTE: If you don’t have SetPoint installed, you can download it from the K800 Downloads Page.
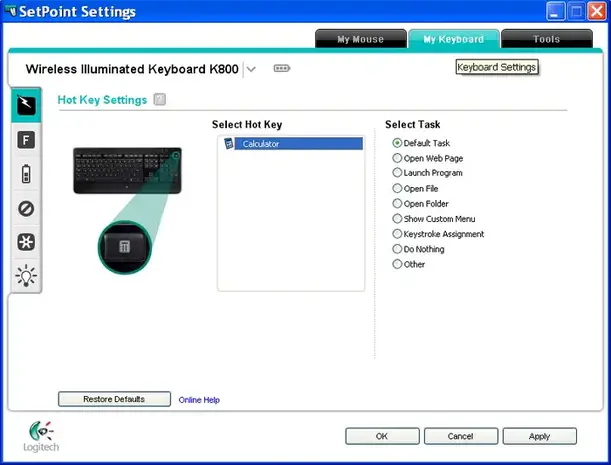
2. Click the My Keyboard tab at the top of the SetPoint Settings window.
NOTE: If you have more than one Logitech keyboard and the K800 isn’t currently displayed, click the down-arrow icon next to the current product name and select Wireless Illuminated Keyboard K800 from the drop-down menu that displays.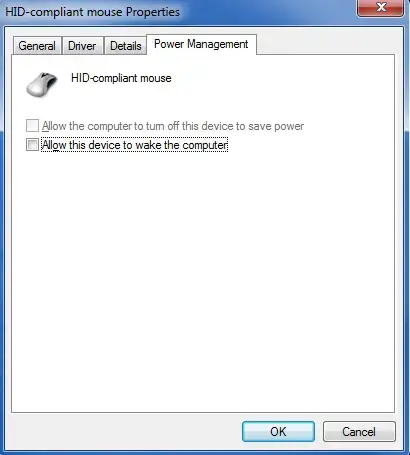
3. Choose the hot key you want to customize in the Select Hot Key field,
NOTE: If the Hot Key Settings screen isn’t showing, click the lightning-bolt.icon on the left toolbar to display it.
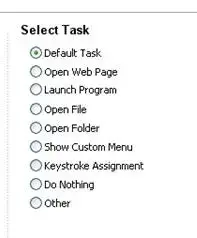
4. Choose the task you want to assign from the Select Task list,
NOTE: You can click the “?” icon next to Hot Key Settings at the top for detailed descriptions of these options.
5. Click Apply to save your settings and then OK to close SetPoint.
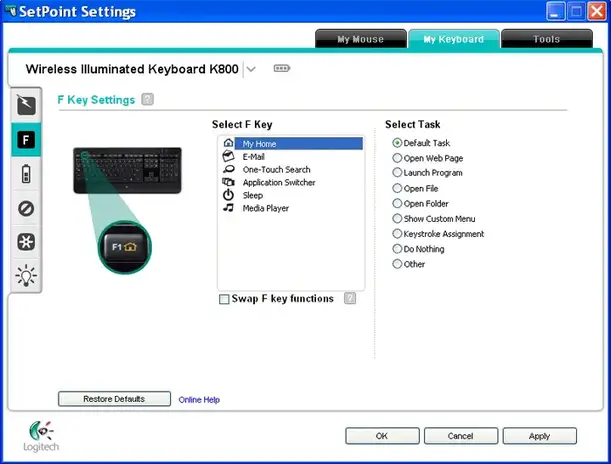
Programming function keys
The function keys, also known as F-keys, are the keys labeled F1 through F12 above the number keys on your K800. Like the programmable keys, these keys can also be programmed to perform certain functions.
NOTE: To use a function key, press the FN key (to the right of the spacebar and Alt key) at the same time as the function key you want to program.
To program a function key:
1. Launch SetPoint (Start > Programs > Logitech > Mouse and Keyboard > Mouse and Keyboard Settings).
NOTE: If you don’t have SetPoint installed, you can download it from the K800 Downloads Page.
2. Click the My Keyboard tab at the top of the SetPoint Settings window.
NOTE: If you have more than one Logitech keyboard and the K800 isn’t currently displayed, click the down-arrow icon next to the current product name and select Wireless Illuminated Keyboard K800 from the drop-down menu that displays.
3. Click the “F” icon on the left toolbar to display the F Key Settings screen
4. In the Select F Key field, choose the function key you want to customize.
NOTE: The pictures in the list match those shown above the numbers on the function keys. For example: My Home is F1.
5. Choose the task you want to assign to the chosen function key from the Select Task list.
NOTE: You can click the “?” icon by F Key Settings at the top for detailed descriptions of these options
6. Click Apply to save your settings and then OK to close SetPoint.
If you prefer, you can make these programmed functions happen without having to hold down the FN key when you press an F-key. (Instead, you’ll have to hold down the FN key for the default F-key functions.) To make this change, select the Swap F key functions check box shown above
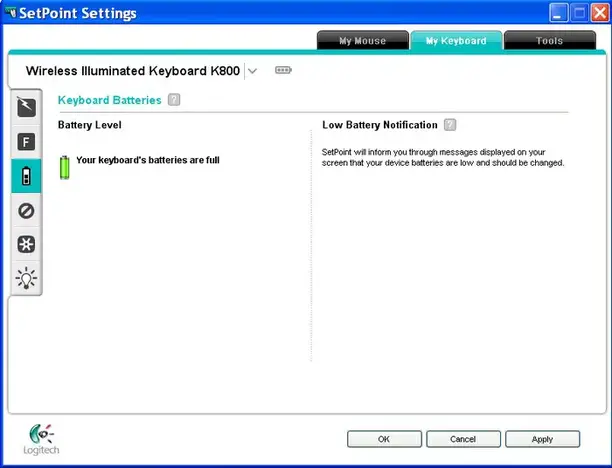
Checking battery status
To check the battery status of your keyboard:
1. Launch SetPoint (Start > Programs > Logitech > Mouse and Keyboard > Mouse and Keyboard Settings).
NOTE: If you don’t have SetPoint installed, you can download it from the K800 Downloads Page.
2. Click the My Keyboard tab at the top of the SetPoint Settings window.
NOTE: If you have more than one Logitech keyboard and the K800 isn’t currently displayed, click the down-arrow icon next to the current product name and select Wireless Illuminated Keyboard K800 from the drop-down menu that displays.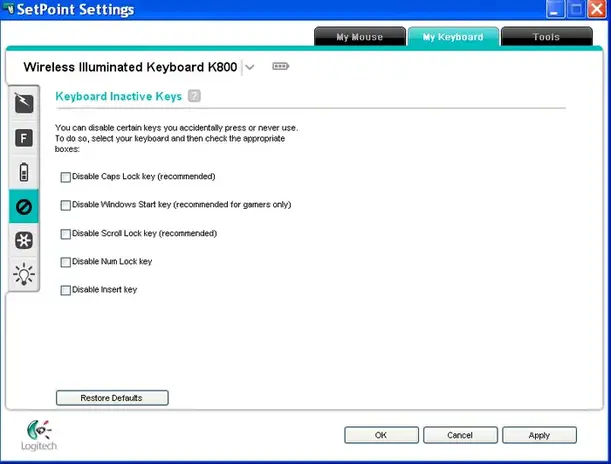
3. Click the battery icon on the left toolbar to display the Keyboard Batteries screen and check your battery status.
4. Click OK to exit SetPoint.
Disabling keys
To disable keys you don’t use:
1. Launch SetPoint (Start > Programs > Logitech > Mouse and Keyboard > Mouse and Keyboard Settings).
NOTE: If you don’t have SetPoint installed, you can download it from the K800 Downloads Page.
2. Click the My Keyboard tab at the top of the SetPoint Settings window.
NOTE: If you have more than one Logitech keyboard and the K800 isn’t currently displayed, click the down-arrow icon next to the current product name and select Wireless Illuminated Keyboard K800 from the drop-down menu that displays.
3. Click the disabling icon on the left toolbar to display the Keyboard Inactive Keys screen.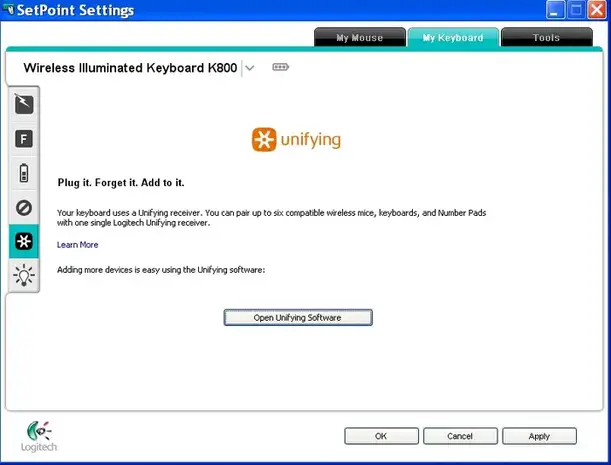
4. Select the checkbox next to any key you want to disable.
NOTE: You can click the “?” icon next to Keyboard Inactive Keys at the top for detailed descriptions of these options.
5. Click Apply to save your settings and then OK to exit SetPoint.
Using the Unifying Software
Your K800 ships with Logitech Unifying Software. This lets you use up to six compatible Logitech products with a single Unifying USB Receiver. With the Unifying software you can:
– Pair and un-pair Unifying devices
– Update software and firmware
– Create report logs
To launch the Unifying software:
1. Launch SetPoint (Start > Programs > Logitech > Mouse and Keyboard > Mouse and Keyboard Settings).
NOTE: If you don’t have SetPoint installed, you can download it from the K800 Downloads Page.
2. Click the My Keyboard tab at the top of the SetPoint Settings window.
NOTE: If you have more than one Logitech keyboard and the K800 isn’t currently displayed, click the down-arrow icon next to the current product name and select Wireless Illuminated Keyboard K800 from the drop-down menu that displays.
3. Click the Unifying icon on the left toolbar to display the Unifying tab.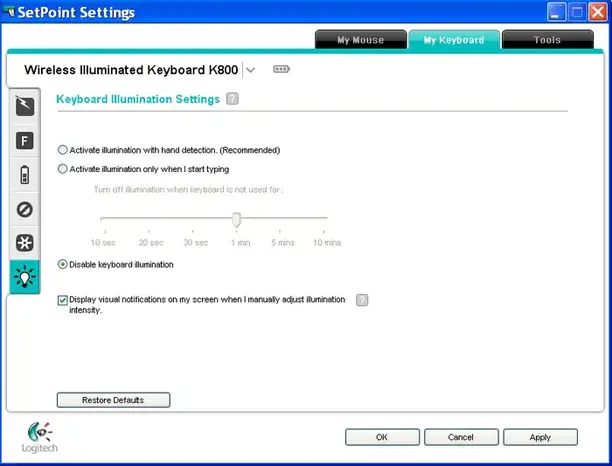
4. Click the Open Unifying Software button to launch the software.
To pair your Unifying receiver with more than one Unifying device. follow the on-screen instructions given in the Logitech Unifying Software window. To use the other features of the Unifying software, click the Advanced button.
Keyboard illumination settings
To change the keyboard illumination settings:
1. Launch SetPoint (Start > Programs > Logitech > Mouse and Keyboard > Mouse and Keyboard Settings).
NOTE: If you don’t have SetPoint installed, you can download it from the K800 Downloads Page.
2. Click the My Keyboard tab at the top of the SetPoint Settings window.
NOTE: If you have more than one Logitech keyboard and the K800 isn’t currently displayed, click the down-arrow icon next to the current product name and select Wireless Illuminated Keyboard K800 from the drop-down menu that displays.
3. Click the light-bulb icon on the left toolbar to display the Keyboard Illumination Settings screen.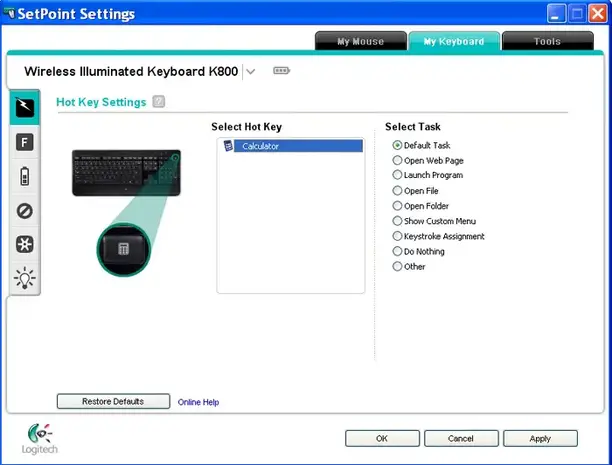
4. Select your settings and then click Apply to save them.
NOTE: You can click the “?” icon at the top for detailed descriptions of these settings.
5. Click OK to exit SetPoint.
My K800 hotkeys do not work as programmed
To verify your keyboard hot key assignments:
1. Launch SetPoint (Start > Programs > Logitech > Mouse and Keyboard > Mouse and Keyboard Settings).
NOTE: If you don’t have SetPoint installed, you can download it from the K800 Downloads Page.
2. Click the My Keyboard tab at the top of the SetPoint Settings window.
NOTE: If you have more than one Logitech keyboard and the K800 isn’t currently displayed, click the down-arrow icon next to the current product name and select Wireless Illuminated Keyboard K800 from the drop-down menu that displays
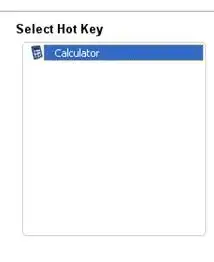
3. Choose the key you want to customize in the Select Hot Key field
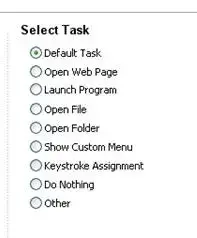
4. Choose the task you want to assign from the Select Task list.
NOTE: You can click the “?” icon next to Hot Key Settings at the top for detailed descriptions of these options.
5. Click Apply to save your settings and then OK to close SetPoint.
My K800 cannot be customized using Logitech software (SetPoint)
Normally, you should be able to customize your K800 settings in the Logitech SetPoint Mouse and Keyboard Software using the My Keyboard tab. If this tab isn’t displayed, you’ll need to re-install SetPoint.
NOTE: Your keyboard will display in SetPoint as Wireless Illuminated Keyboard K800. If you have more than one Logitech keyboard and the K800 isn’t currently displayed, click the down arrow next to the current product name and select the K800 from the drop-down menu that displays.
SetPoint with My Keyboard Tab
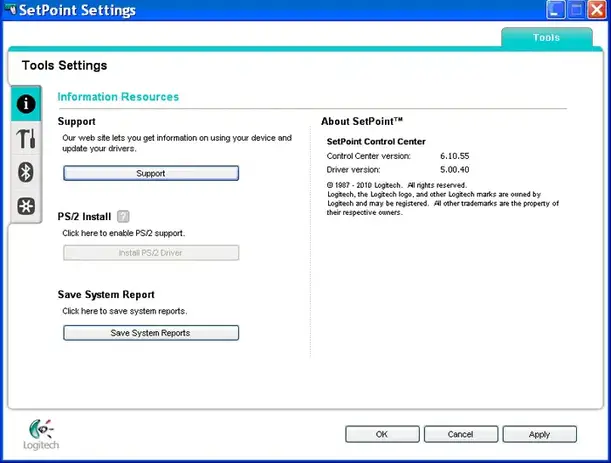
SetPoint without My Keyboard Tab
To uninstall SetPoint:
– Windows XP
– Windows Vista and Windows 7
Windows XP:
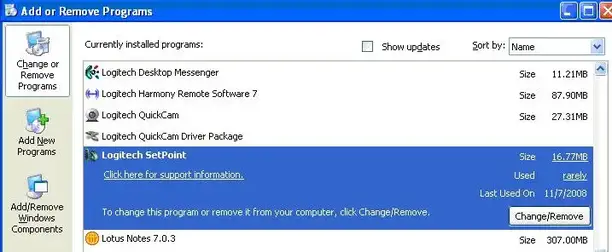
1. Go to Add or Remove Programs.
– Start menu view: Start > Control Panel > Add/Remove Programs
– Classic start menu view: Start > Settings >Control Panel > Add/Remove Programs
2. Select Logitech SetPoint from the list of programs displayed.
3. Click the Change / Remove button and follow the on-screen instructions to uninstall SetPoint.
4. Download and install the latest version of SetPoint from the K800 Downloads Page.
NOTE: You may need to reboot your system after SetPoint has been installed.
5. After your system restarts, open SetPoint to verify that the My Keyboard tab is available.
If the My Keyboard tab is still missing:
1. Exit SetPoint by right-clicking on the SetPoint icon in the system tray at the bottom right corner of your screen next to the clock.
2. Select Exit.
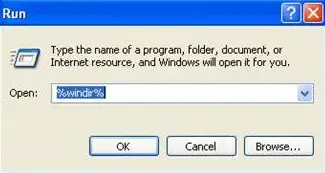
3. Click the Windows Start button.
4. Choose Run.
5. Type %windir% in the Run dialog box.
6. Double-click the System32 folder to open it.
7. Double-click the drivers folder.
8. Rename the file wdf01000.sys to wdf01000.bak.
9. Re-install SetPoint.WARNING:
10. Before you reboot, check to make sure the wdf01000.sys file is present in the drivers folders. If you reboot without this file, it may prevent some of your hardware — including mice and keyboards — from working properly.
11. If the wdf01000.sys file is not present, change wdf01000.bak back to wdf01000.sys.
12. Reboot the computer.
13. After your system restarts, open SetPoint to verify that the My Keyboard tab is present.
Windows Vista and Windows 7
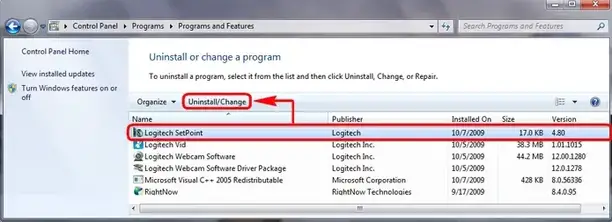
1. Go to Uninstall a program.
– Start menu view: Start > Control Panel > Uninstall a program
– Classic start menu view: Start > Settings >Control Panel > Programs and Features
2. Select Logitech SetPoint from the list of programs displayed.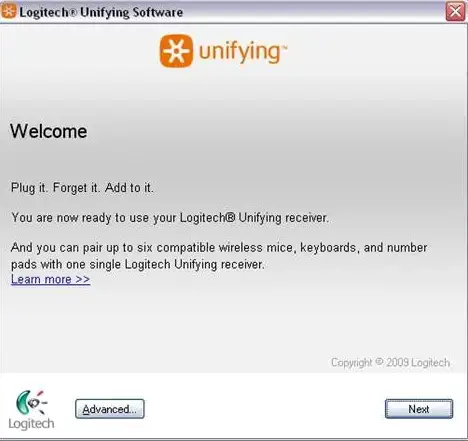
3. Click the Uninstall button highlighted above and follow the on-screen instructions to uninstall SetPoint.
4. Download and install the latest version of SetPoint from the K800 Downloads Page.
NOTE: You may need to reboot your system after SetPoint has been installed.
After your system restarts, open SetPoint to make sure the My Keyboard tab is available.
Additional information:
If you’re still having the same issue, see Knowledge Base article 18009 for how to contact Logitech Technical Support.
My K800 keyboard is not working
This issue is most likely a lost connection. The connection between the keyboard and USB receiver can be lost for several reasons, including:
– Low battery charge
– Moving the USB receiver from one USB port to another
– Moving the USB receiver to another computer
– Plugging the USB receiver into a USB hub, KVM switch or other unsupported device (NOTE: Your USB receiver must be plugged directly into your computer.)
– Using your wireless keyboard on metal surfaces
– Radio frequency (RF) interference from other sources, such as:
– Wireless speakers
– Computer power supplies
– Monitors
– Cell phones
– Garage door openers
Try to rule out any of these problem sources that might be affecting your keyboard before you reconnect it.
Before reconnecting your K800
Before you connect your K800 again:
1. Make sure the batteries in your K800 are fully charged.
2. Make sure your keyboard is turned on. For instructions on how to turn your keyboard on and off, see answer null.
3. Make sure the USB receiver is securely plugged directly into a working USB port on your computer.
4. Turn your computer on.
Follow the process below to reconnect your keyboard
Reconnecting your K800
To reconnect your K800:
1. Download and install the correct version of the Logitech SetPoint mouse and keyboard software from the K800 Downloads page.
2. Launch the Logitech Unifying Software (which was included in SetPoint) from Start > Programs > Logitech > Unifying > Logitech Unifying Software.
3. When the Logitech Unifying Software Welcome screen shown below displays, click Next to continue.
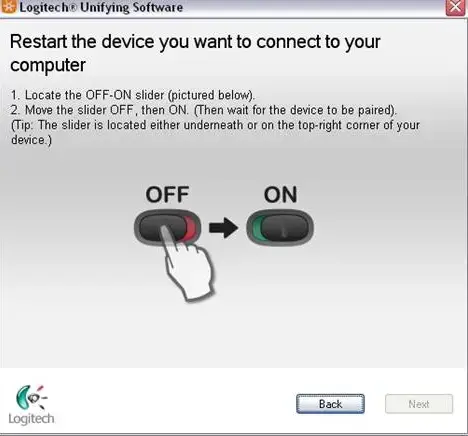
4. Follow the on-screen instructions to turn your K800 off and then back on.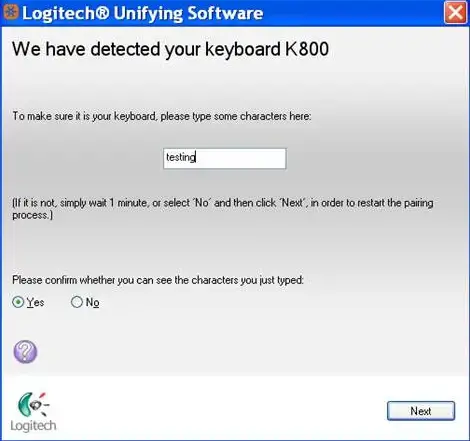
When your K800 is detected, you’ll see this confirmation message:
5. Type a test message in the text field to verify the keyboard is working.
6. Once you’ve confirmed the keyboard is working, choose “Yes” and then click Next to continue.
7. Click Finish to exit the Logitech Unifying Software. Your K800 should now be connected.
Turning my K800 KEYBOARD on and off
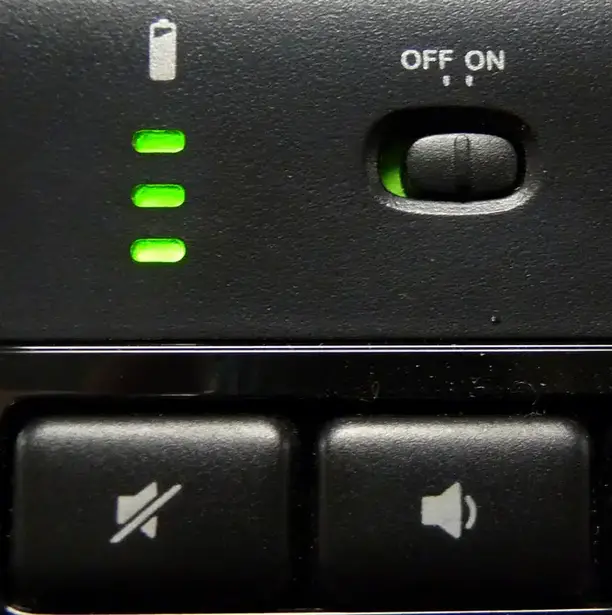
To turn your K800 Keyboard on:
1. Locate the ON/OFF switch at the top right-side of your keyboard.
2. Slide the switch from “OFF” to “ON”.
NOTE: The switch will have a green background showing on the left side and one or more of the battery indicator lights will be lit to the left of the switch, depending on your current battery level.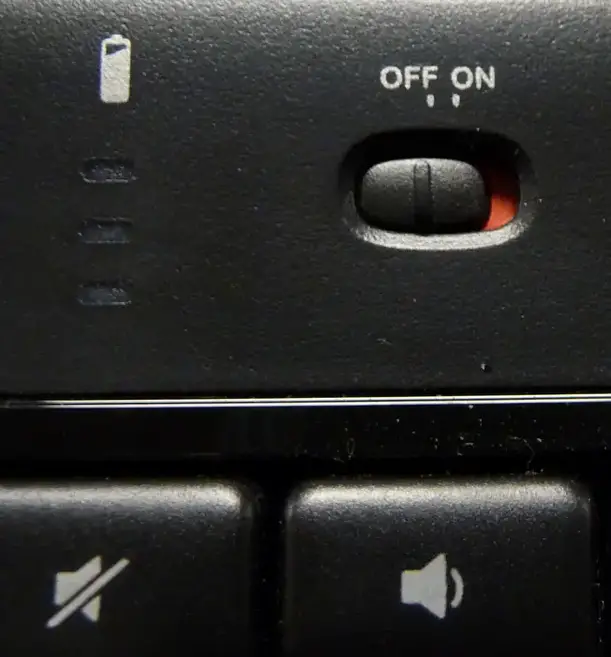
To turn your K800 Keyboard off:
1. Locate the ON/OFF switch at the top right-side of your keyboard.
2. Slide the switch from “ON” to “OFF”.
NOTE: The switch will have a red background showing on the right side and none of the battery indicator lights will be lit to the left of the switch
K800 Num Lock and Caps Lock indicators
Caps Lock indicators
On the K800 Keyboard itself, you can determine if Caps Lock is on by checking the green indicator light in the top left corner of the Caps Lock button. If it is lit, Caps Lock is on and all of the letters you type will appear in uppercase.

You can also determine if your K800 has Caps Lock on through the on-screen notification.
NOTE: You need to have Logitech SetPoint software installed in order to receive on-screen notifications. If you don’t have SetPoint installed, you can download it from the K800 Downloads Page.
To determine on-screen if your K800 has Caps Lock on:
Caps Lock On. When you press the Caps Lock button and see the following “Caps Lock On” message, all of the letters you type will appear in uppercase.
Caps Lock Off. When you press the Caps Lock button and see the following “Caps Lock Off” message, unless you use the Shift button, all of the letters you type will appear in lowercase.
Num Lock indicator
With your K800 Keyboard, you can determine if Num Lock is on through the on-screen notification.
NOTE: You need to have Logitech SetPoint software installed in order to receive on-screen notifications. If you don’t have SetPoint installed, you can download it from the K800 Downloads Page.
To determine on-screen if Num Lock is on:
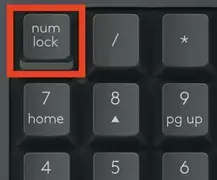
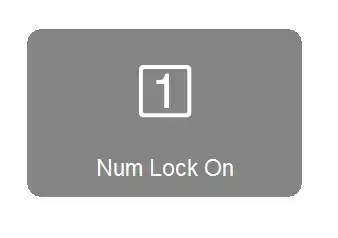
Num Lock On. When you press the Num Lock key at the top left of the keypad and see the following “Num Lock On” message, using the keypad enters numbers.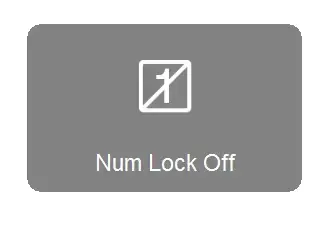
Num Lock Off. When you press the Num Lock key above and to the left of your keypad and see the following “Num Lock Off” message, the numbered keys on the keypad act as direction keys moving your cursor in the direction of the arrows printed on them.
Using the FN and F1-F12 keys on my K800
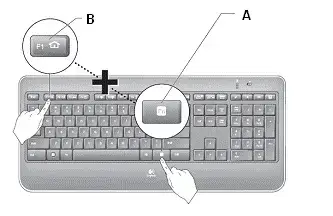
Your K800 Keyboard’s function keys, or F-keys, have two modes:
– Normal. By default, the function keys perform tasks based on the operating system and application you’re using. To use a function key in its normal state, you press it by itself.
– Enhanced. The function keys are pre-programmed to perform certain tasks when you press them at the same time as the FN key (shown below). For example: Press and hold the FN key (A) and the F1 key (B) to launch your internet browser.
Using the Logitech SetPoint Mouse and Keyboard Software, you can change the pre-programmed function for each key. You can also swap the modes so the enhanced functions work without having to press the FN key. See the “Programming function keys” section of answer null for instructions.

The enhanced functions are listed below:
Key : Function
1. Application zone
F1 Launch internet browser
F2 Launch email application
F3 Launch Windows Search*
F4 Application switcher*
2. Convenience zone
F5 Reduce backlight by 25%
F6 Increase backlight by 25%
F7 Battery check
F8 Sleep mode
3. Multimedia navigation zone
F9 Launch media player
F10 Previous track
F11 Play/Pause
F12 Next track
4. Multimedia volume zone
 Mute
Mute
 Volume down
 Volume up
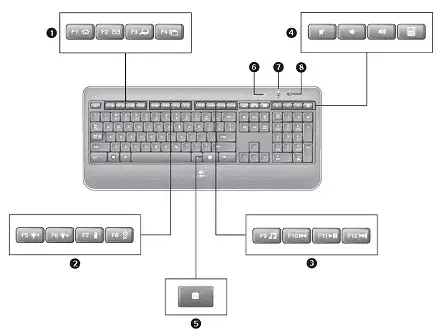 Calculator
Additional features
5. FN key
6. Automatic light sensor (ALS)
7. Battery status indicator
8. Keyboard power switch
*Requires SetPoint

Connecting a second Unifying device to my Unifying receiver
Your K800 Unifying USB receiver can be connected to up to six Unifying Logitech mice and keyboards. You can tell if your devices are Unifying because they will have this logo:
![]()
connect additional Unifying devices to your Unifying USB receiver:
1. Download Logitech SetPoint Mouse and Keyboard Software, if you don’t already have it installed. You can download SetPoint from the K800 Downloads Page.
2. Launch the Logitech Unifying Software (Start > Programs > Logitech > Unifying > Logitech Unifying Software).
3. On the Welcome window that displays, click Next:
For the Unifying software to detect your device, you’ll need to turn it on. Follow the on-screen instructions (shown below) to turn your device off and then back on.
4. When your device is detected, you’ll see a confirmation message as shown below. 5. Type a test message in the text field to make sure the keyboard works.
NOTE: If the keyboard doesn’t work right away, wait a minute to see if it connects. 6. If it doesn’t, select No and then click Next to restart the pairing process from Step 1 above.
7. Select Yes and then click Next.
8. Click Finish to exit the Logitech Unifying Software. Your device should now be connected.
K800 compatibility with KVM switches and hubs
Manufacturers implement keyboard and mouse support in various, non-standard ways. KVM switches may affect the functionality of your K800.
Other third party devices that may interfere with communication between your K800 and your computer are:
– KVM switch boxes
– Port Replicators
– Docking Stations
– USB Hubs
My K800’s backlight stays on
Normally, your K800’s backlight will turn off after 10 to 15 seconds, or whenever you’ve set it to go off.
Sometimes though, the keyboard may stay lit longer. This often happens when the keyboard is moved to a different location on your desk or to another desk entirely.
The reason for this is that the keyboard has a built-in system to detect your hands. When moved, it can take some time for the keyboard to perform this detection again.
Allow 3-5 minutes for your keyboard to go through its detection cycle. Then, the backlight should begin to switch off again in the amount of time expected.
K800 operating distance
In ideal situations, the K800 can operate up to 30 feet (10 meters) with the receiver in clear sight of the keyboard and mouse.
If you are not getting this distance:
– Replace the batteries with a fresh set.
– Move devices such as cell phones, radios, wireless routers, microwaves, and other devices that emit radio waves or could cause radio interference (RF) away from your work area.
To determine if your environment is causing shorter than expected ranges, try using your K800 in a different environment to see if the distance improves.
My K800 frequently loses connection
If you have to constantly reconnect your keyboard or your mouse, try the following:
– Keep other electrical devices at least 8 inches (20 cm) away from the USB Unifying receiver.
– Move the mouse or keyboard closer to the USB Unifying receiver.
– Move the USB Unifying receiver to different locations.
Additional Information
The connection between the K800 keyboard and the USB Unifying receiver can be lost due to several reasons such as:
– Low batteries
– Moving the USB Unifying receiver from one USB port to another
– Moving the USB Unifying receiver to another computer
– Plugging the USB Unifying receiver into a USB hub or other unsupported device such as a KVM switch (your USB Unifying receiver must be plugged directly into your computer).
– Using your wireless mouse/keyboard on metal surfaces
Radio frequency (RF) interference of more powerful wireless devices such as:
– Wireless speakers
– Computer power supplies
– Monitors
– Cellular telephones
– Garage door openers
– If the above solutions do not resolve your problem, consult Knowledge Base article 18009 for instructions on contacting Logitech Technical Support.
Supported operating systems for my K800
Your K800 is supported by:
– Windows 7
– Windows XP
– Windows Vista
The K800 is not supported on Windows 98, Windows ME, Windows 2000, UNIX, Linux or Macintosh operating systems.
K800 battery life information
Battery information
Requires 2 AA NiMh batteries.
– Expected battery life is 15 hours to 10 days depending on backlight settings.
– Your keyboard has a standby mode to conserve power when not in use.
NOTE: The batteries aren’t user replaceable.
Using my K800 with a different USB receiver
Your K800 ships with the new Logitech Unifying USB receiver as shown below:

You can only connect your K800 with Unifying USB receivers that display the Unifying logo  .
.
NOTE: Although the device may be supported by the Unifying receiver, SetPoint and/or Logitech Control Center (LCC) support will depend on the specific product.
Num Lock disabled after Windows 10 starts
By default, the Num Lock on your keyboard is disabled each time Windows 10 boots up after a shutdown or restart.
To configure your operating system so that Num Lock stays on during startup, please contact professional support for your operating system. This requires advanced changes that need to be done under the guidance of a professional technician.