User Manual
M330 Silent delivers advanced right-hand comfort, excellent accuracy, long battery life, and broad compatibility—all while reducing over 90% of clicking sounds.
Specs and Details
Dimensions
Mouse
- Height: 4.15 in (105.4 mm)
- Width: 2.67 in (67.9 mm)
- Depth: 1.51 in (38.4 mm)
- Weight (with batteries): 3.21 oz (91 g)
Technical Specifications
SilentTouch Technology
- Left/Right-click, Middle click, Scrolling and Gliding have been noise reduced
Sensor Technology
- High Precision Optical Tracking
- DPI (Min/Max): 1000±
Buttons
- Number of Buttons: 3 (Left/Right-click, Middle click)
Scrolling
- Line-by-line scrolling
- Scroll Wheel: Yes, Rubber, 2D , mechanical
Battery
- Battery: 18 months 2
- Battery Details: 1 x AA (included)
Connectivity
- Connection Type: 2.4 GHz wireless connection
- Wireless range: 10 m (33ft) 3
- Unifying-ready mouse: Yes
- Unifying-ready receiver: No
Customization software
- Logi Options+
Warranty Information
1-Year Limited Hardware Warranty
Part Number
- Black:
- Grey:
FAQ – Frequently Asked Questions
How to enable Accessibility and Input monitoring permissions for Logitech Options
We’ve identified a few cases where devices aren’t detected in the Logitech Options software or where the device fails to recognize customizations made in the Options software (however, the devices do work in out-of-box mode with no customizations).
Most of the time this happens when macOS is upgraded from Mojave to Catalina/BigSur or when interim versions of macOS are released. To resolve the problem, you can enable permissions manually. Please follow the steps below to remove the existing permissions and then add the permissions. You should then restart the system to allow the changes to take effect.
– Remove existing permissions
– Add the permissions
Remove existing permissions
To remove the existing permissions:
- Close Logitech Options software.
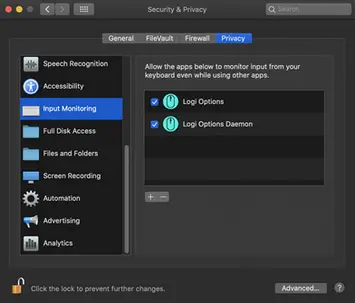
- Go to System Preferences -> Security & Privacy. Click the Privacy tab, and then click Accessibility.
- Uncheck Logi Options and Logi Options Daemon.
- Click on Logi Options and then click on the minus sign ‘–’ .
- Click on Logi Options Daemon and then click on the minus sign ‘–’ .
- Click on Input Monitoring.
- Uncheck Logi Options and Logi Options Daemon.
- Click on Logi Options and then click on the minus sign ‘–’.
- Click on Logi Options Daemon and then click on the minus sign ‘–’.
- Click Quit and Reopen.
To add the permissions:
- Go to System Preferences > Security & Privacy. Click the Privacy tab and then click Accessibility.
- Open Finder and click on Applications or press Shift+Cmd+A from the desktop to open Applications on Finder.
- In Applications, click Logi Options. Drag and drop it to the Accessibility box in the right panel.
- In Security & Privacy, click on Input Monitoring.
- In Applications, click Logi Options. Drag and drop it to the Input Monitoring box.
- Right-click on Logi Options in Applications and click on Show Package Contents.
- Go to Contents, then Support.
- In Security & Privacy, click on Accessibility.
- In Support, click Logi Options Daemon. Drag and drop it to the Accessibility box in the right pane.
- In Security & Privacy, click on Input Monitoring.
- In Support, click Logi Options Daemon. Drag and drop it to the Input Monitoring box in the right pane.
- Click Quit and Reopen.
- Restart the system.
- Launch the Options software and then customize your device.
Logitech Keyboard, Presentation and Mice Software – macOS 11 (Big Sur) Compatibility
Apple has announced a forthcoming update macOS 11 (Big Sur) due to be released in the fall of 2020
|
|
Limited Full Compatibility Logitech Control Center will be fully compatible with macOS 11 (Big Sur), but only for a limited compatibility period. macOS 11 (Big Sur) support for Logitech Control Center will end early 2021. |
|
Fully Compatible |
Fully Compatible
|
|
|
|
Logitech Options and Logitech Control Center macOS message: Legacy System Extension
If you are using Logitech Options or Logitech Control Center (LCC) on macOS you may see a message that legacy system extensions signed by Logitech Inc. will be incompatible with future versions of macOS and recommending to contact the developer for support. Apple provides more information about this message here: About legacy system extensions.
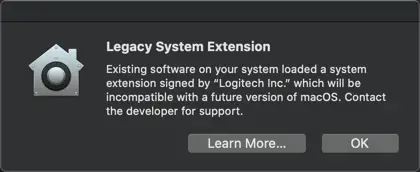
Logitech is aware of this and we are working on updating Options and LCC software to ensure we comply with Apple’s guidelines and also to help Apple improve its security and reliability.
The Legacy System Extension message will be displayed the first time Logitech Options or LCC loads and again periodically while they remain installed and in use, and until we have released new versions of Options and LCC. We do not yet have a release date, but you can check for the latest downloads here.
NOTE: Logitech Options and LCC will continue to work as normal after you click OK.
Logitech Options permission prompts on macOS Monterey, macOS Big Sur, macOS Catalina, and macOS Mojave
Download the latest version of Logitech Options software.
Logitech Options permission prompts on macOS Monterey and macOS Big Sur
For official macOS Monterey and macOS Big Sur support, please upgrade to the latest version of Logitech Options (9.40 or later).
Starting with macOS Catalina (10.15), Apple has a new policy that requires user permission for our Options software for the following features:
– Bluetooth Privacy prompt needs to be accepted to connect Bluetooth devices through Options.
– Accessibility access is needed for scrolling, gesture button, back/forward, zoom, and several other features.
– Input monitoring access is needed for all the features enabled by the software such as scrolling, gesture button, and back/forward among others for devices connected via Bluetooth.
– Screen recording access is needed to capture screenshots using a keyboard or a mouse.
– System Events access is needed for the Notifications feature and Keystroke assignments under different applications.
– Finder access is needed for the Search feature.
– System Preferences access if needed for launching Logitech Control Center (LCC) from Options.
Bluetooth Privacy prompt
When an Options supported device is connected with Bluetooth/Bluetooth Low Energy, launching the software for the first time will show the below pop-up for Logi Options and Logi Options Daemon:
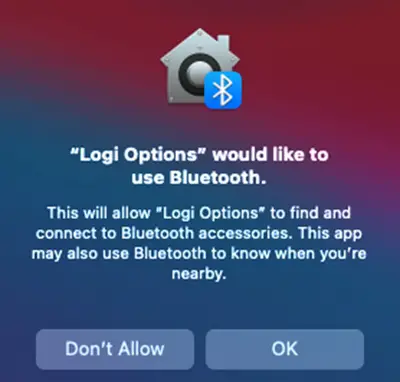
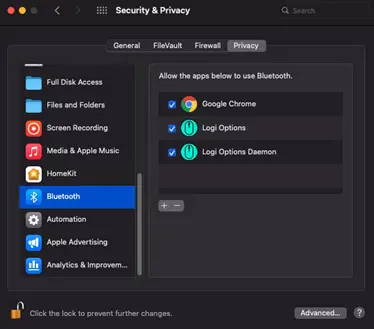
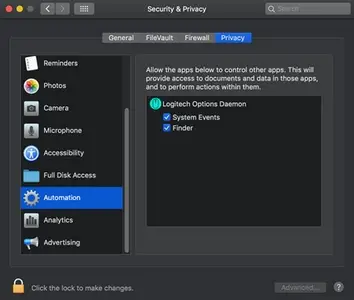
Once you click OK, you will be prompted to enable the checkbox for Logi Options in Security & Privacy > Bluetooth.
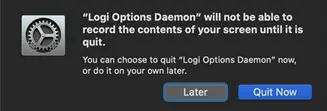
When you enable the checkbox, you will see a prompt to Quit & Reopen. Click on Quit & Reopen for the changes to take effect.

Once the Bluetooth Privacy settings are enabled for both Logi Options and Logi Options Daemon, the Security & Privacy tab will appear as shown:
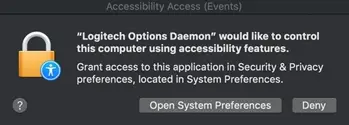
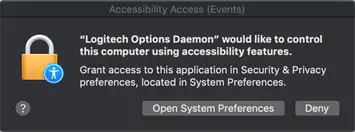
Accessibility Access
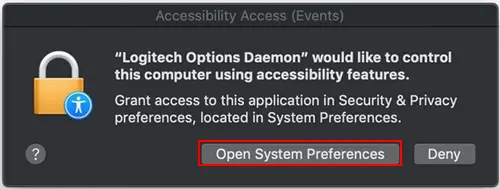
Accessibility access is needed for most of our basic features such as scrolling, gesture button functionality, volume, zoom, and so on. The first time you use any feature that requires accessibility permission, you’ll be presented with the following prompt:
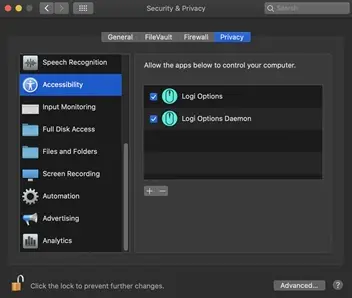
To provide access:
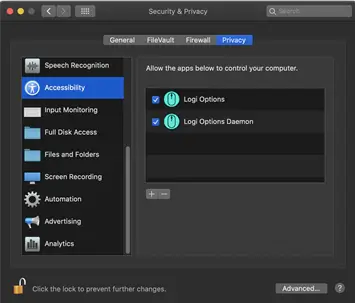
1. Click Open System Preferences.
2. In System Preferences, click the lock at the bottom left corner to unlock.
3. In the right panel, check the boxes for Logitech Options and Logitech Options Daemon.
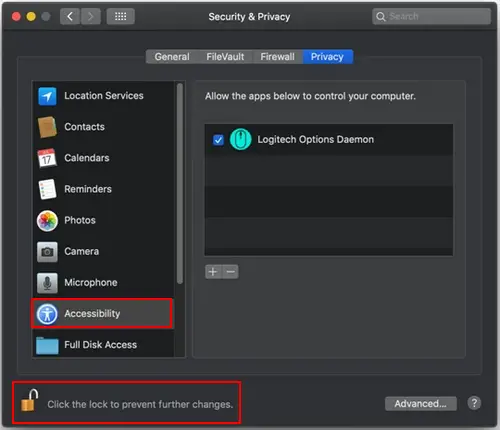
If you already clicked Deny, follow these steps to manually allow access:
1. Launch System Preferences.
2. Click Security & Privacy, then click the Privacy tab.
3. In the left panel, click Accessibility and then follow steps 2-3 above.
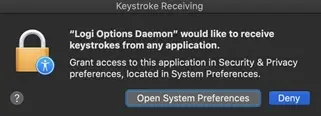
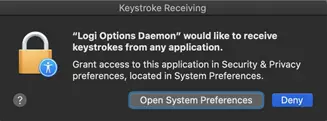
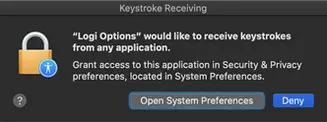
Input Monitoring Access
Input monitoring access is needed when devices are connected using Bluetooth for all features enabled by the software such as scrolling, gesture button, and back/forward to work. The following prompts will be displayed when access is needed:
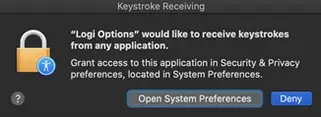
1. Click Open System Preferences.
2. In System Preferences, click the lock at the bottom left corner to unlock.
3. In the right panel, check the boxes for Logitech Options and Logitech Options Daemon.

4. After you check the boxes, select Quit Now to restart the application and allow the changes to take effect.


If you already clicked Deny, please do the following to allow access manually:
1. Launch System Preferences.
2. Click Security & Privacy, and then click the Privacy tab.
3. In the left panel, click Input Monitoring and then follow steps 2-4 from above.
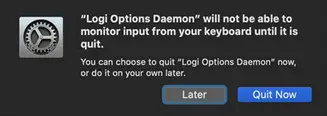
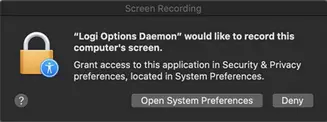
Screen Recording Access
Screen recording access is needed to capture screenshots using any supported device. You’ll be presented with the prompt below when you first use the screen capture feature:
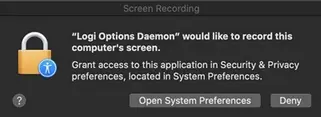
1. Click Open System Preferences.
2. In System Preferences, click the lock at the bottom left corner to unlock.
3. In the right panel, check the box for Logitech Options Daemon.
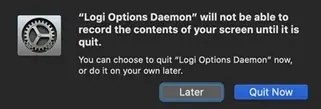
4. Once you check the box, select Quit Now to restart the application and allow the changes to take effect.
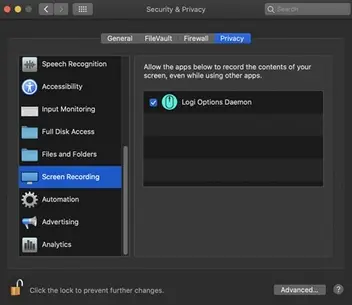
If you already clicked Deny, use the following steps to allow access manually:
1. Launch System Preferences.
2. Click Security & Privacy, then click the Privacy tab.
3. In the left panel, click on Screen Recording and follow steps 2-4 from above.
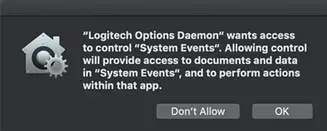
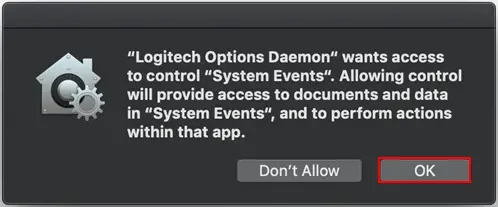
System Events prompts
If a feature requires access to a specific item like System Events or Finder, you will see a prompt the first time you use this feature. Please note that this prompt appears only once to request access for a specific item. If you deny access, all the other features that need access to the same item will not work and another prompt will not be shown.
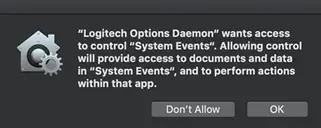
Please click OK to allow access for Logitech Options Daemon so that you can continue to use these features.
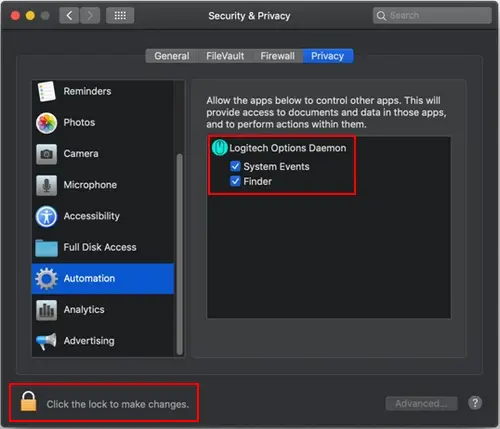
If you already clicked on Don’t Allow, use the following steps to allow access manually:
1. Launch System Preferences.
2. Click Security & Privacy.
3. Click the Privacy tab.
In the left panel, click Automation and then check the boxes under Logitech Options Daemon to provide access. If you are unable to interact with the checkboxes, please click the lock icon on the bottom left corner and then check the boxes.
NOTE: If a feature still doesn’t work after you grant access, please reboot the system.
Logitech Options permission prompts on macOS Catalina
For official macOS Catalina support, please upgrade to the latest version of Logitech Options (8.02 or later).
Starting with macOS Catalina (10.15), Apple has a new policy that requires user permission for our Options software for the following features:
– Accessibility access is needed for scrolling, gesture button, back/forward, zoom and several other features
– Input monitoring (new) access is needed for all the features enabled by the software such as scrolling, gesture button and back/forward among others for devices connected via Bluetooth
– Screen recording (new) access is needed to capture screenshots using a keyboard or a mouse
– System Events access is needed for Notifications feature and Keystroke assignments under different applications
– Finder access is needed for the Search feature
– System Preferences access if needed for launching Logitech Control Center (LCC) from Options
Accessibility Access
Accessibility access is needed for most of our basic features like scrolling, gesture button functionality, volume, zoom, and so on. The first time you use any feature that requires accessibility permission, you’ll be presented with the following prompt:
To provide access:
1. Click Open System Preferences.
2. In System Preferences, click the lock at the bottom left corner to unlock.
3. In the right panel, check the boxes for Logitech Options and Logitech Options Daemon.
If you already clicked ‘Deny’, do the following to allow access manually:
1. Launch System Preferences.
2. Click Security & Privacy, then click the Privacy tab.
3. In the left panel, click Accessibility and then follow steps 2-3 above.
Input Monitoring Access
Input monitoring access is needed when devices are connected using Bluetooth for all features enabled by the software such as scrolling, gesture button and back/forward to work. The following prompts will be displayed when access is needed:
1. Click Open System Preferences.
2. In System Preferences, click the lock at the bottom left corner to unlock.
3. In the right panel, check the boxes for Logitech Options and Logitech Options Daemon.
After you check the boxes, select Quit Now to restart the application and allow the changes to take effect.

If you already clicked ‘Deny’, please do the following to allow access manually:
1. Launch System Preferences.
2. Click Security & Privacy, and then click the Privacy tab.
3. In the left panel, click Input Monitoring and then follow steps 2-4 from above.
Screen Recording Access
Screen recording access is needed to capture screenshots using any supported device. You’ll be presented with the prompt below when you first use the screen capture feature.
1. Click Open System Preferences.
2. In System Preferences, click the lock at the bottom left corner to unlock.
3. In the right panel, check the box for Logitech Options Daemon.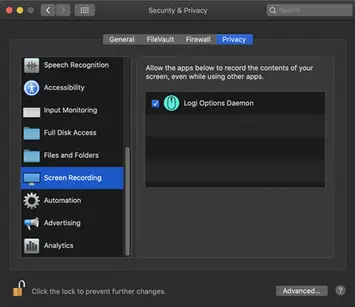
4. Once you check the box, select Quit Now to restart the application and allow the changes to take effect.
If you already clicked ‘Deny’, use the following steps to allow access manually:
1. Launch System Preferences.
2. Click Security & Privacy, then click the Privacy tab.
3. In the left panel, click on Screen Recording and follow steps 2-4 from above.
System Events prompts
If a feature requires access to a specific item like System Events or Finder, you will see a prompt the first time you use this feature. Please note that this prompt appears only once to request access for a specific item. If you deny access, all the other features that need access to the same item will not work and another prompt will not be shown.
Please click on OK to allow access for Logitech Options Daemon so that you can continue to use these features.
If you already clicked on Don’t Allow, use the following steps to allow access manually:
1. Launch System Preferences.
2. Click Security & Privacy.
3. Click the Privacy tab.
4. In the left panel, click Automation and then check the boxes under Logitech Options Daemon to provide access. If you are unable to interact with the checkboxes, please click the lock icon on the bottom left corner and then check the boxes.

NOTE: If a feature still doesn’t work after you grant access, please reboot the system.
– Click here for information on macOS Catalina and macOS Mojave permissions on Logitech Control Center.
– Click here for information on macOS Catalina and macOS Mojave permissions on Logitech Presentation software.
Logitech Options permission prompts on macOS Mojave
For official macOS Mojave support, please upgrade to the latest version of Logitech Options (6.94 or later).
Starting with macOS Mojave (10.14), Apple has a new policy that requires user permission for our Options software for the following features:
– Accessibility access is needed for scrolling, gesture button, back/forward, zoom and several other features
– Notifications feature and keystroke assignments under different applications need access to System Events
– Search feature needs access to Finder
– Launching Logitech Control Center (LCC) from Options requires access to System Preferences
– The following are the user permissions the software needs for you to get complete functionality for your Options-supported mouse and/or keyboard.
Accessibility Access
Accessibility access is needed for most of our basic features like scrolling, gesture button functionality, volume, zoom, and so on. The first time you use any feature that requires accessibility permission, you’ll see a prompt as shown below.
Click Open System Preferences and then turn on the checkbox for Logitech Options Daemon.
In case you clicked Deny, use the following steps to allow access manually:
1. Launch System Preferences.
2. Click on Security & Privacy.
3. Click the Privacy tab.
4. In the left panel, click on Accessibility and check the boxes under Logitech Options Daemon to provide access (as shown below). If you are unable to interact with the checkboxes, please click the lock icon on the bottom left corner and then check the boxes.
System Events prompts
If a feature requires access to any specific item such as System Events or Finder, you will see a prompt (similar to the screenshot below) the first time you use this feature. Please note that this prompt appears only once, requesting access for a specific item. If you deny access, all the other features that need access to the same item will not work and another prompt will not be shown.
Click OK to allow access for Logitech Options Daemon so that you can continue to use these features.
In case you clicked Don’t Allow, use the following steps to allow access manually:
1. Launch System Preferences.
2. Click Security & Privacy.
3. Click the Privacy tab.
4. In the left panel, click Automation and then check the boxes under Logitech Options Daemon to provide access (as shown below). If you are unable to interact with the checkboxes, please click the lock icon on the bottom left corner and then check the boxes.
NOTE: If a feature still doesn’t work after you grant access, please reboot the system.
System Extension Blocked message when installing Logitech Options or LCC
Starting with macOS High Sierra (10.13), Apple has a new policy that requires user approval for all KEXT (driver) loading. You may see a “System Extension Blocked” prompt (shown below) during the installation of Logitech Options or Logitech Control Center (LCC).

If you see this message, you’ll need to approve the loading of the KEXT manually so that your device drivers can be loaded and you can continue to use its functionality with our software. To allow KEXT loading, please open System Preferences and navigate to the Security & Privacy section. On the General tab, you should see a message and an Allow button, as shown below. In order to load the drivers, click Allow. You may need to reboot your system so the drivers are properly loaded and the functionality of your mouse is restored.
NOTE: As set by the system, the Allow button is only available for 30 minutes. If it has been longer than that since you installed LCC or Logitech Options, please restart your system to see the Allow button under the Security & Privacy section of System Preferences.

NOTE: If you don’t allow KEXT loading, all devices supported by LCC will not be detected by software. For Logitech Options, you need to perform this operation if you’re using following devices:
– T651 Rechargeable trackpad
– Solar Keyboard K760
– K811 Bluetooth keyboard
– T630/T631 Touch mouse
– Bluetooth Mouse M557/M558
Logitech Options issues when Secure Input is enabled
Ideally, Secure Input should only be enabled while the cursor is active in a sensitive information field, such as when you enter a password, and should be disabled right after you leave the password field. However, some applications may leave the Secure Input state enabled. In that case, you may experience the following issues with devices supported by Logitech Options:
– When the device is paired in Bluetooth mode, it’s either not detected by Logitech Options or none of the software-assigned features work (basic device functionality will continue to work, however).
– When the device is paired in Unifying mode, it’s not possible to perform keystroke assignments.
If you encounter these issues, check to see if Secure Input is enabled on your system. Do following:
1. Launch Terminal from /Applications/Utilities folder.
2. Type the following command in Terminal and press Enter:ioreg -l -d 1 -w 0 | grep SecureInput
– If the command returns back no information, then Secure Input is not enabled on the system.
– If the command returns back some information, then look for “kCGSSessionSecureInputPID”=xxxx. The number xxxx points to the Process ID (PID) of the application that has Secure Input enabled:
1. Launch Activity Monitor from /Applications/Utilities folder.
2. Search for PID which has secure input enabled.
Once you know which application has Secure Input enabled, close that application to resolve the issues with Logitech Options.
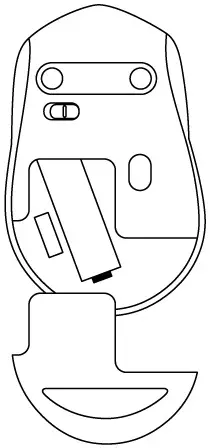
USB receiver storage in the M330 / M331 / B330 mouse
Your mouse was designed with a space where you can store the USB receiver. When you’re not using the mouse, you can store the receiver inside of it.
To locate the storage space for the receiver:
1. Flip the mouse over and slide the battery cover off.
2. Locate the small rectangular slot next to the battery compartment.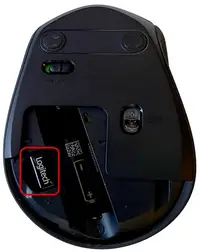
3. Slide the receiver into the slot. It will fit facing either way.
4. Replace the battery cover.
TIP: If you have an extra receiver from any Logitech device you aren’t currently using, this is a good place to store it.
M330 / M331 / B330 mouse not working or frequently stops working
– Mouse isn’t working
– Mouse frequently stops working
Mouse isn’t working
If your mouse isn’t working, the problem is likely a lost connection. The connection between the mouse and the computer can be lost for several reasons, such as:
1. Low battery power
2. Using your mouse on metal surfaces
3. Radio frequency (RF) interference from other wireless devices, such as:
– Wireless speakers
– Computer power supplies
– Monitors
– Cell phones
– Garage door openers
Before reconnecting your mouse
1. Fix or rule out the potential problem sources listed above.
2. Turn your computer on.
3. Insert fresh batteries in your mouse (see M330 / M331 / B330 mouse battery life and replacement for instructions).
4. Plug the receiver directly and securely into a working USB port on your computer.
5. Turn on your mouse using the power switch on the bottom.

The power indicator on the top of the mouse should be green.
Reconnecting your mouse
To reconnect your mouse to a Windows computer:
1. Download and run the Logitech Connection Utility. You can get the software from the Downloads page.
2. On the Logitech Connection Utility Welcome screen, click Next to continue.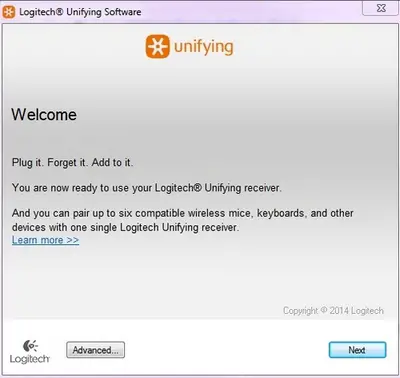
3. Follow the instructions to turn your mouse off and then back on.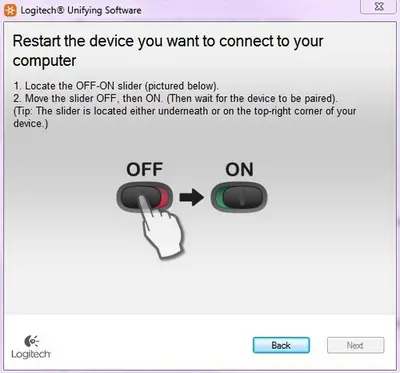
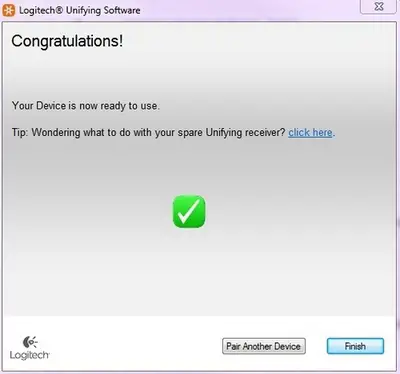
4. When your mouse is detected, you’ll see a confirmation message. Confirm that the mouse is working and then click Next.
5. Click Finish to exit the Connection Utility. Your mouse should now be connected.
6. If this solution doesn’t work after a couple of attempts, restart your computer and try the reconnection process again.
Mouse frequently stops working
– If your mouse frequently stops working and you keep having to reconnect it with the USB receiver, try these suggestions:
– Keep other electrical devices at least 8 inches (20 cm) away from the mouse and the host device.
– Move the mouse closer to the USB receiver.
– Move the receiver to a different USB port on your computer.
M330 / M331 / B330 mouse battery life and replacement
Mouse battery information
– Requires 1 AA alkaline battery
– Expected battery life is up to 24 months
Installing a new battery
When you install the battery for your mouse, make sure it faces the correct direction, as shown in the following image:
No optical light visible on the M330 / M331 / B330 mouse
Your mouse uses an infrared (IR) optical LED light that is invisible to the human eye.
If you’re not sure whether your mouse is powered on, check the On/Off switch located on the bottom.
When your mouse is:
ON — The switch is pushed over to the right and you see green next to it.
OFF — The switch is pushed over to the left and you see red next to it.
Unifying devices not detected after macOS 10.12.1 Sierra update
We are aware that after updating from macOS 10.12 Sierra to macOS Sierra 10.12.1, Logitech Options software does not detect supported Unifying devices on some systems.
To fix this issue, unplug the Unifying receiver and then plug it back into the USB port. If Logitech Options still doesn’t detect the device, you may also need to reboot your system.