Logitech MX Ergo Wireless Trackball Mouse User Manual

Getting Started
- Download Logitech Options to get the most out of your MX Ergo Multi Device Trackball experience, To download and learn more about the possibilities go to logitech.com/options.
- Turn on your MX Ergo trackball.
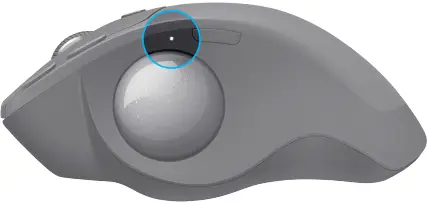
- Press and hold one of the two Easy-Switch™ buttons at the top of the mouse below the scroll wheel for three seconds to ensure your device is in pairing mode.
- To connect MX Ergo trackball to your computer, plug the provided Unifying receiver into a USB port, use an existing Unifying receiver, or connect with Bluetooth.
- Open Logitech Options, select MX Ergo Multi-Device Trackball and discover the MX Ergo trackball can do.
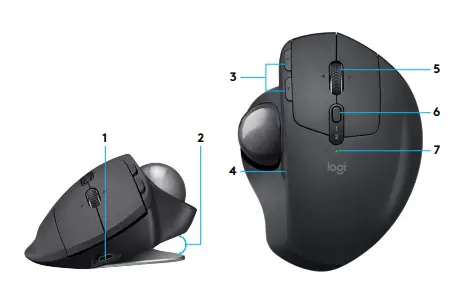
Product Overview

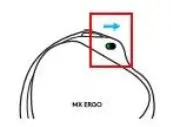
Adjustable metal hinge
With the unique adjustable hinge, you can increase the angle from 0 to a 20-degree tilt that improves the wrist posture and reduces pronation. The carefully sculpted shape gives your hand full palm and finger support, while the soft rubber on the top ensures a good, comfortable grip for long hours of work. To switch between the two angles, simply press on the side of the device to tilt it between 0° and 20° .
Connect the Logitech MX Ergo to a computer using Bluetooth or Unifying receiver.
MX Ergo gives you two choices of wireless connection:
- Bluetooth
- Unifying receiver
You will need to download and install the latest version of Logitech Options. If you don’t
already have the software, you can download it from this product’s Download page.
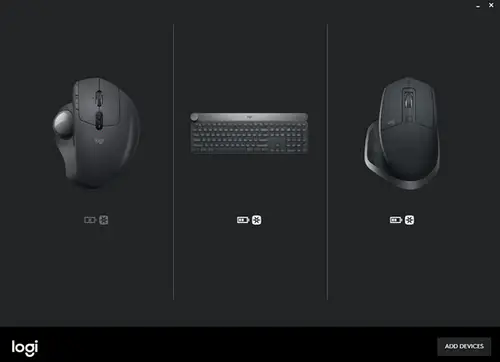
Connect with Bluetooth:
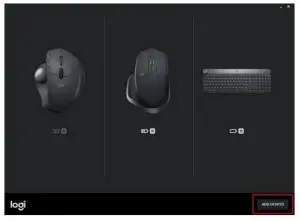
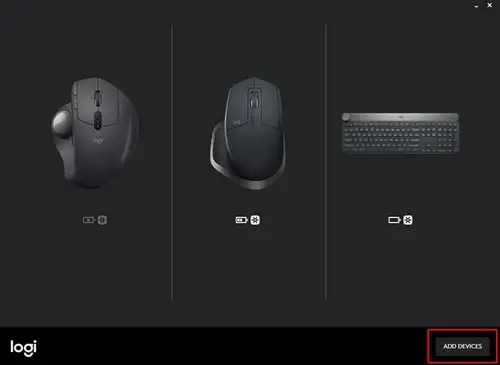
- Open Logitech Options.
- Click Add devices.
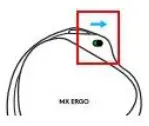
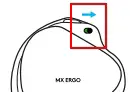
- Make sure your trackball is turned on by sliding the button on the bottom to the right.
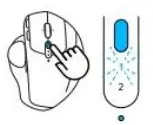
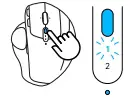
- Turn the trackball over and press the Easy-Switch button to select a channel 1 or 2.
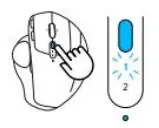
- Press and hold the Easy-Switch button for three seconds to enter pairing mode. The LED will start blinking quickly.
- Find the MX ERGO in your computer’s list of Bluetooth devices and connect it.
Connect Using the Unifying Receiver:
- Open Logitech Options.
- Make sure your trackball is turned on by sliding the button on the bottom to the right.
- Turn the trackball over and press the Easy-Switch button to select a channel 1 or 2.
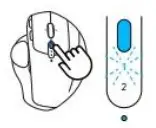
- Press and hold the Easy-Switch button for three seconds to enter pairing mode. The LED will start blinking quickly.
- Find the MX ERGO in your computer’s list of Bluetooth devices and connect it.
- Open Logitech Options and click Add devices.
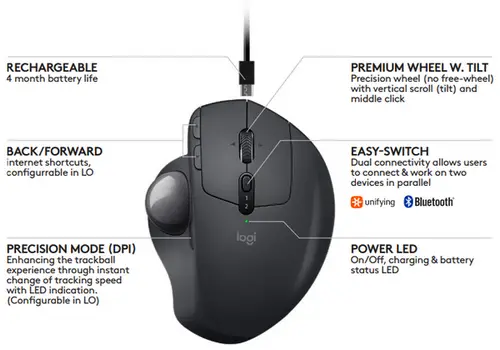
Features:
- Micro USB charging port
- Adjustable angle
- Back / forward buttons
- Precision mode button:
Instantly change your cursor speed and accuracy for optimal control with the press of a button. An LED light illuminates when precision is activated. - Precision scroll wheel with tilt:
Use the precision scroll wheel with tilt and middle click for convenient controls and quick access to your favorite shortcuts. - Easy-Switch and connect button:
Two-channel Easy-Switch capabilities let you switch between two computers without re-pairing. - Power LED
Rechargeable battery:
A fast rechargeable battery holds power for up to four months on a full charge. A quick, one-minute charge gives you a full day of usage.
Flow-enabled:
Easily copy/paste text, images, and files between computers thanks to Logitech Flow technology.
Specs and Details
Dimensions
Trackball Mouse
- Height: 5.22 in (132.5 mm)
- Width: 3.93 in (99.8 mm)
- Depth: 2.02 in (51.4 mm)
- Weight (without metal plate/without receiver): 5.78 oz (164 g)
- Weight (with metal plate/without receiver): 9.14 oz (259 g)
USB Receiver
- Height: 0.72 in (18.4 mm)
- Width: 0.57 in (14.4 mm)
- Depth: 0.24 in (6.1 mm)
- Weight: 0.07 oz (2 g)
Technical Specifications
Sensor Technology
- Logitech Advanced Optical Tracking
- Nominal value: 380 dpi
- Minimal and maximal value: 512-2048 dpi
Buttons
- Number of buttons: 8 (Left/Right-click, Back/Forward, Scroll-wheel with Right/Left-tilt and Middle-click, Precision Mode, Easy-switch)
- Number of customizable buttons: 6
Battery
- Rechargeable Li-Po (500 mAh) battery
- Battery life: Up to 4 months on a single full charge 4
Connection Type
- USB Receiver
- Bluetooth Low Energy Technology
- Wireless operating distance: 10 m (33 ft) 5
Customization software
- Supported by Logi Options+ on macOS 10.15 or later and Windows 10 or later
Warranty Information
1-Year Limited Hardware Warranty
Part Number
- 910-005178
FAQ – Frequently Asked Questions
Does the mx ergo have the super fast, gearless “freely spinning” wheel like the mx masters?
No “free wheeling” but a simple mod will make the wheel spin freely. I did this on mine after a little apprehension at first. Not sure if will be easily reverted to tactile “cog” movement but it suits me.
Does this one come with the wedge? It doesn’t mention it in the description but someone mentioned that they ordered a second one and it came with it.
This comes with the metal wedge to go from 0 to 20 degrees, but it does not have the added “Plus” model accessory to increase the angle by 10, to a total angle of 30 degrees.
Is the ball on this fast enough to switch between 3 screens? The M570 is too slow.
It works fine for me on two computers, don’t know about three though since the mouse has just two selector buttons for two PC’s.
Anyone know how this mouse works with ptc creo 3.0? creo requires a middle mouse button that this doesn’t seem to have.
The scroll wheel is also the middle mouse button…you can also customise the function of each button.
How is this for gaming?
This is definitely not a gaming mouse. The polling rate is only 125Hz, where a typical gaming mouse would poll 500-1000Hz, or more. Nothing is stopping you from playing games with it, but if you’re looking for something that will excel at gaming you’d be better served with a gaming oriented model.
Is there a way to silence the left and right click?
Yes, but it involves knowing how to desolder the old switches and soldering in silent switches that you can find online somewhere or another silent mouse. I’ve silenced all my mice this way and it is actually really easy with the right tools.
What’s the difference between this one and the regular MX Master 3?
MX Master 3 for Mac is finished in Space Gray – meaning its look fits perfectly with your Mac and iPad ecosystem.
Can you use the thumb wheel for vertical scrolling?
The thumb wheel of MX Master 3 can be customized to use as a vertical wheel using Logi Options software.
For more information, kindly visit the Logi website or feel free to contact Logi Support at support.logi.com
Is there a left-hand version of this mouse?
Don’t think so
Can the buttons be programmed differently for different applications? (auto cad, Blue beam, Browsing)?
The Logi Options app has a drop down list to select existing default applications or add applications that you want to program buttons differently. There’s also an “All Applications” option in the same drop down list to program buttons that apply to all programs.
what is the difference between this and the 2S ?
The main differences that a user will notice are the button layout changes (very minor but improved in the 3) and the switch to USB-C for charging. Overall, there aren’t many noticeable changes from my understanding.
What usb revision is the usb c to a cable that comes with the mouse (2.0,3.0,etc)? what charging speeds does it support for other devices?
USB-C cable is a 3.0 and it is Quick charging.1 minute charge could last 70 days.
Can this mouse still be used while charging and/or via USB??
you can certainly use the MX Master 3 while charging the device as well. Please make sure that your device is connected via USB receiver or via Bluetooth.
The battery light only stays on for a couple of seconds after you turn it on, Is there a way to keep the light on all the time to show where it’s at?
If you use the Logitech Options App, it tells you how low is your battery and gives you notifications if it’s low.
does logitech flow functionality work between two chromebooks?
Logitech Flow feature is available only on Mac and Windows operating system. If you ever be in need of assistance with the device, please contact our support and the issue will be taken care of.
is this mouse considered to be eurgonomic?
Yes, it is an ergonomic mouse.
Can you bind key commands with modifiers like shift+l or alt, ctrl?
you can assign both the mentioned commands on the MX Master 3 via Logitech Options. If you ever be in need of assistance with any issue regarding the buttons of the keyboard, then please contact our support and we will be happy to help you.
What is the difference between model number 910-005620 and model number 910-005647 in this mouse?
the reason for the different model numbers is attributed to the different color. Otherwise there is no difference between the two. 910-005620, comes in GRAPHITE color and 910-005647 comes in BLACK color.
VIDEO
How to enable Accessibility and Input monitoring permissions for Logitech Options
We’ve identified a few cases where devices aren’t detected in the Logitech Options software or where the device fails to recognize customizations made in the Options software (however, the devices do work in out-of-box mode with no customizations).
Most of the time this happens when macOS is upgraded from Mojave to Catalina/BigSur or when interim versions of macOS are released. To resolve the problem, you can enable permissions manually. Please follow the steps below to remove the existing permissions and then add the permissions. You should then restart the system to allow the changes to take effect.
– Remove existing permissions
– Add the permissions
Remove existing permissions
To remove the existing permissions:
- Close Logitech Options software.
- Go to System Preferences -> Security & Privacy. Click the Privacy tab, and then click Accessibility.
- Uncheck Logi Options and Logi Options Daemon.
- Click on Logi Options and then click on the minus sign ‘–’ .
- Click on Logi Options Daemon and then click on the minus sign ‘–’ .
- Click on Input Monitoring.
- Uncheck Logi Options and Logi Options Daemon.
- Click on Logi Options and then click on the minus sign ‘–’.
- Click on Logi Options Daemon and then click on the minus sign ‘–’.
- Click Quit and Reopen.
To add the permissions:
- Go to System Preferences > Security & Privacy. Click the Privacy tab and then click Accessibility.
- Open Finder and click on Applications or press Shift+Cmd+A from the desktop to open Applications on Finder.
- In Applications, click Logi Options. Drag and drop it to the Accessibility box in the right panel.
- In Security & Privacy, click on Input Monitoring.
- In Applications, click Logi Options. Drag and drop it to the Input Monitoring box.
- Right-click on Logi Options in Applications and click on Show Package Contents.
- Go to Contents, then Support.
- In Security & Privacy, click on Accessibility.
- In Support, click Logi Options Daemon. Drag and drop it to the Accessibility box in the right pane.
- In Security & Privacy, click on Input Monitoring.
- In Support, click Logi Options Daemon. Drag and drop it to the Input Monitoring box in the right pane.
- Click Quit and Reopen.
- Restart the system.
- Launch the Options software and then customize your device.
Adobe Photoshop 22.3 incompatibility with Mac M1 computers and Logitech Options
Logitech Options software is not compatible with the recent update from Adobe Photoshop 22.3, with native support for Apple M1 computers. We have not observed issues with Intel-based Mac computers.
Adobe Photoshop 22.3 has been confirmed to work with the Logitech Options plugin when you open it using Rosetta 2. Use the following steps:
1. Install the latest Logitech Options software.
2. Install Adobe Photoshop 22.3.
3. Connect any plugin-supported device.
4. Navigate to Applications > Adobe Photoshop 2021 > Adobe Photoshop 2021.
5. Right-click on Photoshop.
6. Select Open using Rosetta.
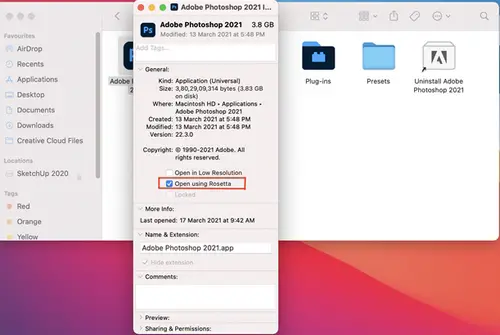 The plugin actions should now work.
Unable to load extensions with Adobe Photoshop
If you’re getting the error “LogiOptions extension could not be loaded because it was not properly signed”, please remove the Adobe Photoshop plugin and then add it again.
Logitech Keyboard, Presentation and Mice Software – macOS 11 (Big Sur) Compatibility
Apple has announced a forthcoming update macOS 11 (Big Sur) due to be released in the fall of 2020.
|
|
Limited Full Compatibility Logitech Control Center will be fully compatible with macOS 11 (Big Sur), but only for a limited compatibility period. macOS 11 (Big Sur) support for Logitech Control Center will end early 2021. |
|
Fully Compatible |
Fully Compatible
|
|
|
|
Logitech Options Software Release Notes
Aug 24, 2022
– Logitech Options App 9.70.29 (macOS only)
– Bug fixes & improvements
July 28, 2022
– Logitech Options App 9.70.68 (Windows only)
– Bug fixes & improvements
May 31, 2022
– Logitech Options App 9.60.87 (Mac)
– Support for M1 Mac
– Optimized the Options+ notifications
– Bug fixes & improvements
March 2, 2022
– Logitech Options App 9.60.87 (Windows only)
– Optimized the Options+ notifications
– Security fixes
– Bug fixes & improvements
January 7, 2022
– Logitech Options App 9.50
– Fixed a backend crash that happens when connected over Bluetooth
macOS 12 compatibility
– Support for LCC devices (Performance MX, Anywhere MX, M510, M310)
– Adobe 2022 Support
– Changed shortcut to PrintScreen on the Screen Capture key in MX Keys for Business
– Additional security fixes
September 28, 2021
– Logitech Options App 9.40
– Support for Logi Bolt app (bundled) that is needed for the following devicesMX Keys combo for Business
– MX Keys for Business
– MX Master 3 for Business
– MX Anywhere 3 for Business
– ERGO K860 for Business
– ERGO M575 for Business
– Logi POP Keys
– Logi POP Mouse
– MX Keys Mini
– MX Keys Mini for Mac
– MX Keys Mini for Business
– Bug fixes and improvements
June 14, 2021 (Revised)
– Logitech Options App 8.54.161 (Windows only)
– Notifications for Options+ beta
– Improved security when logged in Bug fixes and improvements
May 17, 2021
– Logitech Options App 8.54 (macOS only)
– Support for LCC devices: Marble, LS1, M500, M505, M570, and M705
– Bug fixes and improvements
April 21, 2021
– Logitech Options App 8.54.106 (Windows only)
– Bug fixes and improvements
April 1, 2021
– Logitech Options App 8.50 (macOS only)
– Bug fixes and improvements
December 3, 2020
– Logitech Options App 8.36
– Compatibility with Adobe 2021
– Introducing Zoom and Teams plugin support for MX Ergo
– General bug fixes
October 28, 2020
– Logitech Options App 8.34
– Added support for ERGO M575 Wireless Trackball
– Introducing plugin support for MX Ergo Wireless Trackball
– Initial compatibility with macOS Big Sur
– Minor bug fixes
September 21, 2020
– Logitech Options App 8.30
– Added support for MX Anywhere 3 and MX Anywhere 3 for Mac
– App-specific profiles for Zoom and Teams
– Minor bug fixes
May 19, 2020
– Logitech Options App 8.20
-Added support for MX Keys for Mac
– Added support for MX Master 3 for Mac
– Added support for K380 for Mac
– Support for Edge Chromium plugin support for Windows
– Fixed blank screen issue on Windows while launching Options Software
– Fixed the issue with Final cut pro in latest macOS 10.15.4
– Fixed Logitech Options Software crashes when trying to add App Specific Settings to M510 & M545 mice
– Minor bug fixes
Logitech Options and Logitech Control Center macOS message: Legacy System Extension
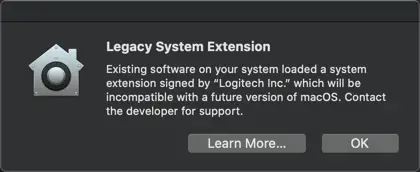
f you are using Logitech Options or Logitech Control Center (LCC) on macOS you may see a message that legacy system extensions signed by Logitech Inc. will be incompatible with future versions of macOS and recommending to contact the developer for support. Apple provides more information about this message here: About legacy system extensions.
Logitech is aware of this and we are working on updating Options and LCC software to ensure we comply with Apple’s guidelines and also to help Apple improve its security and reliability.
The Legacy System Extension message will be displayed the first time Logitech Options or LCC loads and again periodically while they remain installed and in use, and until we have released new versions of Options and LCC. We do not yet have a release date, but you can check for the latest downloads here.
NOTE: Logitech Options and LCC will continue to work as normal after you click OK.
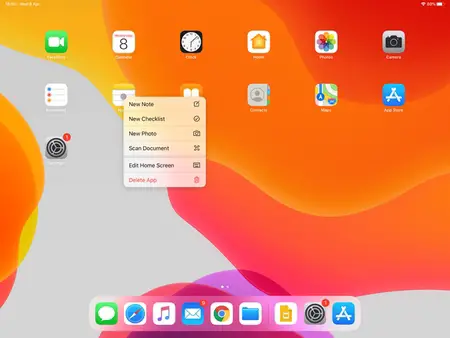
What happens when you right-click in iPadOS?
A right-click is comparable to a long-press with your finger. Using the mouse, there’s no need to hold down to have the menu appear — it shows in an instant.
NOTE: This functionality is subject to support by the app maker.
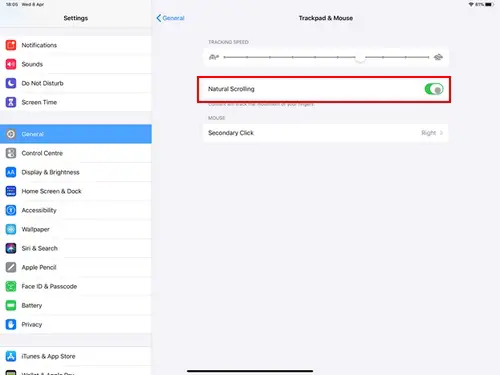
Change the scrolling direction of mouse on iPadOS
You can change the scrolling direction of your mouse from Natural Scrolling to the other direction. Here’s how:
1. Go to Settings > General > Trackpad and Mouse.
2. Slide the toggle to the left to turn off Natural Scrolling.
Pair Logitech mouse to iPad using Bluetooth
1. To pair your mouse to iPad, do the following:
Turn your mouse ON.
The LED should start blinking fast. If it doesn’t, perform a long press on the Easy-Switch button on the mouse.
2.Open the iPad Settings and tap Bluetooth settings.
3. Choose your mouse in the list of Devices.
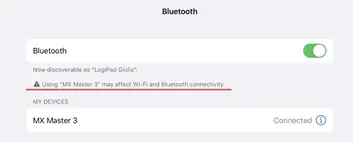
Warning message when Logitech device is connected to iPadOS
When you connect your Logitech device, you might see a warning message.
If this happens, make sure to connect only the devices you’ll be using. The more devices that are connected, the more interference you might have between them.
If you are having connectivity issues, disconnect any Bluetooth accessories that you’re not using. To disconnect a device:
– In Settings > Bluetooth, tap the information button next to the device name, then tap Disconnect.
Bluetooth mouse or keyboard not recognized after reboot on macOS (Intel-based Mac) – FileVault
If your Bluetooth mouse or keyboard does not reconnect after a reboot at the login screen and only reconnects after the login, this might be related to FileVault encryption.
When FileVault is enabled, Bluetooth mice and keyboards will only re-connect after login.
Potential solutions:
– If your Logitech device came with a USB receiver, using it will solve the issue.
– Use your MacBook keyboard and trackpad to login.
– Use a USB keyboard or mouse to login.
Note: This issue is fixed from macOS 12.3 or later on M1. Users with an older version might still experience it.
Logitech mouse AssistiveTouch pointer support on iPadOS
Moving a pointer on iPadOS
iPad OS 13.1 lets you use a mouse as a pointer with the AssistiveTouch feature. This feature is intended to help people who have difficulty using the touch screen, but it can also be useful for advanced users. For example:
Getting things done on the go
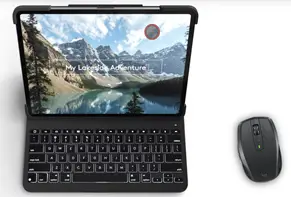
A Logitech mobile mouse such as MX Anywhere 2S can be a good addition to the Logitech Slim Folio Pro Keyboard Case for productive sessions on the go. The mouse will be quite efficient for text editing, scrolling in spreadsheets and navigating between apps.
Working with multiple devices at your desk
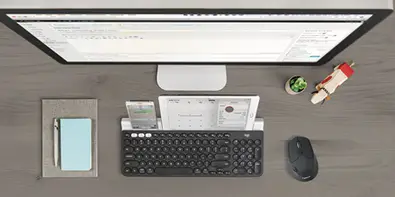
Logitech multi-device keyboards and mice allow you to work on multiple computers, and tablets, and switch between them with the press of a button. You can start a report on your computer, and then switch to your iPad to write a quick message.
Presenting from your iPad
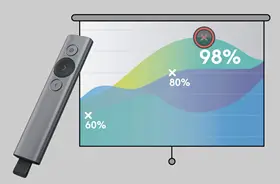
When presenting with your iPad connected to a large screen, Logitech Spotlight Presentation Remote lets you control your slides and point out precise areas of focus in your presentation by moving the iPadOS pointer. (Note: Logitech Presentation software cannot be installed on iPadOS. The Spotlight effect and other software-enabled features are not available on iPad).
How does it work?
The pointer looks like a circle, designed to simulate the touch of a finger. You can use the mouse as if you moved a finger on the screen. Clicking will be like tapping the screen with the finger.
The mouse can be connected using Bluetooth or the wireless USB dongle using a USB adapter. You will need to enable AssistiveTouch in the Accessibility settings. See more setup details below.
Which Logitech mice are supported?
Pointing, clicking, right-click and scrolling are supported on iPadOS 13.1 for most Logitech Bluetooth mice. The supported mice are MX Master 3, MX Master 2S, MX Anywhere 2S, MX Vertical, MX Ergo, M720 Triathlon Mouse, M585, and M350 Pebble Mouse.
NOTE: Logitech Options software and software-related features are not supported on iPadOS.
– Limitations
Enabling the pointer and the AssistiveTouch requires to go multiple levels into the iPad settings. See the setup instructions below.
– iPadOS is enabling pointer movement as an AssistiveTouch feature. This means that the behavior of the pointer will be like moving a finger on the screen, not like using a cursor on a computer.
– Scrolling direction is fixed to “natural scrolling” and cannot be changed. Scrolling doesn’t work in all applications.
Set up and use a Logitech mouse on iPad OS
Make sure you have iPadOS installed on your iPad iPadOS can be installed on the following devices:
– All iPad Pros
– iPad (5th and 6th generation)
– iPad mini (5th generation)
– iPad mini 4
– iPad Air (3rd generation)
– iPad Air 2
Bluetooth Pairing
1. Turn on your mouse and do a long-press on the Bluetooth Easy-Switch button.
2. The Bluetooth LED will start blinking quickly, indicating your mouse is in discoverable mode.
3. Complete the pairing in the Bluetooth settings on your iPad.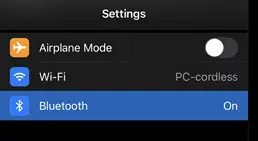
Enable the pointer
The pointer is enabled through the AssistiveTouch feature in iPadOS settings. To enable the pointer:
1. Go to Settings > Accessibility > Touch.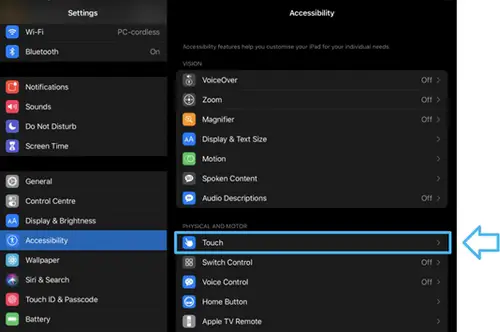
Enable AssistiveTouch.
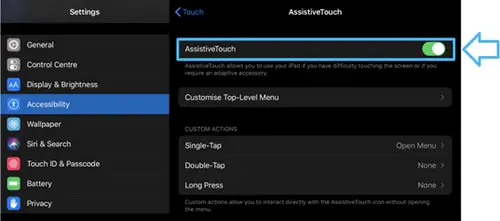
You should see the following appear on your screen:
Pointer circle

The pointer appears when the mouse is connected. You can move this pointer with your mouse. When you click, it will act as a finger doing a tap on the screen
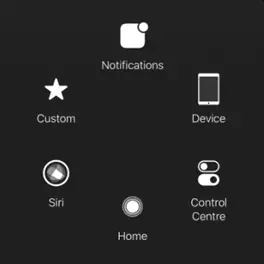
AssistiveTouch button

This is a shortcut to the AssistiveTouch top-level menu and allows you to go to the home screen.
Get the most out of your mouse on iPadOS
Mouse button mapping
By default, the mouse buttons are assigned to the following actions:
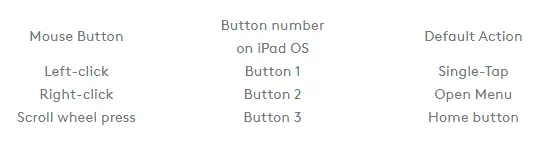
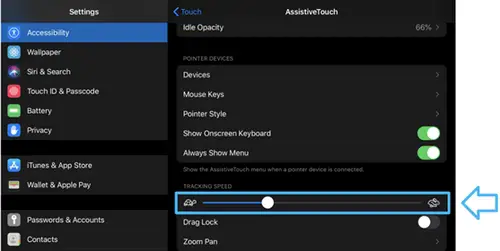
Pointer Settings
You can change the tracking speed of the pointer:
You can also customize the size and color of the pointer:

Customize the mouse buttons
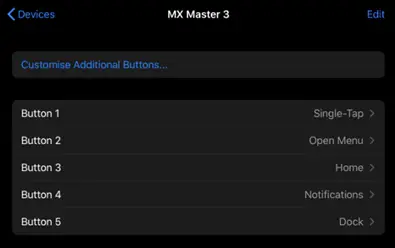
You can customize the actions that will be associated with the different mouse buttons:
1. Go to Settings > Accessibility > Touch > Devices.
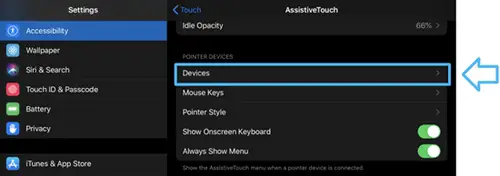
2. Select the connected device you want to customize.
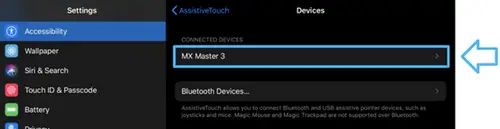
You can also customize additional buttons to use the “Back” and “Forward” buttons of your Logitech Mouse to do things like showing Notifications or using the Dock.
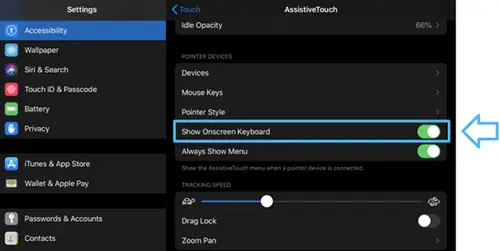
Using the on-screen keyboard
Most of our mice have advanced buttons that are recognized by the system as keyboard shortcuts. Due to this, when a mouse is connected, the system believes that an external keyboard is also connected and the on-screen keyboard will disappear.
If you don’t use an external keyboard and want to keep using the on-screen keyboard, make sure that Show Onscreen Keyboard is enabled.
Backup device settings to the cloud in Logitech Options+
INTRODUCTION
This feature on Logi Options+ allows you to backup the customization of your Options+ supported device automatically to the cloud after creating an account. If you are planning to use your device on a new computer or wish to go back to your old settings on the same computer, log into your Options+ account on that computer and fetch the settings you want from a backup to set up your device and get going.
HOW IT WORKS
When you are logged into Logi Options+ with a verified account, your device settings are automatically backed up to the cloud by default. You can manage the settings and the backups from the Backups tab under More settings of your device (as shown):
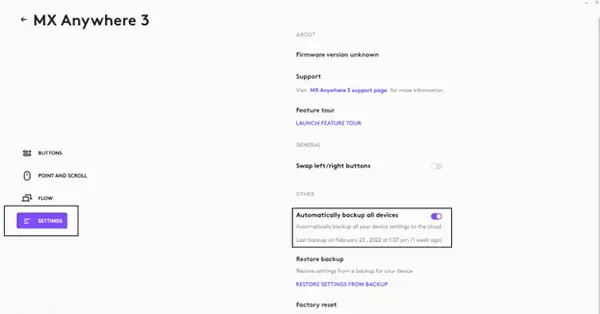
Manage settings and backups by clicking on More > Backups:
AUTOMATIC BACKUP OF SETTINGS — if the Automatically create backups of settings for all devices checkbox is enabled, any settings you have or modify for all of your devices on that computer are backed up to the cloud automatically. The checkbox is enabled by default. You can disable it if you don’t want the settings of your devices to be backed up automatically.
CREATE A BACKUP NOW — this button allows you to backup your current device settings now, if you need to fetch them later.
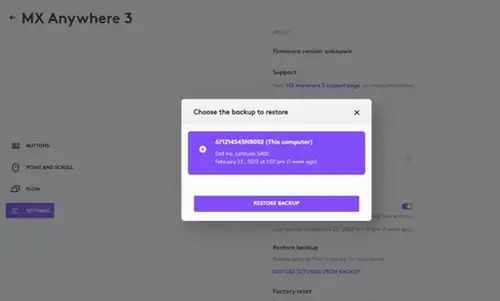
RESTORE SETTINGS FROM BACKUP — this button lets you view and restore all the available backups you have for that device that are compatible with that computer, as shown above.
The settings for a device are backed up for every computer that you have your device connected to and have Logi Options+ that you are logged into. Every time you make some modifications to your device settings, they get backed up with that computer name. The backups can be differentiated based on the following:
– Name of the computer. (Ex. John’s Work Laptop)
– Make and/or model of the computer. (Ex. Dell Inc., Macbook Pro (13-inch) and so on)
– The time when the backup was made
The desired settings can then be selected and restored accordingly.
WHAT SETTINGS GET BACKED UP
– Configuration of all the buttons of your mouse
– Configuration of all the keys of your keyboard
– Point & Scroll settings of your mouse
– Any application-specific settings of your device
WHAT SETTINGS ARE NOT BACKED UP
– Flow settings
– Options+ app settings
Logitech Options permission prompts on macOS Monterey, macOS Big Sur, macOS Catalina, and macOS Mojave
Download the latest version of Logitech Options software.
See Bellow……
Logitech Options permission prompts on macOS Monterey and macOS Big SurFor official macOS Monterey and macOS Big Sur support, please upgrade to the latest version of Logitech Options (9.40 or later).
Starting with macOS Catalina (10.15), Apple has a new policy that requires user permission for our Options software for the following features:
– Bluetooth Privacy prompt needs to be accepted to connect Bluetooth devices through Options.
– Accessibility access is needed for scrolling, gesture button, back/forward, zoom, and several other features.
– Input monitoring access is needed for all the features enabled by the software such as scrolling, gesture button, and back/forward among others for devices connected via Bluetooth.
– Screen recording access is needed to capture screenshots using a keyboard or a mouse.
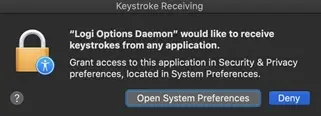
– System Events access is needed for the Notifications feature and Keystroke assignments under different applications.
–Finder access is needed for the Search feature.
– System Preferences access if needed for launching Logitech Control Center (LCC) from Options.
Bluetooth Privacy prompt
When an Options supported device is connected with Bluetooth/Bluetooth Low Energy, launching the software for the first time will show the below pop-up for Logi Options and Logi Options Daemon:
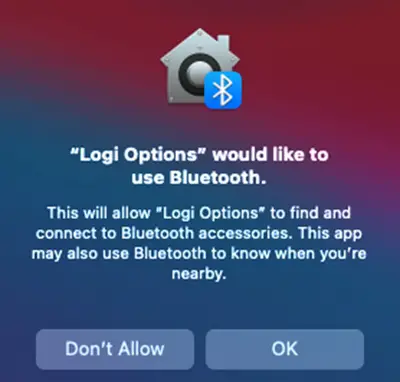
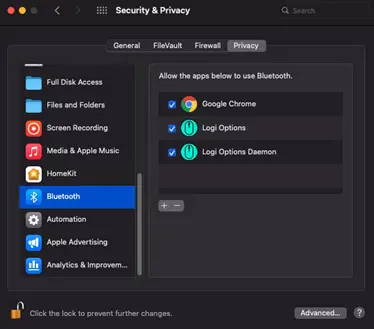
Once you click OK, you will be prompted to enable the checkbox for Logi Options in Security & Privacy > Bluetooth.
When you enable the checkbox, you will see a prompt to Quit & Reopen. Click on Quit & Reopen for the changes to take effect.

Once the Bluetooth Privacy settings are enabled for both Logi Options and Logi Options Daemon, the Security & Privacy tab will appear as shown:
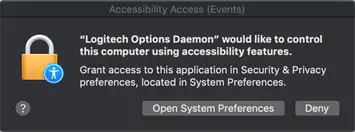
Accessibility Access
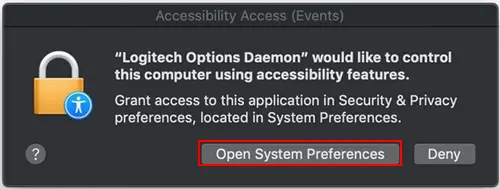
Accessibility access is needed for most of our basic features such as scrolling, gesture button functionality, volume, zoom, and so on. The first time you use any feature that requires accessibility permission, you’ll be presented with the following prompt:
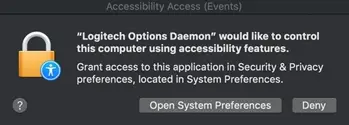
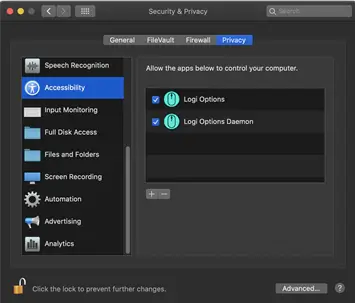
To provide access:
1. Click Open System Preferences.
2. In System Preferences, click the lock at the bottom left corner to unlock.
3. In the right panel, check the boxes for Logitech Options and Logitech Options Daemon.
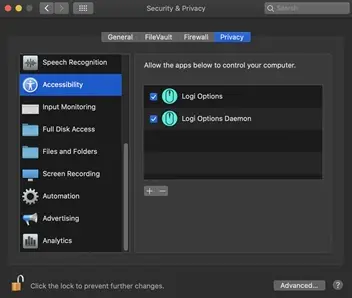
If you already clicked Deny, follow these steps to manually allow access:
1. Launch System Preferences.
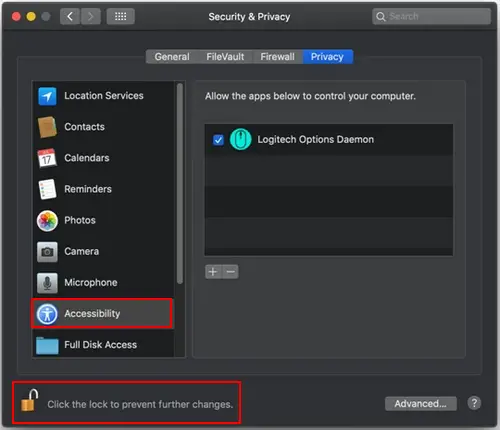
2. Click Security & Privacy, then click the Privacy tab.
3. In the left panel, click Accessibility and then follow steps 2-3 above.
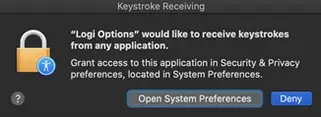
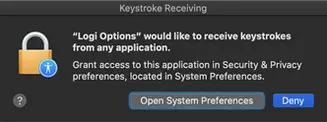
Input Monitoring Access
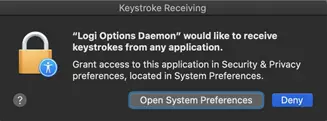
Input monitoring access is needed when devices are connected using Bluetooth for all features enabled by the software such as scrolling, gesture button, and back/forward to work. The following prompts will be displayed when access is needed:
1. Click Open System Preferences.
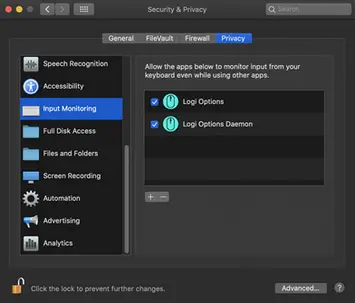
2. In System Preferences, click the lock at the bottom left corner to unlock.
3. In the right panel, check the boxes for Logitech Options and Logitech Options Daemon.

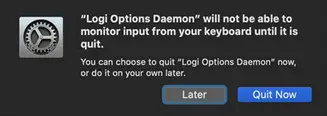
4. After you check the boxes, select Quit Now to restart the application and allow the changes to take effect.


If you already clicked Deny, please do the following to allow access manually:
1. Launch System Preferences.
2. Click Security & Privacy, and then click the Privacy tab.
3. In the left panel, click Input Monitoring and then follow steps 2-4 from above.
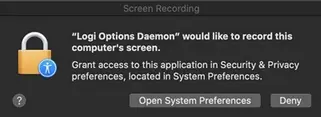
Screen Recording Access
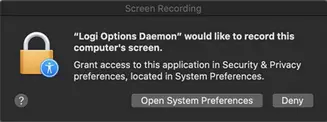
Screen recording access is needed to capture screenshots using any supported device. You’ll be presented with the prompt below when you first use the screen capture feature:
1. Click Open System Preferences.
2. In System Preferences, click the lock at the bottom left corner to unlock.
3. In the right panel, check the box for Logitech Options Daemon.
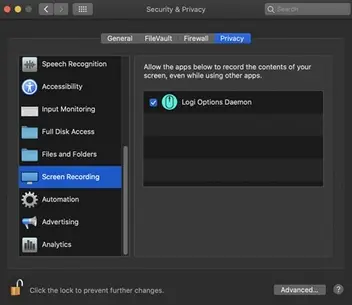
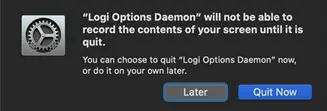
4. Once you check the box, select Quit Now to restart the application and allow the changes to take effect.

If you already clicked Deny, use the following steps to allow access manually:
1. Launch System Preferences.
2. Click Security & Privacy, then click the Privacy tab.
3. In the left panel, click on Screen Recording and follow steps 2-4 from above.
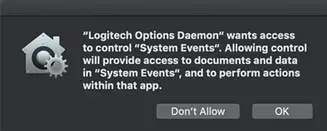
System Events prompts
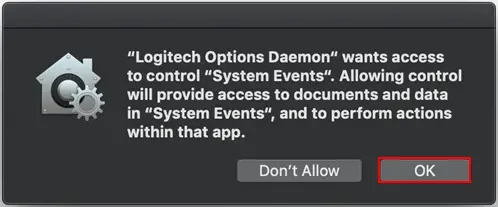
If a feature requires access to a specific item like System Events or Finder, you will see a prompt the first time you use this feature. Please note that this prompt appears only once to request access for a specific item. If you deny access, all the other features that need access to the same item will not work and another prompt will not be shown.
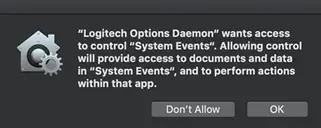
Please click OK to allow access for Logitech Options Daemon so that you can continue to use these features.
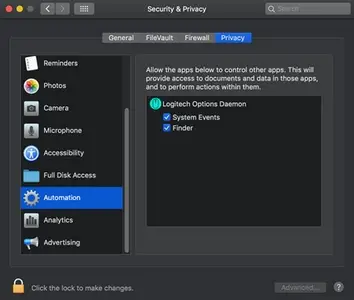
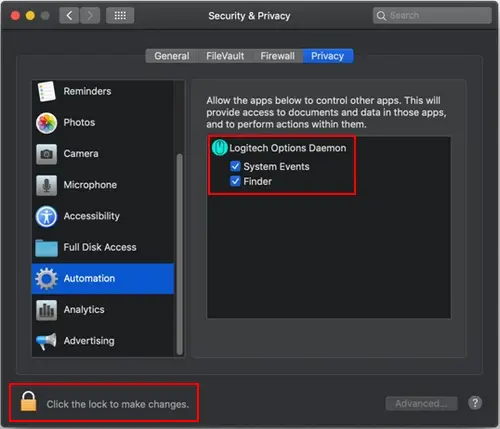
If you already clicked on Don’t Allow, use the following steps to allow access manually:
1. Launch System Preferences.
2. Click Security & Privacy.
3. Click the Privacy tab.
4. In the left panel, click Automation and then check the boxes under Logitech Options Daemon to provide access. If you are unable to interact with the checkboxes, please click the lock icon on the bottom left corner and then check the boxes.
NOTE: If a feature still doesn’t work after you grant access, please reboot the system.
Logitech Options permission prompts on macOS CatalinaFor official macOS Catalina support, please upgrade to the latest version of Logitech Options (8.02 or later).
Starting with macOS Catalina (10.15), Apple has a new policy that requires user permission for our Options software for the following features:
Accessibility access is needed for scrolling, gesture button, back/forward, zoom and several other features
Input monitoring (new) access is needed for all the features enabled by the software such as scrolling, gesture button and back/forward among others for devices connected via Bluetooth
Screen recording (new) access is needed to capture screenshots using a keyboard or a mouse
System Events access is needed for Notifications feature and Keystroke assignments under different applications
Finder access is needed for the Search feature
System Preferences access if needed for launching Logitech Control Center (LCC) from Options
Accessibility Access
Accessibility access is needed for most of our basic features like scrolling, gesture button functionality, volume, zoom, and so on. The first time you use any feature that requires accessibility permission, you’ll be presented with the following prompt:
To provide access:
1. Click Open System Preferences.
2. In System Preferences, click the lock at the bottom left corner to unlock.
3. In the right panel, check the boxes for Logitech Options and Logitech Options Daemon.
If you already clicked ‘Deny’, do the following to allow access manually:
1. Launch System Preferences.
2. Click Security & Privacy, then click the Privacy tab.
3. In the left panel, click Accessibility and then follow steps 2-3 above.
Input Monitoring Access
Input monitoring access is needed when devices are connected using Bluetooth for all features enabled by the software such as scrolling, gesture button and back/forward to work. The following prompts will be displayed when access is needed:
1. Click Open System Preferences.
2. In System Preferences, click the lock at the bottom left corner to unlock.
3. In the right panel, check the boxes for Logitech Options and Logitech Options Daemon.
4. After you check the boxes, select Quit Now to restart the application and allow the changes to take effect.

If you already clicked ‘Deny’, please do the following to allow access manually:
1. Launch System Preferences.
2. Click Security & Privacy, and then click the Privacy tab.
3. In the left panel, click Input Monitoring and then follow steps 2-4 from above.
Screen Recording Access
Screen recording access is needed to capture screenshots using any supported device. You’ll be presented with the prompt below when you first use the screen capture feature.
1. Click Open System Preferences.
2. In System Preferences, click the lock at the bottom left corner to unlock.
3. In the right panel, check the box for Logitech Options Daemon.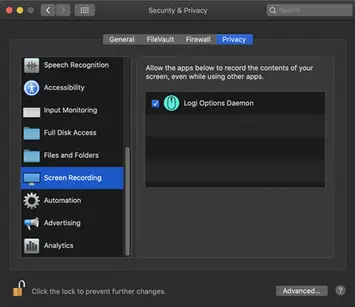
4. Once you check the box, select Quit Now to restart the application and allow the changes to take effect.
If you already clicked ‘Deny’, use the following steps to allow access manually:
1. Launch System Preferences.
2. Click Security & Privacy, then click the Privacy tab.
3. In the left panel, click on Screen Recording and follow steps 2-4 from above.
System Events prompts
If a feature requires access to a specific item like System Events or Finder, you will see a prompt the first time you use this feature. Please note that this prompt appears only once to request access for a specific item. If you deny access, all the other features that need access to the same item will not work and another prompt will not be shown.
Please click on OK to allow access for Logitech Options Daemon so that you can continue to use these features.
If you already clicked on Don’t Allow, use the following steps to allow access manually:
1. Launch System Preferences.
2. Click Security & Privacy.
3. Click the Privacy tab.
4. In the left panel, click Automation and then check the boxes under Logitech Options Daemon to provide access. If you are unable to interact with the checkboxes, please click the lock icon on the bottom left corner and then check the boxes.

NOTE: If a feature still doesn’t work after you grant access, please reboot the system.
– Click here for information on macOS Catalina and macOS Mojave permissions on Logitech Control Center.
– Click here for information on macOS Catalina and macOS Mojave permissions on Logitech Presentation software.
Logitech Options permission prompts on macOS Mojaveor official macOS Mojave support, please upgrade to the latest version of Logitech Options (6.94 or later).
Starting with macOS Mojave (10.14), Apple has a new policy that requires user permission for our Options software for the following features:
– Accessibility access is needed for scrolling, gesture button, back/forward, zoom and several other features
– Notifications feature and keystroke assignments under different applications need access to System Events
– Search feature needs access to Finder
– Launching Logitech Control Center (LCC) from Options requires access to System Preferences
The following are the user permissions the software needs for you to get complete functionality for your Options-supported mouse and/or keyboard.
Accessibility Access
Accessibility access is needed for most of our basic features like scrolling, gesture button functionality, volume, zoom, and so on. The first time you use any feature that requires accessibility permission, you’ll see a prompt as shown below.
Click Open System Preferences and then turn on the checkbox for Logitech Options Daemon.
In case you clicked Deny, use the following steps to allow access manually:
1. Launch System Preferences.
2. Click on Security & Privacy.
3. Click the Privacy tab.
4. In the left panel, click on Accessibility and check the boxes under Logitech Options Daemon to provide access (as shown below). If you are unable to interact with the checkboxes, please click the lock icon on the bottom left corner and then check the boxes.
System Events prompts
If a feature requires access to any specific item such as System Events or Finder, you will see a prompt (similar to the screenshot below) the first time you use this feature. Please note that this prompt appears only once, requesting access for a specific item. If you deny access, all the other features that need access to the same item will not work and another prompt will not be shown.
Click OK to allow access for Logitech Options Daemon so that you can continue to use these features.
In case you clicked Don’t Allow, use the following steps to allow access manually:
1. Launch System Preferences.
2. Click Security & Privacy.
3. Click the Privacy tab.
4. In the left panel, click Automation and then check the boxes under Logitech Options Daemon to provide access (as shown below). If you are unable to interact with the checkboxes, please click the lock icon on the bottom left corner and then check the boxes.
NOTE: If a feature still doesn’t work after you grant access, please reboot the system.
Flow network setup check for Mac
If you are having difficulty establishing a connection between two computers for Flow, follow these steps:
1. Check both systems are connected to the internet:
– On each computer, open a web browser and check the internet connection by navigating to a webpage.
2. Check that both computers are connected to the same network:
– Open the Terminal: For Mac, open your Applications folder, then open the Utilities folder. Open the Terminal application.
– In the Terminal, type: Ifconfig
– Check and note the IP address and Subnet mask. Make sure that both systems are in the same Subnet.
3. Ping the systems by IP address and make sure that ping works:Open the Terminal and type ping <IP address> [Where the <IP address is the IP address of the other computer noted in Step 2 above]
4. Check that the Firewall and Ports are correct:
– Ports used for Flow:
TCP : 59866
UDP : 59867,59868
1. Open the Terminal and type the following cmd to show the ports in use:
> sudo lsof +c15|grep IPv4
2. This is the expected result when Flow is using the default ports:
NOTE: Normally Flow uses the default ports but if those ports are already in use by another application Flow might use other ports.
3. Check that the Logitech Options Daemon is added automatically when Flow is enabled:
– Go to System Preferences > Security & Privacy
– In Security & Privacy go to the Firewall tab. Make sure the Firewall is on, then click on Firewall Options. (NOTE: You may have to click the lock in the bottom left corner to make changes which will prompt you to enter the account password.)
NOTE: On macOS, the firewall default settings automatically allow ports opened by signed apps through the firewall. As Logi Options is signed it should be added automatically without prompting the user.
4. This is the expected result: The two “Automatically allow” options are checked by default. The “Logitech Options Daemon” in the list box is added automatically when Flow is enabled.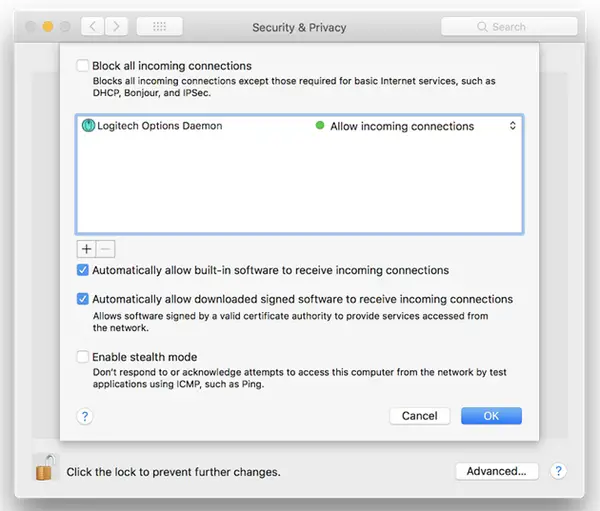
5. If Logitech Options Daemon is not there, try the following:Uninstall Logitech Options
– Reboot your Mac
– Install Logitech Options again
6. Disable Antivirus and reinstall:
– Try disabling your Antivirus program first, then reinstall Logitech Options.
– Once Flow is working, re-enable your Antivirus program.
Compatible Antivirus Programs
| Antivirus Program | Flow discovery & Flow |
|---|---|
| Norton | OK |
| McAfee | OK |
| AVG | OK |
| Kaspersky | OK |
| Eset | OK |
| Avast | OK |
| ZoneAlarm | Not Compatible |
Flow network setup check for Windows
If you are having difficulty establishing a connection between two computers for Flow, follow these steps:
- Check both systems are connected to the internet:
- On each computer, open a web browser and check the internet connection by navigating to a webpage.
- Check both computers connected to the same network:
- Open a CMD prompt/Terminal: Press Win+R to open Run.
- Type cmd and click OK.
- In the CMD prompt type: ipconfig /all
- Check and note the IP address and Subnet mask. Make sure that both systems are in the same Subnet.
- Ping the systems by IP address and make sure that ping works:
- Open a CMD prompt and type: ping <IP address> [Where the <IP address is the IP address of the other computer noted in step 2 above].
- Check that the Firewall & Ports are correct:
Ports used for Flow:TCP 59866 UDP 59867,59868 - Check the port is allowed: Press Win + R to open Run
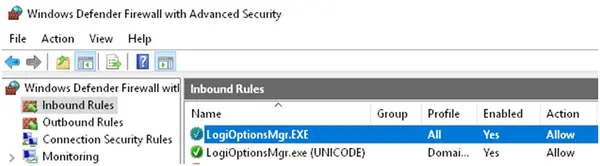
- Type wf.msc and click OK. This should open “Windows Defender Firewall with Advanced Security” window.
- Go to Inbound Rules and make sure LogiOptionsMgr.Exe is there and is allowedExample:
- If you don’t see the entry, it could be that one of your antivirus/firewall applications are blocking the rule creation, or you were initially denied access. Try the following:
- Disable the antivirus/firewall application temporarily.
- Recreate the firewall inbound rule by:
- Uninstalling Logitech Options
- Reboot your computer
- Make sure the antivirus/firewall app is still disabled
- Install Logitech Options again
- Re-enable your antivirus
Compatible Antivirus Programs
| Antivirus Program | Flow discovery & Flow |
|---|---|
| Norton | OK |
| McAfee | OK |
| AVG | OK |
| Kaspersky | OK |
| Eset | OK |
| Avast | OK |
| ZoneAlarm | Not Compatible |
Resolve Bluetooth Wireless issues on macOS
These troubleshooting steps go from easy to more advanced.
Please follow the steps in order and check if the device works after each step.
Make sure you have the latest version of macOS
Apple is regularly improving the way macOS handles Bluetooth devices.
Click here for instructions on how to update macOS.
Make sure you have the right Bluetooth parameters
1. Navigate to the Bluetooth preference pane in System Preferences:
– Go to Apple Menu > System Preferences > Bluetooth 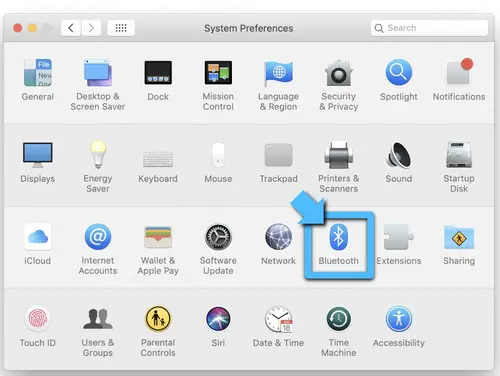
2. Make sure that Bluetooth is turned On. 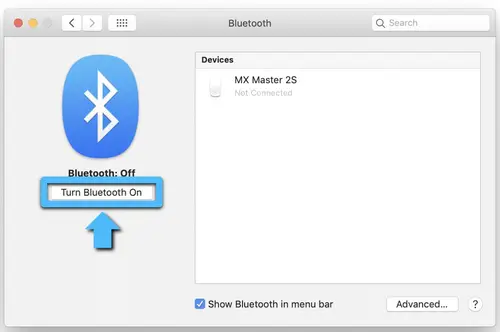
3. In the bottom-right corner of the Bluetooth Preference window, click Advanced. 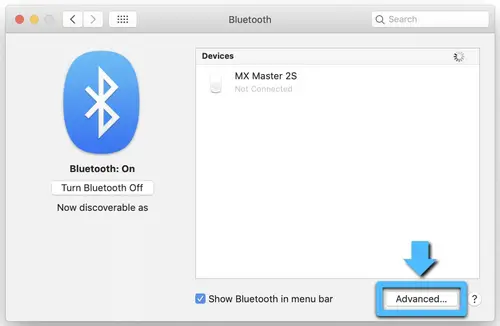
4. Make sure all three options are checked:
– Open Bluetooth Setup Assistant at startup if no keyboard is detected
– Open Bluetooth Setup Assistant at startup if no mouse or trackpad is detected
– Allow Bluetooth devices to wake this computer 
NOTE: These options ensure that Bluetooth-enabled devices can wake your Mac and that the OS Bluetooth Setup Assistant will launch if a Bluetooth keyboard, mouse or trackpad is not detected as connected to your Mac.
5. Click OK.
Restart the Mac Bluetooth Connection on your Mac
1. Navigate to the Bluetooth preference pane in System Preferences:
2. Go to Apple Menu > System Preferences > Bluetooth
3. Click Turn Bluetooth Off. 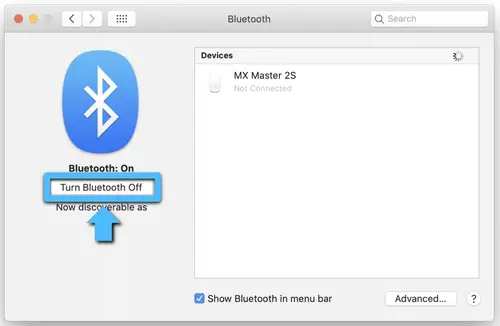
4. Wait a few seconds, and then click Turn Bluetooth On. 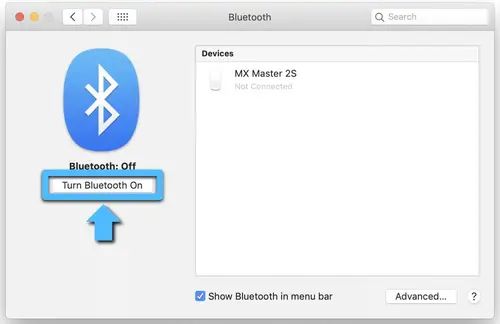
5. Check to see if the Logitech Bluetooth device is working. If not, go to the next steps.
Remove your Logitech device from the list of devices and try to pair again
1. Navigate to the Bluetooth preference pane in System Preferences:
– Go to Apple Menu > System Preferences > Bluetooth
2. Locate your device in the Devices list, and click on the “x” to remove it. 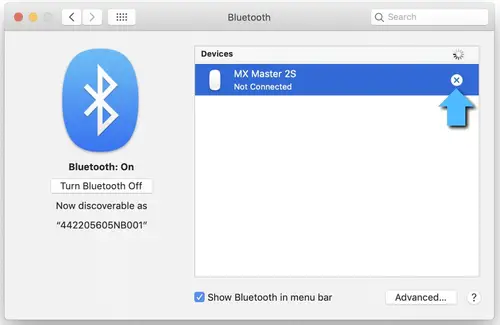
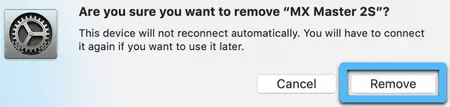
3. Re-pair your device by following the procedure described here.
Disable the hand-off feature
In some cases, disabling the iCloud hand-off functionality can help.
1. Navigate to the General preference pane in System Preferences:
– Go to Apple Menu > System Preferences > General 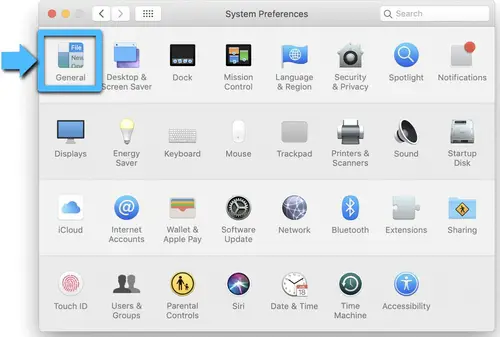
2. Make sure Handoff is unchecked. 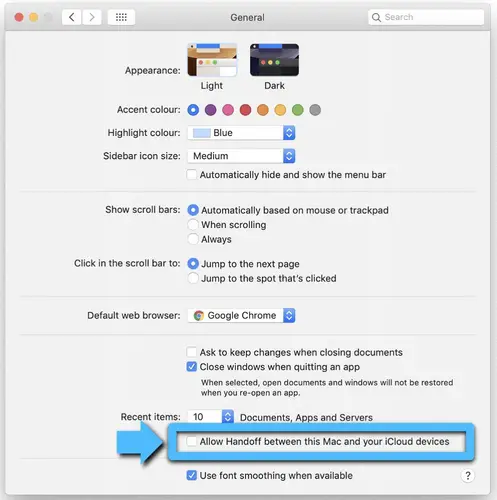
Reset the Mac’s Bluetooth settings
WARNING: This will reset your Mac, and cause it to forget all of the Bluetooth devices you have ever used. You will need to re-configure each device.
1. Make sure Bluetooth is enabled and that you can see the Bluetooth icon in the Mac Menu Bar at the top of the screen. (You’ll need to check the box Show Bluetooth in menu bar in the Bluetooth preferences).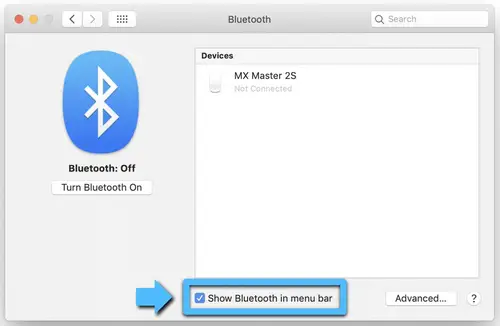
2. Hold down the Shift and Option keys, and then click the Bluetooth icon in the Mac Menu Bar.
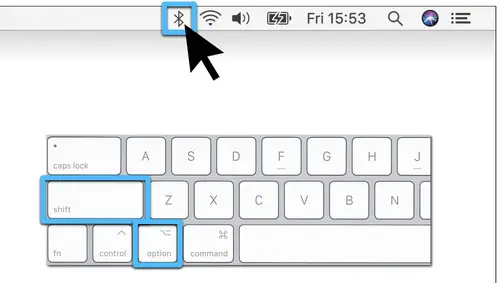
3. The Bluetooth menu will appear, and you will see additional hidden items in the drop-down menu. Select Debug and then Remove all devices. This clears the Bluetooth device table and you’ll then need to reset the Bluetooth system. 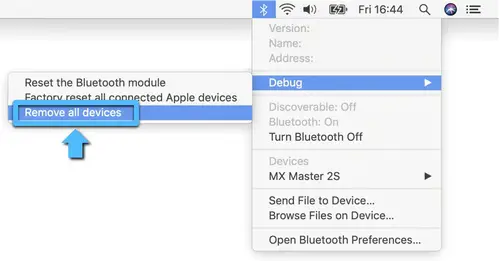
4. Hold down the Shift and Option keys again, click on the Bluetooth menu and select Debug > Reset the Bluetooth Module. 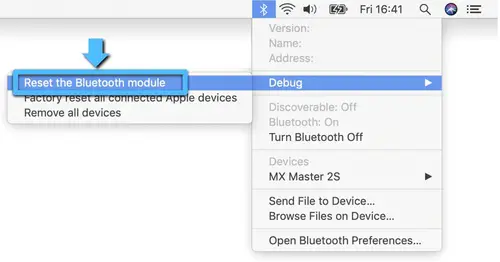
5. You will now need to repair all your Bluetooth devices following standard Bluetooth pairing procedures.
To re-pair your Logitech Bluetooth device:
NOTE: Make sure all your Bluetooth devices are on and have enough battery life before you re-pair them.
When the new Bluetooth Preference file is created, you’ll need to re-pair all your Bluetooth devices with your Mac. Here’s how:
1. If the Bluetooth Assistant starts up, follow the onscreen instructions and you should be ready to go. If the Assistant doesn’t appear, go to Step 3.
2. Click Apple > System Preferences, and select the Bluetooth Preference pane.
3. Your Bluetooth devices should be listed with a Pair button next to each unpaired device. Click Pair to associate each Bluetooth device with your Mac.
4. Check to see if the Logitech Bluetooth device is working. If not, go to the next steps.
Delete your Mac’s Bluetooth Preference List
The Mac’s Bluetooth Preference List may be corrupted. This preference list stores all the Bluetooth devices pairings and their current states. If the list is corrupted, you’ll need to remove your Mac’s Bluetooth Preference List and re-pair your device.
NOTE: This will delete all pairing for your Bluetooth devices from your computer, not just Logitech devices.
1. Click Apple > System Preferences, and select the Bluetooth Preference pane.
2. Click Turn Bluetooth Off. 
3. Open a Finder window and navigate to the /YourStartupDrive/Library/Preferences folder. Press Command-Shift-G on your keyboard and enter /Library/Preferences in the box.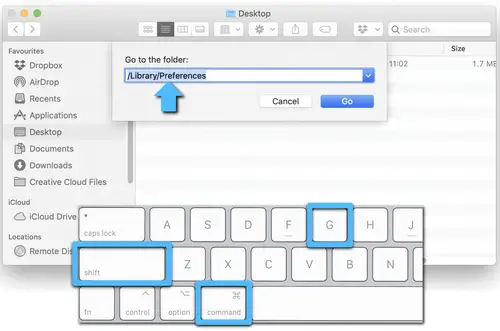
Typically this will be in /Macintosh HD/Library/Preferences. If you changed the name of your startup drive, then the first part of the pathname above will be that [Name]; for example, [Name]/Library/Preferences.
4. With the Preferences folder open in the Finder, look for the file called com.apple.Bluetooth.plist. This is your Bluetooth Preference List. This file could be corrupted and cause problems with your Logitech Bluetooth device.
5. Select the com.apple.Bluetooth.plist file and drag it to the desktop.
NOTE: This will create a backup file on your desktop if you ever want to go back to the original setup. At any point, you can drag this file back to the Preferences folder.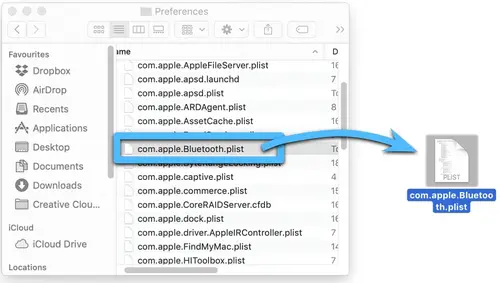
6. In the Finder window that is open to the /YourStartupDrive/Library/Preferences folder, right-click the com.apple.Bluetooth.plist file and select Move to Trash from the pop-up menu. 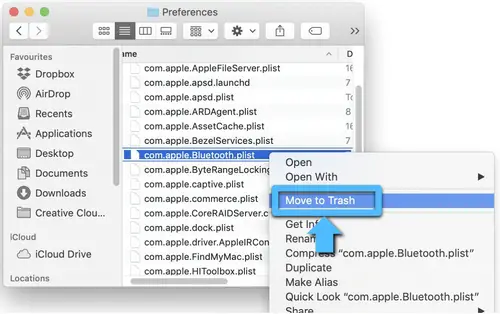
7. If you are asked for an administrator password to move the file to the trash, enter the password and click OK.
8. Close any open applications, then restart your Mac.
9. Re-pair your Logitech Bluetooth device.
Check for Bluetooth Low Energy support
There are two ways to check if your computer supports Bluetooth Low Energy (also called Bluetooth 4.0 or later):
– Use Logitech Options Software to check
– Check directly in the computer advanced settings (experienced users)
Use Logitech Options Software to check
You can use Logitech Options to find out if your computer supports Bluetooth Low Energy technology. If you don’t have Logitech Options software installed, you can download it.
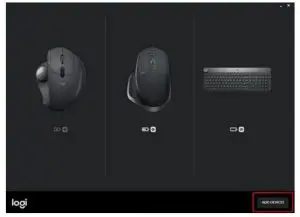
After you’ve installed Logitech Options, open it, and in the lower right corner, click Add Devices. In the Add a device window, in the right pane under Set up a Bluetooth device, you should see a message letting you know whether or not your computer supports Bluetooth Smart devices.
If your computer doesn’t support Bluetooth Low Energy, you can still use your device using Logitech’s Unifying technology. Click Add Unifying Device and follow the on-screen instructions.
Check directly in the computer advanced settings
On a Mac
As a general rule, your Mac should support Bluetooth Low Energy (Bluetooth 4.0) if you have a:
– MacBook (early 2015 and later)
– MacBook Air (mid-2012 and later)
– MacBook Pro (mid-2012 and later)
– Mac mini (mid-2011 and later)
– iMac (late 2012 and later)
– Mac Pro (late 2013 and later)
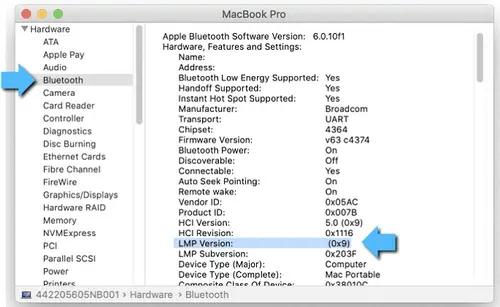
– You can also check in the advanced settings:Go to Apple Menu > About This Mac > System Report
– Click on Hardware > Bluetooth
– Check the LMP Version: If the value is 4.0 (0x6) or greater then the Mac supports Bluetooth Low Energy.
-
-
LPM Version Supports Bluetooth Low Energy
(Bluetooth 4.0 or later)2.0 (0x3) No 2.1 (0x4) No 3.0 (0x5) No 4.0 (0x6) Yes 4.1 (0x7) Yes 4.2 (0x8) Yes 5.0 (0x9) Yes 5.1 (0xa) Yes
-
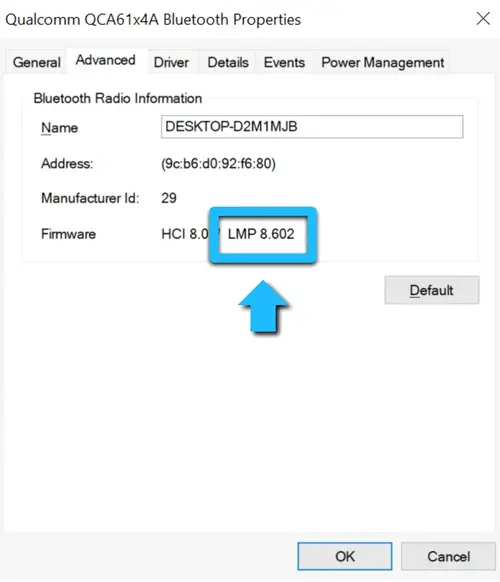
On Windows
- Go the search box on the taskbar, type Device Manager, then select from the menu. In Device Manager, expand Bluetooth, right-click on the Bluetooth wireless adapter (ex. “Qualcomm QCA61x4 Bluetooth” or “Intel(R) Wireless Bluetooth”), and then click Properties.
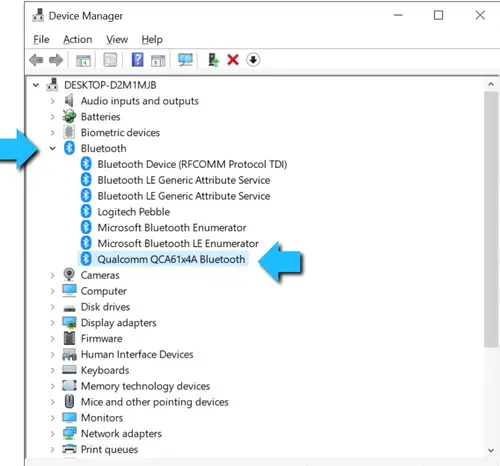
- In the Properties window, click the Advanced tab. In Firmware, if the LMP number is 6 or greater than 6 (ex. here 8) then the PC supports Bluetooth Low Energy.
Logitech Flow status icons
The status icon provides a lot of functionality and allows you to quickly know the status of your Logitech Flow setup, including the active screen.
The Status icon can be found on the bottom right-hand of your computer screen as a small mouse icon. The icons appear as follows, depending on your operating system:
Windows 7:

Windows 10:

Mac:

For more information on what the status icons mean, please see Determine if Logitech Flow is enabled.
Bluetooth troubleshooting for Logitech Bluetooth Mice, Keyboards and Presentation remotes
Bluetooth troubleshooting for Logitech Bluetooth Mice, Keyboards and Presentation remotes
Try these steps to fix issues with your Logitech Bluetooth device:
Logitech Bluetooth device doesn’t connect with computer, tablet or phone
Bluetooth allows you to connect your device wirelessly to your computer without using a USB receiver. Follow these steps to connect via Bluetooth.
Check if your computer is compatible with the latest Bluetooth technology
The latest generation of Bluetooth is called Bluetooth Low Energy and is not compatible with computers that have an older version of Bluetooth (called Bluetooth 3.0 or Bluetooth Classic).
NOTE: Computers with Windows 7 cannot connect with devices that use Bluetooth Low Energy.
1. Make sure that your computer has a recent operating system:
– Windows 8 or later
– macOS 10.10 or later
2. Check if your computer hardware supports Bluetooth Low Energy. If you don’t know, click here for more information.
Set your Logitech device in ‘pairing mode’
In order for the computer to see your Logitech device, you need to put your Logitech device in discoverable mode or pairing mode.
Most Logitech products are equipped with a Bluetooth button or Bluetooth key and have a Bluetooth status LED.
1. Make sure your device is turned ON
2. Hold down the Bluetooth button for three seconds, until the LED starts blinking rapidly. This indicates that the device is ready for pairing.
See the Support page for your product to find more information on how to pair your specific Logitech device.
Complete the pairing on your computer
You will need to complete the Bluetooth pairing on your computer, tablet or phone.
See Connect your Logitech Bluetooth device for more information on how to do this depending on your operating system (OS).
My Logitech Bluetooth device frequently gets disconnected or laggy
Follow these steps if you experience disconnections or lag with your Logitech Bluetooth device.
Troubleshooting checklist
1. Make sure that Bluetooth is ON or enabled on your computer.
2. Make sure your Logitech product is ON.
3. Make sure that your Logitech device and computer are within close proximity of each other.
4. Try moving away from metal and other sources of wireless signal. Try moving away from:
Any device that could emit wireless waves:
– Microwave, cordless phone, baby monitor, wireless speaker, garage door opener, WiFi router
– Computer power supplies
– Strong WiFi signals (learn more)
– Metal or metal wiring in the wall
5. Check the battery of your Logitech Bluetooth product. Low battery power can adversely affect connectivity and overall functionality.
6. If your device has removable batteries, try removing and re-inserting the batteries in your device.
7. Make sure your operating system (OS) is up to date.
Advanced troubleshooting
If the problem still persists, you will need to follow specific steps based on your device OS:
Click on the link below to resolve Bluetooth wireless issues on:
– Windows
– Mac OS X
Send a feedback report to Logitech
Help us improve our products by submitting a bug report using our Logitech Options Software:
1. Open Logitech Options.
2. Click More.
3. Select the problem you see and then click Send feedback report.
System Extension Blocked message when installing Logitech Options or LCC
Starting with macOS High Sierra (10.13), Apple has a new policy that requires user approval for all KEXT (driver) loading. You may see a “System Extension Blocked” prompt (shown below) during the installation of Logitech Options or Logitech Control Center (LCC).
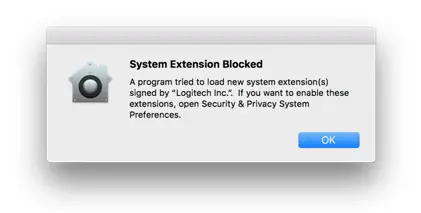
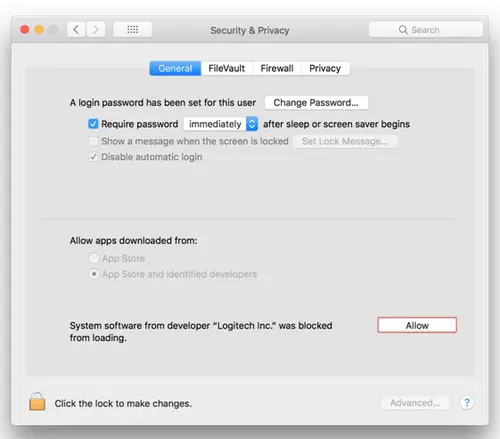
If you see this message, you’ll need to approve the loading of the KEXT manually so that your device drivers can be loaded and you can continue to use its functionality with our software. To allow KEXT loading, please open System Preferences and navigate to the Security & Privacy section. On the General tab, you should see a message and an Allow button, as shown below. In order to load the drivers, click Allow. You may need to reboot your system so the drivers are properly loaded and the functionality of your mouse is restored.
NOTE: As set by the system, the Allow button is only available for 30 minutes. If it has been longer than that since you installed LCC or Logitech Options, please restart your system to see the Allow button under the Security & Privacy section of System Preferences.
NOTE: If you don’t allow KEXT loading, all devices supported by LCC will not be detected by software. For Logitech Options, you need to perform this operation if you’re using following devices:
– T651 Rechargeable trackpad
– Solar Keyboard K760
– K811 Bluetooth keyboard
– T630/T631 Touch mouse
– Bluetooth Mouse M557/M558
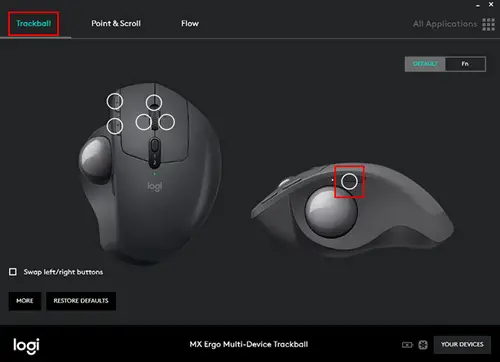
Logitech MX Ergo trackball gestures with Logitech Options
The MX Ergo trackball uses a trackball for navigation instead of a traditional laser. You can use Logitech Options software to customize the Gestures feature.
NOTE: If you don’t have Logitech Options, you can download the software from this product’s Download page.
To customize gesture functionality:
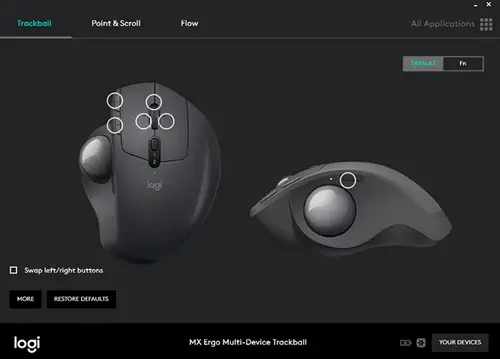
1. Open Logitech Options and select the MX Ergo trackball.
2. Select the Trackball tab and then click on the trackball circle to access the gestures.
The Precision Mode drop-down menu appears. Click More to display the Gesture option and then select it.

3. The Gesture button window appears. Here you can customize the Gesture button. Your changes are automatically saved.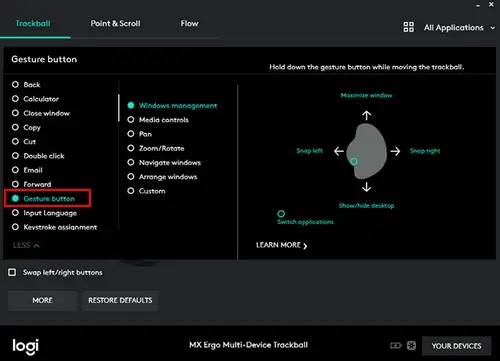
Clean the Logitech MX Ergo trackball
Before you clean your device:
– Unplug it from your computer and make sure it’s turned off. Keep liquids away from your device, and don’t use solvents or abrasives.
To clean your trackball:
– Use water to lightly moisten a soft, lint-free cloth and gently wipe down the mouse.
To clean the ball on your trackball:
1. Remove the metal plate from the bottom.
– To remove the metal place just gently pull the plate away from the mouse, the plate is attached with a powerful magnet but can be removed and placed back easily.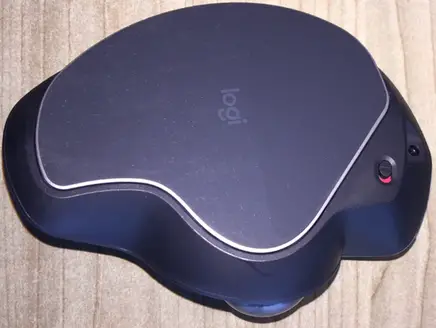
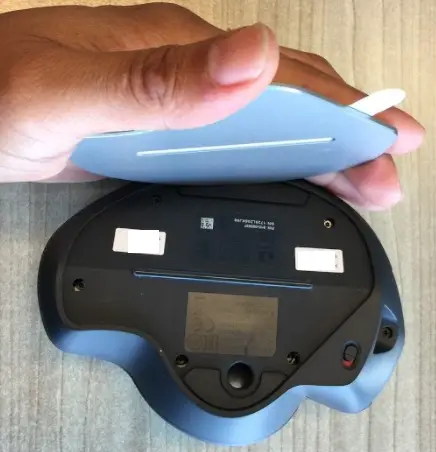
2. Eject the ball with the back of a pen, through the hole on the bottom.The bottom of the hole can be easily accessed once the metal plate has been removed.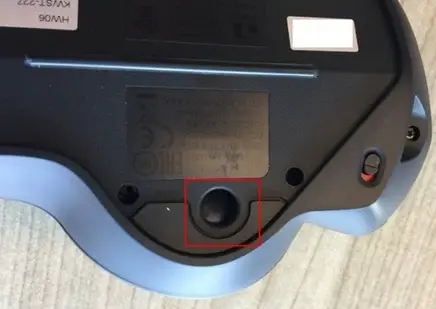
3. Wipe the ball and the white bearings so all dust is removed from the ball cup and the ball.
4. Put the ball back in the cup and place the metal plate with the rubber side facing the table.
NOTE: The metal plate beneath the mouse is adjustable and stays firmly attached via magnetism.
NOTE: In most cases, you can use isopropyl alcohol (rubbing alcohol) and anti-bacterial wipes. Before using rubbing alcohol or wipes, we suggest you test it first in an inconspicuous area to make sure it doesn’t cause discoloration or remove the lettering from the keys.
Connect the Logitech MX Ergo to a computer using Bluetooth or Unifying receiver
MX Ergo gives you two choices of wireless connection:
– Bluetooth
– Unifying receiver
You will need to download and install the latest version of Logitech Options. If you don’t already have the software, you can download it from this product’s Download page.
To connect with Bluetooth:
1. Open Logitech Options.
2. Click Add devices.
3. Make sure your trackball is turned on by sliding the button on the bottom to the right.
4. Turn the trackball over and press the Easy-Switch button to select a channel 1 or 2.

5. Press and hold the Easy-Switch button for three seconds to enter pairing mode. The LED will start blinking quickly.
6. Find the MX ERGO in your computer’s list of Bluetooth devices and connect it.
To connect using the Unifying receiver:
1. Open Logitech Options.
2. Make sure your trackball is turned on by sliding the button on the bottom to the right.
3. Turn the trackball over and press the Easy-Switch button to select a channel 1 or 2.
4. Press and hold the Easy-Switch button for three seconds to enter pairing mode. The LED will start blinking quickly.
5. Find the MX ERGO in your computer’s list of Bluetooth devices and connect it.
Open Logitech Options and click Add devices.
Logitech MX Ergo Easy-Switch function
Your MX Ergo trackball can connect to two devices at the same time. You can connect in both channels using the Unifying receiver or Bluetooth. The Easy-Switch button on the top of the mouse lets you to switch between two computers instantly with a single press.
To learn more about how to connect your MX Ergo using Bluetooth or Unifying receiver see Connect the Logitech MX Ergo to a computer using Bluetooth or Unifying receiver.

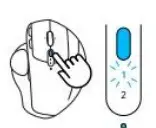
The Easy-Switch channel numbers light up to provide information about the connection: Blinking quickly:
– Discoverable — (The channel is discoverable and looking for a new pairing.)
– Blinking slowly: Connecting — (The channel is searching for a current connection.)
– Glowing steadily: Connected.
Logitech MX Ergo trackball battery and power management
Your MX Ergo trackball is rechargeable. A full charge gives up to four months of battery life.
To charge your trackball:
– Connect one end of the provided charging cable to the micro-USB port on the front of the trackball, as shown below, and the other end to a USB power source.
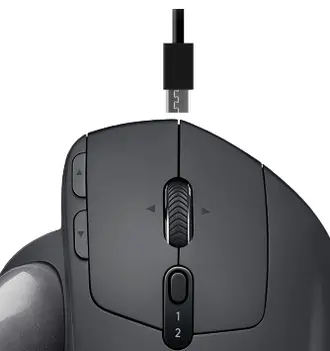
– A minimum of charging for one minute gives you enough power for a full day of use.
The battery LED pulses red when MX Ergo needs to be recharged. While charging, the LED will blink green and then will steadily glow green when fully charged.
NOTE: You can also get on-screen notifications for your battery. See Check MX Ergo trackball battery status for more information.
Configure Logitech MX Ergo Application Specific settings with Logitech Options software
You can use Logitech Options software to configure application-specific settings for your MX Ergo trackball. Here’s how:
1. Open Logitech Options.
NOTE: If you don’t have Logitech Options, you can download it from the product’s Download page.
2. In the main Logitech Options window, select the MX Ergo trackball.
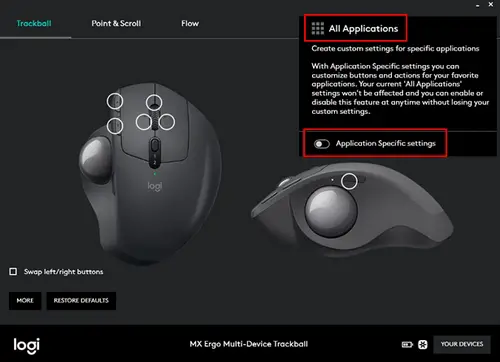
3. On the top right side of the window, click All Applications then slide the button to the right to enable Application Specific settings.
4. Click Add application.
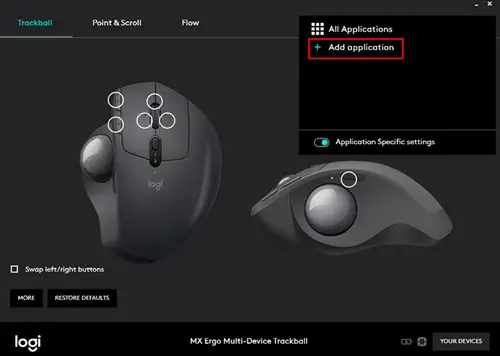
5. You will see a list of installed programs to choose from — select a program and then customize your mouse specifically for that program.

Device not displayed in Logitech Options
If you don’t see your Logitech device listed in Logitech Options, check the following:
– Make sure your device is turned on.
– Make sure you’re using the latest version of Logitech Options. To check the version:
1. Open Logitech Options.
2. On the bottom left of the Logitech Options, click More.
3. In the More settings window, click Software. The version of Logitech Options is listed under About.
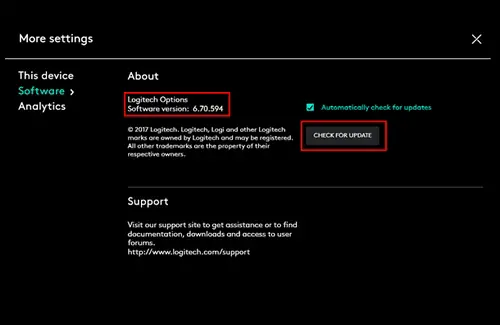
4. If you’re not sure if you’re using the latest version, click Check For Update.
NOTE: You can also enable the option to automatically check for updates, or visit our download page to get the latest software.
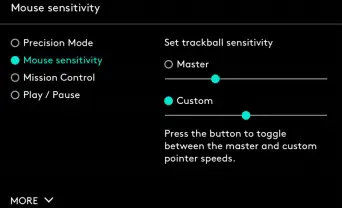
Logitech MX Ergo Precision Mode
When you press the Precision Mode button on your trackball, you can toggle between two modes:
Accuracy or Speed. When the Precision Mode button is switched on, the LED next to the button will light up, to indicate Precision Mode is on. After five minutes, the LED will turn off to conserve power.
Both modes can be customised in Logitech Options to suit your personal preferences.
Logitech MX Ergo trackball battery status LED
Your trackball has an LED to indicate battery status. When you turn your trackball on, the LED lights up to let you know the battery status and then turns off to conserve battery power.
When the LED is:
– Glowing green — Up to 100% battery life
– Glowing red — 10% charge remaining
You can also use Logitech Options to receive battery status notifications, including low charge warnings. If you don’t have Logitech Options, you can get it from the product’s Download page.