User Manual
Getting Started – MX Keys Mini for Mac
Meet MX Keys Mini for Mac – a minimalist keyboard made for Apple® creators. A smaller form factor and smarter keys result in a mightier way to create, make, and do.
QUICK SETUP
Go to the interactive setup guide for quick interactive setup instructions.
If you want more in-depth information, go to the ‘Detailed Setup’ below.

DETAILED SETUP
- Make sure the keyboard is turned on.
The LED on the Easy-Switch button should rapidly blink. If not, perform a long press for three seconds.
- Connect your device via Bluetooth:
- Open the Bluetooth settings on your computer to complete the pairing.
- Click here for more details on how to do this on your computer. If you experience issues with Bluetooth, click here for Bluetooth troubleshooting.
FileVault is an encryption system available on some Mac computers. When enabled, it might prevent Bluetooth® devices from connecting with your computer if you have not yet logged in. If you have FileVault enabled, you can either use your MacBook keyboard and trackpad to log in or you can use a USB keyboard or mouse to log in.
- Install Logitech Options+ Software.
Download Logitech Options+ to use all the possibilities this keyboard has to offer. To download and learn more, go to logitech.com/options+.
PAIR TO A SECOND COMPUTER WITH EASY-SWITCH
Your keyboard can be paired with up to three different computers using the Easy-Switch button to change the channel.
- Select the channel you want using the Easy-Switch button — press and hold the same button for three seconds. This will put the keyboard in discoverable mode so that it can be seen by your computer. The LED will start blinking quickly.
- Open the Bluetooth settings on your computer to complete the pairing. You can read more details here.
- Once paired, a short press on the Easy-Switch button lets you switch channels.

INSTALL SOFTWARE
Download Logitech Options+ to use all the possibilities this keyboard has to offer. To download and learn more, go to logitech.com/options+.
The software is compatible with Windows and Mac.
LEARN MORE ABOUT YOUR PRODUCT
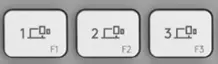
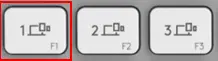
New F-row keys
1 – Dictation
2 – Emoji
3 – Mute/unmute microphone

Dictation

The dictation key lets you convert speech-to-text in active text fields (notes, email, and so on). Simply press and start speaking.
Emoji

You can quickly access emojis by pressing the emoji key.
Mute/unmute microphone

You can mute and unmute your microphone with a simple press during video conferencing calls. To enable the key, download Logi Options+ here.
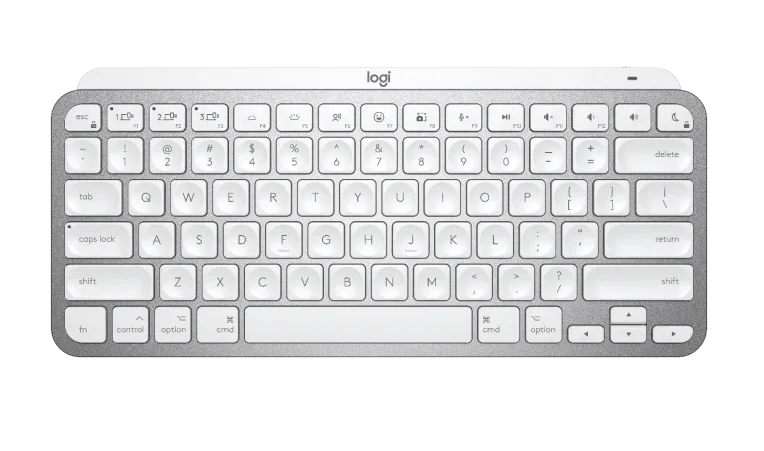
Product Overview
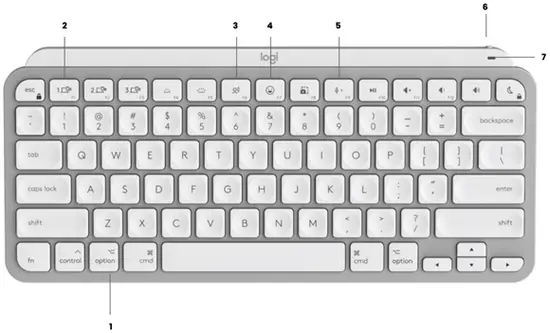
1 – Mac layout
2 – Easy-Switch keys
3 – Dictation key
4 – Emoji key
5 – Mute/unmute microphone
6 – ON/OFF switch
7 – Battery status LED and ambient light sensor
Your keyboard is compatible with macOS 10.15 or later, iOS 13.4, and iPadOS 14 or later.
Battery Notification
Your keyboard has an LED near the On/Off switch to let you know the battery status. The LED will be green from 100% to 11% and turn red from 10% and below. Turn off the backlighting to continue typing for more than 500 hours when the battery is low.

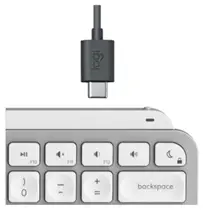
To charge, plug in the USB-C cable at the top right corner of your keyboard. You can continue typing while it is charging.
Smart backlighting
Your keyboard has an embedded ambient light sensor that reads and adapts the level of backlighting accordingly.
| Room brightness | Backlight level |
| Low light – under 100 lux | L4 – 50% |
| High light – over 100 lux | L0 – no backlight*
*Backlight is turned OFF. |
There are eight total backlight levels. You can change the backlight level at any time with two exceptions: the backlight cannot be turned ON when:
- the room brightness is high, over 100 lux
- the keyboard battery is low
Software notifications
Install Logi Options+ software to get the most out of your keyboard. You can find more information here.
- Backlight level notifications

You can see the backlight level changes in real-time. - Backlighting disabled
There are two factors that will disable backlighting:

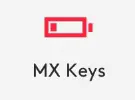
When your keyboard has only 10% of battery left, this message will appear when you try to enable backlighting. If you want the backlight back, plug in your keyboard to charge it.

When the environment around you is too bright, your keyboard will automatically disable backlighting to avoid using it when not needed. This will also allow you to use it longer with backlight in low light conditions. You will see this notification when you try to turn backlighting ON. - Low battery
When your keyboard reaches 10% of battery left, backlighting turns OFF and you get a battery notification on the screen. - F-Keys switch
When you press Fn + Esc you can swap between the Media keys and F-Keys.
We’ve added a notification so you know when you’ve swapped the keys.

By default, the keyboard has direct access to Media Keys.
Logitech Flow
You can work on multiple computers with your MX Keys Mini. With a Flow-enabled Logitech mouse, such as MX Anywhere 3, you can also work and type on multiple computers with the same mouse and keyboard using Logitech Flow technology.
You can use the mouse cursor to move from one computer to the next. MX Keys Mini keyboard will follow the mouse and switch computers at the same time. You can even copy and paste between computers. You will need to install Logitech Options software on both computers and then follow these instructions.
Click here for a list of our Flow-enabled mice.

Specs and Details
Dimensions
MX Keys Mini for Mac Keyboard
- Height: 5.19 in (131.95 mm)
- Width: 11.65 in (295.99 mm)
- Depth: 0.82 in (20.97 mm)
- Height: 17.86 oz (506.4 g)
Technical Specifications
Minimalist Wireless Illuminated Keyboard
- Connect via the Bluetooth Low Energy technology
- Easy-switch keys to connect up to three devices and easily switch between them
- 10 meters wireless range 6
- Hand proximity sensors that turn the backlighting on
- Ambient light sensors that adjust backlighting brightness
- USB-C rechargeable. Full charge lasts 10 days – or 5 months with backlighting off 7
- On/Off power switch
- Caps Lock and Battery indicator lights
- Compatible with Logitech Flow enabled mouse
ATTENTION: FILEVAULT
- FileVault is an encryption system available on some Mac computers. When enabled, it might prevent Bluetooth devices from connecting with your computer if you have not yet logged in. If you have FileVault enabled, we advise purchasing the compatible Logi Bolt USB Receiver.
Sustainability
- Pale Grey plastics: 12% post-consumer recycled material 8
- Paper Packaging: FSC™ -certified
Warranty Information
1-Year Limited Hardware Warranty
Part Number
- 920-010389
California Warnings
-
WARNING: Proposition 65 Warning
Read More About:
FAQ – Frequently Asked Questions
Do not disturb does not work
First, make sure you have installed the latest version of Logi Options software. You can download the software here.
Your Do not disturb key only works out-of-box (without the software) if you are on macOS BigSur.
It is not designed to work on Windows, Android, ChromeOS.
MX Keys Mini Rose and Pale Gray keyboard backlighting changes by itself
Your keyboard is equipped with an ambient light sensor that adapts the keyboard backlight according to the brightness of your room.
There are two default backlight levels that switch automatically:
– If the room starts getting dark (below 100 lux), the keyboard will set the backlighting to level 4. You can of course override this default level and increase or decrease the level.
– When the room is bright, over 100 lux, the backlighting will turn OFF as the contrast is no longer visible, and it won’t drain your battery unnecessarily.
When your keyboard is kept ON, it will detect whenever your hands approach and the backlight will be turned back on. The backlighting won’t turn back on if:
– Your keyboard has no more battery, below 10%.
– If the environment you’re in is too bright.
– If you’ve turned it off manually or using Logitech Options software.
Proximity detection and backlight behavior while charging the MX Keys Mini Keyboard
Your keyboard is equipped with a proximity sensor that detects when your hands hover close to the keyboard.
Proximity detection will not work when the keyboard is charging — you have to press a key on the keyboard to turn the backlight on. Turning the keyboard backlight off while charging will help with the charging time.
The backlighting will stay on for five minutes after typing, so if you are working in the dark, the keyboard will not turn off while typing.
Once fully charged and the charging cable is removed, proximity detection will work again.
Logi Bolt does not work or is not recognized
If your device stops responding, first confirm that the Logi Bolt receiver is working properly. Use the steps below:
1. Open Device Manager and make sure your product is listed.
2. If the receiver is plugged into a USB hub or extender, try plugging it into a port directly on the computer
3. Windows only — try a different USB port. If it makes a difference, try updating the motherboard USB chipset driver.
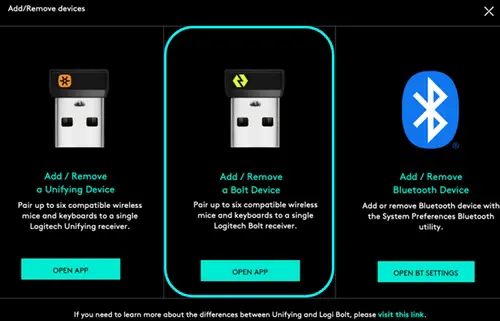
4. If the receiver is Logi Bolt ready, identified by this logo ![]() open Logi Bolt Software and check if the device is found there.
open Logi Bolt Software and check if the device is found there.
5.If not, follow the steps to connect the device to a Logi Bolt receiver.
6.Try using the receiver on a different computer.
7. If it’s still not working on the second computer, check Device Manager to see if the device is recognized.
If your product is still not recognized, the fault is most likely related to the USB receiver rather than the keyboard or mouse. Please contact Customer Support.
Unable to pair to Logi Bolt Receiver
If you’re unable to pair your device to the Logi Bolt receiver, do the following:
STEP A:
1. Make sure the device is found in Devices and Printers. If the device is not there, follow steps 2 and 3.
2. If connected to a USB HUB, USB Extender, or to the PC case, try connecting to a port directly on the computer motherboard.
3. Try a different USB port; if a USB 3.0 port was used previously, try a USB 2.0 port instead.
STEP B:
Open Logi Bolt Software and see if your device is listed there. If it’s not listed, follow the steps to connect the device to a Logi Bolt receiver. See Connect a new device to a Logi Bolt USB receiver for more information.
How can I tell if my device is Logi Bolt ready?
Logi Bolt devices can be recognized by this logo, found on the back of the device next to the Bluetooth logo:
![]()
Are Logi Bolt devices compatible with Unifying USB receivers?
Logi Bolt devices are not compatible with Unifying USB receivers, and Unifying devices are not compatible with Logi Bolt USB receivers.

Connect a new device to a Logi Bolt USB receiver
Your Logi Bolt can host up to six devices.
To add a new device to an existing Logi Bolt receiver:
1. Open Logitech Options.
2. Click Add Device, and then Add a Bolt device.
3. Follow the on-screen instructions.
NOTE: If you don’t have Logitech Options you can download it here.
4. You can determine if your USB receiver is a Logi Bolt by the logo on the bottom right side:

Pair your keyboard with a Logi Bolt receiver
Your device is Logi Bolt compatible and can be connected using the wireless Logi Bolt USB receiver.
- Make sure the keyboard is turned on.
The number 1 LED on the Easy-Switch button should blink rapidly. If it doesn’t, press the button for three seconds (long press).
- Plug the receiver into a USB port on your computer.
- To adapt your keyboard to your operating system:
- For Mac, press Fn + O
- For Windows, press Fn + P
For information on how to pair a second computer, see Pair to a second computer with Easy-Switch.
Do I need a Bolt receiver to use a device that is Logi Bolt compatible?
No, your device was designed to fully perform through Bluetooth connectivity. Logi Bolt is only recommended for users who work in crowded environments with many other wireless devices.
What operating systems is my keyboard compatible with?
You can find compatibility information for your keyboard on the product’s page on Logitech.com. On the product’s page, scroll down to “SPECS & DETAILS”. You’ll find the operating system compatibility based on your connectivity choice, Bluetooth or USB receiver.
Pair your Bluetooth keyboard to a different device with Easy-Switch
Your keyboard can be paired with up to three different computers using the
Easy-Switch button to change the channel.

1. Select the channel you want and press and hold the Easy-Switch button for three seconds. This will put the keyboard in discoverable mode so that it can be seen by your computer. The LED will start blinking quickly.
2. Open the Bluetooth settings on your computer to complete the pairing. More details here.
3. Once paired, a short press on the Easy-Switch button will allow you to switch channels.
Dictation key does not work
irst, make sure you have the latest version of Logi Options software installed. You can download the software here.
The dictation feature of your device can be enabled once you have installed the software.
To use dictation:
– Make sure your cursor is on an active text field
– Press the dictation key and start speaking
Mute / unmute microphone does not work
First, make sure you have the latest version of Logitech Options+ or Logitech Options software installed. You can download them here.
The mute and unmute microphone feature of your device can only be enabled once you have installed the software.
Mute/unmute microphone works on a system level, not on an application level. When you press the key to mute, you will see the image shown below on the top right corner of your screen.

This means your system’s microphone is muted. If you are unmuted on a video conferencing app (ex. Zoom or Microsoft Teams) but can see this sign, you will not be heard when speaking. You’ll need to press the mute/unmute once more to be unmuted.
Bluetooth mouse or keyboard not recognized after reboot on macOS (Intel-based Mac) – FileVault
+Bluetooth mouse or keyboard not recognized after reboot on macOS (Intel-based Mac) – FileVault
If your Bluetooth mouse or keyboard does not reconnect after a reboot at the login screen and only reconnects after the login, this might be related to FileVault encryption.
When FileVault is enabled, Bluetooth mice and keyboards will only re-connect after login.
Potential solutions:
1. If your Logitech device came with a USB receiver, using it will solve the issue.
2. Use your MacBook keyboard and trackpad to login.
3. Use a USB keyboard or mouse to login.
Note: This issue is fixed from macOS 12.3 or later on M1. Users with an older version might still experience it.
How to enable direct access to F-keys
Your keyboard has by default access to the Media and Hotkeys such as Volume Up, Play/Pause, Desktop view, and so on.
If you prefer to have direct access to your F-keys simply press Fn + Esc on your keyboard to swap them.
You can download Logitech Options to get on-screen notifications when you swap from one to the other. Find the software here.

Keyboard backlight does not turn on
Your keyboard backlight will automatically turn off under the following conditions:
– The keyboard is equipped with an ambient light sensor — it assesses the amount of light around you and adapts the backlight accordingly. If there is enough light, it turns the keyboard backlight off to prevent draining the battery.
– When your keyboard’s battery is low, it turns the backlight off to allow you to continue working without disruption.
Backup device settings to the cloud in Logitech Options+
– INTRODUCTION
– HOW IT WORKS
– WHAT SETTINGS GET BACKED UP
INTRODUCTION
This feature on Logi Options+ allows you to backup the customization of your Options+ supported device automatically to the cloud after creating an account. If you are planning to use your device on a new computer or wish to go back to your old settings on the same computer, log into your Options+ account on that computer and fetch the settings you want from a backup to set up your device and get going.
HOW IT WORKS
When you are logged into Logi Options+ with a verified account, your device settings are automatically backed up to the cloud by default. You can manage the settings and the backups from the Backups tab under More settings of your device (as shown):
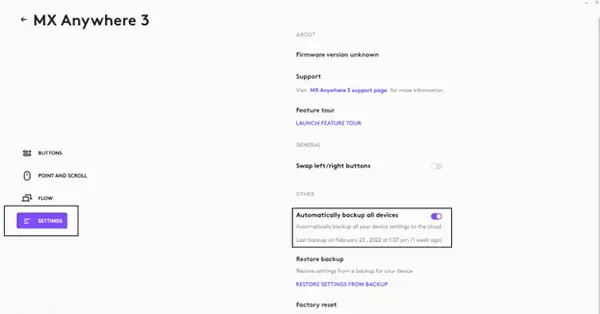
Manage settings and backups by clicking on More > Backups:
AUTOMATIC BACKUP OF SETTINGS — if the Automatically create backups of settings for all devices checkbox is enabled, any settings you have or modify for all of your devices on that computer are backed up to the cloud automatically. The checkbox is enabled by default. You can disable it if you don’t want the settings of your devices to be backed up automatically.
CREATE A BACKUP NOW — this button allows you to backup your current device settings now, if you need to fetch them later.
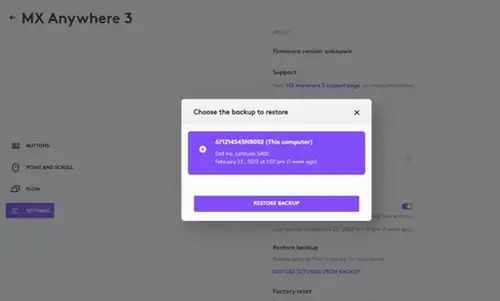
RESTORE SETTINGS FROM BACKUP — this button lets you view and restore all the available backups you have for that device that are compatible with that computer, as shown above.
The settings for a device are backed up for every computer that you have your device connected to and have Logi Options+ that you are logged into. Every time you make some modifications to your device settings, they get backed up with that computer name. The backups can be differentiated based on the following:
1. Name of the computer. (Ex. John’s Work Laptop)
2. Make and/or model of the computer. (Ex. Dell Inc., Macbook Pro (13-inch) and so on)
3. The time when the backup was made
The desired settings can then be selected and restored accordingly.
WHAT SETTINGS GET BACKED UP
– Configuration of all the buttons of your mouse
– Configuration of all the keys of your keyboard
– Point & Scroll settings of your mouse
– Any application-specific settings of your device
WHAT SETTINGS ARE NOT BACKED UP
– Flow settings
– Options+ app settings
Keyboard/Mice – Buttons or keys do not work correctly
Likely Cause(s):
– Potential hardware issue
– Operating system /software settings
– USB port issue
Symptom(s):
– Single-click results in double-click (mice and pointers)
– Repeating or strange characters when typing on the keyboard
– Button/key/control gets stuck or responds intermittently
Possible solutions:
1. Clean the button/key with compressed air.
2. Verify the product or receiver is connected directly to the computer and not to a hub, extender, switch or something similar.
3. Unpair/repair or disconnect/reconnect hardware.
4. Upgrade firmware if available.
5. Windows only — try a different USB port. If it makes a difference, try updating the motherboard USB chipset driver.
6. Try on a different computer. Windows only — if it works on a different computer, then the issue might be related to a USB chipset driver.
*Pointing devices only:
– If you’re not sure if the problem is a hardware or software issue, try switching the buttons in the settings (left click becomes right click and right click becomes left click). If the problem moves to the new button it is a software setting or application issue and hardware troubleshooting cannot resolve it. If the problem stays with the same button it is a hardware issue.
– If a single-click always double-clicks, check the settings (Windows mouse settings and/or in Logitech SetPoint/Options/G HUB/Control Center/Gaming Software) to verify if the button is set to Single Click is Double Click.
NOTE: If buttons or keys respond incorrectly in a particular program, verify if the problem is specific to the software by testing in other programs.
Logitech Options permission prompts on macOS Monterey, macOS Big Sur, macOS Catalina, and macOS Mojave
1. Logitech Options permission prompts on macOS Monterey and macOS Big Sur
2. Logitech Options permission prompts on macOS Catalina
3. Logitech Options permission prompts on macOS Mojave
4. Download the latest version of Logitech Options software.
Logitech Options permission prompts on macOS Monterey and macOS Big Sur
For official macOS Monterey and macOS Big Sur support, please upgrade to the latest version of Logitech Options (9.40 or later).
Starting with macOS Catalina (10.15), Apple has a new policy that requires user permission for our Options software for the following features:
– Bluetooth Privacy prompt needs to be accepted to connect Bluetooth devices through Options.
– Accessibility access is needed for scrolling, gesture button, back/forward, zoom, and several other features.
– Input monitoring access is needed for all the features enabled by the software such as scrolling, gesture button, and back/forward among others for devices connected via Bluetooth.
– Screen recording access is needed to capture screenshots using a keyboard or a mouse.
– System Events access is needed for the Notifications feature and Keystroke assignments under different applications.
– Finder access is needed for the Search feature.
– System Preferences access if needed for launching Logitech Control Center (LCC) from Options.
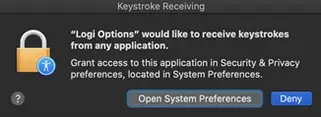
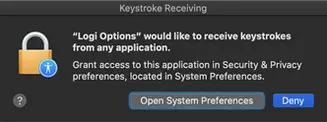
Bluetooth Privacy prompt
When an Options supported device is connected with Bluetooth/Bluetooth Low Energy, launching the software for the first time will show the below pop-up for Logi Options and Logi Options Daemon:
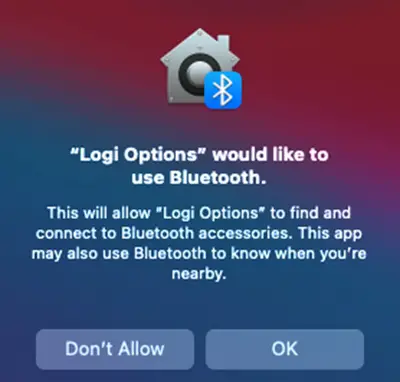
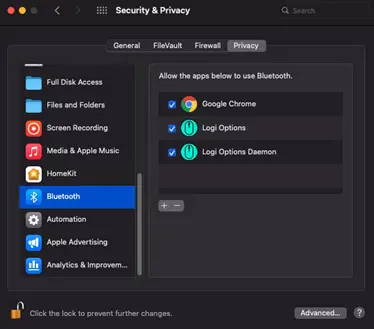
Once you click OK, you will be prompted to enable the checkbox for Logi Options in Security & Privacy > Bluetooth.
When you enable the checkbox, you will see a prompt to Quit & Reopen. Click on Quit & Reopen for the changes to take effect.

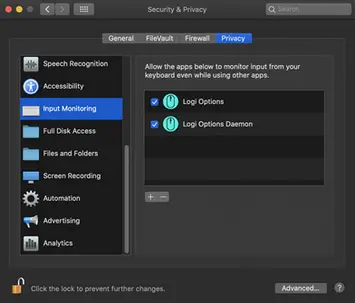
Once the Bluetooth Privacy settings are enabled for both Logi Options and Logi Options Daemon, the Security & Privacy tab will appear as shown:
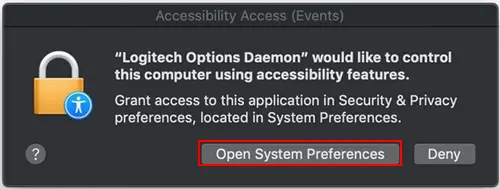
Accessibility Access
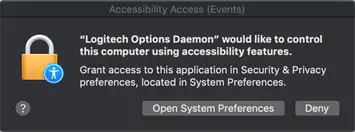
Accessibility access is needed for most of our basic features such as scrolling, gesture button functionality, volume, zoom, and so on. The first time you use any feature that requires accessibility permission, you’ll be presented with the following prompt:
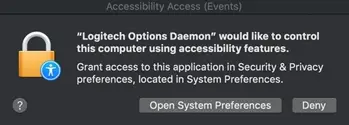
To provide access:
1. Click Open System Preferences.
2. In System Preferences, click the lock at the bottom left corner to unlock.
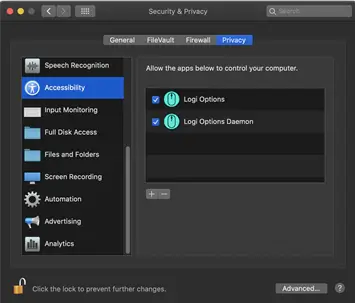
3. In the right panel, check the boxes for Logitech Options and Logitech Options Daemon.
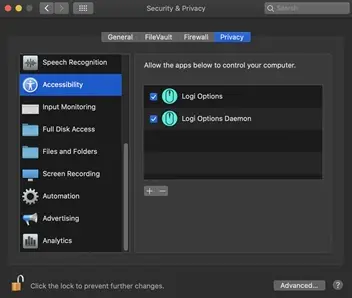
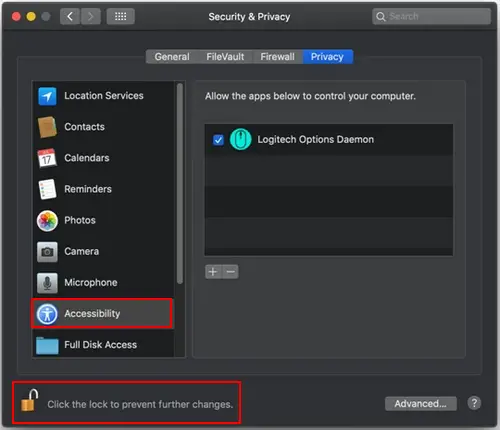
If you already clicked Deny, follow these steps to manually allow access:
1. Launch System Preferences.
2. Click Security & Privacy, then click the Privacy tab.
3. In the left panel, click Accessibility and then follow steps 2-3 above.
Input Monitoring Access
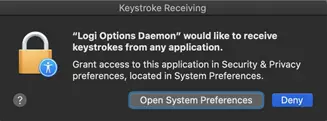
Input monitoring access is needed when devices are connected using Bluetooth for all features enabled by the software such as scrolling, gesture button, and back/forward to work. The following prompts will be displayed when access is needed:
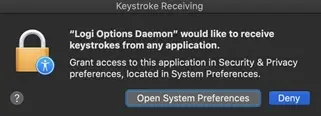
1. Click Open System Preferences.
2. In System Preferences, click the lock at the bottom left corner to unlock.
3. In the right panel, check the boxes for Logitech Options and Logitech Options Daemon.

4. After you check the boxes, select Quit Now to restart the application and allow the changes to take effect.


If you already clicked Deny, please do the following to allow access manually:
1. Launch System Preferences.
2. Click Security & Privacy, and then click the Privacy tab.
3. In the left panel, click Input Monitoring and then follow steps 2-4 from above.
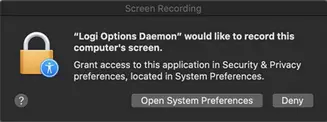
Screen Recording Access
Screen recording access is needed to capture screenshots using any supported device. You’ll be presented with the prompt below when you first use the screen capture feature:
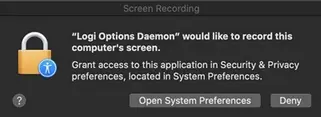
1. Click Open System Preferences.
2. In System Preferences, click the lock at the bottom left corner to unlock.
3. In the right panel, check the box for Logitech Options Daemon.
4. Once you check the box, select Quit Now to restart the application and allow the changes to take effect.

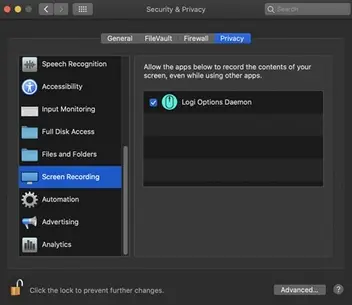
If you already clicked Deny, use the following steps to allow access manually:
1. Launch System Preferences.
2. Click Security & Privacy, then click the Privacy tab.
3. In the left panel, click on Screen Recording and follow steps 2-4 from above.
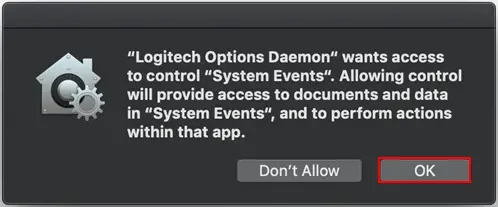
System Events prompts
If a feature requires access to a specific item like System Events or Finder, you will see a prompt the first time you use this feature. Please note that this prompt appears only once to request access for a specific item. If you deny access, all the other features that need access to the same item will not work and another prompt will not be shown.
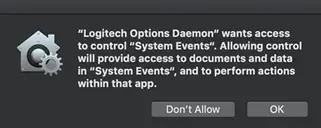
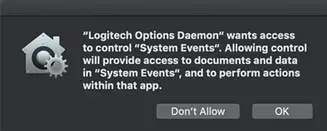
Please click OK to allow access for Logitech Options Daemon so that you can continue to use these features.
If you already clicked on Don’t Allow, use the following steps to allow access manually:
1. Launch System Preferences.
2. Click Security & Privacy.
3. Click the Privacy tab.
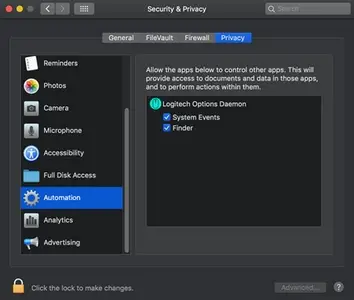
4. In the left panel, click Automation and then check the boxes under Logitech Options Daemon to provide access. If you are unable to interact with the checkboxes, please click the lock icon on the bottom left corner and then check the boxes.
NOTE: If a feature still doesn’t work after you grant access, please reboot the system.
Logitech Options permission prompts on macOS Catalina
For official macOS Catalina support, please upgrade to the latest version of Logitech Options (8.02 or later).
Starting with macOS Catalina (10.15), Apple has a new policy that requires user permission for our Options software for the following features:
– Accessibility access is needed for scrolling, gesture button, back/forward, zoom and several other features
– Input monitoring (new) access is needed for all the features enabled by the software such as scrolling, gesture button and back/forward among others for devices connected via Bluetooth
– Screen recording (new) access is needed to capture screenshots using a keyboard or a mouse
– System Events access is needed for Notifications feature and Keystroke assignments under different applications
– Finder access is needed for the Search feature
– System Preferences access if needed for launching Logitech Control Center (LCC) from Options
Accessibility Access
Accessibility access is needed for most of our basic features like scrolling, gesture button functionality, volume, zoom, and so on. The first time you use any feature that requires accessibility permission, you’ll be presented with the following prompt:
To provide access:
1. Click Open System Preferences.
2. In System Preferences, click the lock at the bottom left corner to unlock.
3. In the right panel, check the boxes for Logitech Options and Logitech Options Daemon.
If you already clicked ‘Deny’, do the following to allow access manually:
1. Launch System Preferences.
2. Click Security & Privacy, then click the Privacy tab.
3. In the left panel, click Accessibility and then follow steps 2-3 above.
Input Monitoring Access
Input monitoring access is needed when devices are connected using Bluetooth for all features enabled by the software such as scrolling, gesture button and back/forward to work. The following prompts will be displayed when access is needed:
1. Click Open System Preferences.
2. In System Preferences, click the lock at the bottom left corner to unlock.
3. In the right panel, check the boxes for Logitech Options and Logitech Options Daemon.
4. After you check the boxes, select Quit Now to restart the application and allow the changes to take effect.


If you already clicked ‘Deny’, please do the following to allow access manually:
1. Launch System Preferences.
2. Click Security & Privacy, and then click the Privacy tab.
3. In the left panel, click Input Monitoring and then follow steps 2-4 from above.
Screen Recording Access
Screen recording access is needed to capture screenshots using any supported device. You’ll be presented with the prompt below when you first use the screen capture feature.
1. Click Open System Preferences.
2. In System Preferences, click the lock at the bottom left corner to unlock.
3. In the right panel, check the box for Logitech Options Daemon.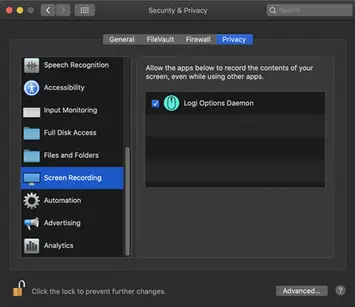
4. Once you check the box, select Quit Now to restart the application and allow the changes to take effect.

If you already clicked ‘Deny’, use the following steps to allow access manually:
1. Launch System Preferences.
2. Click Security & Privacy, then click the Privacy tab.
3. In the left panel, click on Screen Recording and follow steps 2-4 from above.
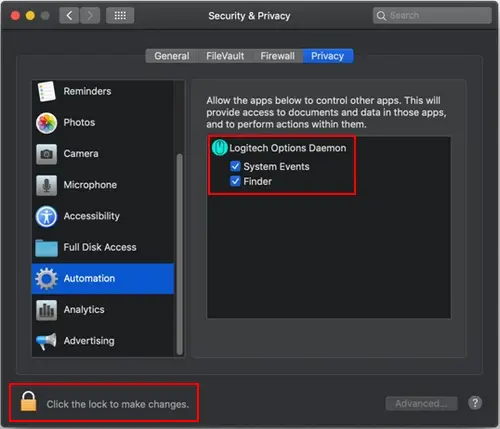
System Events prompts
If a feature requires access to a specific item like System Events or Finder, you will see a prompt the first time you use this feature. Please note that this prompt appears only once to request access for a specific item. If you deny access, all the other features that need access to the same item will not work and another prompt will not be shown.
Please click on OK to allow access for Logitech Options Daemon so that you can continue to use these features.
If you already clicked on Don’t Allow, use the following steps to allow access manually:
1. Launch System Preferences.
2. Click Security & Privacy.
3. Click the Privacy tab.
4. In the left panel, click Automation and then check the boxes under Logitech Options Daemon to provide access. If you are unable to interact with the checkboxes, please click the lock icon on the bottom left corner and then check the boxes.

NOTE: If a feature still doesn’t work after you grant access, please reboot the system.
– Click here for information on macOS Catalina and macOS Mojave permissions on Logitech Control Center.
– Click here for information on macOS Catalina and macOS Mojave permissions on Logitech Presentation software.
Logitech Options permission prompts on macOS Mojave
For official macOS Mojave support, please upgrade to the latest version of Logitech Options (6.94 or later).
Starting with macOS Mojave (10.14), Apple has a new policy that requires user permission for our Options software for the following features:
– Accessibility access is needed for scrolling, gesture button, back/forward, zoom and several other features
– Notifications feature and keystroke assignments under different applications need access to System Events
– Search feature needs access to Finder
– Launching Logitech Control Center (LCC) from Options requires access to System Preferences
– The following are the user permissions the software needs for you to get complete functionality for your Options-supported mouse and/or keyboard.
Accessibility Access
Accessibility access is needed for most of our basic features like scrolling, gesture button functionality, volume, zoom, and so on. The first time you use any feature that requires accessibility permission, you’ll see a prompt as shown below.
Click Open System Preferences and then turn on the checkbox for Logitech Options Daemon.
In case you clicked Deny, use the following steps to allow access manually:
1. Launch System Preferences.
2. Click on Security & Privacy.
3. Click the Privacy tab.
4. In the left panel, click on Accessibility and check the boxes under Logitech Options Daemon to provide access (as shown below). If you are unable to interact with the checkboxes, please click the lock icon on the bottom left corner and then check the boxes.
System Events prompts
If a feature requires access to any specific item such as System Events or Finder, you will see a prompt (similar to the screenshot below) the first time you use this feature. Please note that this prompt appears only once, requesting access for a specific item. If you deny access, all the other features that need access to the same item will not work and another prompt will not be shown.
Click OK to allow access for Logitech Options Daemon so that you can continue to use these features.
In case you clicked Don’t Allow, use the following steps to allow access manually:
1. Launch System Preferences.
2. Click Security & Privacy.
3. Click the Privacy tab.
4. In the left panel, click Automation and then check the boxes under Logitech Options Daemon to provide access (as shown below). If you are unable to interact with the checkboxes, please click the lock icon on the bottom left corner and then check the boxes.
NOTE: If a feature still doesn’t work after you grant access, please reboot the system.
Resolve Bluetooth Wireless issues on macOS
These troubleshooting steps go from easy to more advanced.
Please follow the steps in order and check if the device works after each step.
Make sure you have the latest version of macOS
Apple is regularly improving the way macOS handles Bluetooth devices.
Click here for instructions on how to update macOS.
Make sure you have the right Bluetooth parameters
1. Navigate to the Bluetooth preference pane in System Preferences:
Go to Apple Menu > System Preferences > Bluetooth 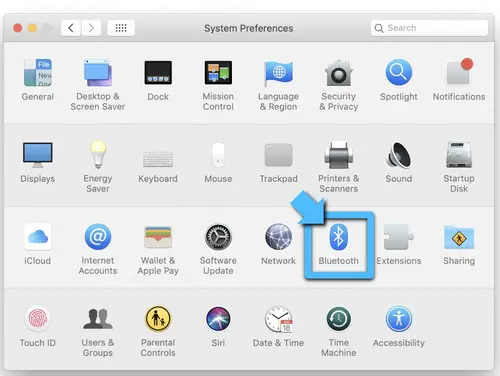
2. Make sure that Bluetooth is turned On. 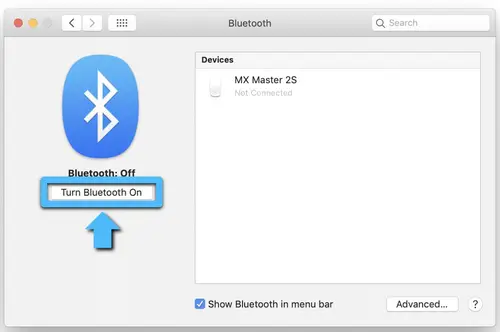
3. In the bottom-right corner of the Bluetooth Preference window, click Advanced. 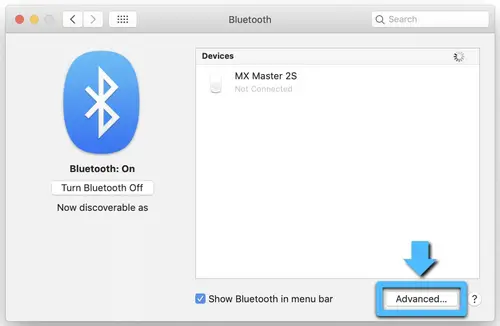
4. Make sure all three options are checked:
– Open Bluetooth Setup Assistant at startup if no keyboard is detected
– Open Bluetooth Setup Assistant at startup if no mouse or trackpad is detected
– Allow Bluetooth devices to wake this computer 
NOTE: These options ensure that Bluetooth-enabled devices can wake your Mac and that the OS Bluetooth Setup Assistant will launch if a Bluetooth keyboard, mouse or trackpad is not detected as connected to your Mac.
5. Click OK.
Restart the Mac Bluetooth Connection on your Mac
1. Navigate to the Bluetooth preference pane in System Preferences:
– Go to Apple Menu > System Preferences > Bluetooth
2. Click Turn Bluetooth Off. 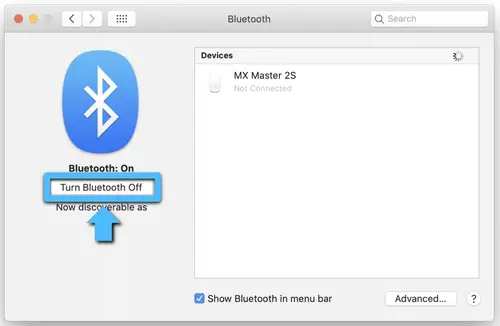
3. Wait a few seconds, and then click Turn Bluetooth On. 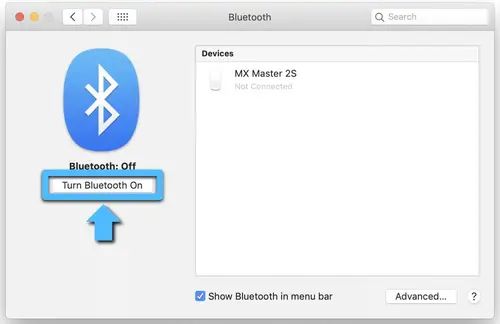
4. Check to see if the Logitech Bluetooth device is working. If not, go to the next steps.
Remove your Logitech device from the list of devices and try to pair again
1. Navigate to the Bluetooth preference pane in System Preferences:
– Go to Apple Menu > System Preferences > Bluetooth
2. Locate your device in the Devices list, and click on the “x” to remove it. 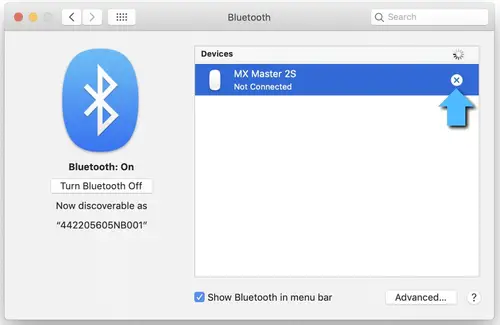
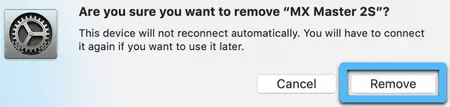
3. Re-pair your device by following the procedure described here.
Disable the hand-off feature
In some cases, disabling the iCloud hand-off functionality can help.
1. Navigate to the General preference pane in System Preferences:
– Go to Apple Menu > System Preferences > General 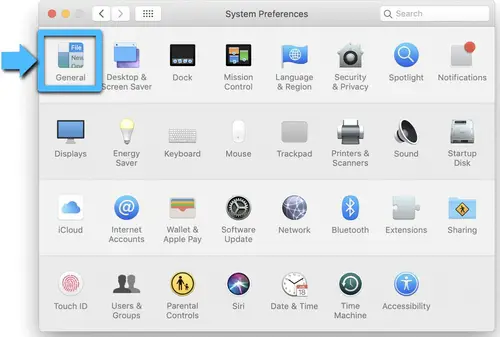
2. Make sure Handoff is unchecked. 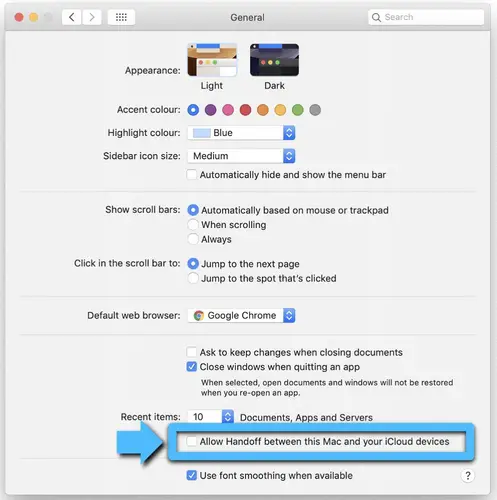
Reset the Mac’s Bluetooth settings
WARNING: This will reset your Mac, and cause it to forget all of the Bluetooth devices you have ever used. You will need to re-configure each device.
1. Make sure Bluetooth is enabled and that you can see the Bluetooth icon in the Mac Menu Bar at the top of the screen. (You’ll need to check the box Show Bluetooth in menu bar in the Bluetooth preferences).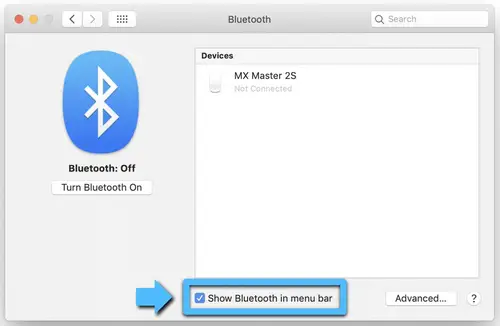
2. Hold down the Shift and Option keys, and then click the Bluetooth icon in the Mac Menu Bar.
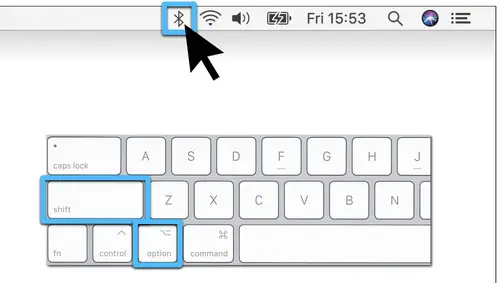
3. The Bluetooth menu will appear, and you will see additional hidden items in the drop-down menu. Select Debug and then Remove all devices. This clears the Bluetooth device table and you’ll then need to reset the Bluetooth system. 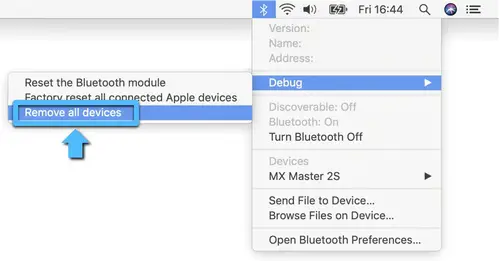
4. Hold down the Shift and Option keys again, click on the Bluetooth menu and select Debug > Reset the Bluetooth Module. 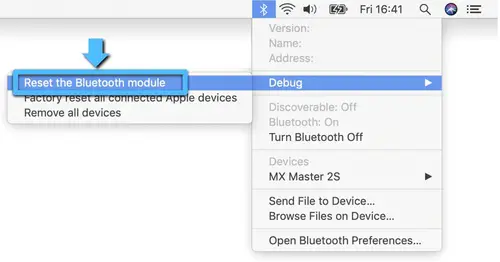
5. You will now need to repair all your Bluetooth devices following standard Bluetooth pairing procedures.
To re-pair your Logitech Bluetooth device:
NOTE: Make sure all your Bluetooth devices are on and have enough battery life before you re-pair them.
When the new Bluetooth Preference file is created, you’ll need to re-pair all your Bluetooth devices with your Mac. Here’s how:
– If the Bluetooth Assistant starts up, follow the onscreen instructions and you should be ready to go. If the Assistant doesn’t appear, go to Step 3.
– Click Apple > System Preferences, and select the Bluetooth Preference pane.
– Your Bluetooth devices should be listed with a Pair button next to each unpaired device. Click Pair to associate each Bluetooth device with your Mac.
– Check to see if the Logitech Bluetooth device is working. If not, go to the next steps.
Delete your Mac’s Bluetooth Preference List
The Mac’s Bluetooth Preference List may be corrupted. This preference list stores all the Bluetooth devices pairings and their current states. If the list is corrupted, you’ll need to remove your Mac’s Bluetooth Preference List and re-pair your device.
NOTE: This will delete all pairing for your Bluetooth devices from your computer, not just Logitech devices.
1. Click Apple > System Preferences, and select the Bluetooth Preference pane.
2. Click Turn Bluetooth Off. 
3. Open a Finder window and navigate to the /YourStartupDrive/Library/Preferences folder. Press Command-Shift-G on your keyboard and enter /Library/Preferences in the box.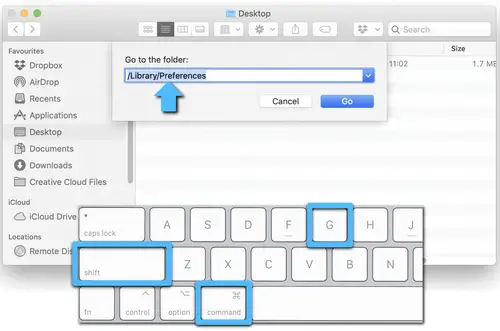
Typically this will be in /Macintosh HD/Library/Preferences. If you changed the name of your startup drive, then the first part of the pathname above will be that [Name]; for example, [Name]/Library/Preferences.
4. With the Preferences folder open in the Finder, look for the file called com.apple.Bluetooth.plist. This is your Bluetooth Preference List. This file could be corrupted and cause problems with your Logitech Bluetooth device.
5. Select the com.apple.Bluetooth.plist file and drag it to the desktop.
NOTE: This will create a backup file on your desktop if you ever want to go back to the original setup. At any point, you can drag this file back to the Preferences folder.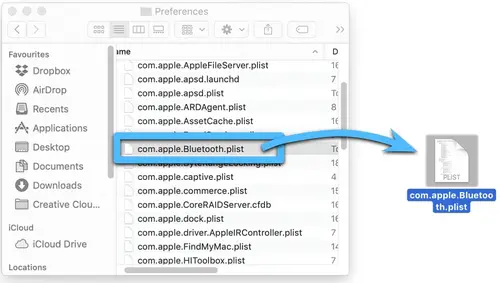
6. In the Finder window that is open to the /YourStartupDrive/Library/Preferences folder, right-click the com.apple.Bluetooth.plist file and select Move to Trash from the pop-up menu. 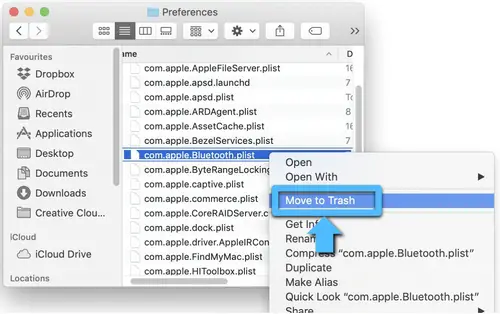
7. If you are asked for an administrator password to move the file to the trash, enter the password and click OK.
8. Close any open applications, then restart your Mac.
9. Re-pair your Logitech Bluetooth device.
Bluetooth troubleshooting for Logitech Bluetooth Mice, Keyboards and Presentation remotes
Try these steps to fix issues with your Logitech Bluetooth device:
– My Logitech device doesn’t connect with my computer, tablet or phone
– My Logitech device has already been connected, but frequently gets disconnected or laggy
Logitech Bluetooth device doesn’t connect with computer, tablet or phone
Bluetooth allows you to connect your device wirelessly to your computer without using a USB receiver. Follow these steps to connect via Bluetooth.
Check if your computer is compatible with the latest Bluetooth technology
The latest generation of Bluetooth is called Bluetooth Low Energy and is not compatible with computers that have an older version of Bluetooth (called Bluetooth 3.0 or Bluetooth Classic).
NOTE: Computers with Windows 7 cannot connect with devices that use Bluetooth Low Energy.
1. Make sure that your computer has a recent operating system:
– Windows 8 or later
– macOS 10.10 or later
2. Check if your computer hardware supports Bluetooth Low Energy. If you don’t know, click here for more information.
Set your Logitech device in ‘pairing mode’
In order for the computer to see your Logitech device, you need to put your Logitech device in discoverable mode or pairing mode.
Most Logitech products are equipped with a Bluetooth button or Bluetooth key and have a Bluetooth status LED.
– Make sure your device is turned ON
– Hold down the Bluetooth button for three seconds, until the LED starts blinking rapidly. This indicates that the device is ready for pairing.
See the Support page for your product to find more information on how to pair your specific Logitech device.
Complete the pairing on your computer
You will need to complete the Bluetooth pairing on your computer, tablet or phone.
See Connect your Logitech Bluetooth device for more information on how to do this depending on your operating system (OS).
Troubleshooting for power and charging Issues
Symptom(s):
– Device does not power on
– Device powers on intermittently
– Battery compartment damage
– Device does not charge
Likely Cause(s):
– Dead batteries
– Potential internal hardware issue
Possible solutions:
1. Recharge the device if it’s rechargeable.
2. Replace with new batteries. If this doesn’t resolve the problem, check the battery compartment for possible damage or corrosion:
– If you find damage, please contact Support.
– If there’s no damage, there could be a hardware issue.
3. If possible, try with a different USB charging cable or cradle and connect to a different power source.
4. If the device powers on intermittently there could be a break in the circuit. This could cause a possible hardware issue.