Logitech Wireless Mouse M525 User Manual
Box Content
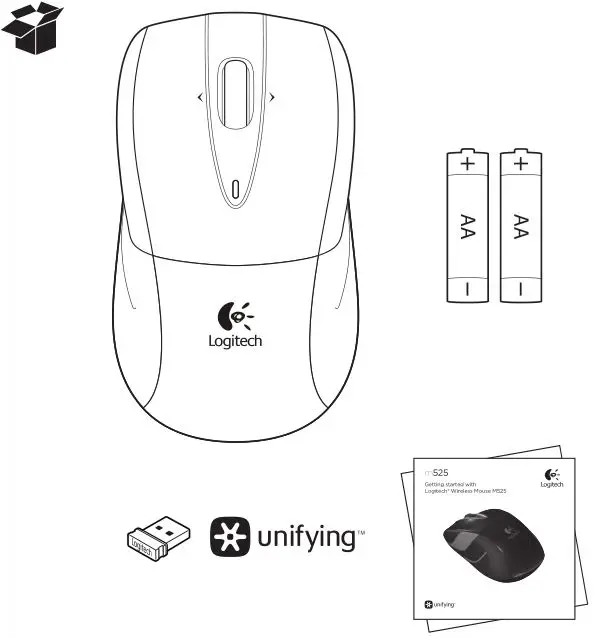
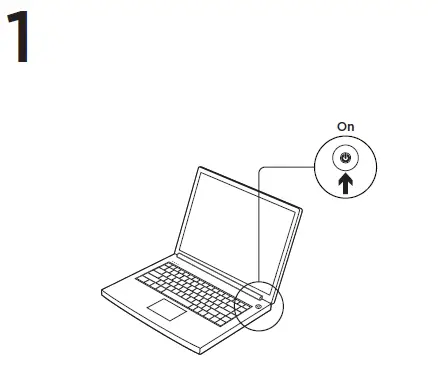
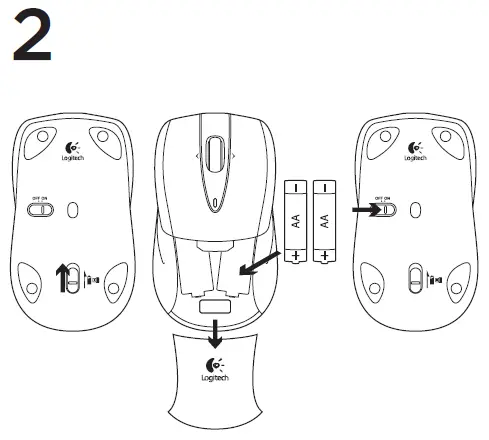
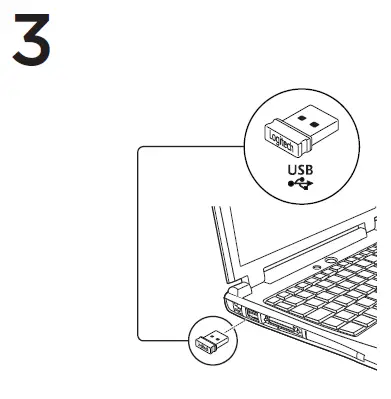
Assembly
Mac® OS X Users: When plugging in the Unifying receiver, the Keyboard Assistant window may appear.
Please close this window.
Advanced features: Software is optional for this mouse! Download the free mouse software for Windows® only (Logitech® SetPoint® for Windows®) at www.logitech.com/downloads to enable side-to-side scrolling and middle button features.
Features
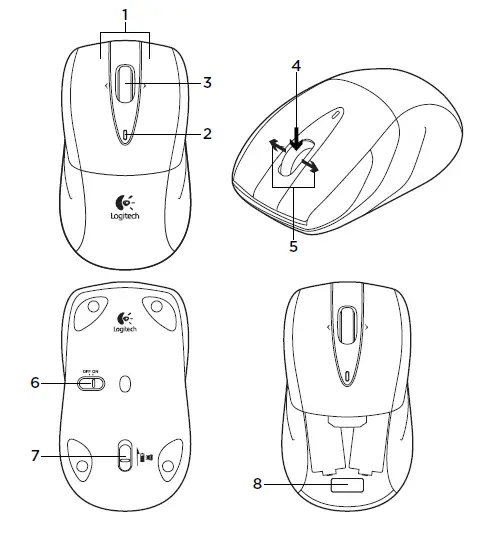
- Left and right mouse buttons
- Battery LED—Flashes green when mouse is powered on, and it flashes red when the battery power is low.
- Scroll wheel
- Middle button—The function of this button depends on your operating system and the application being used. For example, if you are browsing the Internet in Windows® and click on a link using the Middle button, typically the link opens in a new tab.
- Internet back/forward—Tilt the scroll wheel right to move forward one page. Tilt the scroll wheel left to move back one page.*
- On/Off slider switch
- Battery door release
- Unifying receiver storage—When the mouse is not in use, you can store the Unifying receiver inside the mouse.
*On a Mac® the Internet back/forward feature is not supported. You can assign Dashboard, Exposé, Spaces, or other functions to the tilt wheel feature using System Preferences.
The Logitech® Unifying receiver
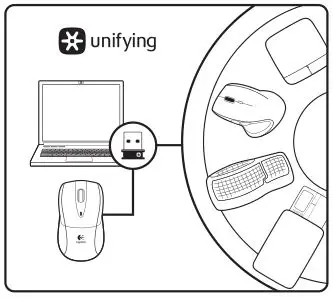
Plug it. Forget it. Add to it.
Your new Logitech product ships with a Logitech® Unifying receiver. Did you know you can add a compatible Logitech wireless device that uses the same receiver as your current Logitech Unifying product?
Are you Unifying-ready?
If you have a Logitech wireless device that’s Unifying-ready, you can pair it with additional Unifying devices. Just look for the orange Unifying logo on the new device or its packaging. Build your ideal combo. Add something. Replace something. It’s easy, and you’ll use only one USB port for up to six devices.
Getting started is easy
If you’re ready to pair your device(s) via Unifying, here’s what you need to do:
- Make sure your Unifying receiver is plugged in.
- If you haven’t already, download the Logitech® Unifying software from www.logitech.com/unifying.
- Start the Unifying software* and follow the onscreen instructions to pair the new wireless device with your existing Unifying receiver.
*Go to Start / All Programs / Logitech / Unifying / Logitech Unifying Software
Help with setup: Mouse not working
- Is the mouse powered on?
- Is the Unifying receiver securely plugged into a computer USB port? Try changing USB ports.
- If the Unifying receiver is plugged into a USB hub, try plugging it directly into a USB port on your computer.
- Check the orientation of the batteries inside the mouse. Replace the batteries if necessary. The mouse uses two AA alkaline batteries.
- Remove metallic objects between the mouse and the Unifying receiver.
- Try moving the Unifying receiver to a USB port closer to the mouse.
- Try reconnecting the mouse and Unifying receiver using the Logitech Unifying software. (Refer to the Unifying section in this guide.)
What do you think?
Please take a minute to tell us. Thank you for purchasing our product.
Logitech Support
United States +1 646-454-3200
Argentina +00800-555-3284
Brasil +0 800-891-4173
Canada +1 866-934-5644
Chile 1230 020 5484
Latin America +1 800-578-9619
Mexico 001 800 578 9619

![]()
© 2011 Logitech. All rights reserved. Logitech, the Logitech logo, and other Logitech marks are owned by Logitech and may be registered. Microsoft, Windows Vista, Windows, and the Windows logo are trademarks of the Microsoft group of companies. Mac, Mac logo, Exposé, and Spaces are trademarks of Apple Inc., registered in the U.S. and other countries. All other trademarks are the property of their respective owners. Logitech assumes no responsibility for any errors that may appear in this manual. Information contained herein is subject to change without notice.
620-003602.003
FAQ – Frequently Asked Questions
Scrolling issues with Windows 8.1 Consumer Preview version
Initial testing with Windows 8.1 Consumer Preview version reveals a scrolling issue with IE11 and Windows 8 apps, as well as on the Windows Start screen itself:
– Moderate to fast scrolling can become unresponsive until you stop scrolling. Then, the page will jump a long distance, usually to either the beginning or the end.
We’re working with Microsoft to resolve this issue.
As a workaround, you can modify your scrolling settings in IE11. Here’s how:
1. Launch IE11.
2. Open Internet Options and select the Advanced tab.
3. In the Browsing section, clear “Use smooth scrolling”.
![]()
4. In the Security section, clear “Enable Enhanced Protected Mode”, and then click OK.
IMPORTANT: Disabling Enhanced Protected Mode degrades the security settings in IE11. Please consider this before you make this change.
5. Restart your computer.
Cleaning your Logitech device
In the event your Logitech device needs cleaning we have some recommendations:
Before You Clean
– If your device is cabled, please unplug your device from your computer first.
– If your device has user-replaceable batteries, please remove the batteries.
– Be sure to switch off your device and then wait 5-10 seconds before starting to clean.
– Don’t put cleaning liquids directly on your device.
– For devices that are not waterproof, please keep moisture to a minimum and avoid any liquid dripping or seeping into the device
– When using cleaning sprays, spray the cloth and wipe — do not spray the device directly. Never submerge the device in a liquid, cleaning or otherwise.
– Don’t use bleach, acetone/nail polish remover, strong solvents, or abrasives.
Cleaning Keyboards
– To clean the keys, use regular tap water to lightly moisten a soft, lint-free cloth and gently wipe down the keys.
– Use compressed air to remove any loose debris and dust between the keys. If you do not have compressed air available, you could also use cold-air from a hair-dryer.
– You can also use fragrance-free disinfecting wipes, fragrance-free anti-bacterial wet wipes, makeup removing tissue, or alcohol swabs containing less than 25% concentration of alcohol.
– Don’t use bleach, acetone/nail polish remover, strong solvents, or abrasives.
Cleaning Mice or Presentation Devices
– Use tap water to lightly moisten a soft, lint-free cloth and gently wipe down the device.
– Use lens cleaner to lightly moisten a soft, lint-free cloth and gently wipe down your device.
– You can also use fragrance-free disinfecting wipes, fragrance-free anti-bacterial wet wipes, makeup removing tissue, or alcohol swabs containing less than 25% concentration of alcohol.
– Don’t use bleach, acetone/nail polish remover, strong solvents, or abrasives.
Cleaning Headsets
– Plastic parts (headband, mic boom, etc.): it is recommended to use fragrance-free disinfecting wipes, fragrance-free anti-bacterial wet wipes, makeup-removing tissue, or alcohol swabs containing less than 25% concentration of alcohol.
– Leatherette earpads: it is recommended to use fragrance-free disinfecting wipes, fragrance-free anti-bacterial wet wipes, or make-up removal tissue. Alcohol wipes can be used on a limited basis.
– For the braided cable: it is recommended to use anti-bacterial wet wipes. When wiping cables and cords, grip the cord mid-way and pull towards the product. Don’t forcefully pull the cable away from the product or away from the computer.
– Don’t use bleach, acetone/nail polish remover, strong solvents, or abrasives.
Cleaning Webcams
– Use tap water to lightly moisten a soft, lint-free cloth and gently wipe down the device.
– Use lens cleaner to lightly moisten a soft, lint-free cloth and gently wipe down the webcam lens.
– Don’t use bleach, acetone/nail polish remover, strong solvents, or abrasives.
If Your Device Still Isn’t Clean
– In most cases, you can use isopropyl alcohol (rubbing alcohol) or fragrance-free anti-bacterial wipes and apply more pressure when cleaning. Before using rubbing alcohol or wipes, we suggest you test it first in an inconspicuous area to make sure it doesn’t cause discoloration or remove any printing on your device.
– If you’re still not able to get your device clean, please consider contacting us.
COVID-19
Logitech encourages users to properly sanitize their products in accordance with guidelines put out by the World Health Organization and the Centers for Disease Control guidelines.
Erratic scrolling with SetPoint when using Chrome, Internet Explorer, or Windows 8 Start screen apps
SetPoint versions 6.50 and later include a smooth scrolling plug-in for Google Chrome and Internet Explorer. If you’re having problems with erratic scrolling, please upgrade to SetPoint 6.52 or later, which improves scrolling for these browsers.
After upgrading to SetPoint version 6.52 or later, you may still experience erratic scrolling on individual web sites or pages that implement technologies differently. If you’re using Start screen apps in Windows 8, it’s also possible that the app you’re using can’t properly interpret the smooth scrolling function. In this case, you can also disable the SetPoint smooth scrolling plug-in.
– Google Chrome
– Internet Explorer
– Windows 8 Start screen apps
NOTE: You can disable the SetPoint plug-in for the Internet Explorer and Chrome browsers individually, but if you disable smooth scrolling in SetPoint, it will be disabled for everything: Chrome, Internet Explorer, and the Windows 8 Start screen apps.
Google Chrome
To disable the Logitech SetPoint smooth scrolling plug-in for Google Chrome:
1. Launch Chrome.
2. Click the icon on the upper-right corner and select Settings.

3. Select Extensions > Logitech SetPoint and clear Enabled.

NOTE: To enable the smooth scrolling plug-in, follow the steps above, and in step 3, click Enable.
4. Close and re-open your browser for the settings to take effect.
Internet Explorer
To disable the Logitech SetPoint smooth scrolling plug-in for Internet Explorer:
1. Select Control Panel > Network and Internet > Internet Options.
2. On the Programs tab, click Manage add-ons.

3. Select Logitech SetPoint and then click Disable.
NOTE: If the plug-in is currently disabled, the Enable button will appear instead.

4. Click Close to close the dialog box.
NOTE: To enable the smooth scrolling plug-in, follow the steps above, and in step 4, click Enable.
5Close and re-open your browser for the settings to take effect.
Windows 8 Start screen apps
If scrolling is too fast or too slow with some of your Windows 8 Start screen apps, try the following:
– If your mouse has a Scroll Left and Scroll Right function, use that instead of the scroll wheel.
– Disable Smooth Scrolling in SetPoint:
1. Launch SetPoint by clicking the SetPoint icon 
2. Click on Pointer Settings, and clear Enable Smooth Scrolling.

3. Click Apply and then OK to exit the SetPoint User Interface.
NOTE: When you disable smooth scrolling in SetPoint, it will be disabled for everything: Chrome, Internet Explorer, and the Windows 8 Start screen apps.
Wireless product not working properly when also using a USB 3.0 device
When using a USB 2.0 2.4GHz wireless peripheral device (such as a mouse, keyboard, or headphones) with a PC that also has a USB 3.0 peripheral device plugged in, you may experience erratic operation caused by interference. This is especially likely to happen when using USB 3.0 remote hard drives or flash drives.
This interference may result in:
– Delayed response to mouse or keyboard inputs
– Missing keyboard characters or mouse commands
– Decreased operating distance between the USB 2.0 wireless device and its receiver
There are some techniques that can help early adopters of USB 3.0 to mitigate potential problems with their existing 2.4GHz wireless devices:
– If your PC has multiple USB 2.0 connectors available, separate your USB 3.0 and USB 2.0 receivers by as much distance as possible. For example, if your PC has a choice of USB 2.0 connectors, use the one on the opposite side of the PC from the USB 3.0 connector.
– Position your USB 2.0 receiver as close as possible to your wireless peripheral (mouse, keyboard, headphones, etc.).
– Use a standard, USB-extender cable to position your USB 2.0 wireless receiver as far away as possible from your USB 3.0 connector.
A USB-extender cable is available for Logitech customers who are experiencing this problem (click here for more information).
NOTE: A USB 3.0 connector sometimes referred to as Super Speed USB or SS, normally has a blue plastic insert in the connector. Unlike a USB 2.0 connector which has 4 pins within the connector, a USB 3.0 connector has 9 pins.
Move your USB 2.0 wireless receiver to the opposite side of your computer:

Make sure your USB 2.0 wireless receiver is in the USB 2.0 connector closest to your wireless peripheral:

Use a USB extended cable to position your wireless receiver as far away from your USB 3.0 peripheral as possible:

Windows 8 and Windows 10 product support and device compatibility
To check if your Logitech product works with Windows 8 or Windows 10, first select the appropriate product category from the list below.
Mice and keyboards
Tablet and laptop accessories
Gaming products
Harmony remotes
Speakers
Headphones and headsets
Smart radios
Squeezebox network music players
Alert security cameras
WiLife security cameras
Webcams
M525 battery life and replacement
Battery information
– Requires 2 AA alkaline batteries
– Expected battery life is up to 36 months (3 years)
Checking battery status
You can check your mouse’s battery status using the Logitech SetPoint mouse and keyboard software. See answer 360023405953 for instructions.
Installing new batteries
When you install new batteries, make sure they are facing the correct direction as shown:

Extending battery life
Your mouse enters standby mode to conserve power when not in use. For best battery performance:
– Use only alkaline batteries. Non-alkaline batteries (such as NiMHor NiCd) operate at a lower voltage and may affect the battery life.
– Avoid using your mouse on dark or transparent surfaces, such as glass. These surfaces cause the optical sensor to use more power.
– Make sure replacement batteries are new and within the manufacturer’s expiration date.
– Don’t mix old and new batteries.
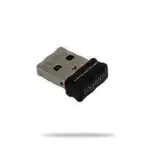
Using the M525 with a different USB receiver
Your M525 mouse ships with the Unifying receiver:

You can connect your mouse to any receiver that displays this Unifying logo:
![]()
NOTE:
Although a device may be supported by the Unifying receiver, SetPoint and/or Logitech Control Center (LCC) support depends on the specific product.
Purchasing a replacement Unifying receiver for the M525 mouse
Your M525 mouse is a Unifying device that can be used with any Unifying receiver. If you’ve lost or damaged the receiver, you can purchase a replacement from the M525 Parts Store.
The mouse won’t work with a non-Unifying receiver. To be sure you have the right receiver, look for this Unifying logo:
![]()
Unifying receiver storage in the M525 mouse
Your mouse was designed with a space where you can store the Unifying receiver. When you’re not using the mouse, you can store the receiver inside of it.
To locate the storage space for a Unifying receiver in your mouse:
1. Flip the mouse over and slide the battery cover off.

2. Locate the small rectangular slot next to the battery compartment.
3. Slide the receiver into the slot. It will fit facing either way.
4. Replace the battery cover.
TIP: If you have an extra receiver from any Logitech Unifying device you aren’t currently using, this is a great place to store it.
M525 battery light doesn’t stay on
The green battery light in the center of your M525 mouse isn’t meant to stay on. This is the normal behavior of the mouse.
When you turn your mouse on or replace the batteries, the light will come on for a few seconds. This indicates that the battery has enough charge for your mouse to work.
The light will go off after a few seconds to conserve battery power.

Customizing the M525 mouse with Logitech SetPoint software
Follow these links to learn how you can customize your M525 mouse using Logitech SetPoint mouse and keyboard software:
NOTE:
– If you don’t already have the software installed, you can download SetPoint.
– Customizing the mouse buttons (see answer 360023405593)
– Adjusting your mouse movements (see answer 360023405593)
– Customizing mouse settings for games (see answer 360023405593)
– Advanced settings for specific applications (see answer 360023405593)
Turning the M525 mouse on and off
To turn the M525 mouse on and off:
1. Flip the mouse over.
2. Locate the power switch on the bottom.

3. Slide the switch to the right to turn it ON.
4. Slide the switch to the left to turn it OFF.
Tracking light not visible on the M525 mouse
Your mouse uses an infrared (IR) light that is invisible to the human eye. This means you won’t be able to see the light emitting from the bottom of your mouse.
If you’re not sure whether your mouse is powered on, check the ON/OFF switch located on the bottom. When your mouse is:
ON — The switch is pushed over to the right and you see green next to it.
OFF — The switch is pushed over to the left and you see red next to it.
M525 mouse is not working or frequently loses connection
– Mouse isn’t working
– Mouse frequently loses connection
Mouse isn’t working
If your M525 mouse isn’t working, the problem is likely a lost connection. The connection between the mouse and the Unifying receiver can be lost for several reasons, such as:
– Low battery levels
– Moving the receiver from one USB port to another
– Moving the receiver to another computer
– Plugging the receiver into a USB hub, KVM switch or other unsupported device (NOTE: Your Unifying receiver must be plugged directly into your computer.)
Using your wireless mouse on metal surfaces
– Radio frequency (RF) interference from other sources, such as:
– Wireless speakers
– Computer power supplies
– Monitors
– Cell phones
– Garage door openers
Before connecting your M525:
1. Fix or rule out the potential problems listed above.
2. Turn your computer on.
3. Insert fresh batteries in your mouse (see answer 360023405233 for instructions).
4. Plug the Unifying receiver directly and securely into a working USB port on your computer.
5. Turn on your mouse (the power switch is on the bottom of the mouse).
The power indicator on top should turn green for a few seconds, letting you know there is enough charge for the mouse to work. The light then goes out to conserve battery power.
Reconnecting your M525
NOTE: These instructions use Windows screenshots. Macintosh will look slightly different, but the instructions are the same.
1. Download and install the latest software from the M525 Downloads Page.
2. Launch the Logitech Unifying Software.
– Windows: Start > Programs > Logitech > Unifying > Logitech Unifying Software
– Macintosh: Applications / Utilities / Logitech Unifying Software
3. Click Next at the bottom of the Welcome screen.
4. Follow the on-screen instructions to turn your mouse off and then back on.

5. When your mouse is detected, you’ll see this window:

Select Yes and then click Next.
6. Click Finish to exit the Logitech Unifying Software. Your mouse should now be connected.
Mouse frequently loses connection
If your mouse frequently stops working and you keep having to reconnect it with the Unifying receiver, try these suggestions:
– Keep other electrical devices at least 8 inches (20 cm) away from the Unifying receiver
– Move the mouse closer to the Unifying receiver
– Move the receiver to a different USB port on your computer
Supported operating systems for the M525 mouse
The M525 mouse is supported on:
– Windows 7
– Windows XP
– Windows Vista
– Macintosh 10.5 +
– Linux Kernel 2.6+
NOTE: The M525 is not supported on Windows 98, Windows ME, Windows 2000, and UNIX.
Cursor does not follow mouse movements
If the cursor isn’t following the movements of your mouse, we suggest you:
1. Use a mouse pad.
2. Avoid using your mouse on:
– Glass and other see-through surfaces
– Reflective surfaces, such as mirrors and metal desks
– Wood grains and grooved surfaces
3. Try the mouse on a piece of white paper to make sure it isn’t a tracking issue on the particular surface you’re using.
Operating distance between the mouse or keyboard and USB receiver
In an ideal environment, a Unifying or non-Unifying device can operate up to 30 feet (10 meters) away from its receiver (shown below) in a clear line of sight.

If you’re not getting this distance, try these suggestions:
– Replace the battery/batteries or make sure your mouse or keyboard is fully charged
– Move devices that emit radio waves or could cause radio interference away from your work area (Examples: cell phones, radios, wireless routers, microwaves)
To determine if your environment is shortening your operating range, try using your device in a different environment to see if the distance improves. If it does, look for other possible sources of interference you can remove from your work area.
Uninstalling Logitech SetPoint Software
To uninstall Logitech SetPoint software, first select your operating system:
– Windows XP
– Windows 7 and Vista
– Windows 8
– Windows 10
Windows XP
1. Go to Add or Remove Programs:
– Default Start Menu: Start > Control Panel > Add or Remove Programs
– Classic Start Menu: Start > Settings > Control Panel > Add or Remove Programs
2. Select “Logitech SetPoint” from the list.

3. Click the Remove button.
4. Follow the on-screen instructions to remove SetPoint from your system.
NOTE: You may need to restart your computer to finish uninstalling SetPoint.
Windows 7 and Vista
1. Go to Uninstall a program:
– Default Start Menu: Start > Control Panel > Uninstall a program
– Classic Start Menu: Start > Settings > Control Panel > Programs and Features
2. Select “Logitech SetPoint” from the list.
3. Click Uninstall.
4. Follow the on-screen instructions to remove SetPoint from your system.
NOTE: You may need to restart your computer to finish uninstalling SetPoint.
Windows 8
1. Go to Uninstall a program:
– Start screen > Right-click on Mouse and Keyboard Settings > Uninstall
– Start screen > Right-click on empty space and select All apps > Control Panel > Uninstall a program

2. Select “Logitech SetPoint” from the list.

3. Click Uninstall.
4. Follow the on-screen instructions to remove SetPoint from your system.
NOTE: You may need to restart your computer to finish uninstalling SetPoint.
Windows 10
1. Go to Programs and Features:
– Right-click on the Windows logo on the bottom left of the window, then click Programs and Features
2. Select Logitech SetPoint from the list of programs.

3. Click on Uninstall and follow the on-screen instructions to uninstall Setpoint.
NOTE: You may need to restart your computer to finish uninstalling.
Mouse and keyboard compatibility with USB hubs and KVM switches
We do not support the use of third-party devices with our mice and keyboards. They can interfere with communication between a mouse or keyboard and the computer.
Unsupported third-party devices include:
– KVM switch boxes
– Port replicators
– Docking stations
– USB hubs
NOTE: The manufacturers of these third-party devices implement keyboard and mouse support in different ways. There is currently no industry standard.
Mouse buttons do not work as programmed in SetPoint
When the mouse buttons aren’t working the way you programmed them to, the problem is usually with the configuration. You can check and change your mouse button settings in the Logitech SetPoint mouse and keyboard software. See Knowledge Base article 23057 for more information.
Macintosh Keyboard Setup Assistant appears when USB receiver gets plugged in
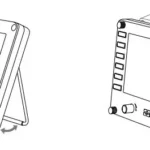
The Keyboard Setup Assistant (shown below) may launch when you plug in the receiver for your mouse. This behavior is normal and expected.
You do not need to complete the Assistant to use your mouse. Click the red button in the top left corner to close the Keyboard Setup Assistant.

Unable to customize my mouse or keyboard in SetPoint
Normally, you should be able to customize your mouse or keyboard settings in the Logitech SetPoint mouse and keyboard software on the My Mouse / My Keyboard tab.
Without the My Mouse / My Keyboard tab in SetPoint, only the Tools tab will display, as shown here:

If the My Mouse / My Keyboard tab isn’t displayed, you’ll need to uninstall and re-install SetPoint following the instructions below.
To uninstall and re-install SetPoint:
– Windows XP
– Windows Vista and Windows 7
– Windows 8
Windows XP
1. Go to Add or Remove Programs.
– Default Start Menu view: Start > Control Panel > Add/Remove Programs
– Classic Start Menu view: Start > Settings > Control Panel > Add/Remove Programs
2. Select Logitech SetPoint from the list of programs displayed.
3. Click the Change / Remove button and follow the on-screen instructions to uninstall SetPoint.
4. Download and install the latest version of SetPoint from the Web Downloads Page.
NOTE: You may need to restart your system after SetPoint has been installed.
5. After your system restarts, open SetPoint to verify that the My Mouse / My Keyboard tab is available.
If the My Mouse / My Keyboard tab is still missing:
1. Right-click on the SetPoint icon in the system tray (at the bottom right of your screen) and select Exit.

2. Click the Windows Start button.
3. Choose Run.
4. Type %windir% in the Run dialog box.

5. Double-click the System32 folder to open it.
6. Double-click the drivers folder.
7. Rename the file wdf01000.sys to wdf01000.bak.
8. Re-install SetPoint.
IMPORTANT: Before you restart your system, make sure the wdf01000.sys file is present in the drivers folders. If you restart without this file, it may prevent some of your hardware — including mice and keyboards — from working properly.
9. If the wdf01000.sys file isn’t in the drivers folder, change wdf01000.bak back to wdf01000.sys.
10. Restart the computer.
11. After your system restarts, open SetPoint to verify that the My Mouse / My Keyboard tab is present.
Windows Vista and Windows 7
1. Go to Uninstall a program.
– Default Start Menu view: Start > Control Panel > Uninstall a program
– Classic Start Menu view: Start > Settings > Control Panel > Programs and Features
2. Select Logitech SetPoint from the list of programs displayed.

3. Click the Uninstall button highlighted above and follow the on-screen instructions to uninstall SetPoint.
4. Download and install the latest version of SetPoint from the Web Download page.
After your system restarts, open SetPoint to make sure the My Mouse / My Keyboard tab is available.
Windows 8
1. Go to Uninstall a program.
– Start screen > Right-click on Mouse and Keyboard Settings > Uninstall
– Start screen > Right-click on empty space and select All apps > Control Panel > Uninstall a program
2. Select “Logitech SetPoint” from the list.
3. Click Uninstall.
4. Follow the on-screen instructions to remove SetPoint from your system.
NOTE: You may need to restart your computer to finish uninstalling SetPoint.
Mouse doesn’t display in LCC and can’t be programmed for Mac
This mouse model isn’t supported by the Logitech Control Center (LCC) for Macintosh, but might still work as a basic mouse on a Mac.
If a device is programmable, the LCC for Mac will display the image for that device. Because this mouse isn’t supported, the image won’t display in the LCC and you won’t be able to program it there.

If a device is not supported in the LCC, there won’t be an image for it.

My Unifying mouse or keyboard wakes the computer even when it is set not to
Symptom
After disabling the ability to wake-up the system in Windows Device Manager, the Unifying mouse or keyboard still brings the system out of sleep mode.
Solution
Even if you bought a mouse-only or keyboard-only product, the Unifying receiver that came with it still enumerates for both the mouse and keyboard interfaces.
Example
If you have two mice attached, then you would need to uncheck the “Allow this device to wake the computer” option for both mice plus a keyboard in the Windows Device Manager.
Use the process below to identify and configure the Unifying devices to not wake up the system in Windows Device Manager.
Changing wake-up settings in the Device Manager
To change the wake-up settings in Windows Device Manager, you’ll need to launch it through Computer Management and then make your selections. Here’s how:
1. Click Start, right-click Computer, and then click Manage.
2. Click Device Manager in the navigation pane on the left.

3. Select and expand either the “Keyboards” or “Mice and other pointing devices” category.
4. Right-click on the first entry and go to Properties > Details tab > Hardware IDs under the Property section.
5. Make sure the Value section contains: HIDVID_046D&PID_C52B. If it doesn’t, click Cancel and open the next mouse or keyboard entry in the list.

6. Select the “Power Management” tab and uncheck the “Allow this device to wake the computer” check box.

7. Repeat the same steps for all entries in both the “Keyboards” and “Mice and other pointing devices” categories.
Mouse double-clicks when clicked once
– My mouse has been double-clicking from the first day of usage
– My mouse has been working fine until recently and now it’s double-clicking
If your mouse double-clicked from the first day of usage, check the Windows setting called Single-click to open an item. This option makes a single mouse click act as a double click. Disable this setting to return the mouse to the standard one click option.
To disable, first select your operating system:
– Disabling the single-click to open option in Windows 8/Windows 10
– Disabling the Single-Click to open option in Windows 7/Vista
– Disabling the Single-Click to open option in Windows XP
Disabling the single-click to open option in Windows 8/Windows 10
1. Click on the magnifying glass to bring up the Search menu, type ‘single-click’, and then select Specify single- or double-click to open.
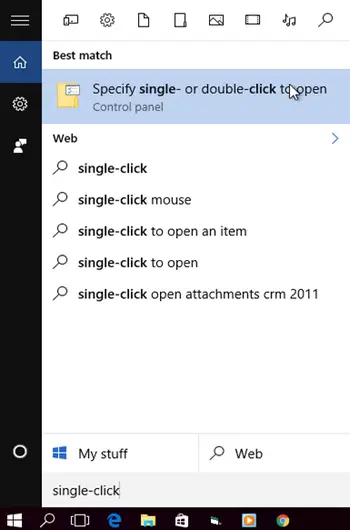
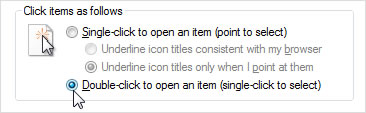
2. Select the General tab, and under Click items as follows, make sure Double-click to open an item (single-click to select) is the selected option.
Disabling the Single-Click to open option in Windows 7/Vista
1. Open your computer window by clicking on Computer.

2. Click Folder and Search Options in the file menu under Organize.
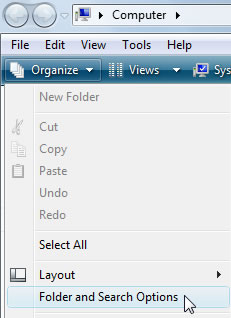
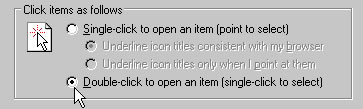
3. Under the General tab, make sure that the option ‘Double-click to open an item’ is selected.
4. Click on OK to save the settings.
5. If the ‘Single-click to open an item’ option was not selected, try resetting the mouse by switching it off and on.
Disabling the Single-Click to open option in Windows XP
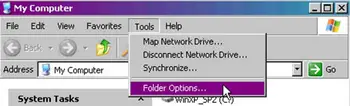
1. Open My Computer.

2. Click Folder Options in the file menu under Tools.

3. Under the General tab, make sure that the option ‘Double-click to open an item’ is selected.
4. Click on OK to save the settings.
5. If the ‘Single-click to open an item’ option was not selected, try resetting the mouse by switching it off and on.