USER MANUAL
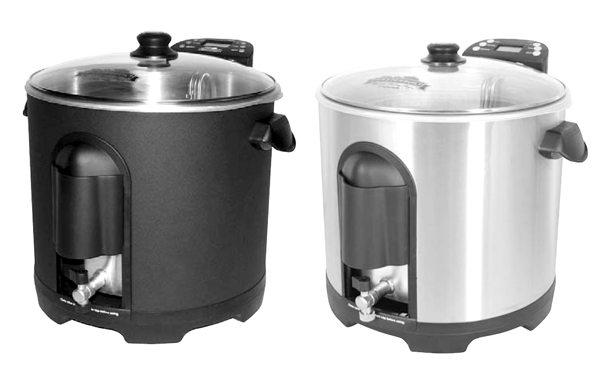
Electric Fryer, Boiler, & Steamer
Masterbuilt : [20010306, 20010406]
Masterbuilt Manufacturing, Inc.
450 Brown Avenue, Columbus,GA 31906
1-800-489-1581
www.masterbuilt.com
WARNINGS
MPORTANT SAFEGUARDS
When using electrical appliances, basic safety precautions should always be followed, including but not limited to the following:
- Read all instructions.
- A short cord is provided to prevent possibility of entanglement or tripping that may occur with use of a longer cord.
- Never move appliance when oil or water is above 100°F(37°C).
- Do NOT touch hot surfaces. Use handles and knobs.
- To protect against electric shock, do NOT immerse cord, plugs, or any part of control panel in water or other liquids.
- Do NOT move appliance while in use or HOT.
- This is an ATTENDED appliance. Do NOT leave this appliance unattended during use. Even after use, never allow children or pets near appliance. Heated liquid inside cooking pot remains dangerously HOT for a period of time after use.
- Close supervision is necessary when appliance is used near children. Do NOT let children handle or put cord in mouth.
- ALWAYS keep children and pets away from appliance.
- Unplug from outlet when not in use and before cleaning. Allow to cool before removing parts for cleaning and storing.
- Do NOT operate appliance with a damaged cord, plug, or after appliance mal functions, or has been damaged in any manner. Contact Master built Customer Service for assistance 1-800-489-1581.
- Accessory attachments not supplied by Master built Manufacturing, Inc. are not recommended and may cause injury.
- Do NOT use outdoors, appliance is for indoor use only.
- Do NOT let cord hang over edge of table or counter, or touch hot surfaces.
- Do NOT place on or near a HOT gas or electric burner, or in a heated oven.
- ALWAYS attach breakaway cord w/plug to appliance first, then plug cord in outlet.
- To disconnect, turn thermostat control knob to “OFF”, then remove plug from outlet.
- Do NOT use appliance for other than intended use.
- If oil begins to smoke, IMMEDIATELY turn appliance off.
- NEVER overfill cooking pot. Do NOT exceed max fill line.
- Do NOT immerse electric cord or control panel in water.
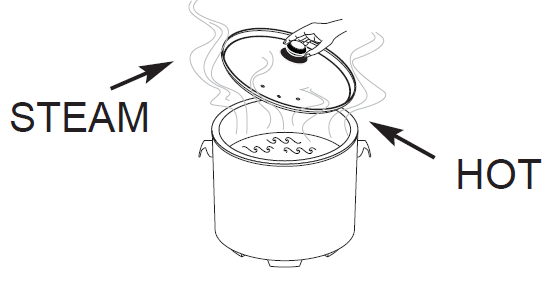
- Open lid with caution to prevent being burned by escaping steam.
SAVE THESE INSTRUCTIONS
IMPORTANT INFORMATION: DO NOT USE AN EXTENSION CORD.
Use of extension cord increases risk of entanglement or tripping.
Use of extension cord causes loss of energy and appliance may not heat properly.
PARTS LIST
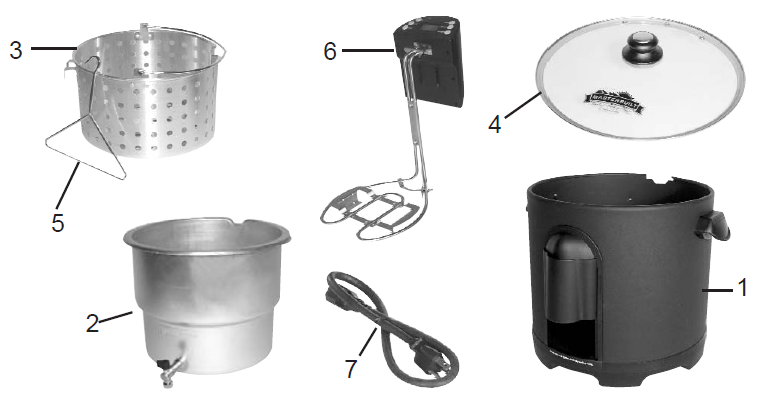
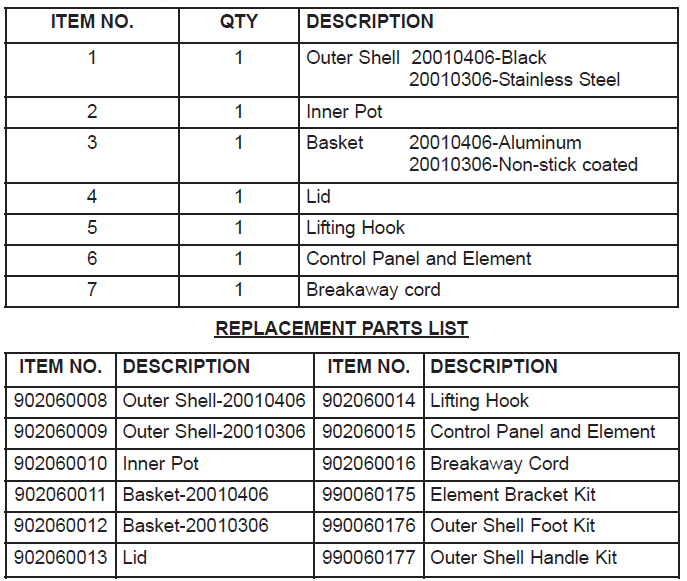
STOP!
DO NOT RETURN TO RETAILER
For Assembly Assistance, Missing or Damaged Parts
Call: MASTERBUILT Customer Service at 1-800-489-1581 or
EMAIL us at [email protected]
ASSEMBLY INSTRUCTIONS
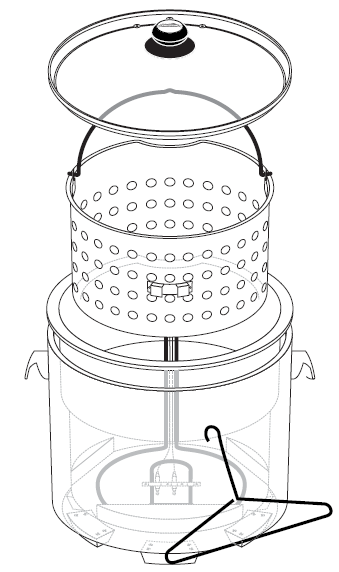
Step 1
Align notch of inner pot (2) with notch on outer shell (1). Insert inner pot into outer shell.
Step 2
Attach control panel and element (6) to outer shell mounting bracket as shown. Control must be correctly attached for appliance to operate. A built in safety switch on control panel will prevent unit from heating if not mounted properly.
Step 3
Place basket (3) inside inner pot.
Step 4
Place glass lid (4) on last.
Glass lid will not fit tightly when basket’s in use during cooking process.
STARTER TIPS
FOR BEST RESULTS, READ following start up tips before using this product. Remember this is an ELECTRIC unit and has different characteristics than a gas unit.
FOR SAFETY, heating element only heats up when properly attached to mounting bracket (see assembly instructions). This is a powerful heating element and may cause circuit breaker to trip. Minimize occurrences by operating any additional appliances on separate circuit. Tripping circuit breaker will NOT damage unit or household electrical system.
PRE-HEATING oil or water may take up to 55 minutes. Take advantage of this time to prepare foods for cooking. For optimum performance, completely pre-heat unit to cooking temperature before frying or boiling foods. Keeping lid ON during pre-heating and cooking cycles will reduce heating time and keep temperature more consistent.
INDICATOR LIGHT will turn ON when heating liquid in unit. It will turn OFF when liquid has been heated to designated temperature. Indicator light may turn on and off during cooking as heating element works to maintain a constant temperature.
POWER LIGHT will illuminate indicating power cord is plugged into outlet. Unit will not start heating until START button is pushed.
TIMER is NOT connected to heating element. Element WILL NOT TURN OFF when timer beeps.
OPERATING INSTRUCTIONS
Step 1
Mount control panel & element onto bracket on outer shell.
Step 2
Plug power cord into an outlet (refer to “Warnings & Important Safeguards” section of
manual). Power light will illuminate indicating the unit is plugged in, element is mounted
correctly and unit is on.
Step 3
Note: Temperature MUST be set before timer will function.
To set temperature:
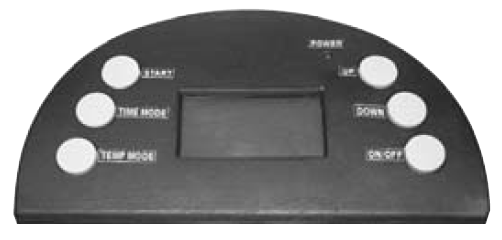
- Press ON button.
- Press TEMP MODE button once-LED display will blink.
- Use UP and DOWN buttons to set temperature.
- Press TEMP MODE button again to lock in temperature.
To set timer:
- Press TIME MODE button once-LED display for hours will blink.
- Use UP and DOWN buttons to set minutes.
- Press TIME MODE button again to lock in time
Step 4
When cooking time has elapsed and food is done, press ON/OFF button to turn off heating element and unplug power cord.
Allow excess oil to drain by hooking basket on side of pot with drain clip.
CAUTION: When using drain hook on basket, make sure that basket is firmly in place on rim of pot before releasing handle so basket will not fall back into hot oil or water causing personal injury.
WARNING: Do not use appliance without water or oil in pot. It can be severely damaged if heated while empty.
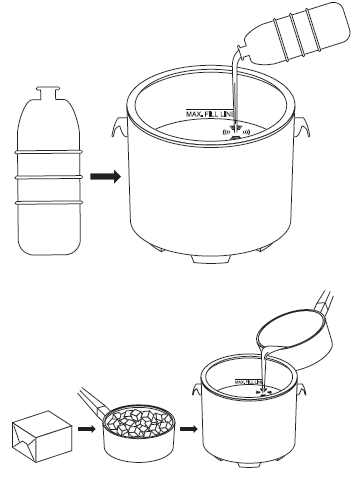
WARNING: Place unit on level and stable surface to prevent tipping.
CAUTION: Hot when in use.
CAUTION: Do not overfill pot past fill line.
CAUTION: Do not mix different types of oil at the same time.
CAUTION: Never melt fat or lard on the heating element or in basket
RESET FUNCTION
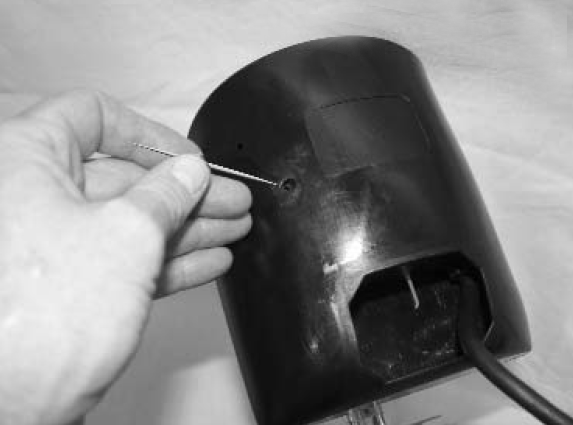
- Your appliance is equipped with an overheat safety feature.
- If appliance overheats it will shut off automatically.
- To reset appliance, unplug from outlet, then insert a toothpick into small hole found on back of control panel.
HOW TO CLEAN UNIT
Masterbuilt recommends cleaning unit prior to use.
Clean lid, inner pot, and basket with a damp cloth or sponge using a mild detergent. Rinse and dry thoroughly. These parts may also be cleaned in a dishwasher. Clean outer shell, cord, control panel and element with a damp cloth or sponge using a mild detergent. Dry thoroughly.
NEVER put these parts in a dishwasher.
WARNING: Do not place control panel under running water. Immersing control panel and cord can cause electrocution.
STORAGE and MAINTENANCE
DANGER: Disconnect electric cord from outlet, before cleaning, servicing and/or removing heating element. Electrical shock can result in personal injury or death.
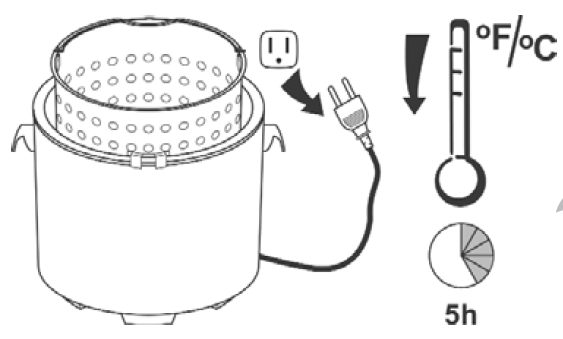
Turn appliance off, unplug and let cool for 2 hours if using water, 5 hours if using oil before cleaning or storing.
CAUTION: Do not pour used oil in sink. Drain it back into oil containers.
DRAIN VALVE
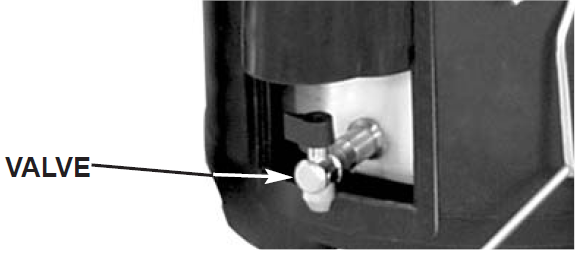
CAUTION: Do not pour used oil in sink. Drain it back into oil containers.
DANGER: Disconnect electric cord from outlet, before cleaning, servicing and/or removing heating element. Electrical shock can result in personal injury or death.
ATTENTION: Not all models are equipped with drain valve. (See packaging for details) Align drain valve spout over container and drain. Close valve when complete. Unused oil may be stored in appliance. Do NOT store water in appliance.
FREQUENTLY ASKED QUESTIONS
Why won’t my turkey fryer turn on?
The Control Panel features a “Safety Switch” that must be aligned properly for unit to power on. Green light will illuminate when control panel is mounted correctly.
How much oil do I need to use?
Fryer will require approximately 1.5 gallons (5.7L) of oil. The fill line is the maximum amount of liquid that can safely be used in this unit. Filling to the line provides more than enough water or oil to prepare any dish in this unit.
What type of oil should I use?
Peanut oil is recommended because of the great taste and higher smoke point but any common cooking oil may be used.
How hot will the oil become?
Oil will reach 400°F (204°C) in approximately 55 minutes. Oil temperature will decrease to 275°- 280°F (135-138°C) when turkey is placed in fryer, which is an appropriate turkey frying temperature.
Should I keep the lid on during use?
Yes, the lid helps retain heat, and keeps splatter inside unit
What size turkey can I deep fry in this unit?
You can deep fry up to a 14 lb (6.35kgs) turkey in this unit.
Can an extension cord be used with this unit?
No, extension cords will lose electric current resulting in increased cooking time and decreased performance. Extension cords can also pose a trip hazard.
Does the turkey go in the basket breast side up or down?
Turkey and turkey breasts should be placed horizontal in basket, breast side up.
I followed the formula and the turkey did not fully cook. What went wrong?
Cooking conditions may vary. Turkey could have been cold. Bring turkey to room temperature before frying. Sometimes a cold or frozen spot in a joint or deep in the turkey breast does not allow that section to cook properly.
Can the Electric Turkey Fryer be used outdoors?
Outdoor use is not recommended for Masterbuilt’s Electric Turkey Fryer.
If you do not want to use the unit in your house please use in a garage or covered patio to prevent Electric Turkey Fryer from being exposed to rain showers.
VISIT OUR WEBSITE FOR MORE INFORMATION AND GREAT TASTING RECIPES.
www.masterbuilt.com
RECIPES
DEEP FRIED WHOLE TURKEY
MAXIMUM RECOMMENDED
TURKEY SIZE IS 14 POUNDS (6.35kgs)!
Allow turkey to reach room temperature or set out 1 hour before frying.
THAWING TURKEY
The National Wild Turkey Federation recommends refrigerator thawing and to allow approximately 24 hours for every five pounds (2.3kgs) of bird thawed in the refrigerator.
COOKING INSTRUCTIONS
- Insure turkey is completely thawed, free of ice and water. Remove neck, giblet bag, plastic pop-up cooking indicator and leg ties. Pay special attention to inner cavity area when checking for ice or water.
- Fill pot with oil to the fill line.
- Set control dial to 400°F (204°C) (pre-heating time may take up to 55 minutes), and place lid on unit.
- While oil is pre-heating, prepare turkey. Inject with marinade of your choice and season outside of turkey with a Cajun rub.
- CALCULATE COOKING TIME
The formula for calculating turkey cooking time is 3 minutes per pound (0.45kg), then add 5 minutes to total cooking time, rounding to nearest minute:
13.86 lbs X 3 mins 41.58 mins
Plus 5 minutes + 5.00 mins
__________________
= 46.58 mins
Total Cooking Time 47.00 mins
NOTE: Cooking conditions vary. Insert a food thermometer 2 inches (5.08cm) into the deepest part of turkey and make sure an internal temperature of 180°F (82°C) is reached.
6. Heating indicator light will go OFF when temperature is reached.
7. Place turkey horizontally in basket, breast side up.
8. Wearing protective gloves or mitts, hook basket handle with lifting hook and very slowly lower basket into hot oil.
9. With basket in place, cover with lid. Set timer or mark time.
10. Heating light will come on, indicating the element is heating. Be certain to cook for complete calculated time .
11. When cooking time is complete, turn turkey fryer OFF and lift basket from hot oil slowly. Hook basket to side of pot with drain clip to drain excess oil.
12. Carefully tilt the turkey up on one end to allow oil to drain out of the center cavity.
The turkey can remain in the basket to cool until ready to serve.
DEEP FRIED TURKEY BREAST
Follow the above directions and safety precautions and adjust formula to 7 minutes per pound (0.45kg), then add 5 minutes to total cooking time.
LOW COUNTRY BOIL (BOILING)
- 1 lb (0.45kg) shrimp
- 1 lb (0.45kg) crawfish
- 1 lb (0.45kg) smoked sausage
- 8 pieces of short ear corn
- 2 bags of crab boil mix
- 2 lbs (0.91kg) of whole new potatoes
Fill inner pot with water to fill line, add 2 bags of crab boil mix and bring water to a boil. Allow water to boil for 15 minutes then add sausage (cut sausage in 1/4 inch (0.64cm) thick slices). Three minutes later, add potatoes; 3 minutes later, add corn; 3 minutes later, add shrimp and crawfish together; 3 minutes later, remove and serve.
COOKING CHART
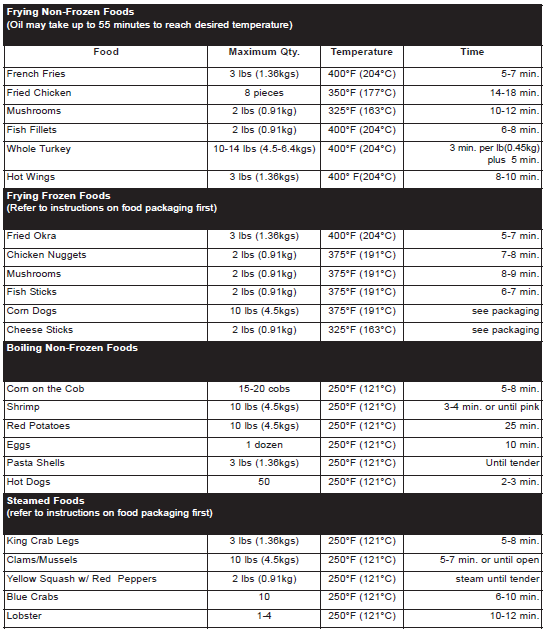
WARNING: NEVER place frozen poultry in oil. Use extreme caution when cooking frozen foods. Never fill oil past fill line or exceed maximum amount of food in basket. Spill over can cause serious injury. Slowly lower basket into hot oil and cover with lid. Always wear protective gloves or mitts.
CAUTION: When using drain hook on basket, make sure that basket is firmly in place on rim of pot before releasing handle so basket will not fall back into hot oil or water causing personal injury.
HOW TO STEAM USING APPLIANCE
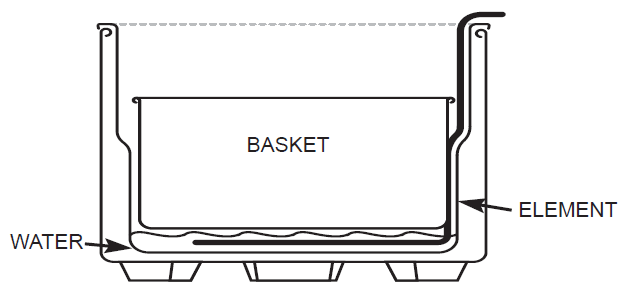
Add water until it reaches bottom of the basket. Do not allow water to evaporate. This will cause the element to overheat and can damage the unit.
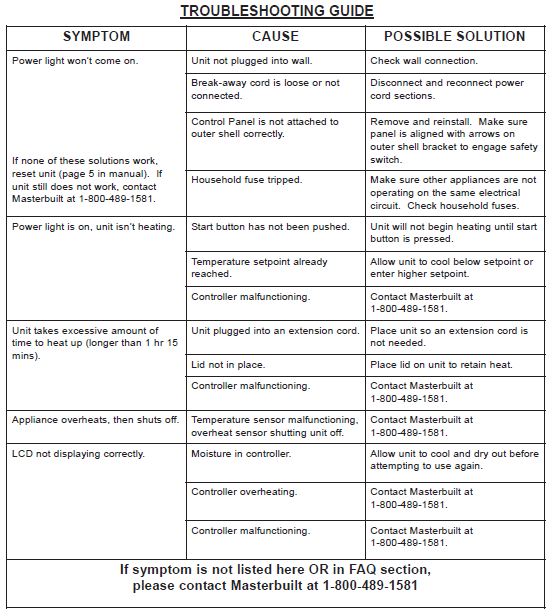
TROUBLESHOOTING GUIDE
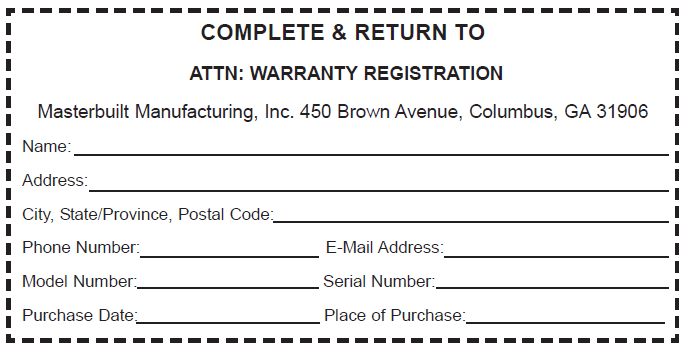
WARRANTY INFORMATION
Masterbuilt warrants its products to be free from defects in material and workmanship under proper assembly, normal use and recommended care for 90 days from the date of original retail purchase.
Masterbuilt warranty does not cover paint finish as it may burn off during normal use.
Masterbuilt warranty does not cover rust of the unit.Masterbuilt requires reasonable proof of purchase for warranty claims and suggests that you keep your receipt. Upon the expiration of such warranty, all such liability shall terminate.
Within the stated warranty period, Masterbuilt, at its discretion, shall repair or replace defective components free of charge with owner being responsible for shipping.Should Masterbuilt require return of component(s) in question for inspection Masterbuilt will be responsible for shipping charges to return requested item.This warranty excludes property damage sustained due to misuse, abuse, accident, damage arising out of transportation, or damage incurred by commercial use of this product.
This expressed warranty is the sole warranty given by Masterbuilt and is in lieu of all other warranties, expressed or implied including implied warranty, merchantability, or fitness for a particular purpose.
Neither Masterbuilt nor the retail establishment selling this product, has authority to make any warranties or to promise remedies in addition to or inconsistent with those stated above.
Masterbuilt’s maximum liability, in any event, shall not exceed the purchase price of the product paid by the original consumer/purchaser. Some states do not allow the exclusion or limitation of incidental or consequential damages. In such a case, the above limitations or exclusions may not be applicable.
California residents only: Not withstanding this limitation of warranty, the following specific restrictions apply; if service, repair, or replacement of the product is not commercially practical, the retailer selling the product or Masterbuilt will refund the purchase price paid for the product, less the amount directly attributable to use by the original buyer prior to the discovery of the nonconformity. Owner may take the product to the retail establishment selling this product in order to obtain performance under warranty.
This expressed warranty gives you specific legal rights, and you may also have other rights which vary from state to state.
