WARNING!
Read all safety warnings and all instructions. Failure to follow the warnings and instructions may result in electric shock, fire and/or serious injury. Save all warnings and instructions for future reference.
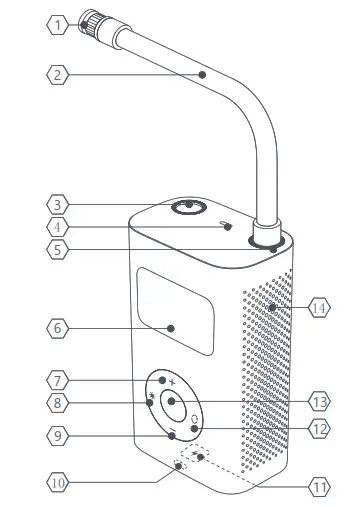
Product Overview
Note: Illustrations of the product, its accessories, and its user interface in this user manual are provided for reference only.
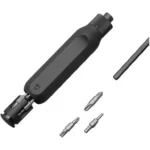
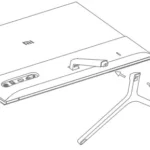
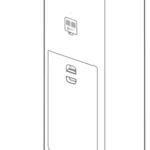
Parts Description
| 1. Schrader Valve 2. High-pressure Air Hose 3. Air Hose Compartment 4. Light 5. Air Hose Connection 6. Display 7. +Button |
8. Light On/Off Button 9. – Button 10. Battery Level Indicator 11. Charging Port 12. Mode Button 13. Start/Stop Button 14. Heat Dissipation Vent |
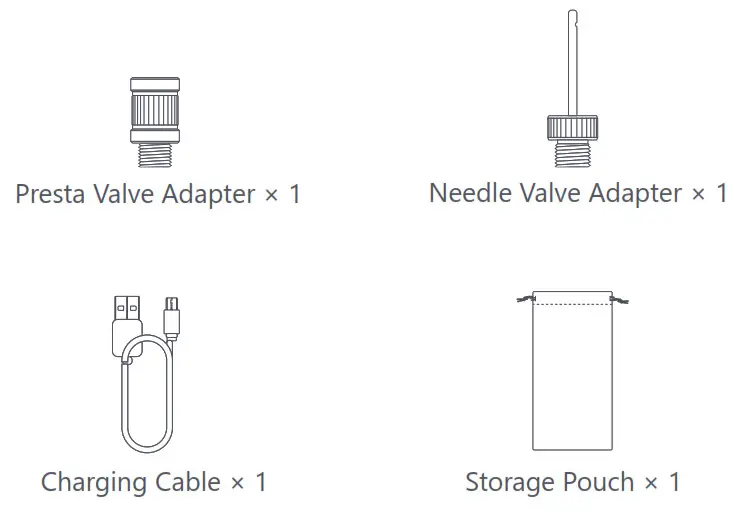
Accessories
Safety Instructions
The air compressor has an operating noise level of 75 dB. Please take appropriate precautions to protect your hearing. The air compressor and air hose can get very hot after running for a while. Do not touch hot surfaces until they have cooled down. This product is not a toy and should not be used by children.
Usage
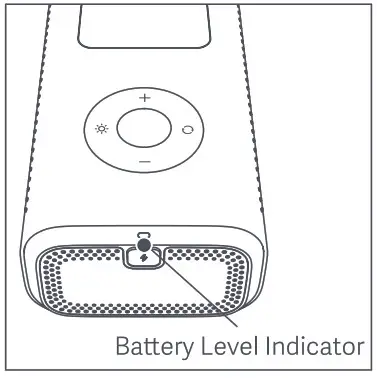
- Battery Level Indicator & Charging
Battery Level Indicator
The battery level indicator has different colors to indicate the air compressor‘s remaining battery level:
White: More than 50%
Orange: 20 to 50%
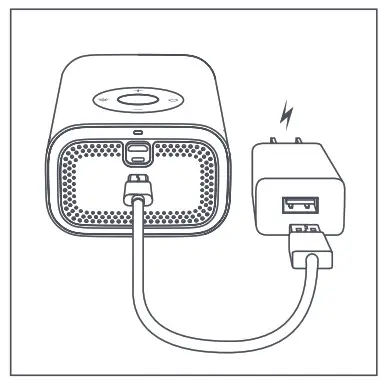
Red: Less than 20%, charge as soon as possibleCharging
Fully charge the air compressor before using it for the first time. Connect the charging cable to the certified 5.0 V 2.0 A USB charger (sold separately) to charge the air compressor.
Battery level indicator while charging:
Blinking White: Charging
White: Fully charged
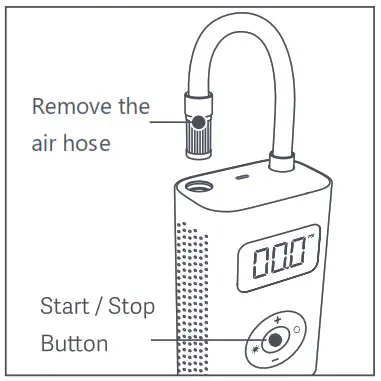
Note: The air compressor cannot be used while charging. - Turning On the Air Compressor
Remove the high-pressure air hose from its compartment, then the air compressor will automatically turn on. If the air compressor is not used for 3 minutes, it will automatically turn off. If the air compressor automatically turns off while the air hose is removed, press and hold the Start/Stop button to turn the air compressor on again.
- Connecting the High-pressure Air Hose and Nozzle
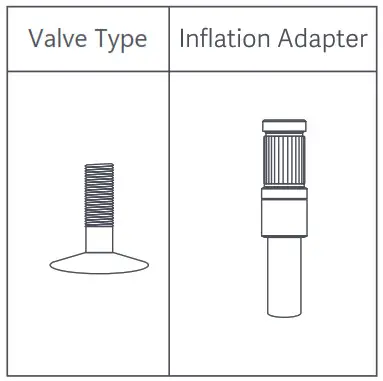
Schrader Valve
Tires on cars, motorcycles, e-bikes, and most mountain bikes use a Schrader valve.
To inflate: The air compressor can be directly connected to a Schrader valve to start inflating.
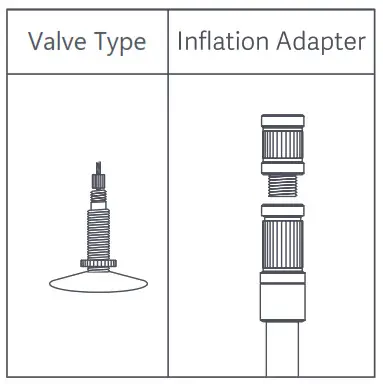
To deflate: Use an appropriate tool to press the pin inside the air valve to release air.Presta Valve Adapter
Road bicycles and certain mountain bikes use a Presta valve which requires the included Presta valve adapter to be used.
To inflate: Unscrew the Presta valve’s ring, attach the Presta valve adapter to the air hose, and connect the air compressor to the tire’s valve to start inflating. After the tire is inflated, screw the valve’s ring back down.
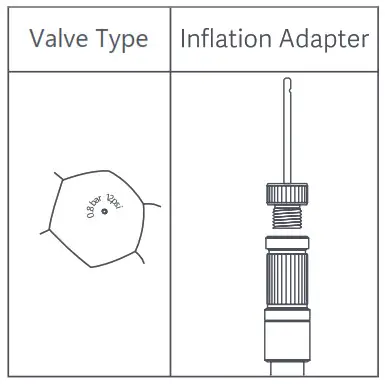
To deflate: Unscrew the ring of the Presta valve, and press the valve stem down to release air.Needle Valve Adapter
To inflate balls like basketballs and footballs, the included needle valve adapter will need to be used.
To inflate: Screw the needle valve adapter onto the Schrader valve adapter, then insert the needle into the valve of the ball to start inflating.
To deflate: Insert the needle valve adapter into the valve of the ball, and gently apply pressure to the ball to release air. - Detecting Air Pressure
The current pressure will automatically be displayed after the air hose is connected to an item while the air compressor is turned on. - Determining the Right Air Pressure
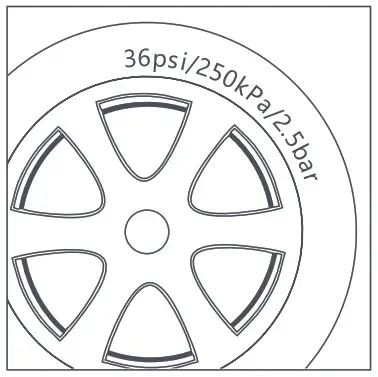
To ensure safety and to prevent injuries from bursting items due to over-inflation, always refer to the instructions or relevant directions accompanying the item to be inflated before inflating it, in order to determine the correct air pressure.Tires
The recommended air pressure of tires for cars, bicycles, and motorcycles is indicated on the tire’s sidewall.
The recommended tire pressure for cars is also indicated on the driver’s side door jamb.
For details concerning load carrying capacity and recommended air pressures, refer to your vehicle’s instructions or manual.Balls
The recommended air pressure for footballs, basketballs, volleyballs, and other balls is indicated near the ball’s air valve. Air Pressure Reference Table
Category Type Recommended Pressure Range Bicycles 12-, 14-, & 16-inch bicycle tires
20-, 22-, & 24-inch bicycle tires
Mi QICYCLE Electric Folding Bike tires
Mi Electric Scooter tires 26-, 27.5-, & 29-inch mountain bike tires
700c road bike clincher tires 700c road bike tubular tires30 – 50 psi 40 – 50 psi 45 – 50 psi 40 – 50 psi 45 – 65 psi 100 – 130 psi 120 – 145 psi Motorcycle Scooter & street motorcycle tires 1.8 – 3.0 bar Cars Car tires 2.2 – 2.8 bar Balls Basketball Soccer ball Volleyball Football 7 – 9 psi 8 – 16 psi 4 – 5 psi 12 – 14 psi Note: Pressure range values are for reference only. Always refer to the instructions or manual of the item being inflated for actual inflation pressure specifications. (The data above is from the QiCYCLE lab.)
- Pressure Presets
Switch Mode
Press the Mode button to switch between the five inflation modes below. Select the preferred air pressure unit before inflating. Press and hold the Mode button to toggle between psi and bar. 
Manual Mode: User-specified pressure preset (pressure value and unit will be saved)
Adjustable Range: 3 – 150 psi
Bicycle Mode: Default 45 psi
Adjustable Range: 30 – 65 psi
Motorcycle Mode: Default 2.4 bar
Adjustable Range: 1.8 – 3.0 bar
Car Mode: Default 2.5 bar
Adjustable Range: 1.8 – 3.5 bar
Ball Mode: Default 8 psi
Adjustable Range: 4 – 16 psiAdjusting the Preset Pressure

After selecting a mode, press + or – to increase or decrease the preset pressure value. Press and hold the + or – button to quickly adjust the pressure value. 
When adjusting a preset pressure, the blinking value indicates the target pressure, and a non-blinking value indicates the realtime pressure. Light

Press the light on/off button to turn the air compressor’s light on/off. The light makes it easy to see in the dark when you have any operations, such as connecting the air compressor to a valve. - Inflating
Start Inflating

Press the Start/Stop button to start inflating. The current pressure is shown in real-time while inflating. When inflating, the air compressor may be as loud as 75 – 80 dB. Please take appropriate precautions to protect your hearing. The air compressor and air hose can get very hot after running for a while. Avoid prolonged skin contact with the hose to prevent injuries. Stop Inflating

Once the preset pressure value has been reached, the air compressor will automatically stop inflating. The air compressor can also be manually stopped at any time while inflating by pressing the Start/Stop button once. Start Inflating
Press the Start/Stop button to start inflating. The current pressure is shown in real-time while inflating. When inflating, the air compressor may be as loud as 75 – 80 dB. Please take appropriate precautions to protect your hearing. The air compressor and air hose can get very hot after running for a while. Avoid prolonged skin contact with the hose to prevent injuries.
Caution
Items such as balloons, beach balls, and swim rings cannot be automatically inflated because they have an air pressure requirement below the air compressor’s minimum pressure range. Only inflate these items manually with caution.
Battery Information
The air compressor’s battery lasts about 30 minutes on a full charge running without a load at an ambient temperature of 25°C. Using the air compressor under a heavy load or at lower ambient temperatures may reduce its battery life. - Disconnecting the Air Hose
The air compressor’s air hose may get very hot after inflating. To prevent injuries, exercise caution when disconnecting it from a valve. Some air may leak out of the valve when disconnecting the air compressor. To avoid pressure loss, quickly disconnect the air hose from the valve. - Turning Off the Air Compressor
 Insert the air hose back into its storage compartment to turn off the air compressor. Press and hold the Start/Stop button while the air compressor is turned on. If the air compressor is not used for 3 minutes, it will automatically turn off.
Precautions
- The air compressor should only be operated by persons 16 years of age or older. Keep children at a safe distance when using the air compressor.
- The air compressor has a built-in lithium battery and should never be exposed to fire or improperly disposed of. Do not expose the air compressor’s battery to high temperature environments, such as leaving it in a car in direct sunlight. If the lithium battery is exposed to extreme heat, impact or water, there is a risk of fire, spontaneous combustion, and even explosion.
- The air compressor should not be stored at temperatures below -10°C or over 45°C. Exposure to extreme heat or cold will shorten the air compressor’s service life and damage the built-in battery.
- Leaving the air compressor unused for long periods may harm the battery. It is recommended to charge the air compressor at least once every three months.
- The air compressor uses a built-in DC motor which may produce electrical sparks when running and should never be used in flammable or explosive environments.
- If the air compressor makes an unusual noise while running or starts to overheat, turn it off immediately.
- Always make sure the correct air pressure unit is selected before setting the air pressure to prevent accidents such as a burst tire. Common Unit Conversion: 1 bar = 14.5 psi, 1 bar = 100 kPa.
- Always monitor the air compressor during usage and never leave it unattended when using it without presetting a pressure to avoid over-inflating.
- Only use the air compressor in a clean, dry environment. Intrusion of dirt and dust may cause damage to the air compressor. The air compressor is not waterproof and should never be rinsed with water.
Maintenance and Servicing
- Regular cleaning, maintenance, method for keeping tools sharp, and lubrication, charge at least once every three months.
- Servicing by manufacturer or agent.
- List of user-replaceable parts (High-pressure Air Hose & Schrader Valve, Presta Valve Adapter, Needle Valve Adapter and Charging Cable) .
- Special tools which may be required, do not disassemble and repair by yourself.
Troubleshooting
| Problem | Solution |
| Slow inflation speed | 1. Check whether the air compressors battery level is sufficient 2. Check whether the air hose is leaking. 3. Check whether both ends of the air hose are securely connected. 4. Check whether the item that is being inflated is leaking. |
| Air compressor turns on but does not inflate | 1. Check whether the air hose is removed from its compartment before inflating. 2. Check whether the air compressors battery level is sufficient. 3. Check whether the pressure of the item that is being inflated exceeds the preset pressure. |
| Unable to increase or decrease the preset pressure | Make sure the air compressor is set to the correct mode. Manual mode has a blank display without any icons and allows you to adjust the preset value within a range of 3 -150 psi. |
| Air compressor inflates normally but the displayed pressure is zero | The pressure of low-pressure inflatables including balloons is too low to measure. |
| Air compressor already turned off after connecting the air hose to a valve |
Press and hold the Start/Stop button to turn the air compressor on again. |
| Air leaks out when connecting the air hose | Make sure the air hose is securely connected. |
| Color of the battery level indicator is different when inflating compared to standby state |
The lithium battery’s voltage level significantly drops when discharging power, causing the battery level indicator to have a different color when inflating compared to standby state. This is normal. |
Specifications
| Name | Mi Portable Electric Air Compressor |
| Model | M.ICQB02Q.1 |
| Dimensions | 124 x 71 x 45.3 mm (Air compressor, excluding air hose) |
| Inflation Pressure Range | 0.2 – 10.3 bar / 3 – 150 psi |
| Operating Temperature | Charging: 0 °C — 45 °C Discharging: -10 °C — 45 °C |
| Storage Temperature | -10 °C — 45 °C |
| Air Hose Dimensions | Air hose length 180 mm (including Schrader valve adapter and excluding thread) |
| Air Valve Dimensions | Schrader valve adapter 11 x 20 mm Presta valve adapter 11 x 15 mm |
| Battery Capacity | 2000 mAh (14.8 Wh) |
| Operating Noise Level | Less than 80 dB at a distance of 1 m |
| Power Adapter | 5 V |
| Charging Port | Micro – USB |
| Charging Time | < 3 hours |
| Sensor Accuracy | ±2 psi |
Noise Value and Vibration
test result
| Noise emission values determined according to EN 60745 – 1 : | |
| Sound Pressure Level | LpA = 72.8 dB (A) |
| Uncertainty | K= 3.0 dB |
| A – weighted Sound Power Level | LWA = 83.8 dB (A) |
| Uncertainty | K= 3.0 dB |
| Declared A-weighted Sound Power Level (according to EN 1012-1) | 87 dB (A) |
| Vibration total values determined according to EN 60745-1: | |
| Vibration Emission Value | ah = 2.9 m/s2 |
| Uncertainty | K = 1.5 m/s2 |
The following information:
- that the declared vibration total value has been measured in accordance with a standard test method and may be used for comparing one tool with another;
- that the declared vibration total value may also be used in a preliminary assessment of exposure.
Warning:
that the vibration emission during actual use of the power tool can differ from the declared total value depending on the ways in which the tool is used; and of the need to identify safety measures to protect the operator that are based on an estimation of exposure in the actual conditions of use (taking account of all parts of the operating cycle such as the times when the tool is switched off and when it is running idle in addition to the trigger time) .
- Work area safety
a) Keep work area clean and well lit. Cluttered or dark areas invite accidents.
b) Do not operate power tools in explosive atmospheres, such as in the presence of flammable liquids, gases or dust. Power tools create sparks which may ignite the dust or fumes.
c) Keep children and bystanders away while operating a power tool. Distractions can cause you to lose control. - Electrical safety
a) Power tool plugs must match the outlet. Never modify the plug in any way. Do not use any adapter plugs with earthed (grounded) power tools. Unmodified plugs and matching outlets will reduce risk of electric shock.
b) Avoid body contact with earthed or grounded surfaces, such as pipes, radiators, ranges and refrigerators. There is an increased risk of electric shock if your body is earthed or grounded.
c) Do not expose power tools to rain or wet conditions. Water entering a power tool will increase the risk of electric shock.
d) Do not abuse the cord. Never use the cord for carrying, pulling or unplugging the power tool. Keep cord away from heat, oil, sharp edges or moving parts. Damaged or entangled cords increase the risk of electric shock.
e) When operating a power tool outdoors, use an extension cord suitable for outdoor use. Use of a cord suitable for outdoor use reduces the risk of electric shock.
f) If operating a power tool in a damp location is unavoidable, use a residual current device (RCD) protected supply. Use of an RCD reduces the risk of electric shock. - Personal safety
a) Stay alert, watch what you are doing and use common sense when operating a power tool. Do not use a power tool while you are tired or under the influence of drugs, alcohol or medication. A moment of inattention while operating power tools may result in serious personal injury.
b) Use personal protective equipment. Always wear eye protection. Protective equipment such as dust mask, non-skid safety shoes, hard hat, or hearing protection used for appropriate conditions will reduce personal injuries.
c) Prevent unintentional starting. Ensure the switch is in the off-position before connecting to power source and/or battery pack, picking up or carrying the tool. Carrying power tools with your finger on the switch or energising power tools that have the switch on invites accidents.
d) Remove any adjusting key or wrench before turning the power tool on. A wrench or a key left attached to a rotating part of the power tool may result in personal injury.
e) Do not overreach. Keep proper footing and balance at all times. This enables better control of the power tool in unexpected situations.
f) Dress properly. Do not wear loose clothing or jewellery. Keep your hair, clothing and gloves away from moving parts. Loose clothes, jewellery or long hair can be caught in moving parts.
g) If devices are provided for the connection of dust extraction and collection facilities, ensure these are connected and properly used. Use of dust collection can reduce dust-related hazards. - Power tool use and care
a) Do not force the power tool. Use the correct power tool for your application. The correct power tool will do the job better and safer at the rate for which it was designed.
b) Do not use the power tool if the switch does not turn it on and off. Any power tool that cannot be controlled with the switch is dangerous and must be repaired.
c) Disconnect the plug from the power source and/or the battery pack from the power tool before making any adjustments, changing accessories, or storing power tools. Such preventive safety measures reduce the risk of starting the power tool accidentally.
d) Store idle power tools out of the reach of children and do not allow persons unfamiliar with the power tool or these instructions to operate the power tool. Power tools are dangerous in the hands of untrained users.
e) Maintain power tools. Check for misalignment or binding of moving parts, breakage of parts and any other condition that may affect the power tool’s operation. If damaged, have the power tool repaired before use. Many accidents are caused by poorly maintained power tools.
f) Keep cutting tools sharp and clean. Properly maintained cutting tools with sharp cutting edges are less likely to bind and are easier to control.
g) Use the power tool, accessories and tool bits etc. In accordance with these instructions, taking into account the working conditions and the work to be performed. Use of thepower tool for operations different from those intended could result in a hazardous situation. - Battery tool use and care
a) Recharge only with the charger specified by the manufacturer. A charger that is suitable for one type of battery pack may create a risk of fire when used with another battery pack.
b) Use power tools only with specifically designated battery packs. Use of any other battery packs may create a risk of injury and fire.
c) When battery pack is not in use, keep it away from other metal objects, like paper clips, coins, keys, nails, screws or other small metal objects, that can make a connection from one terminal to another. Shorting the battery terminals together may cause burns or a fire.
d) Under abusive conditions, liquid may be ejected from the battery; avoid contact. If contact accidentally occurs, flush with water. If liquid contacts eyes, additionally seek medical help. Liquid ejected from the battery may cause irritation or burns. - Service
a) Have your power tool serviced by a qualified repair person using only identical replacement parts. This will ensure that the safety of the power tool is maintained.
![]() We iRiding (Xiamen) Technology Co., Ltd., hereby, declares that this equipment is in compliance with following European Directives & harmonised standards: 2006/42/EC, 2014/30/EU, 2012/19/EU, 2011/65/EU, 2006/66/EC, EN 60745-1:2009+A11, EN 1012-1:2010, EN 55014-1:2017, EN 55014-2:2015 The full text of the EU declaration of conformity is available at the following internet address: http://www.mi.com/global/service/support/declaration.html Jintong Weng, Quality Engineer, Mar.2019, Xiamen China
We iRiding (Xiamen) Technology Co., Ltd., hereby, declares that this equipment is in compliance with following European Directives & harmonised standards: 2006/42/EC, 2014/30/EU, 2012/19/EU, 2011/65/EU, 2006/66/EC, EN 60745-1:2009+A11, EN 1012-1:2010, EN 55014-1:2017, EN 55014-2:2015 The full text of the EU declaration of conformity is available at the following internet address: http://www.mi.com/global/service/support/declaration.html Jintong Weng, Quality Engineer, Mar.2019, Xiamen China
![]() All products bearing this symbol are waste electrical and electronic equipment (WEEE as in directive 2012/19/ EU) which should not be mixed with unsorted household waste. Instead, you should protect human health and the environment by handing over your waste equipment to a designated collection point for the recycling of waste electrical and electronic equipment, appointed by the government or local authorities. Correct disposal and recycling will help prevent potential negative consequences to the environment and human health. Please contact the installer or local authorities for more information about the location as well as terms and conditions of such collection points.
All products bearing this symbol are waste electrical and electronic equipment (WEEE as in directive 2012/19/ EU) which should not be mixed with unsorted household waste. Instead, you should protect human health and the environment by handing over your waste equipment to a designated collection point for the recycling of waste electrical and electronic equipment, appointed by the government or local authorities. Correct disposal and recycling will help prevent potential negative consequences to the environment and human health. Please contact the installer or local authorities for more information about the location as well as terms and conditions of such collection points.
Original instructions
Read this manual carefully before use, and retain it for future reference.